2007 VOLVO XC90 brake light
[x] Cancel search: brake lightPage 148 of 268

2007 Volvo XC90
watched when driving in hot climates or hilly terrain. Use a lower gear \
and turn off the air conditioner if the temperature
gauge needle enters the red range.
l If the automatic transmission begins to overheat, a message will be disp\
layed in the text window.
l Hauling a trailer affects handling, durability, and economy.
l It is necessary to balance trailer brakes with the towing vehicle brakes\
to provide a safe stop (check and observe state/
local regulations).
l Do not connect the trailer's brake system directly to the vehicle's brak\
e system.
l Remove the ball and drawbar assembly when the hitch is not being used.
l Volvo recommends the use of synthetic engine oil when towing a trailer o\
ver long distances or in mountainous areas.
NOTE:
l When parking the vehicle with a trailer on a hill, apply the parking bra\
ke before putting the gear selector in (P)ark.
When starting on a hill, put the gear selector in (D)rive before relea\
sing the parking brake. Always follow the trailer
manufacturer's recommendations for wheel chocking.
l If you use the manual (Geartronic) shift positions while towing a trai\
ler, make sure the gear you select does not put too
much strain on the engine (using too high a gear).
WARNING!
l Bumper-attached trailer hitches must not be used on Volvos, nor should s\
afety chains be attached to the bumper.
l Trailer hitches attaching to the vehicle rear axle must not be used.
l Never connect a trailer's hydraulic brake system directly to the vehicle\
brake system, nor a trailer's lighting system
directly to the vehicle lighting system. Consult your nearest authorized\
Volvo retailer for correct installation.
l When towing a trailer, the trailer's safety wire must be correctly faste\
ned to the hole or hook provided in the trailer
hitch on the vehicle. The safety wire should never be fastened to or wou\
nd around the drawbar ball.
pg. 139 Starting and driving
Towing a trailer
Smoother starts with a trailer
Models equipped with the V8-engine and the 6-speed automatic transmissio\
n have a built-in function that reduces
acceleration slightly in first gear when the vehicle is towing a trailer\
. This is done to help avoid wheel spin and to make
starting off smoother.
l This function is activated when the trailer's electrical connector is pl\
ugged into the electrical socket mounted near the
trailer hitch.
l The function is automatically deactivated when the trailer's wiring is d\
isconnected from the socket. The vehicle will
then accelerate normally.
NOTE: Since this function is activated when a connector is plugged into the e\
lectrical socket near the trailer hitch, it will
be activated by any electrical equipment (e.g. bicycle racks with light\
ing, etc) that is plugged in, and will remain active
until the equipment is unplugged from the socket.
Leveling
If your vehicle is equipped with automatic leveling, the rear suspension\
always retains the correct ride height regardless of
the load.
l The system adjusts the rear suspension to the correct level after the ve\
hicle has been driven a short distance.
file:///K|/ownersdocs/2007/2007_XC90/07xc90_06.htm (24 of 32)12/30/200\
6 5:53:44 PM
Page 152 of 268

2007 Volvo XC90
W - Winter/Wet driving mode - enhanced vehicle traction
l Mode W will only function if the gear selector is in the (D)rive position.
l Press the button at the base of the gear selector to engage/disengage th\
is driving mode.
l An LED in the button will light up to indicate that W is engaged and thi\
s will also be displayed in the instrument panel
(see
page 46).
l This mode may be selected for starting/ moving off on slippery roads.
1. Synthetic oil is not used when the oil is changed at the normal maint\
enance service intervals except at owner request and at
additional charge. Please consult your Volvo retailer.
pg. 144 Starting and driving
Before a long distance trip
It is always worthwhile to have your vehicle checked at a Volvo retailer\
before driving long distances. Your retailer will
also be able to supply you with bulbs, fuses, spark plugs and wiper blad\
es for your use in the event that problems occur.
As a minimum, the following items should be checked before any long trip\
:
l Check that engine runs smoothly and that fuel consumption is normal.
l Check for fuel, oil, and fluid leakage.
l Check transmission oil level1.
l Check condition of drive belts.
l Check state of the battery's charge.
l Examine tires carefully (the spare tire as well), and replace those th\
at are worn. Check tire pressures.
l The brakes, front wheel alignment, and steering gear should be checked b\
y your Volvo retailer only.
l Check all lights, including high beams.
l Reflective warning triangles are legally required in some states/provinc\
es.
l Have a word with your Volvo retailer if you intend to drive in countries\
where it may be difficult to obtain the correct
fuel.
l Consider your destination. If you will be driving through an area where \
snow or ice are likely to occur, consider snow
tires.
1. To prevent injury from contact with hot surfaces, do not inspect your\
vehicle's transmission fluid yourself. Have your vehicle's
transmission fluid level inspected by a qualified Volvo service technici\
an.
pg. 145 Starting and driving
Blind Spot Information System (BLIS) - option
file:///K|/ownersdocs/2007/2007_XC90/07xc90_06.htm (28 of 32)12/30/200\
6 5:53:44 PM
Page 182 of 268

2007 Volvo XC90
WARNING!
l When the vehicle is driven immediately after being washed, apply the bra\
kes several times in order
to remove any moisture from the brake linings.
l Engine cleaning agents should not be used when the engine is warm. This \
constitutes a fire risk.
Automatic washing - simple and quick
l We do NOT recommend washing your vehicle in an automatic wash during the\
first six months
(because the paint will not have hardened sufficiently).
l An automatic wash is a simple and quick way to clean your vehicle, but i\
t is worth remembering that
it may not be as thorough as when you yourself go over the vehicle with \
sponge and water. Keeping the
underbody clean is most important, especially in the winter. Some automa\
tic washers do not have
facilities for washing the underbody.
l Before driving into an automatic car wash, make sure that side view mirr\
ors, auxiliary lamps, etc, are
secure, and that any antenna(s) are retracted or removed. Otherwise th\
ere is risk of the machine
dislodging them.
Exterior lighting
Condensation may form temporarily on the inside of the lenses of exterio\
r lights such as headlights, fog
lights, or tail lights. This is normal and the lights are designed to wi\
thstand moisture. Normally,
condensation will dissipate after the lights have been on for a short ti\
me.
Polishing and waxing
l Normally, polishing is not required during the first year after delivery\
, however, waxing may be
beneficial.
l Before applying polish or wax the vehicle must be washed and dried. Tar \
spots can be removed with
kerosene or tar remover. Difficult spots may require a fine rubbing comp\
ound.
l After polishing use liquid or paste wax.
l Several commercially available products contain both polish and wax.
l Waxing alone does not substitute for polishing a dull surface.
l A wide range of polymer-based car waxes can be purchased today. These wa\
xes are easy to use and
produce a long-lasting, high-gloss finish that protects the bodywork aga\
inst oxidation, road dirt and
fading.
l Do not polish or wax your vehicle in direct sunlight (the surface of th\
e vehicle should not be warmer
than 113° F (45° C).
file:///K|/ownersdocs/2007/2007_XC90/07xc90_08.htm (3 of 7)12/30/2006 \
5:53:48 PM
Page 205 of 268

2007 Volvo XC90
NOTE: After the battery has been disconnected or replaced, lock and unlock th\
e vehicle with the central
locking system's remote control to reactivate such features as the power\
windows, moonroof, courtesy
lighting, etc.
WARNING!
Ventilation hose:
l The battery generates hydrogen gas, which is flammable and explosive. Th\
e battery is fitted with a
ventilation hose which vents hydrogen gas out of the battery compartment\
through a ventilation
opening in the bottom of this compartment. If the battery must be replac\
ed, it is essential that the
ventilation hose is properly connected to the battery and that it is rou\
ted through the ventilation
opening provided (see illustration).
l Be sure the ventilation hose is free of debris.
l Only use replacement batteries equipped with a ventilation hose. Consult\
your Volvo retailer.
pg. 194 Maintenance
Replacing bulbs
When replacing bulbs, keep the following points in mind:
l Never touch the glass of bulbs with your fingers. Grease and oils from y\
our fingers vaporize in the
heat and will leave a deposit on the reflector, which will damage it.
l The optional Active Bi-Xenon headlight bulbs contain trace amounts of me\
rcury. These bulbs should
always be disposed of by an authorized Volvo retailer.
l The following bulbs should only be replaced by a trained and qualified V\
olvo service technician:
- Active Bi-Xenon headlights,
- Courtesy (dome) lighting,
- Reading lights,
- Glove compartment lights
- Turn signals and courtesy lights in the side door mirrors
- High-mounted brake lights
file:///K|/ownersdocs/2007/2007_XC90/07xc90_09.htm (19 of 37)12/30/200\
6 5:53:50 PM
Page 211 of 268

2007 Volvo XC90
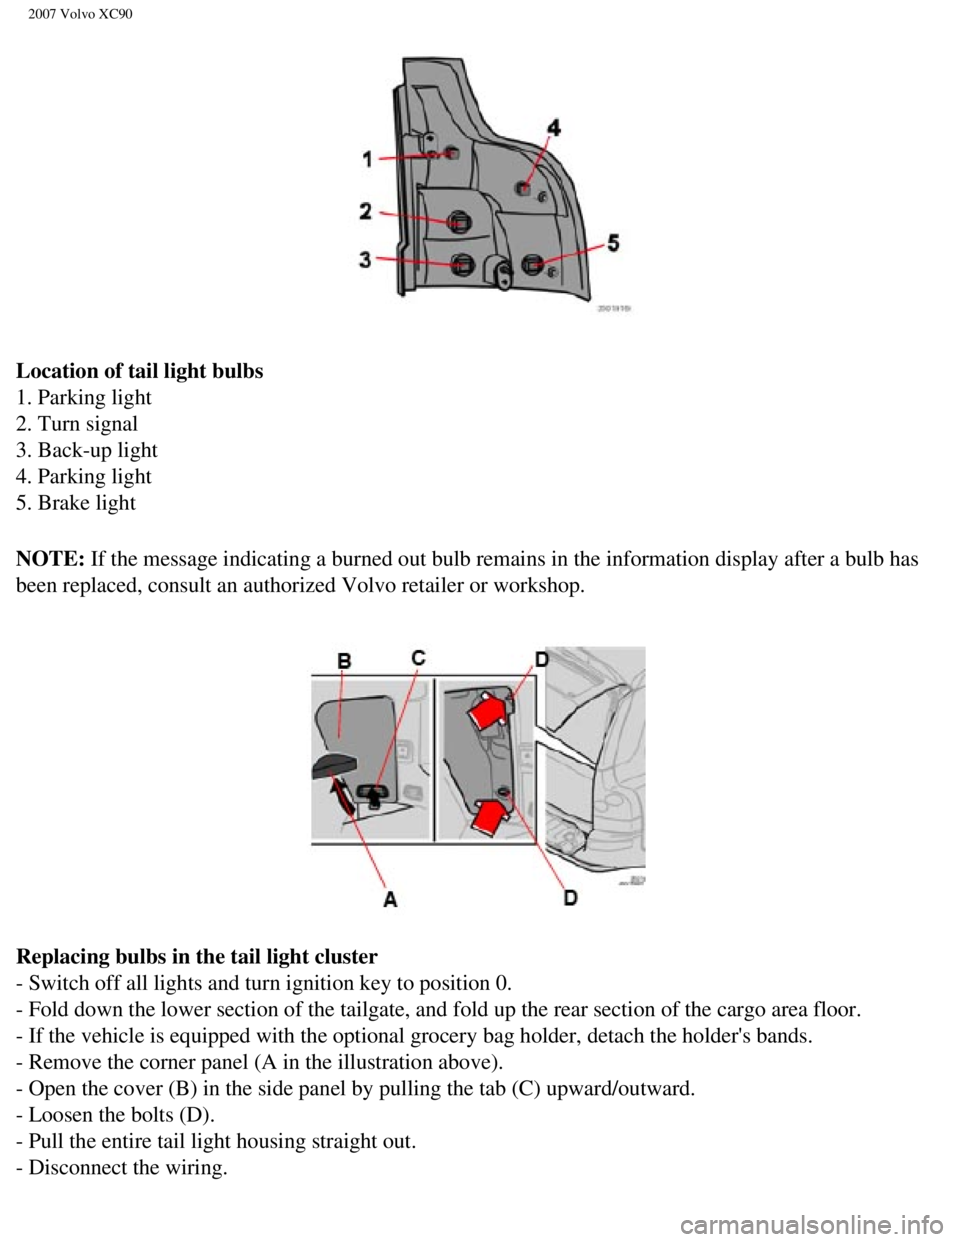
Location of tail light bulbs
1. Parking light
2. Turn signal
3. Back-up light
4. Parking light
5. Brake light
NOTE: If the message indicating a burned out bulb remains in the information \
display after a bulb has
been replaced, consult an authorized Volvo retailer or workshop.
Replacing bulbs in the tail light cluster
- Switch off all lights and turn ignition key to position 0.
- Fold down the lower section of the tailgate, and fold up the rear sect\
ion of the cargo area floor.
- If the vehicle is equipped with the optional grocery bag holder, detac\
h the holder's bands.
- Remove the corner panel (A in the illustration above).
- Open the cover (B) in the side panel by pulling the tab (C) upward\
/outward.
- Loosen the bolts (D).
- Pull the entire tail light housing straight out.
- Disconnect the wiring.
file:///K|/ownersdocs/2007/2007_XC90/07xc90_09.htm (25 of 37)12/30/200\
6 5:53:50 PM
Page 212 of 268

2007 Volvo XC90
- Place the tail light housing on a soft cloth to avoid scratching the l\
ens.
- Turn the lamp holder(s) counterclockwise and pull out.
- Turn signal, back-up light, brake light bulbs: Turn the bulb countercl\
ockwise and remove it.
- Parking light bulbs: Pull the bulb straight out.
- Insert a new bulb.
- Place the lamp holder in the groove and turn clockwise.
- Press wiring back into place.
- Align the tail light housing with the holes for the retaining bolts an\
d press it into place.
- Tighten the retaining bolts.
- Reinsert the side and corner panels.
pg. 199 Maintenance
Replacing bulbs
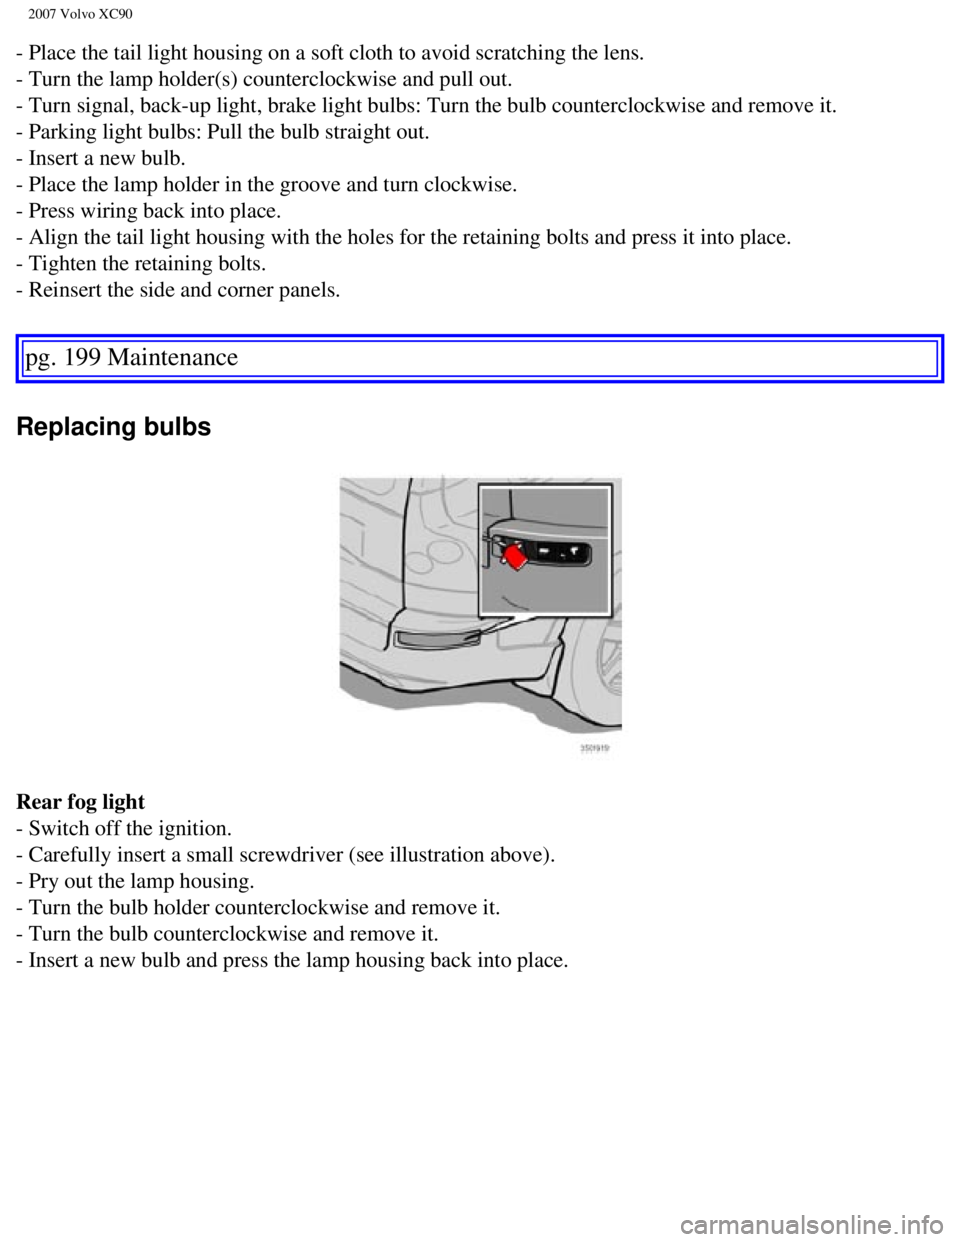
Rear fog light
- Switch off the ignition.
- Carefully insert a small screwdriver (see illustration above).
- Pry out the lamp housing.
- Turn the bulb holder counterclockwise and remove it.
- Turn the bulb counterclockwise and remove it.
- Insert a new bulb and press the lamp housing back into place.
file:///K|/ownersdocs/2007/2007_XC90/07xc90_09.htm (26 of 37)12/30/200\
6 5:53:50 PM
Page 219 of 268

2007 Volvo XC90
Fuses
Fuse box in the passenger compartment, behind the plastic cover, driver'\
s side
This fuse box is located behind the plastic cover below the steering whe\
el. When replacing a blown fuse,
be sure to replace it with a new one of the same color and amperage (wr\
itten on the fuse). No. Amperage
1. Heated passenger's seat 15
2. Heated driver's seat 15
3. Horn 15
4. -
5. Audio system 10
6. -
7. -
8. Alarm siren 5
9. Brake light switch feed 5
10. Instrument panel, climate system, power driver's seat, Occupant Weig\
ht Sensor 10
11. 12-volt sockets - front and rear seats 15
12. -
13. -
14. -
15. ABS, STC/DSTC 5
16. Power steering, Active Bi-Xenon headlights (option) 10
17. Driver's side front foglight (option) 7.5
18. Passenger's side front foglight (option) 7.5
19. -
file:///K|/ownersdocs/2007/2007_XC90/07xc90_09.htm (33 of 37)12/30/200\
6 5:53:51 PM
Page 221 of 268

2007 Volvo XC90
Fuses in the cargo compartment
The fuses in the cargo area are located behind the panel on the driver's\
side of the cargo compartment.
When replacing a blown fuse, be sure to replace it with a new one of the\
same color and amperage
(written on the fuse). No. Amperage
1. Backup lights 10
2. Parking lights, foglights, cargo compartment lighting, license plate \
lights, brake light
diodes 20
3. Accessories 15
4. -
5. Rear Electronic module 10
6. Rear Seat Entertainment (accessory) 7.5
7. Trailer wiring (30-feed) 15
8. 12-volt socket in cargo compartment 15
9. Rear passenger's side door - power window, power window cutout functi\
on 20
10. Rear driver's side door - power window, power window cutout function\
20
11. -
12. -
13. -
14. Subwoofer (option), rear air conditioning system (option) 15
15. -
file:///K|/ownersdocs/2007/2007_XC90/07xc90_09.htm (35 of 37)12/30/200\
6 5:53:51 PM