2007 VOLVO XC90 light
[x] Cancel search: lightPage 229 of 268

2007 Volvo XC90
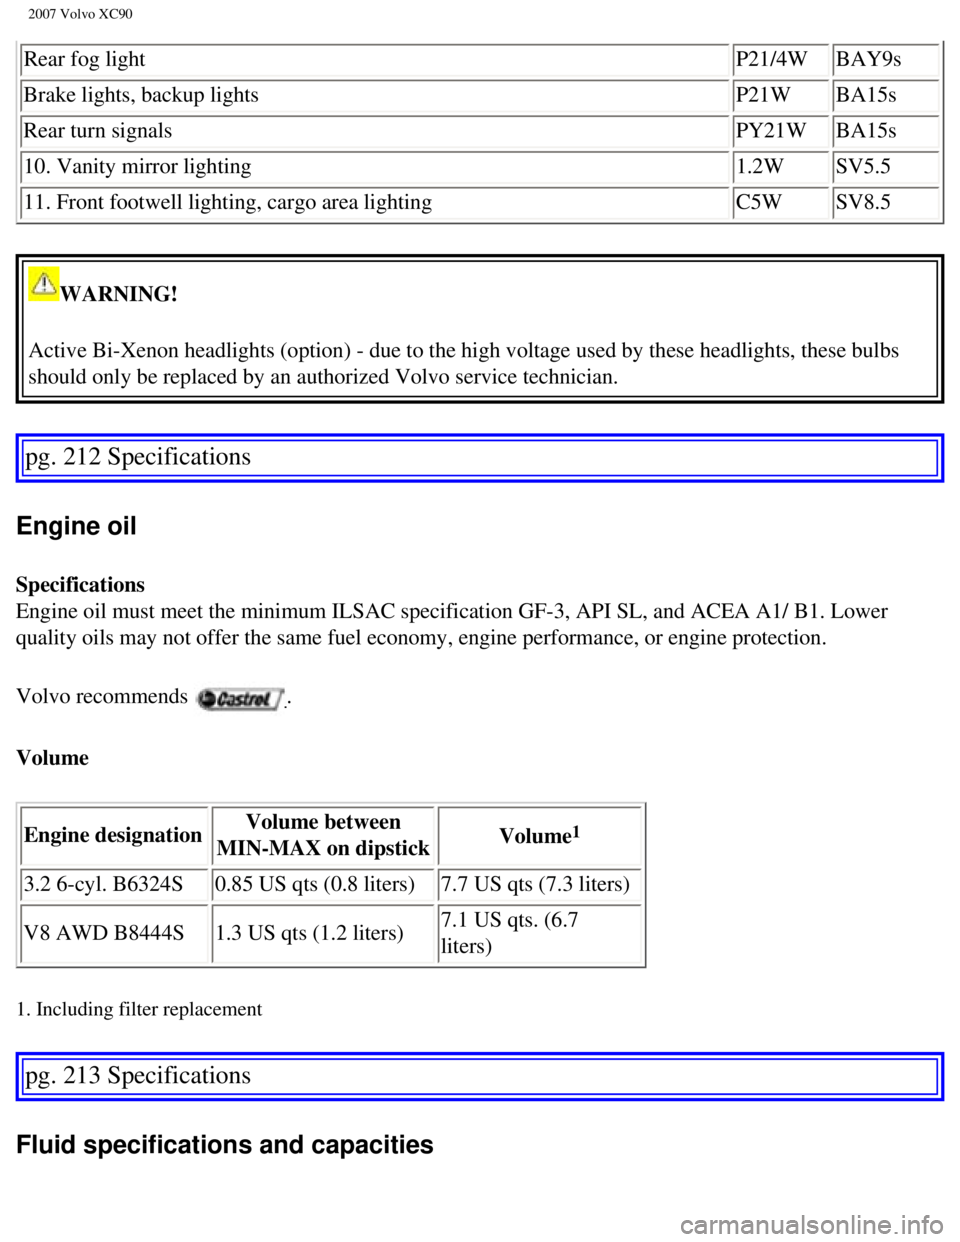
Rear fog lightP21/4W BAY9s
Brake lights, backup lights P21W BA15s
Rear turn signals PY21W BA15s
10. Vanity mirror lighting 1.2W SV5.5
11. Front footwell lighting, cargo area lighting C5W SV8.5
WARNING!
Active Bi-Xenon headlights (option) - due to the high voltage used by \
these headlights, these bulbs
should only be replaced by an authorized Volvo service technician.
pg. 212 Specifications
Engine oil
Specifications
Engine oil must meet the minimum ILSAC specification GF-3, API SL, and A\
CEA A1/ B1. Lower
quality oils may not offer the same fuel economy, engine performance, or\
engine protection.
Volvo recommends
.
Volume
Engine designation Volume between
MIN-MAX on dipstick Volume
1
3.2 6-cyl. B6324S
0.85 US qts (0.8 liters) 7.7 US qts (7.3 liters)
V8 AWD B8444S 1.3 US qts (1.2 liters) 7.1 US qts. (6.7
liters)
1. Including filter replacement
pg. 213 Specifications
Fluid specifications and capacities
file:///K|/ownersdocs/2007/2007_XC90/07xc90_10.htm (6 of 10)12/30/2006\
5:53:52 PM
Page 255 of 268

2007 Volvo XC90
Compact disc care
l Do not put tape or labels on the disc itself. They could become stuck in\
the player.
l Use CD standard EN 60908 discs only. Discs not meeting this standard may\
cause problems with
system (poor sound). CDR discs can cause listening problems due to the\
quality of the disc or recording
equipment used.
l DualDisc: The audio side of a DualDisc (combined CD/DVD) does not meet\
CD specifications and
may not play in your audio system.
l Keep the discs clean. Wipe them with a soft, clean, lint-free cloth, wor\
king from the center outwards.
If necessary, dampen the cloth with a neutral soap solution. Dry thoroug\
hly before using.
l Never use cleaning spray or antistatic liquid. Use only cleaners specifi\
cally made for CD's.
l Use discs of the correct size only (3.5" discs should never be used). \
l Volvo does not recommend the use of plastic outer rings on the disc.
l Condensation may occur on discs/ optical components of the changer in co\
ld winter weather. The disc
can be dried with a clean, lint-free cloth. Optical components in the CD\
changer may, however, take up
to one hour to dry off.
l Never attempt to play a disc which is damaged in any way.
When not in use, the discs should be stored in their covers. Avoid stori\
ng discs in excessive heat, direct
sunlight or dusty locations.
pg. 236 Audio
Menu structure
FM Menu
1. Radio Text
2. Audio Settings
1
1. Surround
2. Subwoofer (option)
3. Equalizer Fr
4. Equalizer Rr
5. Reset All
AM Menu
See Audio Settings i the FM Menu.
CD Menu
1. Random
2. Disc Text
3. Audio Settings
file:///K|/ownersdocs/2007/2007_XC90/07xc90_11.htm (22 of 26)12/30/200\
6 5:53:54 PM
Page 256 of 268

2007 Volvo XC90
See Audio Settings in the FM Menu.
AUX Menu (option)
1. AUX input vol
2. Audio Settings
1
See Audio Settings in the FM Menu
1. Certain audio systems
pg. 237 Audio
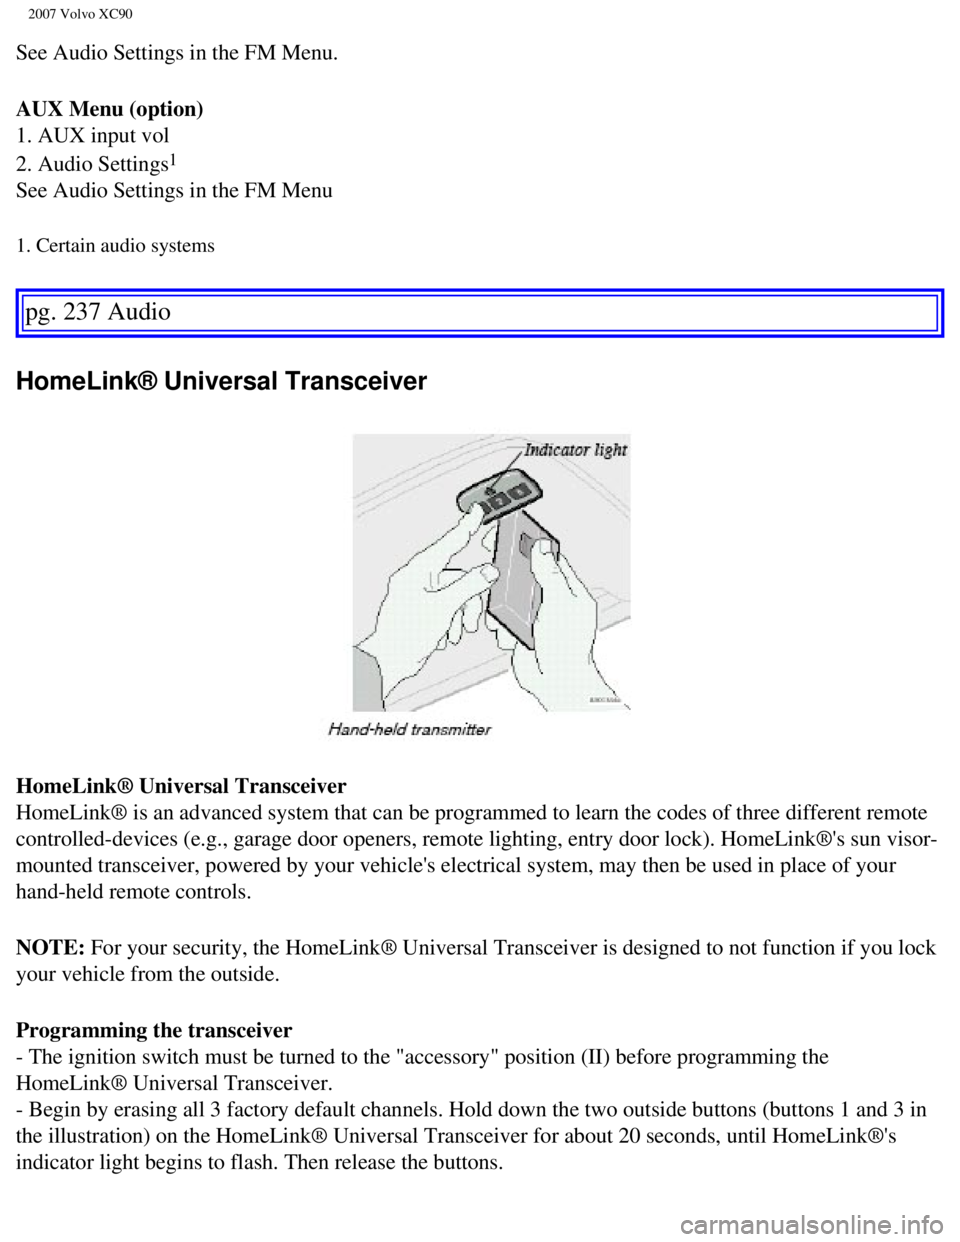
HomeLink® Universal Transceiver
HomeLink® Universal Transceiver
HomeLink® is an advanced system that can be programmed to learn the c\
odes of three different remote
controlled-devices (e.g., garage door openers, remote lighting, entry d\
oor lock). HomeLink®'s sun visor-
mounted transceiver, powered by your vehicle's electrical system, may th\
en be used in place of your
hand-held remote controls.
NOTE: For your security, the HomeLink® Universal Transceiver is designed t\
o not function if you lock
your vehicle from the outside.
Programming the transceiver
- The ignition switch must be turned to the "accessory" position (II) \
before programming the
HomeLink® Universal Transceiver.
- Begin by erasing all 3 factory default channels. Hold down the two out\
side buttons (buttons 1 and 3 in
the illustration) on the HomeLink® Universal Transceiver for about 2\
0 seconds, until HomeLink®'s
indicator light begins to flash. Then release the buttons.
file:///K|/ownersdocs/2007/2007_XC90/07xc90_11.htm (23 of 26)12/30/200\
6 5:53:54 PM
Page 257 of 268

2007 Volvo XC90
- Hold your hand-held transmitter (garage door opener, for example) 2 \
to 5 in. (5 to 12 cm) away from
the HomeLink® surface, keeping the indicator light in view. For place\
ment questions, contact
HomeLink® toll-free 1-800-355-3515 (Internet:
www.HomeLink.com).
- Using two hands, push and hold both your hand-held transmitter's butto\
n and the transceiver button
you wish to program. The indicator light will flash first slowly, then r\
apidly. Rapid flashing tells you the
HomeLink® button has been successfully programmed. Release both butto\
ns.
- If you are programming a rolling code-equipped device (e.g., garage d\
oor opener or entry door lock),
refer to "Programming rolling codes" on the next page to complete the pr\
ogramming process.
Repeat steps 3 and 4 to program the other two transceiver buttons.
If, after several attempts, you are unable to successfully train the Hom\
eLink® Universal Transceiver to
learn your hand-held transmitter's signal, contact HomeLink® toll-fre\
e 1-800-355-3515 (Internet:
www.
HomeLink.com).
pg. 238 Audio
HomeLink® Universal Transceiver
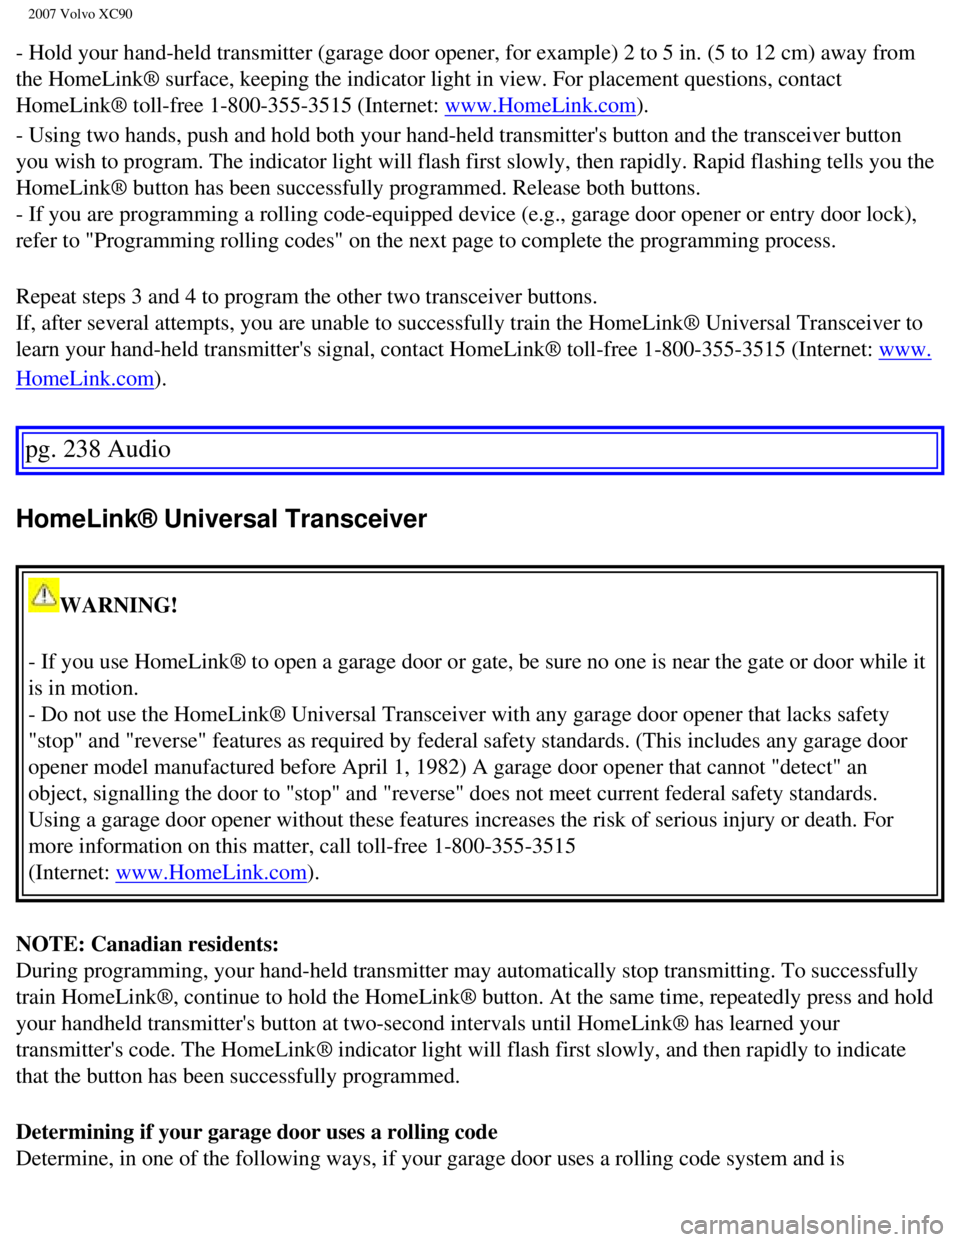
WARNING!
- If you use HomeLink® to open a garage door or gate, be sure no one \
is near the gate or door while it
is in motion.
- Do not use the HomeLink® Universal Transceiver with any garage door\
opener that lacks safety
"stop" and "reverse" features as required by federal safety standards. (\
This includes any garage door
opener model manufactured before April 1, 1982) A garage door opener th\
at cannot "detect" an
object, signalling the door to "stop" and "reverse" does not meet curren\
t federal safety standards.
Using a garage door opener without these features increases the risk of \
serious injury or death. For
more information on this matter, call toll-free 1-800-355-3515
(Internet:
www.HomeLink.com).
NOTE: Canadian residents:
During programming, your hand-held transmitter may automatically stop tr\
ansmitting. To successfully
train HomeLink®, continue to hold the HomeLink® button. At the sam\
e time, repeatedly press and hold
your handheld transmitter's button at two-second intervals until HomeLin\
k® has learned your
transmitter's code. The HomeLink® indicator light will flash first sl\
owly, and then rapidly to indicate
that the button has been successfully programmed.
Determining if your garage door uses a rolling code
Determine, in one of the following ways, if your garage door uses a roll\
ing code system and is
file:///K|/ownersdocs/2007/2007_XC90/07xc90_11.htm (24 of 26)12/30/200\
6 5:53:54 PM
Page 258 of 268

2007 Volvo XC90
manufactured after 1996:
l Refer to the garage door opener owner's manual for verification.
l If your hand-held transmitter appears to program the HomeLink® Univer\
sal Transceiver but the
programmed button does not activate the garage door, your garage door op\
ener may have a rolling code.
l Press the programmed HomeLink® button. If the garage door opener has \
the rolling code feature, the
HomeLink® indicator light flashes rapidly and then glows steadily aft\
er approximately 2 seconds.
To train a rolling code garage door opener, follow these instructions after programming the desired
transceiver button according to "Programming the transceiver." The help \
of a second person may make
training easier.
- Locate the training button on the garage door opener motor head unit. \
The location and color of the
training button may vary. If you encounter difficulty, refer to the gara\
ge door opener owner's manual or
call toll-free 1-800-355-3515 (Internet:
www.HomeLink.com).
- Press the "training" button on the garage door opener motor head unit \
until the "training" light comes
on.
- Press and release the programmed HomeLink® button. Press and releas\
e the programmed HomeLink®
button a second time to complete the training process.
- Some garage door openers may require you to do this procedure a third \
time to complete the training.
- The programmed button on your HomeLink® Universal Transceiver shoul\
d now operate your garage
door opener. The original hand-held transmitter can also be used, as des\
ired, to operate the garage door.
The remaining two HomeLink® buttons can be programmed in the same way\
. In the event of any
problems in programming the HomeLink® Universal Transceiver, call tol\
l-free 1-800-355-3515
(Internet:
www.HomeLink.com).
pg. 239 Audio
HomeLink® Universal Transceiver
Operating the HomeLink® Universal Transceiver
Once programmed, the HomeLink® Universal Transceiver can be used in p\
lace of your hand-held
transmitters.
To operate, the key must be turned to the "accessory" position (II) or\
the engine must be running. Press
the programmed HomeLink® button to activate the garage door, driveway\
gate, security lighting, home
security system, etc.
Your original hand-held transmitters may, of course, be used at any time\
.
Erasing programmed buttons
Individual buttons cannot be erased. To erase all three programmed butto\
ns:
- Turn the ignition key to the "accessory" position (II).
file:///K|/ownersdocs/2007/2007_XC90/07xc90_11.htm (25 of 26)12/30/200\
6 5:53:54 PM
Page 259 of 268

2007 Volvo XC90
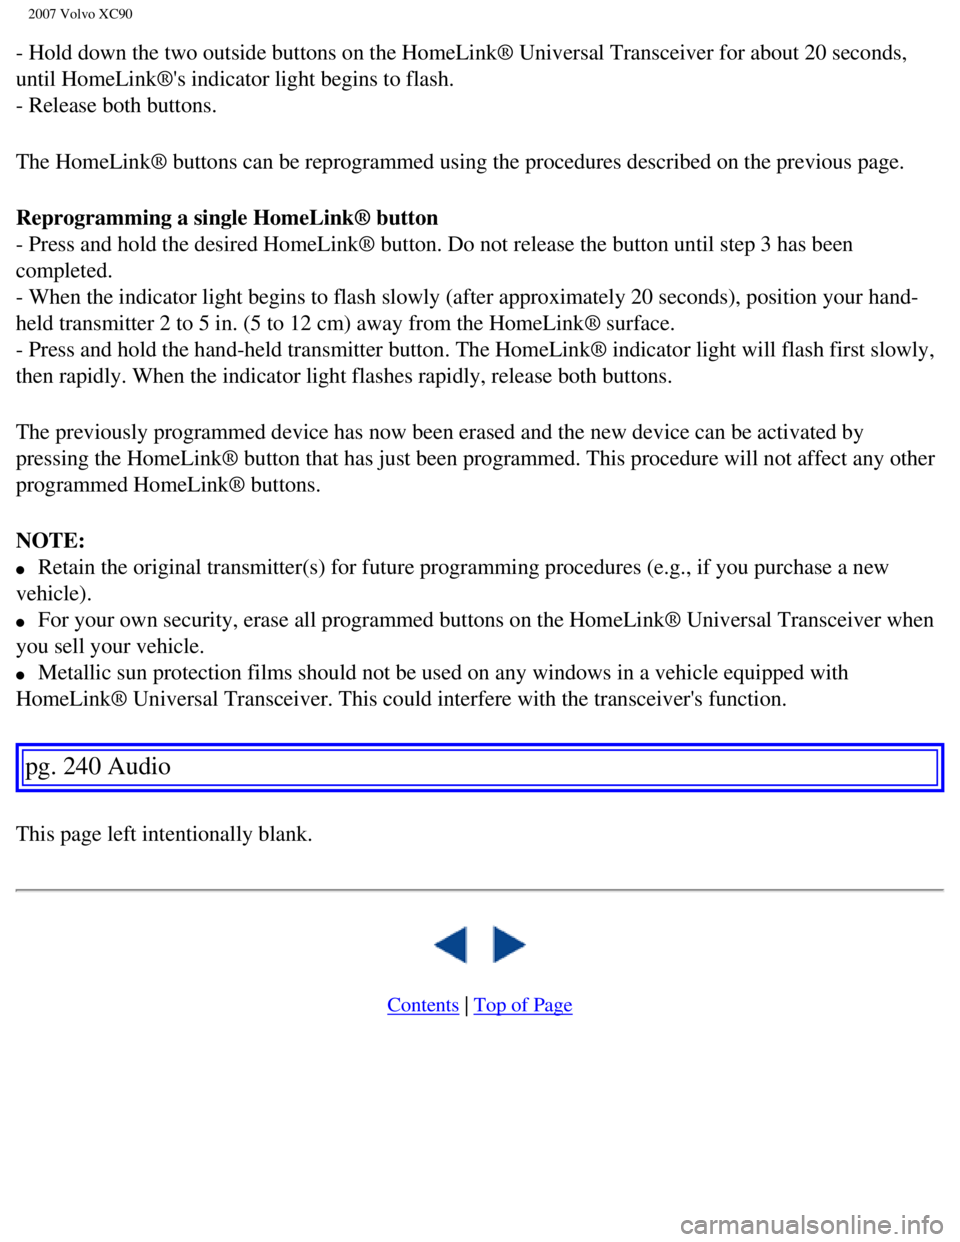
- Hold down the two outside buttons on the HomeLink® Universal Transc\
eiver for about 20 seconds,
until HomeLink®'s indicator light begins to flash.
- Release both buttons.
The HomeLink® buttons can be reprogrammed using the procedures descri\
bed on the previous page.
Reprogramming a single HomeLink® button
- Press and hold the desired HomeLink® button. Do not release the but\
ton until step 3 has been
completed.
- When the indicator light begins to flash slowly (after approximately \
20 seconds), position your hand-
held transmitter 2 to 5 in. (5 to 12 cm) away from the HomeLink® su\
rface.
- Press and hold the hand-held transmitter button. The HomeLink® indi\
cator light will flash first slowly,
then rapidly. When the indicator light flashes rapidly, release both but\
tons.
The previously programmed device has now been erased and the new device \
can be activated by
pressing the HomeLink® button that has just been programmed. This pro\
cedure will not affect any other
programmed HomeLink® buttons.
NOTE:
l Retain the original transmitter(s) for future programming procedures (\
e.g., if you purchase a new
vehicle).
l For your own security, erase all programmed buttons on the HomeLink® \
Universal Transceiver when
you sell your vehicle.
l Metallic sun protection films should not be used on any windows in a veh\
icle equipped with
HomeLink® Universal Transceiver. This could interfere with the transc\
eiver's function.
pg. 240 Audio
This page left intentionally blank.
Contents | Top of Page
file:///K|/ownersdocs/2007/2007_XC90/07xc90_11.htm (26 of 26)12/30/200\
6 5:53:54 PM
Page 260 of 268

2007 Volvo XC90
2 0 0 7
VOLVO XC90
Index
pg. 241-244 Index
A
A/C (air conditioning)
81
ABS
2, 49, 128
Accessory installation (special warnings)
5
Active Bi-Xenon headlights (ABL)
52, 55
Air cleaner
185
Air conditioning
76
Air distribution
78, 81
Air quality sensor
82
Air vents
78
Alarm
111
All Wheel Drive
126
All Wheel Drive - towing
135
Anti-lock Brake System (ABS)
2, 49
Ashtray
65, 94
Audio system
219
AUTO (climate control)
80
Autostart
119, 121
AUX (audio system)
232
Average speed
62
AWD
126
B
Bass
225
file:///K|/ownersdocs/2007/2007_XC90/07xc90_12.htm (1 of 9)12/30/2006 \
5:53:56 PM
Page 261 of 268

2007 Volvo XC90
Battery 183, 191, 216
Battery - replacing
192
Battery drain - avoiding
116
Belt check
184
Black Box (Vehicle Event Data)
180
Blind Spot Information System (BLIS)
145
Blower (fan)
80
Booster cushion (integrated)
40
Brake circuit
127
Brake fluid
189
Brake system
48, 127
Bulbs
194
Bulbs, list of
211
Bulbs, replacing
194
C
Capacity weight
161
Carbon Monoxide - Important Warning
115
Cargo capacity
210
CD functions
233
CD Pause
233
Central locking system - remote control
105
Changing a wheel
168
Changing coolant
184
Check Engine warning light
48
Child restraints
31
Child safety
28
Climate system
76
Clock
46
Coat hanger
96
Cold weather precautions
143
Compact disc care CD care
235
Coolant
188
file:///K|/ownersdocs/2007/2007_XC90/07xc90_12.htm (2 of 9)12/30/2006 \
5:53:56 PM