Page 184 of 251
Each time the car is refueled:
Check the engine oil level.
Clean the windshield, windshield wipers, headlights, and tail lights.
Monthly:
Check cold tire pressure in all tires. Inspect the tires for wear.
Check that engine coolant and other fluid levels are between the indicated "min" and "max" markings.
Clean interior glass surfaces with a glass cleaner and soft paper towels.
Wipe driver information displays with a soft cloth.
Visually inspect battery terminals for corrosion. Corrosion may indicate a loose terminal connector, or a battery near
the end of its useful service life. Consult your Volvo retailer for additional information.
As needed:
Wash the car, including the undercarriage, to reduce wear that can be caused by a buildup of dirt, and corrosion that
can be caused by salt residues.
Clean leaves and twigs from air intake vents at the base of the windshield, and from other places where they may
collect.
NOTE
Complete service information for qualified technicians is available online for purchase or subscription at
www.volvotechinfo.com
.
192 06 Maintenance and specifications
Maintaining your car
Emission inspection readiness
What is an Onboard Diagnostic System (OBD II)?
OBD II is part of your vehicle's computerized engine management system. It stores diagnostic information about your
vehicle's emission controls. It can light the Check Engine light (MIL) if it detects an emission control "fault." A "fault"
is a component or system that is not performing within an expected range. A fault may be permanent or temporary.
OBD II will store a message about any fault.
How do states use OBD II for emission inspections?
Many states connect a computer directly to a vehicle's OBD II system. The inspector can then read "faults." In some
states, this type of inspection has replaced the tailpipe emission test.
How can my vehicle fail OBD II emission inspection?
Your vehicle can fail OBD II emission inspection for any of the following reasons.
If your Check Engine (MIL) light is lit, your vehicle may fail inspection.
If your vehicle's Check Engine light was lit, but went out without any action on your part, OBD II will still have a
recorded fault. Your vehicle may pass or fail, depending on the inspection practices in your area.
If you had recent service that required disconnecting the battery, OBD II diagnostic information may be incomplete
and "not ready" for inspection. A vehicle that is not ready may fail inspection.
How can I prepare for my next OBD II emission inspection?
ProCarManuals.com
Page 190 of 251
Check the level frequently. The fluid does not require changing. The fluid level must be between the MIN and MAX
marks. For capacities and recommended fluid grade, see page 248.
WARNING
If a problem should occur in the power steering system or if the vehicle has no electrical current and must be towed,
it is still possible to steer the vehicle. However, keep in mind that greater effort will be required to turn the steering
wheel.
CAUTION
Keep the area around the power steering fluid reservoir clean when checking.
198 06 Maintenance and specifications
Replacing bulbs
Introduction
All bulb specifications are listed on page 204
. The following bulbs should only be replaced by a trained and qualified
Volvo service technician:
Dome lighting
Reading lights
Glove compartment lighting
Turn signals in the door mirror
Approach lighting in the door mirror
Brake lights
Active Bi -Xenon and LED bulbs
WARNING
Active Bi -Xenon headlights (option) - due to the high voltage used by these headlights, these bulbs should only be
replaced by a trained and qualified Volvo service technician.
Turn off the lights and remove the remote key from the ignition before changing any bulbs.
Headlight housing
ProCarManuals.com
Page 191 of 251
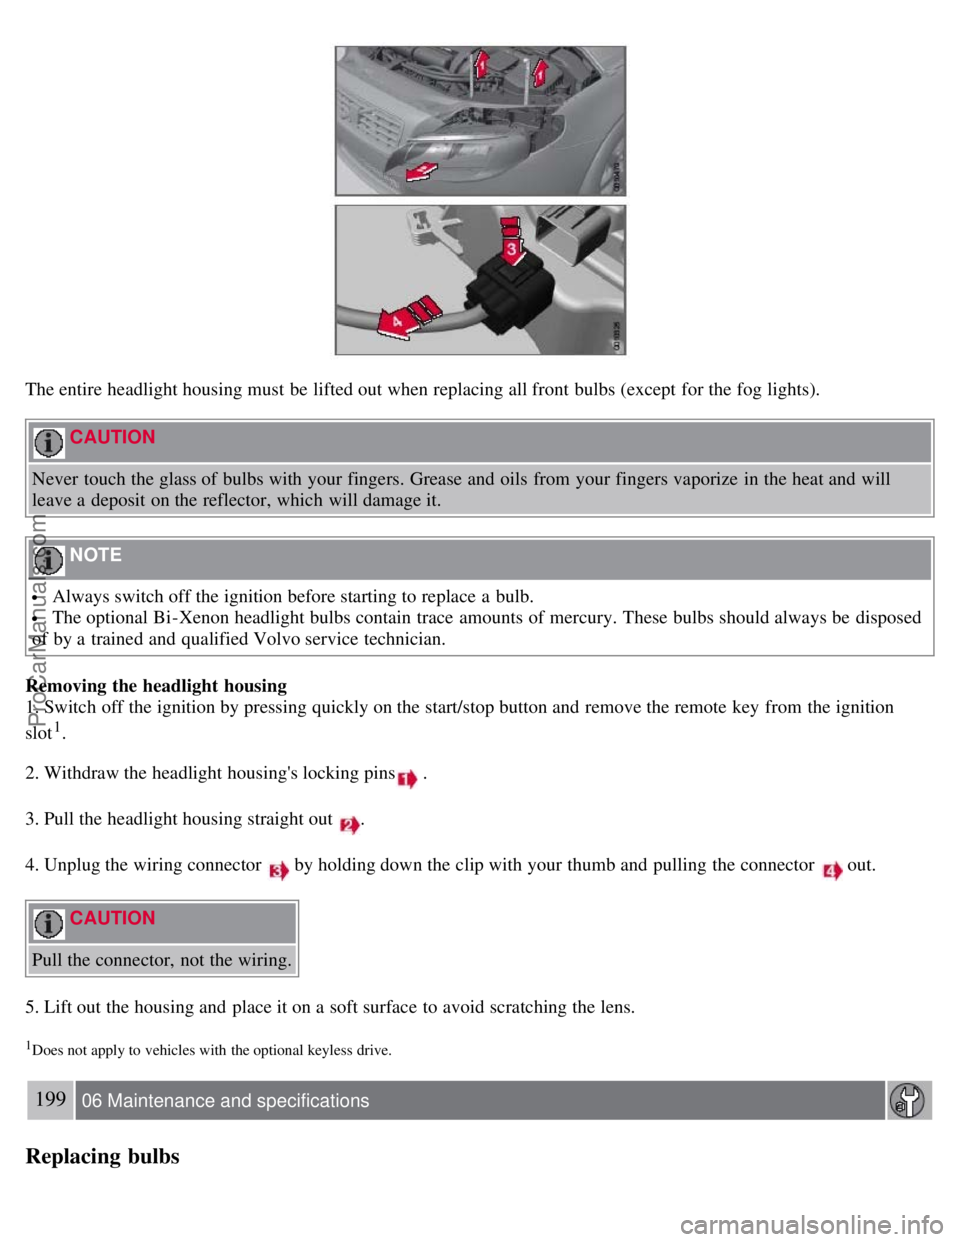
The entire headlight housing must be lifted out when replacing all front bulbs (except for the fog lights).
CAUTION
Never touch the glass of bulbs with your fingers. Grease and oils from your fingers vaporize in the heat and will
leave a deposit on the reflector, which will damage it.
NOTE
Always switch off the ignition before starting to replace a bulb.
The optional Bi -Xenon headlight bulbs contain trace amounts of mercury. These bulbs should always be disposed
of by a trained and qualified Volvo service technician.
Removing the headlight housing
1. Switch off the ignition by pressing quickly on the start/stop button and remove the remote key from the ignition
slot
1.
2. Withdraw the headlight housing's locking pins
.
3. Pull the headlight housing straight out
.
4. Unplug the wiring connector
by holding down the clip with your thumb and pulling the connector out.
CAUTION
Pull the connector, not the wiring.
5. Lift out the housing and place it on a soft surface to avoid scratching the lens.
1Does not apply to vehicles with the optional keyless drive.
199 06 Maintenance and specifications
Replacing bulbs
ProCarManuals.com
Page 192 of 251
6. Replace the defective bulb(s), see page 204.
Reinserting the headlight housing
1. Plug in the connector until it clicks into place.
2. Reinstall the headlight housing and locking pins. Check that they are correctly inserted. The headlight housing must
be properly inserted and secured in place before the lighting is switched on or the remote key is inserted into the
ignition slot.
3. Check that the lights function properly.
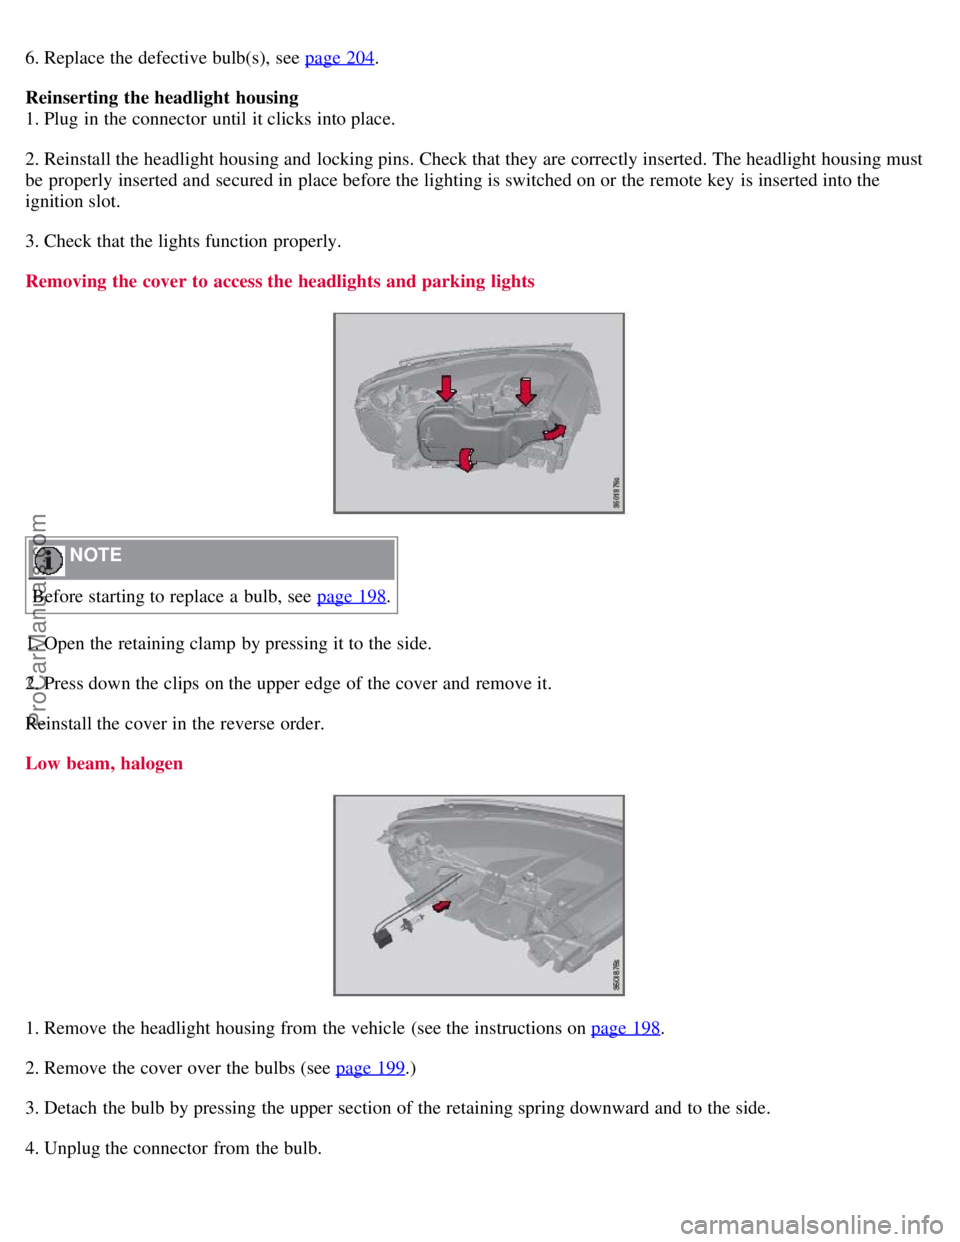
Removing the cover to access the headlights and parking lights
NOTE
Before starting to replace a bulb, see page 198
.
1. Open the retaining clamp by pressing it to the side.
2. Press down the clips on the upper edge of the cover and remove it.
Reinstall the cover in the reverse order.
Low beam, halogen
1. Remove the headlight housing from the vehicle (see the instructions on page 198.
2. Remove the cover over the bulbs (see page 199
.)
3. Detach the bulb by pressing the upper section of the retaining spring downward and to the side.
4. Unplug the connector from the bulb.
ProCarManuals.com
Page 193 of 251
5. Replace the bulb and reinsert it into the headlight housing.
6. Put the cover back into position and reinstall the headlight housing.
200 06 Maintenance and specifications
Replacing bulbs
High beam, Halogen
1. Remove the headlight housing from the vehicle (see the instructions on page 198.)
2. Remove the cover over the bulbs (see page 199
.)
3. Pull the bulb holder out of the headlight housing.
4. Pull the defective bulb out of the socket.
5. Press the new bulb into the socket until it snaps into place. It can only be secured in one position.
6. Return the bulb holder into position in the headlight housing.
7. Put the cover back into position and reinstall the headlight housing.
Parking lights
1. Remove the headlight housing from the vehicle (see the instructions on page 198.)
2. Remove the cover over the bulbs (see page 199
.)
3. To access the bulb, first remove the high beam bulb
4. Pull the wire to withdraw the bulb holder.
ProCarManuals.com
Page 194 of 251
5. Remove the burned out bulb and install a new one. It can only be secured in one position.
6. Press the bulb holder into the socket and press until it clicks into place.
7. Put the cover back into position and reinstall the headlight housing.
Turn signals
1. Remove the headlight housing from the vehicle (see the instructions on page 198).
2. Remove the round cover by pulling the tab until the cover comes off.
3. Pull out the holder to access the bulb.
4. Remove the burned out bulb by pressing it in slightly and turning out before pulling it out. Press a new bulb into the
socket.
5. Press the bulb holder into the socket and press until it clicks into place.
6. Press the cover until it clicks into position.
7. Reinstall the headlight housing.
201 06 Maintenance and specifications
Replacing bulbs
Side marker lights
1. Remove the headlight housing from the vehicle (see the instructions on page 198.
2. Remove the round cover.
ProCarManuals.com
Page 195 of 251
3. Pull the wire to withdraw the bulb holder.
4. Pull out the burned out bulb and install a new one. It can only be secured in one position.
5. Press the bulb holder into the socket and press until it clicks into place.
6. Press the cover until it clicks into position.
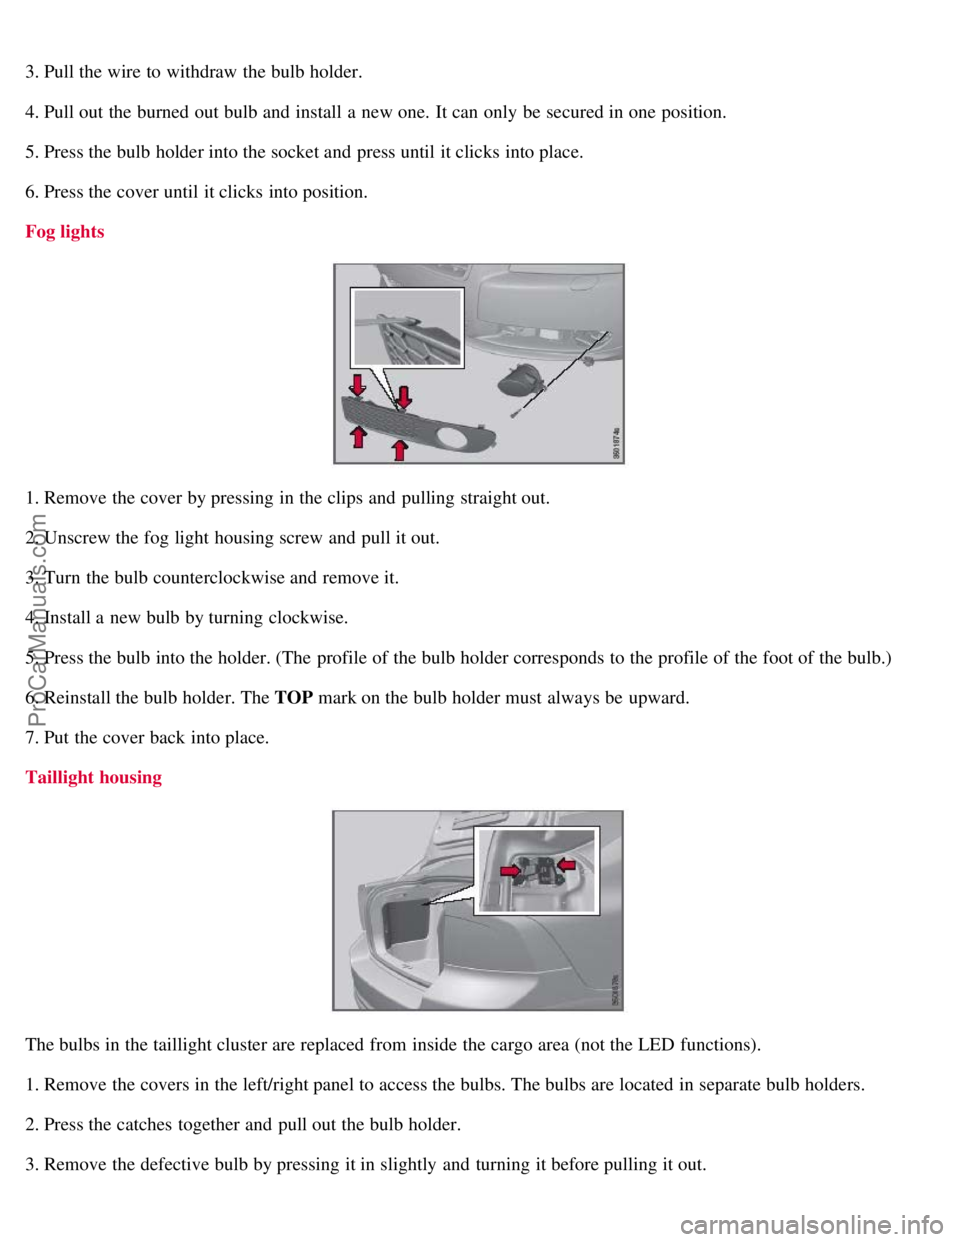
Fog lights
1. Remove the cover by pressing in the clips and pulling straight out.
2. Unscrew the fog light housing screw and pull it out.
3. Turn the bulb counterclockwise and remove it.
4. Install a new bulb by turning clockwise.
5. Press the bulb into the holder. (The profile of the bulb holder corresponds to the profile of the foot of the bulb.)
6. Reinstall the bulb holder. The TOP mark on the bulb holder must always be upward.
7. Put the cover back into place.
Taillight housing
The bulbs in the taillight cluster are replaced from inside the cargo area (not the LED functions).
1. Remove the covers in the left/right panel to access the bulbs. The bulbs are located in separate bulb holders.
2. Press the catches together and pull out the bulb holder.
3. Remove the defective bulb by pressing it in slightly and turning it before pulling it out.
ProCarManuals.com
Page 196 of 251
4. Plug in the connector.
5. Press the bulb holder until it clicks into place and reinstall the cover.
202 06 Maintenance and specifications
Replacing bulbs
Location of taillight bulbs
Parking lights (LED)
Turn signals
Side maker lights (LED)
Brake lights
Rear fog light (driver's side only)
Backup light
NOTE
If an error message remains in the display after a faulty bulb has been replaced, contact an authorized Volvo
workshop.
Brake lights
ProCarManuals.com