2007 VOLVO S80 fuel
[x] Cancel search: fuelPage 173 of 251
177 05 During your trip
Refueling
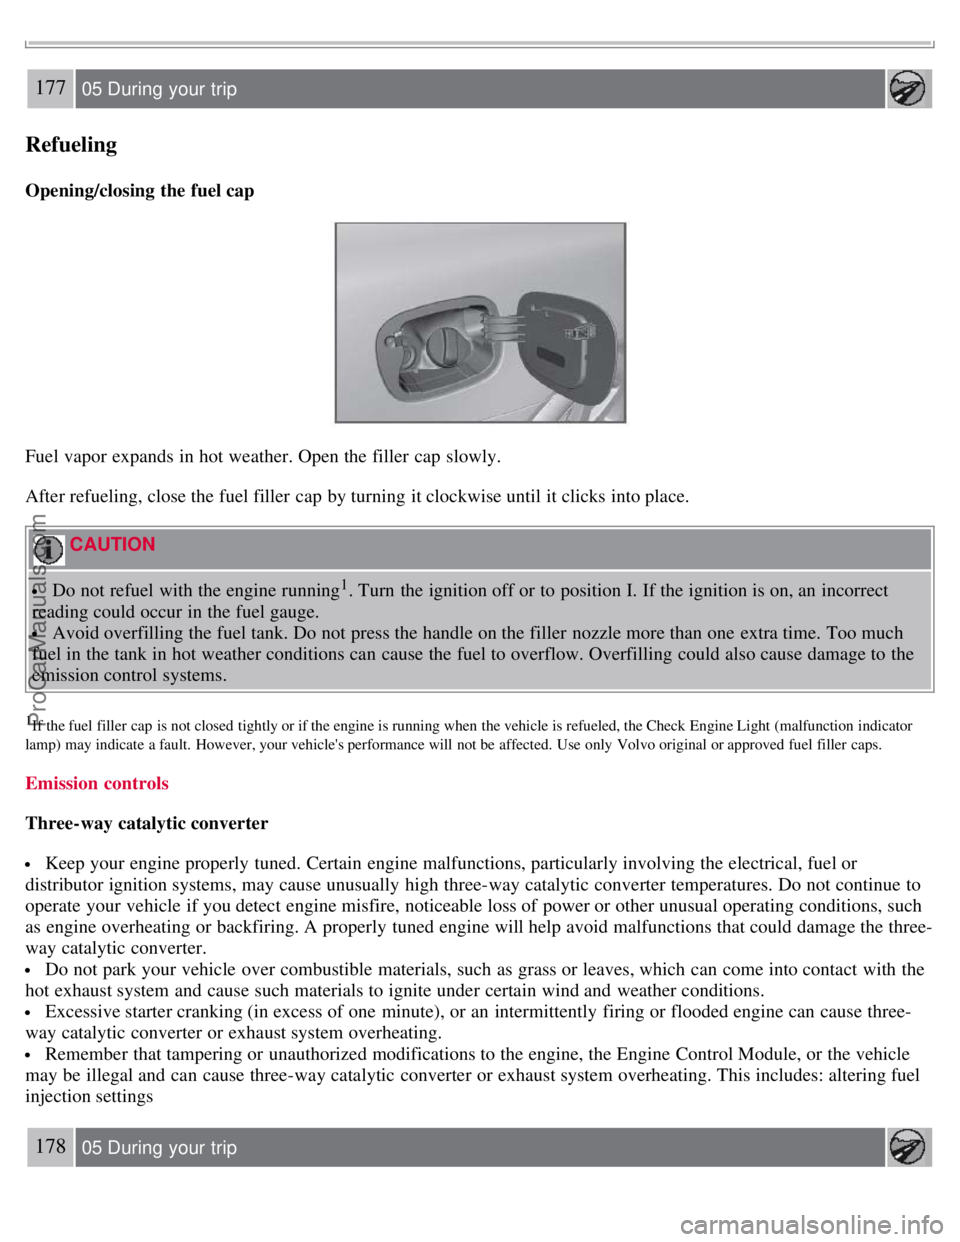
Opening/closing the fuel cap
Fuel vapor expands in hot weather. Open the filler cap slowly.
After refueling, close the fuel filler cap by turning it clockwise until it clicks into place.
CAUTION
Do not refuel with the engine running1. Turn the ignition off or to position I. If the ignition is on, an incorrect
reading could occur in the fuel gauge.
Avoid overfilling the fuel tank. Do not press the handle on the filler nozzle more than one extra time. Too much
fuel in the tank in hot weather conditions can cause the fuel to overflow. Overfilling could also cause damage to the
emission control systems.
1If the fuel filler cap is not closed tightly or if the engine is running when the vehicle is refueled, the Check Engine Light (malfunction indicator
lamp) may indicate a fault. However, your vehicle's performance will not be affected. Use only Volvo original or approved fuel filler caps.
Emission controls
Three-way catalytic converter
Keep your engine properly tuned. Certain engine malfunctions, particularly involving the electrical, fuel or
distributor ignition systems, may cause unusually high three-way catalytic converter temperatures. Do not continue to
operate your vehicle if you detect engine misfire, noticeable loss of power or other unusual operating conditions, such
as engine overheating or backfiring. A properly tuned engine will help avoid malfunctions that could damage the three-
way catalytic converter.
Do not park your vehicle over combustible materials, such as grass or leaves, which can come into contact with the
hot exhaust system and cause such materials to ignite under certain wind and weather conditions.
Excessive starter cranking (in excess of one minute), or an intermittently firing or flooded engine can cause three-
way catalytic converter or exhaust system overheating.
Remember that tampering or unauthorized modifications to the engine, the Engine Control Module, or the vehicle
may be illegal and can cause three-way catalytic converter or exhaust system overheating. This includes: altering fuel
injection settings
178 05 During your trip
ProCarManuals.com
Page 174 of 251

Refueling
or components, altering emission system components or location or removing components, and/or repeated use of
leaded fuel.
NOTE
Unleaded fuel is required for vehicles with three-way catalytic converters.
Heated oxygen sensors
The heated oxygen sensors monitor the oxygen content of the exhaust gases. Readings are fed into a control module
that continuously monitors engine functions and controls fuel injection. The ratio of fuel to air into the engine is
continuously adjusted for efficient combustion to help reduce harmful emissions.
179 05 During your trip
Loading
Introduction
The load carrying capacity of your vehicle is determined by factors such as the number of passengers, the amount of
cargo, the weight of any accessories that may be installed, etc.
NOTE
To increase loading space, the rear seat backrests can be folded down, see page 80
.
The trunk lid can be opened via the button located on the lighting panel, see page 60.
Load the cargo in the trunk against the backrest.
Load wide cargo in the trunk on both sides of the rear seat split.
Unstable loads can be secured to the load anchoring eyelets with straps or web lashings to help keep them from
shifting.
WARNING
The vehicle's driving characteristics may change depending on the weight and distribution of the load.
A 44-pound (20 kg) object produces a force of 2,200 pounds (1,000 kg) in a head-on collision at 30 mph (50
km/h).
Loading the cargo area
Stop the engine and apply the parking brake when loading or unloading long objects. The gear selector can be knocked
out of position by long loads, which could set the vehicle in motion. To increase loading space, the rear seat backrests
can be folded down, see page 80
.
WARNING
Stop the engine, put the gear selector in P , and apply the parking brake when loading or unloading long objects.
The rear seat should not be loaded to a level higher than 2 in. (5 cm) below the upper edge of the rear side
windows. Objects placed higher than this level could impede the function of the Volvo Inflatable Curtain.
ProCarManuals.com
Page 177 of 251
Removal:
Open the cover 30 degrees and lift straight up.
Installation:
Insert the cover in the grooves behind the upholstery and close the cover.
Roof loads
Using load carriers
Load carriers are available as Volvo accessories. Observe the following points when in use:
To avoid damaging your vehicle and to achieve maximum safety when driving, we recommend using the load
carriers that Volvo has developed especially for your vehicle.
Volvo-approved removable roof racks are designed to carry the maximum allowable roof load for this vehicle: 220
lbs (100 kg). For non-Volvo roof racks, check the manufacturer's weight limits for the rack.
Never exceed the rack manufacturer's weigh limits and never exceed the maximum rated roof load of 220 lbs (100
kg).
Avoid single-point loads. Distribute loads evenly.
Place heavier cargo at the bottom of the load.
Secure the cargo correctly with appropriate tie-down equipment.
Check periodically that the load carriers and load are properly secured.
Remember that the vehicle's center of gravity and handling change when you carry a load on the roof.
The vehicle's wind resistance and fuel consumption will increase with the size of the load.
Drive smoothly. Avoid rapid starts, fast cornering and hard braking.
182 05 During your trip
Towing a trailer
Introduction
Volvo recommends the use of Volvo trailer hitches that are specially designed for the vehicle.
NOTE
See page 244
for the maximum trailer and tongue weights recommended by Volvo.
Observe the legal requirements of the state/province in which the vehicles are
All Volvo models are equipped with energy- absorbing shock-mounted bumpers. Trailer hitch installation should
not interfere with the proper operation of this bumper system.
Trailer towing does not normally present any particular problems, but take into consideration:
Increase tire pressure to recommended full. See the tire inflation tables on pages 221 and 222.
When your vehicle is new, avoid towing heavy trailers during the first 620 miles (1,000 km).
Maximum speed when towing a trailer: 50 mph (80 km/h).
Engine and transmission are subject to increased loads. Therefore, engine coolant temperature should be closely
watched when driving in hot climates or hilly terrain. Use a lower gear and turn off the air conditioner if the
temperature gauge needle enters the red range.
If the automatic transmission begins to overheat, a message will be displayed in the text window.
Avoid overload and other abusive operation.
ProCarManuals.com
Page 184 of 251
Each time the car is refueled:
Check the engine oil level.
Clean the windshield, windshield wipers, headlights, and tail lights.
Monthly:
Check cold tire pressure in all tires. Inspect the tires for wear.
Check that engine coolant and other fluid levels are between the indicated "min" and "max" markings.
Clean interior glass surfaces with a glass cleaner and soft paper towels.
Wipe driver information displays with a soft cloth.
Visually inspect battery terminals for corrosion. Corrosion may indicate a loose terminal connector, or a battery near
the end of its useful service life. Consult your Volvo retailer for additional information.
As needed:
Wash the car, including the undercarriage, to reduce wear that can be caused by a buildup of dirt, and corrosion that
can be caused by salt residues.
Clean leaves and twigs from air intake vents at the base of the windshield, and from other places where they may
collect.
NOTE
Complete service information for qualified technicians is available online for purchase or subscription at
www.volvotechinfo.com
.
192 06 Maintenance and specifications
Maintaining your car
Emission inspection readiness
What is an Onboard Diagnostic System (OBD II)?
OBD II is part of your vehicle's computerized engine management system. It stores diagnostic information about your
vehicle's emission controls. It can light the Check Engine light (MIL) if it detects an emission control "fault." A "fault"
is a component or system that is not performing within an expected range. A fault may be permanent or temporary.
OBD II will store a message about any fault.
How do states use OBD II for emission inspections?
Many states connect a computer directly to a vehicle's OBD II system. The inspector can then read "faults." In some
states, this type of inspection has replaced the tailpipe emission test.
How can my vehicle fail OBD II emission inspection?
Your vehicle can fail OBD II emission inspection for any of the following reasons.
If your Check Engine (MIL) light is lit, your vehicle may fail inspection.
If your vehicle's Check Engine light was lit, but went out without any action on your part, OBD II will still have a
recorded fault. Your vehicle may pass or fail, depending on the inspection practices in your area.
If you had recent service that required disconnecting the battery, OBD II diagnostic information may be incomplete
and "not ready" for inspection. A vehicle that is not ready may fail inspection.
How can I prepare for my next OBD II emission inspection?
ProCarManuals.com
Page 186 of 251

The appearance of the engine compartment may vary depending on engine model.
Coolant expansion tank
Power steering fluid reservoir
Engine oil dipstick
Radiator
Air cleaner
Filler cap for engine oil
Brake fluid reservoir
Battery
Relay and fuse box
Washer fluid reservoir
WARNING
The cooling fan may start or continue to operate (for up to 6 minutes) after the engine has been switched off.
WARNING
The distributor ignition system operates at very high voltages. Special safety precautions must be followed to prevent
injury. Always turn the ignition off when:
Replacing distributor ignition components e.g. plugs, coil, etc.
Do not touch any part of the distributor ignition system while the engine is running. This may result in unintended
movements and body injury.
194 06 Maintenance and specifications
Engine oil
Checking the engine oil
The oil level should be checked every time the vehicle is refueled. This is especially important during the period up to
the first scheduled maintenance service.
See page 246 for oil specifications.
Refer to the Warranty and Service Records Information booklet for information on the oil change intervals.
Volvo recommends
oil products.
CAUTION
ProCarManuals.com
Page 217 of 251

Tire Pressure Monitoring System (TPMS) -U.S models only
The tire pressure monitoring system uses sensors mounted in the tire valves to check inflation pressure levels. When
the vehicle is moving at a speed of approximately 20 mph (30 km/h) or faster, these sensors transmit inflation pressure
data to a receiver located in the vehicle.
NOTE
USA - FCC ID: KR5S122780002
This device complies with part 15 of the FCC rules. Operation is subject to the following conditions: (1) This device
may not cause harmful interference, and (2) this device must accept any interference received, including interference
that may cause undesired operation.
When low inflation pressure is detected, TPMS will light up the tire pressure warning light (
) (also referred to as a
telltale) in the instrument panel, and will display a message in the text window. The wording of this message is
determined by the degree of inflation pressure loss.
NOTE
If a fault occurs in TPMS, the tire pressure warning light will flash for approximately 1 minute and TIRE PRESS
SYST SERVICE REQUIRED will be displayed.
Each tire, including the spare (if provided), should be checked monthly when cold and inflated to the inflation pressure
recommended by the vehicle manufacturer on the vehicle placard or tire inflation pressure label. (If your vehicle has
tires of a different size than the size indicated on the vehicle placard or tire inflation pressure label, you should
determine the proper tire inflation pressure for those tires.)
As an added safety feature, your vehicle has been equipped with a tire pressure monitoring system (TPMS) that
illuminates a low tire pressure telltale when one or more of your tires is significantly under-inflated. Accordingly,
when the low tire pressure telltale illuminates, you should stop and check your tires as soon as possible, and inflate
them to the proper pressure. Driving on a significantly under-inflated tire causes the tire to overheat and can lead to
tire failure. Under-inflation also reduces fuel efficiency and tire tread life, and may affect the vehicle's handling and
stopping ability.
Please note that the TPMS is not a substitute for proper tire maintenance, and it is the driver's responsibility to
maintain correct tire pressure, even if under-inflation has not reached the level to trigger illumination of the TPMS low
tire pressure telltale.
Your vehicle has also been equipped with a TPMS malfunction indicator to indicate when the system is not operating
properly. The TPMS malfunction indicator is combined with the low tire pressure telltale. When the system detects a
malfunction, the telltale will flash for approximately one minute and then remain continuously illuminated. This
sequence will continue upon subsequent vehicle start-ups as long as the malfunction exists. When the malfunction
indicator is illuminated, the system may not be able to detect or signal low tire pressure as intended. TPMS
malfunctions may occur for a variety of reasons, including the installation of replacement or alternate tires or wheels
on the vehicle that prevent the TPMS from functioning properly. Always check the TPMS malfunction telltale after
replacing one or more tires or wheels on your vehicle to ensure that the replacement or alternate tires and wheels allow
the TPMS to continue to function properly.
224 06 Maintenance and specifications
Wheels and tires
ProCarManuals.com
Page 220 of 251
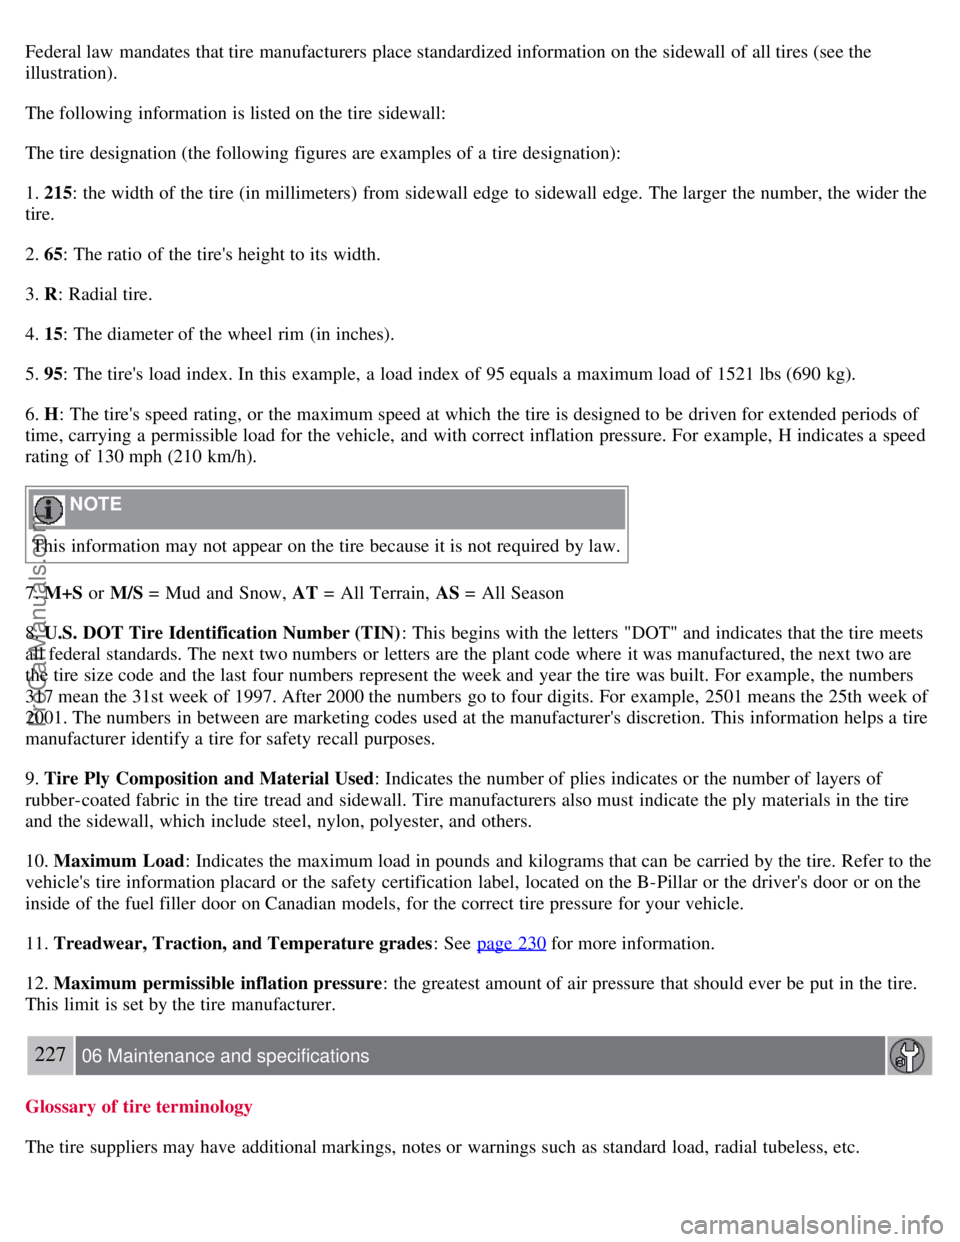
Federal law mandates that tire manufacturers place standardized information on the sidewall of all tires (see the
illustration).
The following information is listed on the tire sidewall:
The tire designation (the following figures are examples of a tire designation):
1. 215: the width of the tire (in millimeters) from sidewall edge to sidewall edge. The larger the number, the wider the
tire.
2. 65: The ratio of the tire's height to its width.
3. R: Radial tire.
4. 15: The diameter of the wheel rim (in inches).
5. 95: The tire's load index. In this example, a load index of 95 equals a maximum load of 1521 lbs (690 kg).
6. H : The tire's speed rating, or the maximum speed at which the tire is designed to be driven for extended periods of
time, carrying a permissible load for the vehicle, and with correct inflation pressure. For example, H indicates a speed
rating of 130 mph (210 km/h).
NOTE
This information may not appear on the tire because it is not required by law.
7. M+S or M/S = Mud and Snow, AT = All Terrain, AS = All Season
8. U.S. DOT Tire Identification Number (TIN) : This begins with the letters "DOT" and indicates that the tire meets
all federal standards. The next two numbers or letters are the plant code where it was manufactured, the next two are
the tire size code and the last four numbers represent the week and year the tire was built. For example, the numbers
317 mean the 31st week of 1997. After 2000 the numbers go to four digits. For example, 2501 means the 25th week of
2001. The numbers in between are marketing codes used at the manufacturer's discretion. This information helps a tire
manufacturer identify a tire for safety recall purposes.
9. Tire Ply Composition and Material Used : Indicates the number of plies indicates or the number of layers of
rubber-coated fabric in the tire tread and sidewall. Tire manufacturers also must indicate the ply materials in the tire
and the sidewall, which include steel, nylon, polyester, and others.
10. Maximum Load : Indicates the maximum load in pounds and kilograms that can be carried by the tire. Refer to the
vehicle's tire information placard or the safety certification label, located on the B-Pillar or the driver's door or on the
inside of the fuel filler door on Canadian models, for the correct tire pressure for your vehicle.
11. Treadwear, Traction, and Temperature grades : See page 230
for more information.
12. Maximum permissible inflation pressure : the greatest amount of air pressure that should ever be put in the tire.
This limit is set by the tire manufacturer.
227 06 Maintenance and specifications
Glossary of tire terminology
The tire suppliers may have additional markings, notes or warnings such as standard load, radial tubeless, etc.
ProCarManuals.com
Page 221 of 251
Tire information placard: A placard showing the OE (Original Equipment) tire sizes, recommended inflation
pressure, and the maximum weight the vehicle can carry.
Tire Identification Number (TIN) : A number on the sidewall of each tire providing information about the tire
brand and manufacturing plant, tire size and date of manufacturer.
Inflation pressure : A measure of the amount of air in a tire.
Standard load: A class of P-metric or Metric tires designed to carry a maximum load at 35 psi [37 psi (2.5 bar) for
Metric tires]. Increasing the inflation pressure beyond this pressure will not increase the tires load carrying capability.
Extra load : A class of P-metric or Metric tires designed to carry a heavier maximum load at 41 psi [43 psi (2.9 bar)
for Metric tires]. Increasing the inflation pressure beyond this pressure will not increase the tire's load carrying
capability.
kPa : Kilopascal, a metric unit of air pressure.
PSI: Pounds per square inch, a standard unit of air pressure.
B-pillar : The structural member at the side of the vehicle behind the front door.
Bead area of the tire : Area of the tire next to the rim.
Sidewall of the tire: Area between the bead area and the tread.
Tread area of the tire : Area of the perimeter of the tire that contacts the road when mounted on the vehicle.
Rim: The metal support (wheel) for a tire or a tire and tube assembly upon which the tire beads are seated.
Maximum load rating : a figure indicating the maximum load in pounds and kilograms that can be carried by the
tire. This rating is established by the tire manufacturer.
Maximum permissible inflation pressure : the greatest amount of air pressure that should ever be put in the tire.
This limit is set by the tire manufacturer.
Recommended tire inflation pressure : inflation pressure, established by Volvo, which is based on the type of tires
that are mounted on a vehicle at the factory. This inflation pressure is affected by the number of occupants in the
vehicle, the amount of cargo, and the speed at which the vehicle will be driven for a prolonged period. This
information can be found on the tire inflation placard(s) located on the driver's side B-pillar or on the inside of the fuel
filler door on Canadian models, and in the tire inflation table in this chapter.
Cold tires : The tires are considered to be cold when they have the same temperature as the surrounding (ambient)
air. This temperature is normally reached after the vehicle has been parked for at least 3 hours.
228 06 Maintenance and specifications
Wheels and tires
Vehicle loading
Properly loading your vehicle will provide maximum return of vehicle design performance.
Before loading your vehicle, familiarize yourself with the following terms for determining your vehicle's weight
ratings, with or without a trailer, from the vehicle's Federal/Canadian Motor Vehicle Safety Standards (FMVSS/
CMVSS) label, and the vehicle's tire information placard:
Curb weight
The weight of the vehicle including a full tank of fuel and all standard equipment. It does not include passengers,
cargo, or optional equipment.
Capacity weight
All weight added to the curb weight, including cargo and optional equipment. When towing, trailer hitch tongue load
is also part of cargo weight.
NOTE
For trailer towing information, please refer to the section "Towing a trailer" on page 182
.
ProCarManuals.com