Page 100 of 251

position so that the vehicle can be moved1.
Lift away the rubber mat on the floor of the storage compartment behind the center console and open the hatch.
Insert the key blade into the opening as far as possible. Press the key blade down and keep it held down. Move the
gear selector from the P position. For information on the key blade, see page 48
.
All Wheel Drive - AWD
2
Your Volvo can be equipped with permanent All Wheel Drive, which means that power is distributed automatically
between the front and rear wheels. Under normal driving conditions, most of the engine's power is directed to the front
wheels. However, if there is any tendency for the front wheels to spin, an electronically controlled coupling distributes
power to the wheels that have the best traction.
1If the battery is dead, the optional electric parking brake cannot be applied or released. Connect an auxiliary battery if the battery voltage is too
low, see page 104
.
2Standard on certain models.
107 03 Your driving environment
Brakes
Brake system
The brake system is a hydraulic system consisting of two separate brake circuits. If a problem should occur in one of
these circuits, it is still possible to stop the vehicle with the other brake circuit.
If the brake pedal must be depressed farther than normal and requires greater foot pressure, the stopping distance will
be longer.
A warning light in the instrument panel will light up to warn the driver that a fault has occurred.
If this light comes on while driving or braking, stop immediately and check the brake fluid level in the reservoir.
NOTE
Press the brake pedal hard and maintain pressure on the pedal - do not pump the brakes.
WARNING
If the fluid level is below the MIN mark in the reservoir or if a brake system message is shown in the information
display: DO NOT DRIVE. Have the vehicle towed to a trained and qualified Volvo service technician and have the
brake system inspected.
Power brakes function only when the engine is running
The power brakes utilize vacuum pressure which is only created when the engine is running. Never let the vehicle roll
to a stop with the engine switched off.
If the power brakes are not working, the brake pedal must be pressed approximately five times harder than usual to
make up for the lack of power assistance. This can happen for example when towing your vehicle or if the engine is
switched off when the vehicle is rolling. The brake pedal feels harder than usual.
ProCarManuals.com
Page 102 of 251
WARNING
If
and come on at the same time and the brake level is below the MIN mark in the reservoir or if a
brake system-related message is shown in the information display: DO NOT DRIVE. Have the vehicle towed to a
trained and qualified Volvo service technician and have the brake system inspected.
109 03 Your driving environment
Brakes
Manual parking brake
The parking brake pedal is located under the dashboard, to the left of the brake pedal. When the brake is applied, an
indicator light illuminates in the instrument panel.
NOTE
The indicator light will light up even if the parking brake has only been partially applied.
Applying the parking brake
1. Press firmly on the brake pedal.
2. Press down pedal 1 firmly to its full extent.
3. Release the brake pedal and ensure that the vehicle is at a standstill.
4. If the vehicle rolls, the parking brake pedal must be pushed down more firmly.
ProCarManuals.com
Page 107 of 251
2 0 0 7
VOLVO S80
112 04 Comfort and driving pleasure
Menus and messages 114
Climate system118
Audio system125
Trip computer136
Compass137
Stability system139
Active chassis system-Four C141
Cruise control142
Adaptive Cruise Control-ACC144
Collision warning system (option)150
Park assist (option)153
Blind Spot Information System (option)155
Passenger compartment convenience158
Bluetooth hands-free (option)162
113 04 Comfort and driving pleasure
114 04 Comfort and driving pleasure
Menus and messages
Center console
Certain functions are controlled from the center console via the menu system or from the optional keypad in the
steering wheel. Each function is described under its respective section.
The current menu level is shown at the top right of display in the center console.
Center console controls
ProCarManuals.com
Page 110 of 251
Audio settings
Main menu Bluetooth cell phone
Bluetooth (option)
Change phone
Remove phone
1The menu option for audio settings is available in all audio sources.
116 04 Comfort and driving pleasure
Menus and messages
Main instrument panel
READ - access to the list of messages and message confirmation.
Thumbwheel - browse among menus and options in the list of functions.
RESET - reset the active function. Used in certain cases to select/activate a function, see the explanation under each
respective function.
The menus shown on the information displays in the instrument panel are controlled with the left lever. The menus
shown depend on ignition mode. Press READ to erase a message and return to the menus.
Menu overview
Driving distance on current fuel reserve
Average
Instantaneous:
Average speed
Current speed in mph (Canadian models only)
DSTC
Message
ProCarManuals.com
Page 111 of 251
When a warning, information or indicator symbol comes on, a corresponding message appears on the information
display. An error message is stored in a memory list until the fault is rectified.
Press READ to acknowledge and scroll among the messages.
NOTE
If a warning message appears while you are using the trip computer, the message must be read and confirmed by
pressing READ before the previous activity can be resumed.
117 04 Comfort and driving pleasure
Menus and messages
ProCarManuals.com
Page 117 of 251

Press the button once for the highest heat level - three indicator lights come on.
Press the button twice for a lower heat level - two indicator lights come on.
Press the button three times for the lowest heat level - one indicator light comes on.
Press the button four times to switch off the heat - no indicator lights come on.
Heated rear seats
1
Heat control for the outboard seating positions takes place in the same way as for the front seat.
Air distribution
The figure consists of three buttons. When the buttons are pressed, an indicator light in front of the respective part of
the figure illuminates and shows which air distribution is selected, see page 124
.
1Option on Canadian models only.
122 04 Comfort and driving pleasure
Climate system
Auto
The function automatically regulates cooling, heating, blower speed, recirculation, and air distribution to maintain the
chosen temperature. If you select one or more manual functions, the other functions continue to be controlled
automatically. The air quality sensor is engaged and all manual settings are switched off when AUTO is pressed. The
display shows AUTO CLIMATE .
Blower speed in automatic mode can be set under Climate settings
Automatic blower adjust . Choose between Low,
Normal or High.
NOTE
Selecting the lowest blower speed may increases the risk of fog forming on the windows.
ProCarManuals.com
Page 120 of 251

Climate system
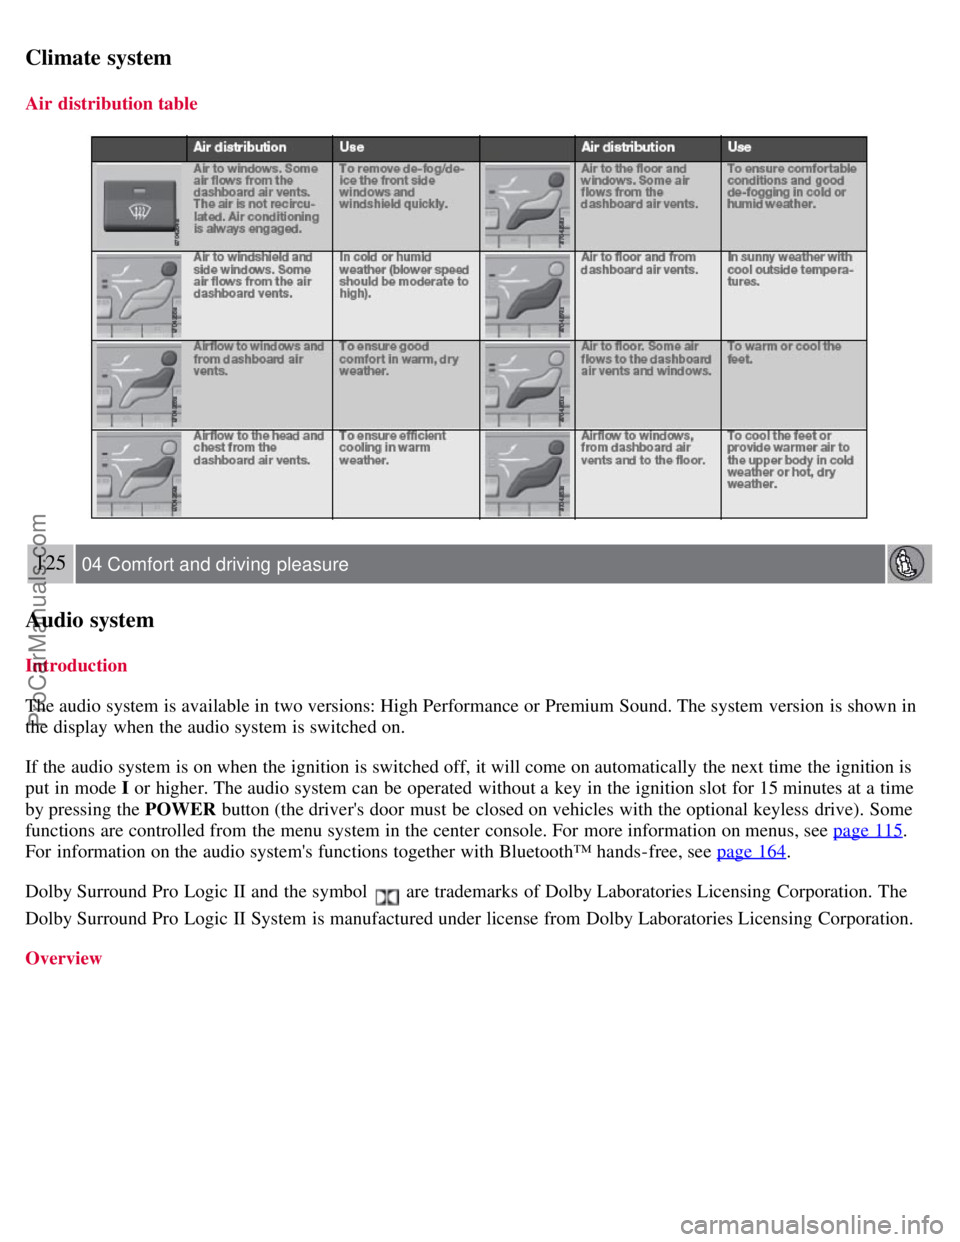
Air distribution table
125 04 Comfort and driving pleasure
Audio system
Introduction
The audio system is available in two versions: High Performance or Premium Sound. The system version is shown in
the display when the audio system is switched on.
If the audio system is on when the ignition is switched off, it will come on automatically the next time the ignition is
put in mode I or higher. The audio system can be operated without a key in the ignition slot for 15 minutes at a time
by pressing the POWER button (the driver's door must be closed on vehicles with the optional keyless drive). Some
functions are controlled from the menu system in the center console. For more information on menus, see page 115
.
For information on the audio system's functions together with Bluetooth™ hands-free, see page 164
.
Dolby Surround Pro Logic II and the symbol
are trademarks of Dolby Laboratories Licensing Corporation. The
Dolby Surround Pro Logic II System is manufactured under license from Dolby Laboratories Licensing Corporation.
Overview
ProCarManuals.com
Page 125 of 251

Scan CD
Playing a CD (CD player1)
If a music CD is in the player when CD is pressed, it will be played automatically. Otherwise, insert a disc and press
CD .
1Certain markets only.
Playing a CD (CD changer)
If a CD position with a music CD is already selected when CD is pressed, it will be played automatically. Otherwise
select a disc with the number buttons 1-6 or
/ on the navigation button.
Insert a CD (CD changer)
1. Select an empty position with the number buttons 1-6 or
/ on the navigation button.
An empty position is marked on the display. The text Insert disc shows that a new disc can be inserted. The CD
changer can hold up to six CDs.
2. Insert a CD in the CD changer slot.
Disc eject
For reasons of traffic safety, an ejected CD must be removed within 12 seconds or it will be automatically drawn back
into the slot and the CD player will enter pause mode. Press the CD button to restart the disc.
Eject individual discs by pressing the eject button.
Eject all discs with a long press on the eject button. The entire magazine is emptied disc by disc.
NOTE
The Eject all function can only be used while the vehicle is at a standstill and will be cancelled if the vehicle begins
to move.
Pause
When the audio system volume is turned off completely, the CD player will pause and will resume playing when the
volume is turned up again.
Sound files
In addition to playing normal music CDs, the CD player/changer can also play discs containing files in mp3 or wma
format.
NOTE
Some copy protected sound files may not be read by the player.
When a CD containing sound files is inserted into the player the disc's directory structure is scanned before the CD
begins playing. The length of time that this takes depends on the quality of the disc.
129 04 Comfort and driving pleasure
Audio system
ProCarManuals.com