2007 VOLVO S80 start stop button
[x] Cancel search: start stop buttonPage 51 of 251
The doors and the trunk can be locked by pressing the lock button in any of the outside door handles.
NOTE
All doors and the trunk must be closed when the lock button is pressed. Otherwise, the vehicle will not lock.
Keyless drive remote control and driver's seat memory
When you leave the vehicle with a PCC in your possession and lock any door, the position of the driver's seat will
be stored in the seat's memory.
The next time a door is opened by a person with the same PCC in his/her possession, the driver's seat will
automatically move to the position that it was in when the door was most recently locked.
NOTE
If several people carrying PCCs approach the vehicle at the same time, the driver's seat will assume the position it
was in for the person who opens a door first.
57 02 Locks and alarm
Keyless drive
See also page 78 for information on adjusting and storing the seat's position in the seat memory.
Keyless drive information messages
If anyone leaves the vehicle with the only keyless drive remote control in his or her possession while the ignition is
switched on, a message will be shown in the information display and an audible signal will sound.
NOTE
This message will only be displayed if the start control is in mode I or II.
The message will be erased from the display and the audible signal will stop when the PCC has been returned to the
vehicle and one of the following has occurred:
A door has been opened and closed
The PCC has been inserted in the ignition slot
The READ button (see page 116 for the location of this button) has been pressed.
CAUTION
Keyless drive remote controls should never be left in the vehicle. In the event of a break-in, a remote found in the
vehicle could make it possible to start the engine.
Electromagnetic fields or metal obstructions can interfere with the keyless drive system. Avoid placing the remote
control near cellular phones, metallic objects or e.g., in a metal briefcase.
USA - FCC ID:KR55WK48952, KR55WK48964
NOTE
This device complies with part 15 of the FCC Rules. Operation is subject to the following two conditions: (1) This
ProCarManuals.com
Page 57 of 251

description of the menu system.
USA FCC ID: MAYDA 5823(3)
This device complies with part 15 of the FCC rules. Operation is subject to the following conditions: (1) This device
may not cause harmful interference, and (2) this device must accept any interference received, including interference
that may cause undesired operation.
Canada IC: 4405A-DA 5823(3)
Movement sensor DA5823 by Dynex Operation is subject to the following conditions: (1) this device may not cause
interference, and (2) this device must accept any interference, including interference that may cause undesired
operation of the device.
63 02 Locks and alarm
Alarm
Disarming the alarm
Press the Unlock button on the remote key. Two short flashes from the car's direction indicators confirm that the alarm
has been deactivated and that all doors are unlocked.
Turning off (stopping) the alarm
If the alarm is sounding, it can be stopped by pressing the Unlock button on the remote control or by inserting the
remote key in the ignition slot. Two short flashes from the car's direction indicators confirm that the alarm has been
turned off.
Other alarm-related functions
Automatic re-arming
If the doors are unlocked, the locks will automatically reengage (re-lock) and the alarm will re-arm after 2 minutes
unless a door or the trunk has been opened.
Audible/visual alarm signal
An audible alarm signal is given by a battery powered siren. The alarm cycle lasts for 30 seconds.
The visual alarm signal is given by flashing all turn signals for approximately 5 minutes or until the alarm is turned
off.
Remote key not functioning
If the remote key is not functioning properly, the alarm can be turned off and the vehicle can be started as follows:
1. Open the driver's door with the key blade. This will trigger the alarm.
2. Insert the remote key into the ignition slot. This will turn off the alarm.
64 02 Locks and alarm
Alarm
ProCarManuals.com
Page 63 of 251

technician as soon as possible.
A malfunction indicator (CHECK ENGINE) light may have many causes. Sometimes, you may not notice a change in
your car's behavior. Even so, an uncorrected condition could hurt fuel economy, emission controls, and drivability.
Extended driving without correcting the cause could even damage other components in your vehicle.
Canadian models are equipped with this symbol:
Anti-lock Brake System (ABS) warning light
If the warning light comes on, there may be a malfunction in the ABS system (the standard braking system will still
function). Check the system by:
1. Stopping in a safe place and switching off the ignition.
72 03 Your driving environment
Instruments and controls
2. Restart the engine.
3. If the warning light goes off, no further action is required.
If the warning light remains on, the vehicle should be driven to a trained and qualified Volvo service technician for
inspection. See page 107
for additional information.
Canadian models are equipped with this symbol:
Rear fog light
This symbol indicates that the rear fog light (located in the driver's side tail light cluster) is on.
Stability system
This indicator symbol flashes when the DSTC (Dynamic Stability and Traction Control system) is actively working to
stabilize the vehicle. See page 139
for more detailed information.
Tire pressure monitoring system (TPMS) - option
This symbol illuminates to indicate that tire pressure in one or more tires is low. See page 223
for detailed information.
Low fuel level
When this light comes on, there are approximately 2.1 US gallons (8 liters) of fuel remaining in the tank.
Information symbol
The information symbol illuminates and a text message is displayed if a fault is detected in one of the vehicle's
systems. The message can be erased and the symbol can be turned off by pressing the READ button (see page 116
for
information) or this will take place automatically after a short time (the length of time varies, depending on the
function affected).
The information symbol may also illuminate together with other symbols.
High beam indicator
This symbol illuminates when the high beam headlights are on, or if the high beam flash function is used.
ProCarManuals.com
Page 65 of 251

the vehicle has been started, the SRS system's diagnostic functions have detected a fault in a seat belt lock or
tensioner, a front airbag, side impact airbag, and/or an inflatable curtain. Have the system(s) inspected by a trained and
qualified Volvo service technician as soon as possible.
Seat belt reminder
This symbol comes on for approximately 6 seconds if the driver has not fastened his or her seat belt.
Generator not charging
This symbol comes on during driving if a fault has occurred in the electrical system. Contact an authorized Volvo
workshop.
Fault in brake system
If this symbol lights, the brake fluid level may be too low. Stop the vehicle in a safe place and check the level in the
brake fluid reservoir, see page 193
. If the level in the reservoir is below MIN , the vehicle should be transported to an
authorized Volvo workshop to have the brake system checked.
If the brake and ABS symbols come on at the same time, there may be a fault in the brake force distribution system.
1. Stop the vehicle in a safe place and turn off the engine.
2. Restart the engine.
If both symbols extinguish, continue driving.
If the symbols remain on, check the level in the brake fluid reservoir. See page 193. If the brake fluid level is
normal but the symbols are still lit, the vehicle can be driven, with great care, to an authorized Volvo workshop to
have the brake system checked.
If the level in the reservoir is below MIN , the vehicle should be transported to an authorized Volvo workshop to
have the brake system checked.
WARNING
If the fluid level is below the MIN mark in the reservoir or if a warning message is displayed in the text window:
DO NOT DRIVE. Have the vehicle towed to an authorized Volvo retailer and have the brake system inspected.
If the ABS and Brake system lights are on at the same time, there is a risk of reduced vehicle stability.
Warning symbol
The red warning symbol comes on when a fault has been indicated which could affect the safety and/or drivability of
the vehicle. An explanatory text is shown on the information display at the same time. The symbol remains visible
until the fault has been rectified but the text message can be cleared with the READ button, see page 116
. The
warning symbol can also come on in conjunction with other symbols.
Action:
1. Stop in a safe place. Do not drive the vehicle further.
74 03 Your driving environment
Instruments and controls
2. Read the information on the information display. Implement the action in accordance with the message in the
display. Clear the message using READ .
ProCarManuals.com
Page 67 of 251
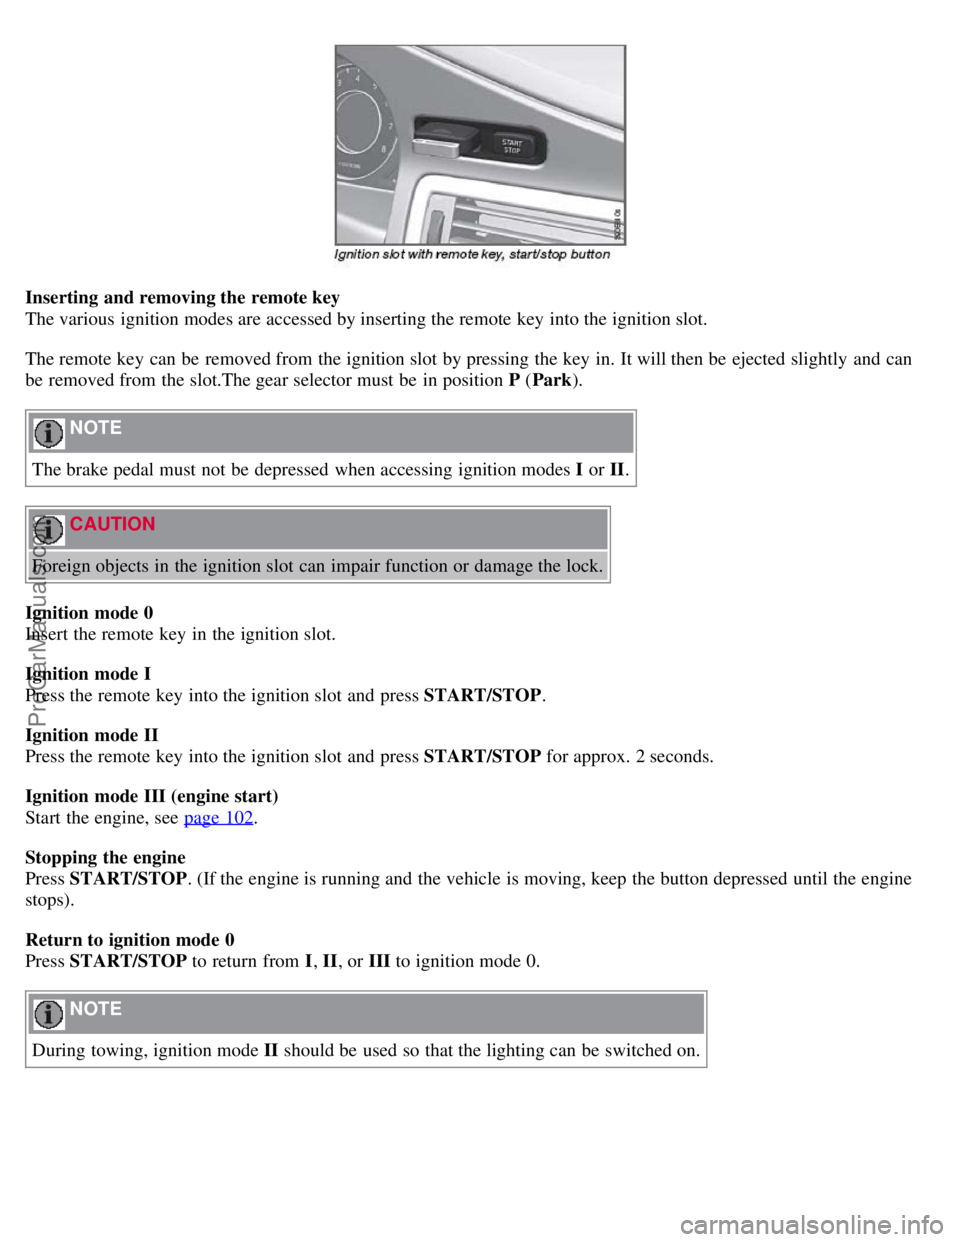
Inserting and removing the remote key
The various ignition modes are accessed by inserting the remote key into the ignition slot.
The remote key can be removed from the ignition slot by pressing the key in. It will then be ejected slightly and can
be removed from the slot.The gear selector must be in position P (Park ).
NOTE
The brake pedal must not be depressed when accessing ignition modes I or II.
CAUTION
Foreign objects in the ignition slot can impair function or damage the lock.
Ignition mode 0
Insert the remote key in the ignition slot.
Ignition mode I
Press the remote key into the ignition slot and press START/STOP .
Ignition mode II
Press the remote key into the ignition slot and press START/STOP for approx. 2 seconds.
Ignition mode III (engine start)
Start the engine, see page 102
.
Stopping the engine
Press START/STOP . (If the engine is running and the vehicle is moving, keep the button depressed until the engine
stops).
Return to ignition mode 0
Press START/STOP to return from I, II, or III to ignition mode 0.
NOTE
During towing, ignition mode II should be used so that the lighting can be switched on.
ProCarManuals.com
Page 95 of 251
Starting the engine
Starting the engine
1. Fasten the seat belt.
WARNING
Before starting the engine, check that the seat, steering wheel and mirrors are adjusted properly. Make sure the brake
pedal can be depressed completely. Adjust the seat if necessary.
1. Insert the remote key into the ignition slot. Press the key until it is drawn into the slot
1.
NOTE
The remote key should be inserted into the ignition slot with the key blade end of the remote pointing out. See the
illustration on page 75
.
2. Depress the brake pedal
2.
WARNING
An extra mat on the driver's floor can cause the accelerator and/or brake pedal to catch. Check that the movement of
these pedals is not impeded. Not more than one protective floor covering may be used at one time.
1On vehicles with the optional keyless drive, it is only necessary to have a remote control in the passenger's compartment.
2If the vehicle is moving, it is only necessary to press the start/stop button to start the vehicle.
3. Press and release the start/stop button. The autostart function will operate the starter motor until the engine starts.
The starter motor operates for a maximum of 10 seconds. If the engine has not started, repeat the procedure.
WARNING
Always remove the remote key from the ignition slot when leaving the vehicle, especially if there are children in
the vehicle.
Never remove the remote key from the ignition slot while driving or when the vehicle is being towed. The
steering lock could otherwise be activated, making it impossible to steer the vehicle. Never remove the remote key
with keyless drive function (option) from the vehicle while driving or during towing.
Always place the gear selector in Park and apply the parking brake before leaving the vehicle. Never leave the
vehicle unattended with the engine running.
Always open garage doors fully before starting the engine inside a garage to ensure adequate ventilation. The
exhaust gases contain carbon monoxide, which is invisible and odorless but very poisonous.
NOTE
The idling speed can be noticeably higher than normal during cold starts. This is to enable emission control system
can reach normal operating temperature as quickly as possible, which helps reduce exhaust emissions.
Keylock: Your vehicle is equipped with a keylock system. When the engine is switched off, the gear selector must
be in the Park position before the key can be removed
1 from the ignition slot.
ProCarManuals.com
Page 104 of 251
2. Press the control.
3. Release the brake pedal and ensure that the vehicle is at a standstill.
4. When the vehicle is parked, the gear selector must be in position P.
The
symbol in the instrument panel flashes while the parking bake is being applied, and glows steadily when
the parking brake has been fully applied.
NOTE
In an emergency the parking brake can be applied when the vehicle is moving by holding in the control. Braking
will be interrupted when the accelerator pedal is depressed or the control is released.
An audible signal will sound during this procedure if the vehicle is moving at speeds above 6 mph (10 km/h).
Parking on a hill
If the vehicle is pointing uphill, turn the front wheels so that they point away from the curb.
If the vehicle is pointing downhill, turn the front wheels so that they point toward the curb.
Releasing the electric parking brake
Manual release
1. Insert the remote key in the ignition slot.
2. Press firmly on the brake pedal.
3. Pull the parking brake control.
Vehicles with Keyless drive (option)
1. Press the START/STOP button.
2. Press firmly on the brake pedal.
3. Pull the parking brake control.
Automatic release
1. Start the engine.
111 03 Your driving environment
Parking brake
2. Fasten the seat belt.
NOTE
For safety reasons, the parking brake is only released automatically if the engine is running and the driver is
wearing a seat belt.
The electric parking brake will be released immediately when the accelerator pedal is pressed and the gear selector
ProCarManuals.com
Page 135 of 251
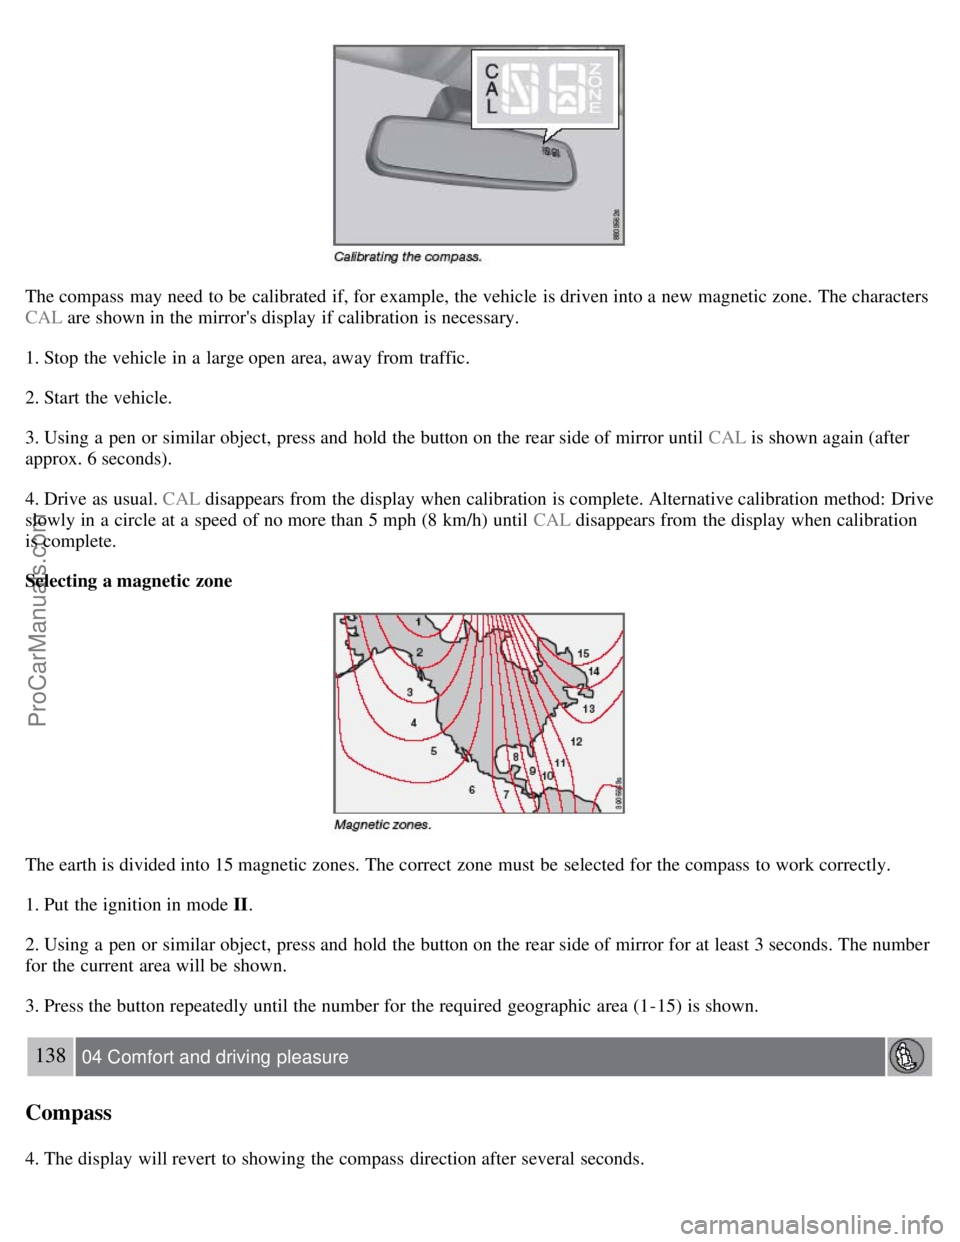
The compass may need to be calibrated if, for example, the vehicle is driven into a new magnetic zone. The characters
CAL are shown in the mirror's display if calibration is necessary.
1. Stop the vehicle in a large open area, away from traffic.
2. Start the vehicle.
3. Using a pen or similar object, press and hold the button on the rear side of mirror until CAL is shown again (after
approx. 6 seconds).
4. Drive as usual. CAL disappears from the display when calibration is complete. Alternative calibration method: Drive
slowly in a circle at a speed of no more than 5 mph (8 km/h) until CAL disappears from the display when calibration
is complete.
Selecting a magnetic zone
The earth is divided into 15 magnetic zones. The correct zone must be selected for the compass to work correctly.
1. Put the ignition in mode II.
2. Using a pen or similar object, press and hold the button on the rear side of mirror for at least 3 seconds. The number
for the current area will be shown.
3. Press the button repeatedly until the number for the required geographic area (1-15) is shown.
138 04 Comfort and driving pleasure
Compass
4. The display will revert to showing the compass direction after several seconds.
ProCarManuals.com