Page 175 of 208
1. Turn the bulb holder counterclockwise and remove it.
2. Remove the bulb from the holder by pressing it in and twisting it counterclockwise.
3. Insert a new bulb and reinstall the bulb holder in the headlight housing.
Side marker light
1. Turn the bulb holder counterclockwise, pull it out, and replace the bulb.
2. Reinstall the bulb holder. It can only be installed in one position.
Front fog light (option)
1. Switch off all lights and turn the key to position 0.
2. Remove the panel around the fog light housing.
3. Unscrew both torx screws in the fog light housing and remove it.
ProCarManuals.com
Page 176 of 208
4. Disconnect the connector from the bulb.
5. Turn the bulb counterclockwise and pull it out.
6. Install the new bulb in its seat and turn it clockwise.
7. Reconnect the connector to the bulb.
199 09 Maintenance and servicing
Replacing front bulbs
8. Secure the fog light housing with the screws and press the panel back into place.
200 09 Maintenance and servicing
Replacing taillight bulbs
Removing the taillight bulb holder
All bulbs in the taillight cluster can be replaced from the cargo area. To access the bulb holders:
1. Switch off all lights and turn the key to position 0.
2. Remove the covers in the left/right panels to access the bulb holders.
3. Disconnect the wiring connector from the affected bulb holder.
4. Press the catches together and pull out the bulb holder.
5. Replace the defective bulb.
ProCarManuals.com
Page 177 of 208
6. Press the wiring connector back into position.
7. Press the bulb holder into place and reinstall the cover.
Location of taillight bulbs
NOTE
If the message indicating a burned out bulb remains in the information display after the bulb has been replaced, consult
an authorized Volvo retailer or workshop.
High-level brake light
These bulbs should only be replaced by an authorized Volvo service technician.
201 09 Maintenance and servicing
Replacing interior bulbs
License plate lighting
1. Switch off all lights and turn the key to position 0.
ProCarManuals.com
Page 184 of 208
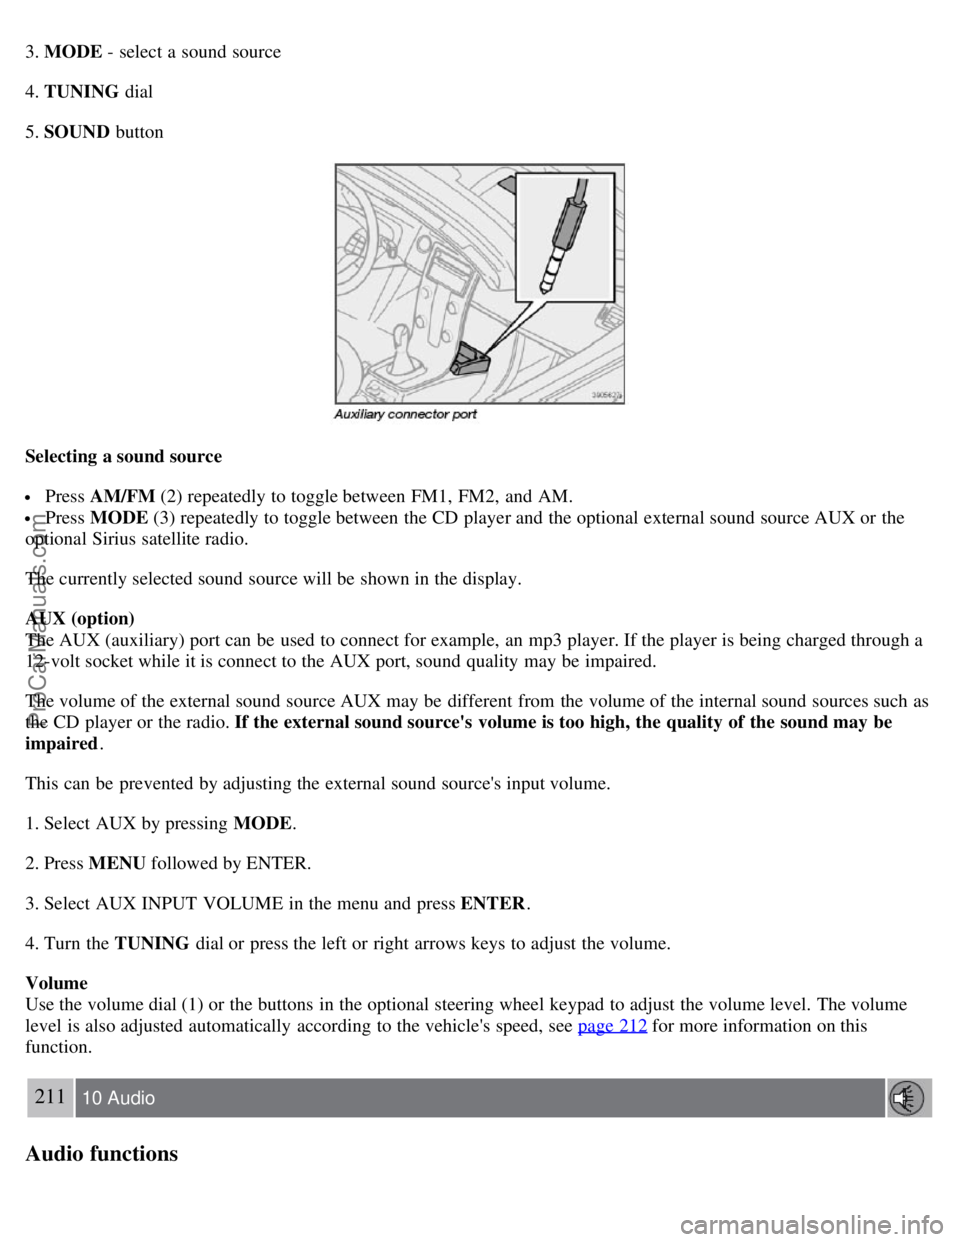
3. MODE - select a sound source
4. TUNING dial
5. SOUND button
Selecting a sound source
Press AM/FM (2) repeatedly to toggle between FM1, FM2, and AM.
Press MODE (3) repeatedly to toggle between the CD player and the optional external sound source AUX or the
optional Sirius satellite radio.
The currently selected sound source will be shown in the display.
AUX (option)
The AUX (auxiliary) port can be used to connect for example, an mp3 player. If the player is being charged through a
12-volt socket while it is connect to the AUX port, sound quality may be impaired.
The volume of the external sound source AUX may be different from the volume of the internal sound sources such as
the CD player or the radio. If the external sound source's volume is too high, the quality of the sound may be
impaired .
This can be prevented by adjusting the external sound source's input volume.
1. Select AUX by pressing MODE .
2. Press MENU followed by ENTER.
3. Select AUX INPUT VOLUME in the menu and press ENTER .
4. Turn the TUNING dial or press the left or right arrows keys to adjust the volume.
Volume
Use the volume dial (1) or the buttons in the optional steering wheel keypad to adjust the volume level. The volume
level is also adjusted automatically according to the vehicle's speed, see page 212
for more information on this
function.
211 10 Audio
Audio functions
ProCarManuals.com
Page 185 of 208
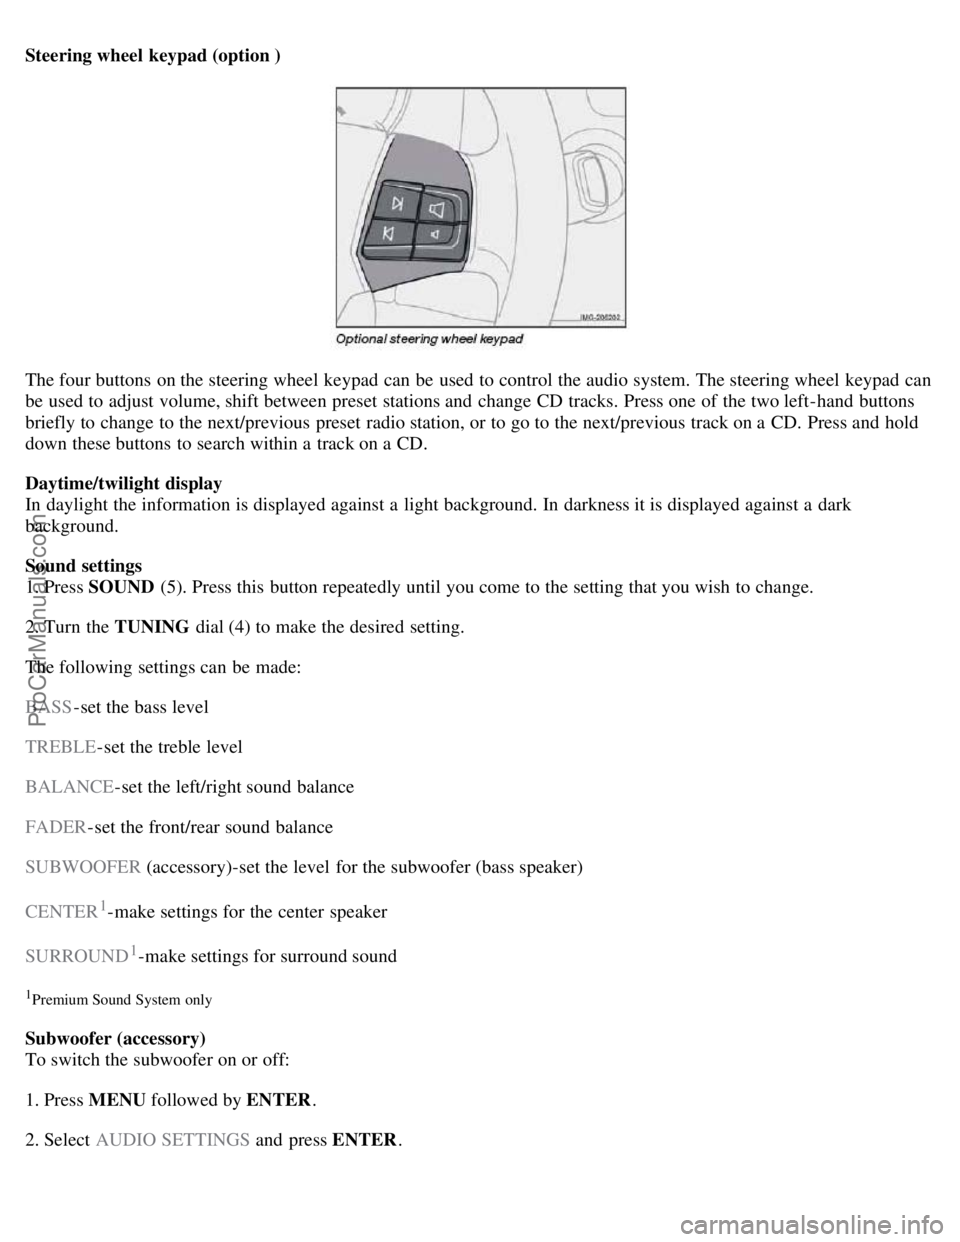
Steering wheel keypad (option )
The four buttons on the steering wheel keypad can be used to control the audio system. The steering wheel keypad can
be used to adjust volume, shift between preset stations and change CD tracks. Press one of the two left-hand buttons
briefly to change to the next/previous preset radio station, or to go to the next/previous track on a CD. Press and hold
down these buttons to search within a track on a CD.
Daytime/twilight display
In daylight the information is displayed against a light background. In darkness it is displayed against a dark
background.
Sound settings
1. Press SOUND (5). Press this button repeatedly until you come to the setting that you wish to change.
2. Turn the TUNING dial (4) to make the desired setting.
The following settings can be made:
BASS -set the bass level
TREBLE -set the treble level
BALANCE -set the left/right sound balance
FADER -set the front/rear sound balance
SUBWOOFER (accessory)-set the level for the subwoofer (bass speaker)
CENTER
1-make settings for the center speaker
SURROUND
1-make settings for surround sound
1Premium Sound System only
Subwoofer (accessory)
To switch the subwoofer on or off:
1. Press MENU followed by ENTER .
2. Select AUDIO SETTINGS and press ENTER.
ProCarManuals.com
Page 187 of 208
Adjust the level with the TUNING dial (4), or use the Up/Down arrows. Additional frequencies can be selected
with the Right/Left arrows.
Save the settings by pressing ENTER or exit without saving by pressing EXIT .
Automatic sound control
The audio system's volume is adjusted automatically according to the speed of the vehicle. There are three settings
available, which determine the level of volume compensation:
LOW
MEDIUM*
HIGH
* Default setting.
To set the automatic sound level:
1. Press MENU followed by ENTER .
2. Select AUDIO SETTINGS in the menu and press ENTER .
3. Select AUTO. VOLUME CONTROL in the menu and press ENTER.
4. Select LOW, MEDIUM , or HIGH and press ENTER .
213 10 Audio
Radio functions
Radio function controls
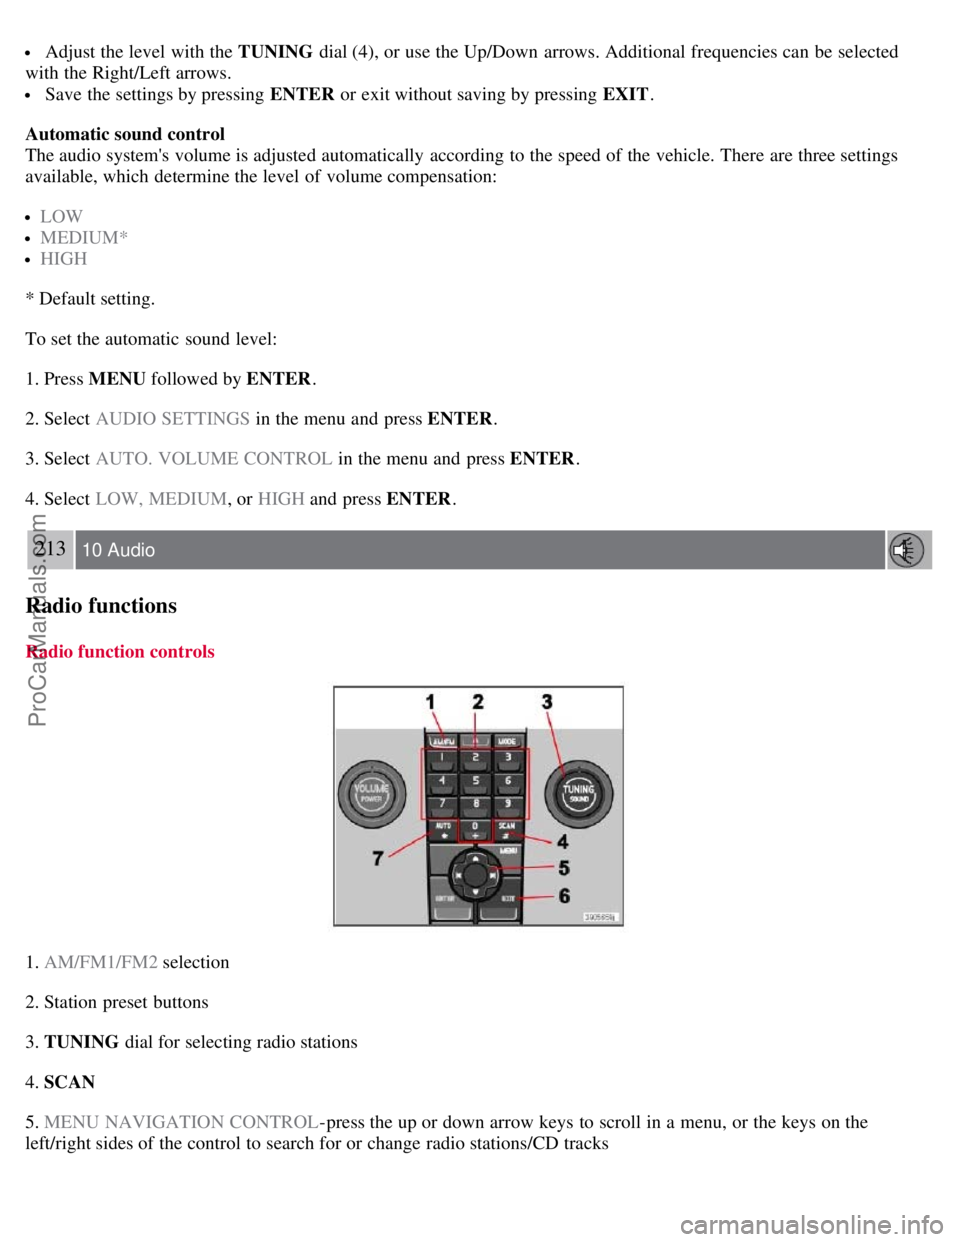
1. AM/FM1/FM2 selection
2. Station preset buttons
3. TUNING dial for selecting radio stations
4. SCAN
5. MENU NAVIGATION CONTROL -press the up or down arrow keys to scroll in a menu, or the keys on the
left/right sides of the control to search for or change radio stations/CD tracks
ProCarManuals.com
Page 188 of 208
6. EXIT-press to cancel a menu selection or a selected function
7. AUTO -search for and store the strongest radio stations in the area in which you are driving
Searching for stations
There are two ways to manually tune a radio station:
1. Turn the TUNING dial (3) to the desired frequency.
2. Press the left or right arrow key on the MENU NAVIGATION CONTROL and hold it down. The radio scans
slowly in the selected direction and will increase the scanning speed after a few seconds. Release the button when the
desired frequency appears in the display.
The frequency can be fine-tuned by short presses on the left/right arrow keys.
Storing preset stations
Manually storing a station
1. Tune to the desired station.
2. Press and hold the preset button under which the station is to be stored. The audio system sound will be interrupted
for a few seconds and STATION STORED will appear in the display.
NOTE
A total of 30 stations can be stored; 10 stations each in AM , FM1 and FM2 .
Automatically storing a station
Pressing AUTO (7) automatically searches for and stores up to ten strong AM or FM stations in a separate memory. If
more than ten stations are found, the ten strongest ones are stored. This function is especially useful in areas in which
you are not familiar with radio stations or their frequencies.
To use the AUTO function:
1. Select a waveband using the AM/FM button (1).
2. Start the search by pressing AUTO until AUTO STORING appears in the display.
When the search is completed, AUTO STORING will no longer be displayed. If there are no stations with sufficient
signal strength, NO AST FOUND is displayed.
The auto-stored stations can be selected using the preset buttons (2).
Press EXIT (6) to terminate the automatic storing function.
When the radio is in auto-store mode, AUTO is shown in the display. AUTO disappears when you return to normal
radio mode, which can be done by briefly pressing AM/FM (1), EXIT (6), or AUTO (7).
214 10 Audio
Radio functions
To return to the Auto-store mode, press the AUTO button briefly and select a stored station by pressing one of the
preset buttons (2).
ProCarManuals.com
Page 190 of 208
NOTE
The digital signals from the Sirius satellites are line-of-sight, which means that physical obstructions such as bridges,
tunnels, etc, may temporarily interfere with signal reception.
Selecting Sirius radio mode
1. Press Power to switch on the audio system (see page 213
for information on the standard radio functions).
2. Press the MODE button repeatedly until Sirius 1 or 2 is displayed.
Activating Sirius radio
1. Tune to a satellite channel that has no audio, which means that the channel is unsubscribed and the text " CALL 888-
539-SIRIUS TO SUBSCRIBE " is displayed (see also "Selecting a channel" below).
2. Call Sirius at 1-888-539-SIRIUS (7474).
3. When asked for the Sirius ID number press AUTO to display this number. It is also possible to retrieve the Sirius ID
from the MENU.
4. " UPDATING SUBSCRIPTION " will be displayed while the subscription is being updated, after which the display
will return to the normal view.
SIRIUS ID
The SIRIUS ID is required when contacting the Sirius Call Center. It is used to activate your account and when making
any account transactions. The SIRIUS ID is sometimes referred to as the Electronic Serial Number (ESN).
Selecting a channel category
1. Select Sirius radio mode as described above.
2. Press ENTER .
3. Use the up/down arrow keys to scroll through the list of categories.
4. Press ENTER or the right arrow key to select a category.
5. Use the left or right arrow keys to select a channel in the currently chosen category.
6. Press ENTER to listen to a channel.
NOTE
The category "All" is default, which enables you to scroll through the entire list of available satellite channels.
The channel categories are automatically updated several times a year. This takes approximately two minutes and
will interrupt normal broadcasting. A message will be displayed while updating is in progress. Information on
channel or feature updates is available at www.sirius.com
.
Selecting a channel
There are three ways of tuning in a channel:
Using the left and right arrow keys
By turning the tuning control
Through direct channel entry
Direct channel entry
ProCarManuals.com