2007 VOLVO S40 display
[x] Cancel search: displayPage 162 of 208

Clean the windshield, windshield wipers, headlights, and taillights
Monthly:
Check cold tire pressure in all tires. Inspect the tires for wear.
Check that engine coolant and other fluid levels are between the indicated "min" and "max" markings.
Clean interior glass surfaces with a glass cleaner and soft paper towels.
Wipe driver information displays with a soft cloth.
Visually inspect battery terminals for corrosion. Corrosion may indicate a loose terminal connector, or a battery near the
end of its useful service life. Consult your Volvo retailer for additional information.
As needed:
Wash the car, including the undercarriage, to reduce wear that can be caused by a buildup of dirt, and corrosion that can
be caused by salt residues.
Clean leaves and twigs from air intake vents at the base of the windshield, and from other places where they may
collect.
NOTE
Complete service information for qualified technicians is available online for purchase or subscription at
www.volvotechinfo.com
.
186 09 Maintenance and servicing
Maintaining your car
Emission inspection readiness
What is an Onboard Diagnostic System (OBD II)?
OBD II is part of your vehicle's computerized engine management system. It stores diagnostic information about your
vehicle's emission controls. It can light the Check Engine light (MIL) if it detects an emission control "fault." A "fault" is a
component or system that is not performing within an expected range. A fault may be permanent or temporary. OBD II
will store a message about any fault.
How Do States Use OBD II for Emission Inspections?
Many states connect a computer directly to a vehicle's OBD II system. The inspector can then read "faults." In some states,
this type of inspection has replaced the tailpipe emission test.
How Can My Vehicle Fail OBD II Emission Inspection ?
Your vehicle can fail OBD II emission inspection for any of the following reasons.
If your Check Engine (MIL) light is lit, your vehicle may fail inspection.
If your vehicle's Check Engine light was lit, but went out without any action on your part, OBD II will still have a
recorded fault. Your vehicle may pass or fail, depending on the inspection practices in your area.
If you had recent service that required disconnecting the battery, OBD II diagnostic information may be incomplete and
"not ready" for inspection. A vehicle that is not ready may fail inspection.
How Can I Prepare for My Next OBD II Emission Inspection ?
If your Check Engine (MIL) light is lit - or was lit but went out without service, have your vehicle diagnosed and, if
necessary, serviced by a qualified Volvo technician.
If you recently had service for a lit Check Engine light, or if you had service that required disconnecting the battery, a
period of driving is necessary to bring the OBD II system to "ready" for inspection. A half-hour trip of mixed stop-and -
go/highway driving is typically needed to allow OBD II to reach readiness. Your Volvo retailer can provide you with more
ProCarManuals.com
Page 166 of 208

NOTE
Volvo uses different systems to indicate a low oil level or pressure. Some models have an oil pressure sensor, in which
case a warning symbol (see page 53
) is used to indicate low oil pressure. Other models have an oil level sensor, in which
case the driver is alerted by the warning symbol in the center of the instrument panel and a text in the information
display. Some models use both systems. Contact an authorized Volvo retailer for more information.
Washer fluid
The washer fluid reservoir is located in the engine compartment and holds approximately 6.8 US qts (6.5 liters). During
cold weather, the reservoir should be filled with windshield washer solvent containing antifreeze.
Coolant
Normally, the coolant does not need to be changed. If the system must be drained, consult your Volvo retailer.
NOTE
Do not top off with water only. This reduces the rust-protective and antifreeze qualities of the coolant and has a lower
boiling point. It can also cause damage to the cooling system if it should freeze. Top off with Volvo Genuine
Coolant/Antifreeze only (a 50/50 mix of water and antifreeze).
191 09 Maintenance and servicing
Fluids
CAUTION
ProCarManuals.com
Page 177 of 208
6. Press the wiring connector back into position.
7. Press the bulb holder into place and reinstall the cover.
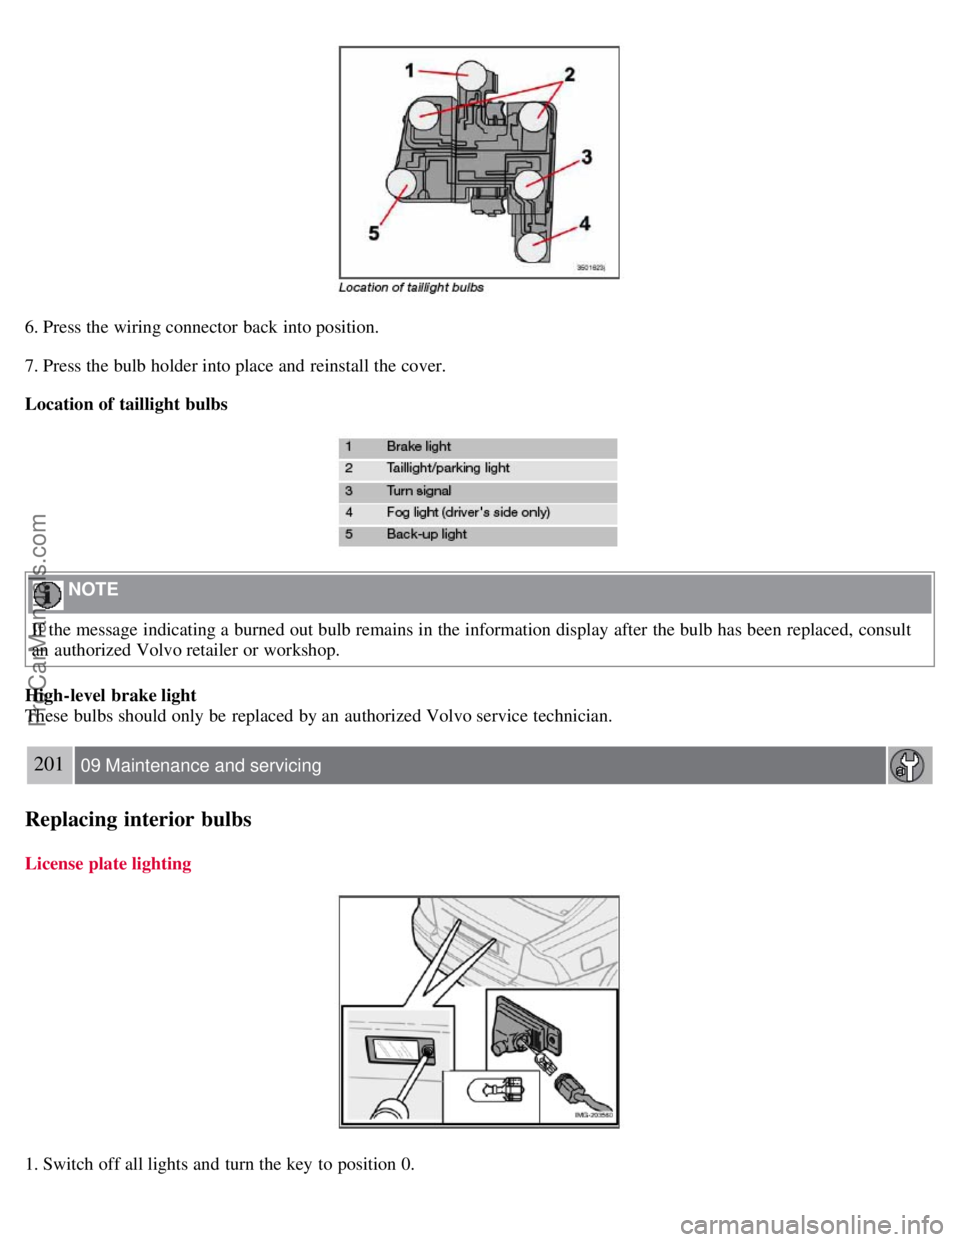
Location of taillight bulbs
NOTE
If the message indicating a burned out bulb remains in the information display after the bulb has been replaced, consult
an authorized Volvo retailer or workshop.
High-level brake light
These bulbs should only be replaced by an authorized Volvo service technician.
201 09 Maintenance and servicing
Replacing interior bulbs
License plate lighting
1. Switch off all lights and turn the key to position 0.
ProCarManuals.com
Page 184 of 208
3. MODE - select a sound source
4. TUNING dial
5. SOUND button
Selecting a sound source
Press AM/FM (2) repeatedly to toggle between FM1, FM2, and AM.
Press MODE (3) repeatedly to toggle between the CD player and the optional external sound source AUX or the
optional Sirius satellite radio.
The currently selected sound source will be shown in the display.
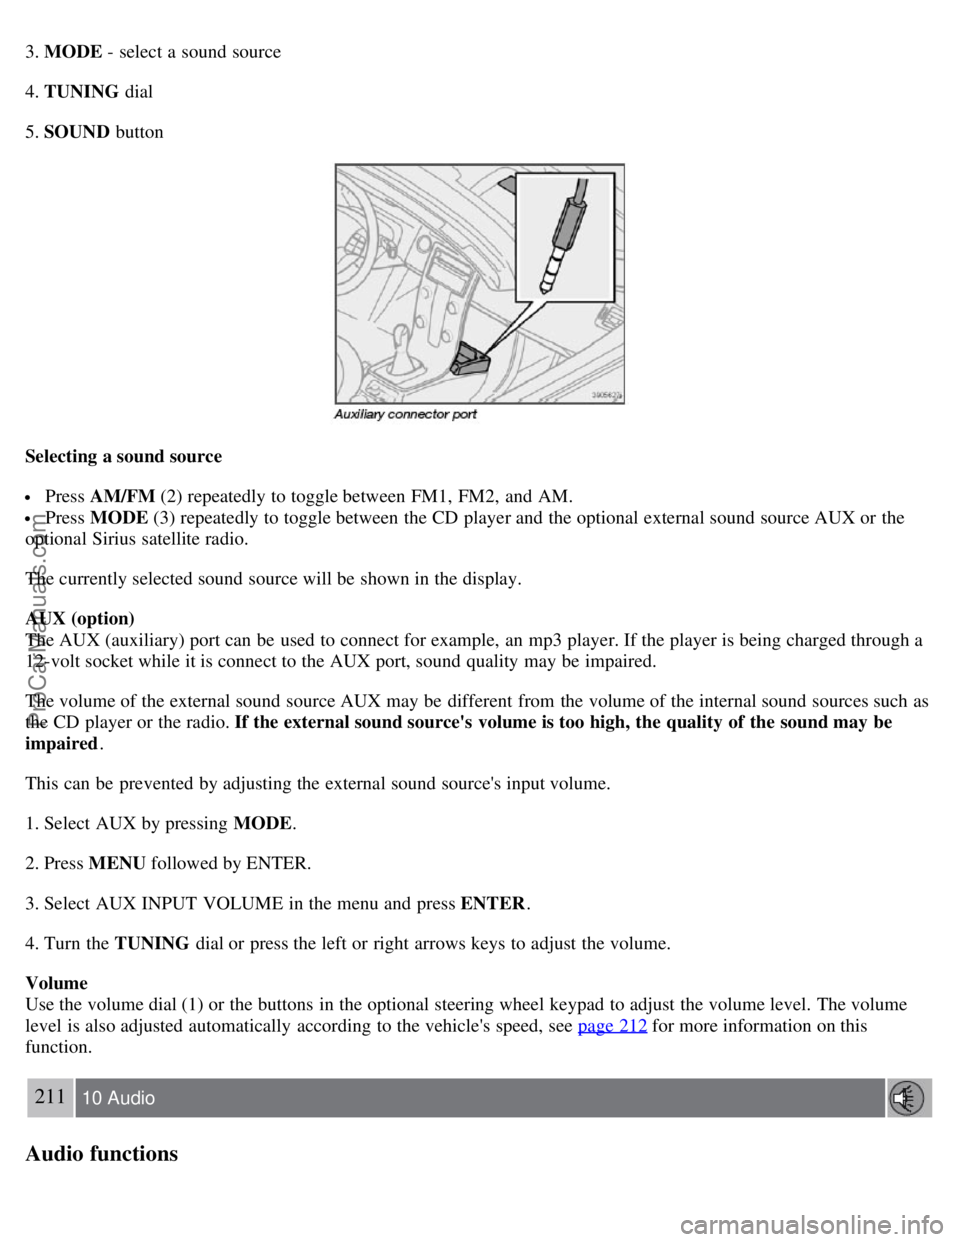
AUX (option)
The AUX (auxiliary) port can be used to connect for example, an mp3 player. If the player is being charged through a
12-volt socket while it is connect to the AUX port, sound quality may be impaired.
The volume of the external sound source AUX may be different from the volume of the internal sound sources such as
the CD player or the radio. If the external sound source's volume is too high, the quality of the sound may be
impaired .
This can be prevented by adjusting the external sound source's input volume.
1. Select AUX by pressing MODE .
2. Press MENU followed by ENTER.
3. Select AUX INPUT VOLUME in the menu and press ENTER .
4. Turn the TUNING dial or press the left or right arrows keys to adjust the volume.
Volume
Use the volume dial (1) or the buttons in the optional steering wheel keypad to adjust the volume level. The volume
level is also adjusted automatically according to the vehicle's speed, see page 212
for more information on this
function.
211 10 Audio
Audio functions
ProCarManuals.com
Page 185 of 208
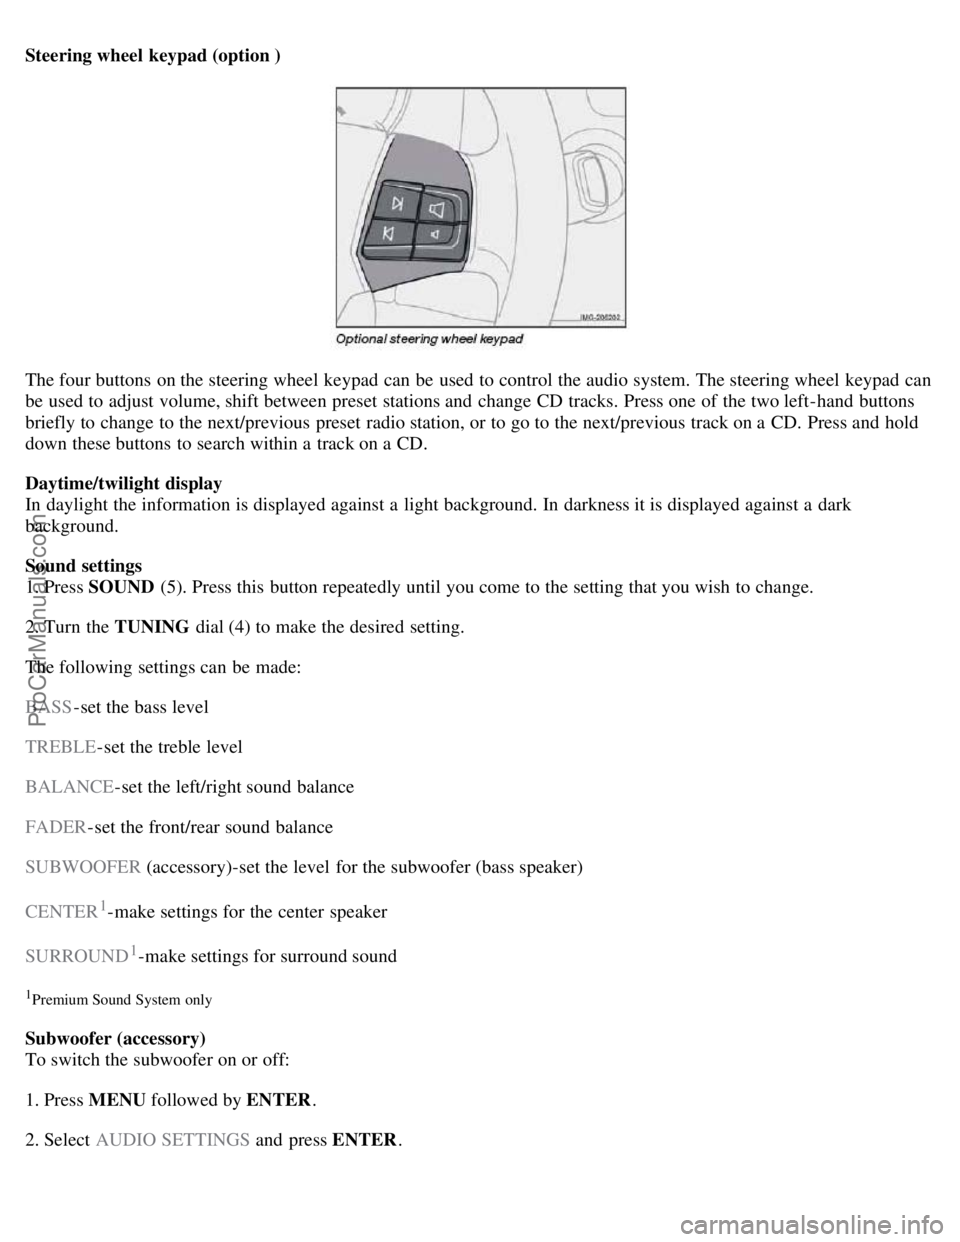
Steering wheel keypad (option )
The four buttons on the steering wheel keypad can be used to control the audio system. The steering wheel keypad can
be used to adjust volume, shift between preset stations and change CD tracks. Press one of the two left-hand buttons
briefly to change to the next/previous preset radio station, or to go to the next/previous track on a CD. Press and hold
down these buttons to search within a track on a CD.
Daytime/twilight display
In daylight the information is displayed against a light background. In darkness it is displayed against a dark
background.
Sound settings
1. Press SOUND (5). Press this button repeatedly until you come to the setting that you wish to change.
2. Turn the TUNING dial (4) to make the desired setting.
The following settings can be made:
BASS -set the bass level
TREBLE -set the treble level
BALANCE -set the left/right sound balance
FADER -set the front/rear sound balance
SUBWOOFER (accessory)-set the level for the subwoofer (bass speaker)
CENTER
1-make settings for the center speaker
SURROUND
1-make settings for surround sound
1Premium Sound System only
Subwoofer (accessory)
To switch the subwoofer on or off:
1. Press MENU followed by ENTER .
2. Select AUDIO SETTINGS and press ENTER.
ProCarManuals.com
Page 186 of 208
3. Select SUBWOOFER and press ENTER.
Surround sound
Surround sound settings are used to balance sound levels throughout the vehicle. Surround settings for the various
sound sources are made separately.
NOTE
Dolby Surround Pro Logic II is only available on the Premium Sound system.
When listening to FM radio stations, Dolby Surround Pro Logic II functions best in areas with strong reception. If
reception is weak, selecting 2 or 3-channel stereo may provide better sound quality.
The Dolby symbol will be appear in the display when Dolby Pro Logic II is activated.
There are three alternative settings:
Pro Logic II
3-channel
212 10 Audio
Audio functions
Off (normal 2-channel stereo)
Activating/deactivating Surround sound
1. Press MENU followed by ENTER .
2. Select AUDIO SETTINGS in the menu and press ENTER .
3. Select Surround FM/AM/CD/AUX and press ENTER.
4. Select PRO LOGIC II , 3-channel stereo or OFF and press ENTER.
Equalizer Front/Rear
This function is used to fine-tune the sound level for different frequencies separately.
NOTE
This function is only available on certain sound systems.
To adjust the equalizer settings:
1. Press MENU followed by ENTER .
2. Select AUDIO SETTINGS in the menu and press ENTER .
3. Select EQUALIZER FRONT/REAR and press ENTER.
The column in the display indicates the sound level for the current frequency.
ProCarManuals.com
Page 188 of 208
6. EXIT-press to cancel a menu selection or a selected function
7. AUTO -search for and store the strongest radio stations in the area in which you are driving
Searching for stations
There are two ways to manually tune a radio station:
1. Turn the TUNING dial (3) to the desired frequency.
2. Press the left or right arrow key on the MENU NAVIGATION CONTROL and hold it down. The radio scans
slowly in the selected direction and will increase the scanning speed after a few seconds. Release the button when the
desired frequency appears in the display.
The frequency can be fine-tuned by short presses on the left/right arrow keys.
Storing preset stations
Manually storing a station
1. Tune to the desired station.
2. Press and hold the preset button under which the station is to be stored. The audio system sound will be interrupted
for a few seconds and STATION STORED will appear in the display.
NOTE
A total of 30 stations can be stored; 10 stations each in AM , FM1 and FM2 .
Automatically storing a station
Pressing AUTO (7) automatically searches for and stores up to ten strong AM or FM stations in a separate memory. If
more than ten stations are found, the ten strongest ones are stored. This function is especially useful in areas in which
you are not familiar with radio stations or their frequencies.
To use the AUTO function:
1. Select a waveband using the AM/FM button (1).
2. Start the search by pressing AUTO until AUTO STORING appears in the display.
When the search is completed, AUTO STORING will no longer be displayed. If there are no stations with sufficient
signal strength, NO AST FOUND is displayed.
The auto-stored stations can be selected using the preset buttons (2).
Press EXIT (6) to terminate the automatic storing function.
When the radio is in auto-store mode, AUTO is shown in the display. AUTO disappears when you return to normal
radio mode, which can be done by briefly pressing AM/FM (1), EXIT (6), or AUTO (7).
214 10 Audio
Radio functions
To return to the Auto-store mode, press the AUTO button briefly and select a stored station by pressing one of the
preset buttons (2).
ProCarManuals.com
Page 189 of 208
Saving auto-stored stations in the preset memory
An auto-stored station can be saved in the memory for manually preset stations.
1. Press AUTO (7) briefly.
2. Auto is displayed.
3. Press one of the preset buttons (2) under which the station is to be stored. Hold down the button until STATION
STORED is displayed.
The radio will then exit auto-store mode and the stored station can be selected by pressing the preset button.
Scanning
SCAN (4) automatically searches through the selected waveband for strong AM or FM stations. When the radio finds a
station, that station will be played for approximately 8 seconds, after which scanning resumes.
Activating/deactivating SCAN
1. Select radio mode using the AM/FM button (2).
2. Press SCAN to activate the function. SCAN is shown in the display.
3. Press the SCAN or EXIT button to deactivate the scan function and listen to the selected station.
Storing a station found with SCAN
A station can be stored as a preset while the SCAN function is activated.
Press one of the preset buttons (2) under which the station is to be stored. Hold down the button until STATION
STORED is displayed.
The SCAN function will be deactivated and the station can be selected by pressing the preset button.
Radio text
Certain stations broadcast program information, which can be shown in the display.
To start this function:
1. Select FM1 or FM2 and press the MENU button.
2. Press ENTER .
3. Select RADIOTEXT in the menu and press ENTER .
To deactivate this function, select RADIOTEXT again and press ENTER.
215 10 Audio
Sirius satellite radio (option or retailer-installed accessory)
Listening to satellite radio
The Sirius satellite system consists of a number of high elevation satellites in geosynchronous orbit.
ProCarManuals.com