Page 152 of 208
suspension problem. Each tire, if left in place, tells a story about the suspension. Tire rotation, on the other hand, could
make suspension wear harder to detect. Early detection is very important, because suspension problems can make tire
wear worse.
If you do rotate your tires...
Please follow the tire manufacturer's recommendations, as outlined in the tire manufacturers tire warranty pamphlet.
170 07 Wheels and tires
Changing a wheel
Changing a wheel
The spare tire, jack, and crank are located under the carpet on the floor of the cargo area.
To change a tire:
1. Engage the parking brake.
2. Put the gear selector in Park (P).
3. Block the wheels that are on the ground with wooden blocks or large stones.
4. Remove the wheel cap (where applicable) using the lug wrench in the tool bag.
5. With the car still on the ground, use the lug wrench to loosen the wheel nuts 1/2 - 1 turn by exerting downward
pressure. Turn the nuts counterclockwise to loosen.
ProCarManuals.com
Page 153 of 208

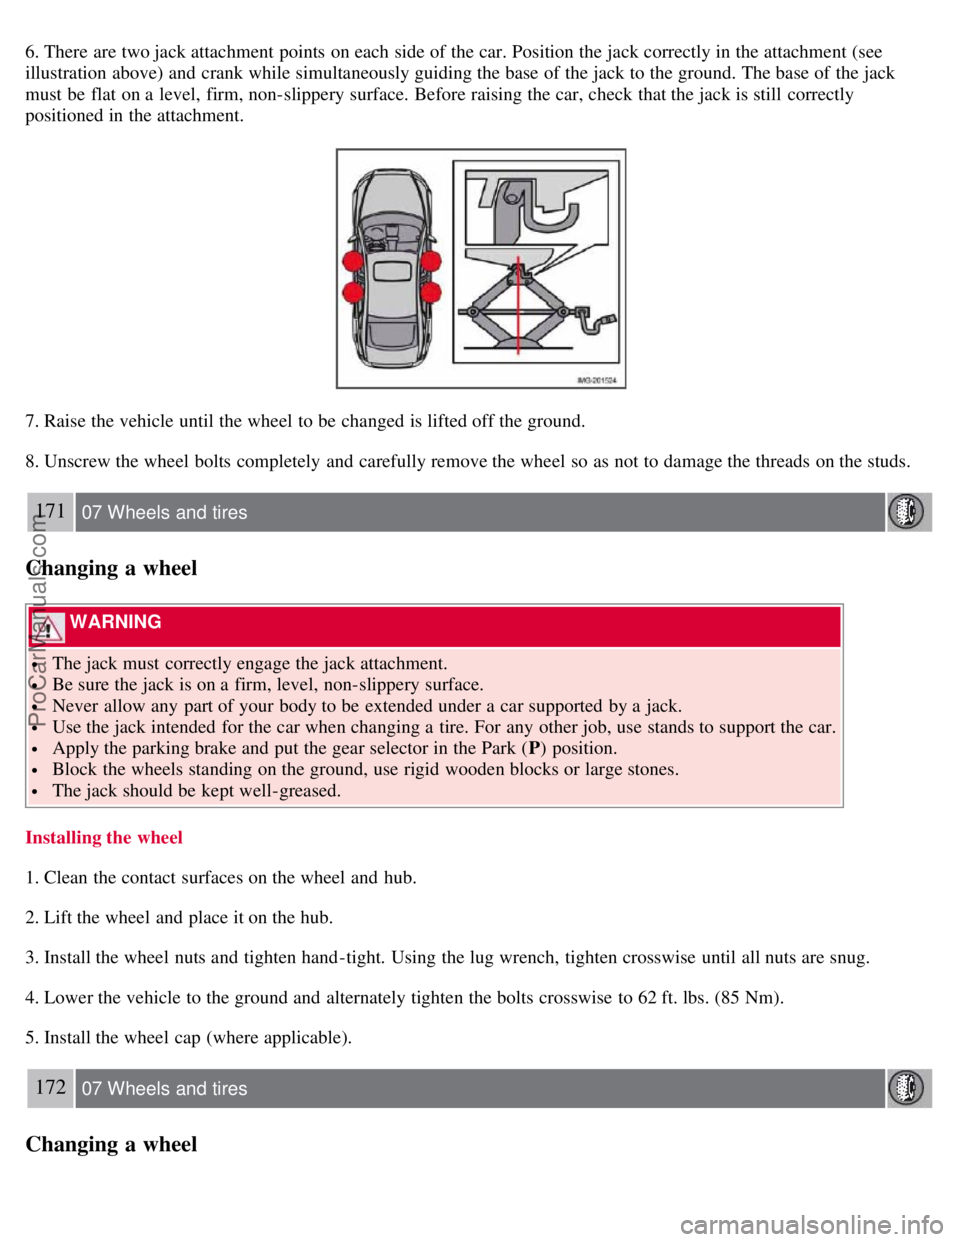
6. There are two jack attachment points on each side of the car. Position the jack correctly in the attachment (see
illustration above) and crank while simultaneously guiding the base of the jack to the ground. The base of the jack
must be flat on a level, firm, non-slippery surface. Before raising the car, check that the jack is still correctly
positioned in the attachment.
7. Raise the vehicle until the wheel to be changed is lifted off the ground.
8. Unscrew the wheel bolts completely and carefully remove the wheel so as not to damage the threads on the studs.
171 07 Wheels and tires
Changing a wheel
WARNING
The jack must correctly engage the jack attachment.
Be sure the jack is on a firm, level, non-slippery surface.
Never allow any part of your body to be extended under a car supported by a jack.
Use the jack intended for the car when changing a tire. For any other job, use stands to support the car.
Apply the parking brake and put the gear selector in the Park (P) position.
Block the wheels standing on the ground, use rigid wooden blocks or large stones.
The jack should be kept well-greased.
Installing the wheel
1. Clean the contact surfaces on the wheel and hub.
2. Lift the wheel and place it on the hub.
3. Install the wheel nuts and tighten hand -tight. Using the lug wrench, tighten crosswise until all nuts are snug.
4. Lower the vehicle to the ground and alternately tighten the bolts crosswise to 62 ft. lbs. (85 Nm).
5. Install the wheel cap (where applicable).
172 07 Wheels and tires
Changing a wheel
ProCarManuals.com
Page 156 of 208

Exterior plastic components
Cleaning exterior plastic components should be done with a cleaning agent specially designed for this purpose.
Solvents or stain removers should not be used. Consult your Volvo retailer.
NOTE
When washing the car, remember to remove dirt from the drain holes in the doors and sills.
NOTE
During high pressure washing, the spray mouthpiece must never be closer to the vehicle than 13" (30 cm). Do not
spray into the locks.
When washing or steam cleaning the engine, avoid spraying water or steam directly on the electrical components
or toward the rear side of the engine. Special moonroof cautions:
Always close the moonroof and sun shade before washing your vehicle.
Never use abrasive cleaning agents on the moonroof.
Never use wax on the rubber seals around the moonroof
Automatic washing - simple and quick
We do NOT recommend washing your car in an automatic wash during the first six months (because the paint will not
have hardened sufficiently).
An automatic wash is a simple and quick way to clean your car, but it is worth remembering that it may not be as
thorough as when you yourself go over the car with sponge and water. Keeping the underbody clean is most important,
especially in the winter. Some
177 08 Car care
Washing and cleaning the car
automatic washers do not have facilities for washing the underbody.
CAUTION
Before driving into an automatic car wash, turn off the optional rain sensor to avoid damaging the windshield
wipers.
Make sure that side view mirrors, auxiliary lamps, etc, are secure, and that any antenna(s) are retracted or
removed. Otherwise there is risk of the machine dislodging them.
Chromed wheels : Clean chrome-plated wheels using the same detergents used for the body of the vehicle.
Aggressive wheel-cleaning agents can permanently stain chrome-plated wheels
WARNING
When the car is driven immediately after being washed, apply the brakes several times in order to remove any
moisture from the brake linings.
Engine cleaning agents should not be used when the engine is warm. This constitutes a fire risk.
Exterior lighting
Condensation may form temporarily on the inside of the lenses of exterior lights such as headlights, fog lights, or
taillights. This is normal and the lights are designed to withstand moisture. Normally, condensation will dissipate after
the lights have been on for a short time.
ProCarManuals.com
Page 163 of 208
information on planning a trip.
Maintain your vehicle in accordance with your vehicle's maintenance schedule.
187 09 Maintenance and servicing
Hood and engine compartment
Opening the hood
To open the hood:
1. Pull the lever located under the left side of the dash to release the hood lock.
2. Lift the hood slightly.
3. Press up the release control located under the front edge of the hood (at the center) up to the right, and lift the hood.
WARNING
Check that the hood locks engage properly when closed.
188 09 Maintenance and servicing
Hood and engine compartment
Engine compartment
1. Cooling system expansion tank
ProCarManuals.com
Page 174 of 208
High beam bulb
1. Open the hood.
2. Remove the headlight housing.
3. Turn the bulb holder counterclockwise and pull it out. Replace the bulb. Note how the bulb holder is positioned.
4. Reinstall the bulb holder. It can only be installed in one position.
5. Reinstall the headlight housing.
Parking light bulb
1. Pull out the bulb holder with a pair of pliers. The bulb holder should not be pulled out by the wire.
2. Replace the bulb.
3. Press the bulb holder back into place. It can only be installed in one position.
198 09 Maintenance and servicing
Replacing front bulbs
Turn signal
ProCarManuals.com
Page 175 of 208
1. Turn the bulb holder counterclockwise and remove it.
2. Remove the bulb from the holder by pressing it in and twisting it counterclockwise.
3. Insert a new bulb and reinstall the bulb holder in the headlight housing.
Side marker light
1. Turn the bulb holder counterclockwise, pull it out, and replace the bulb.
2. Reinstall the bulb holder. It can only be installed in one position.
Front fog light (option)
1. Switch off all lights and turn the key to position 0.
2. Remove the panel around the fog light housing.
3. Unscrew both torx screws in the fog light housing and remove it.
ProCarManuals.com
Page 176 of 208
4. Disconnect the connector from the bulb.
5. Turn the bulb counterclockwise and pull it out.
6. Install the new bulb in its seat and turn it clockwise.
7. Reconnect the connector to the bulb.
199 09 Maintenance and servicing
Replacing front bulbs
8. Secure the fog light housing with the screws and press the panel back into place.
200 09 Maintenance and servicing
Replacing taillight bulbs
Removing the taillight bulb holder
All bulbs in the taillight cluster can be replaced from the cargo area. To access the bulb holders:
1. Switch off all lights and turn the key to position 0.
2. Remove the covers in the left/right panels to access the bulb holders.
3. Disconnect the wiring connector from the affected bulb holder.
4. Press the catches together and pull out the bulb holder.
5. Replace the defective bulb.
ProCarManuals.com
Page 178 of 208

2. Remove the screw with a screw driver.
3. Detach the entire bulb housing and carefully pull it out. Turn the connector counterclockwise and pull out the bulb.
4. Replace the bulb.
5. Reinstall the connector and turn it clockwise.
6. Reinstall the entire bulb housing and screw it into place.
Footwell lighting
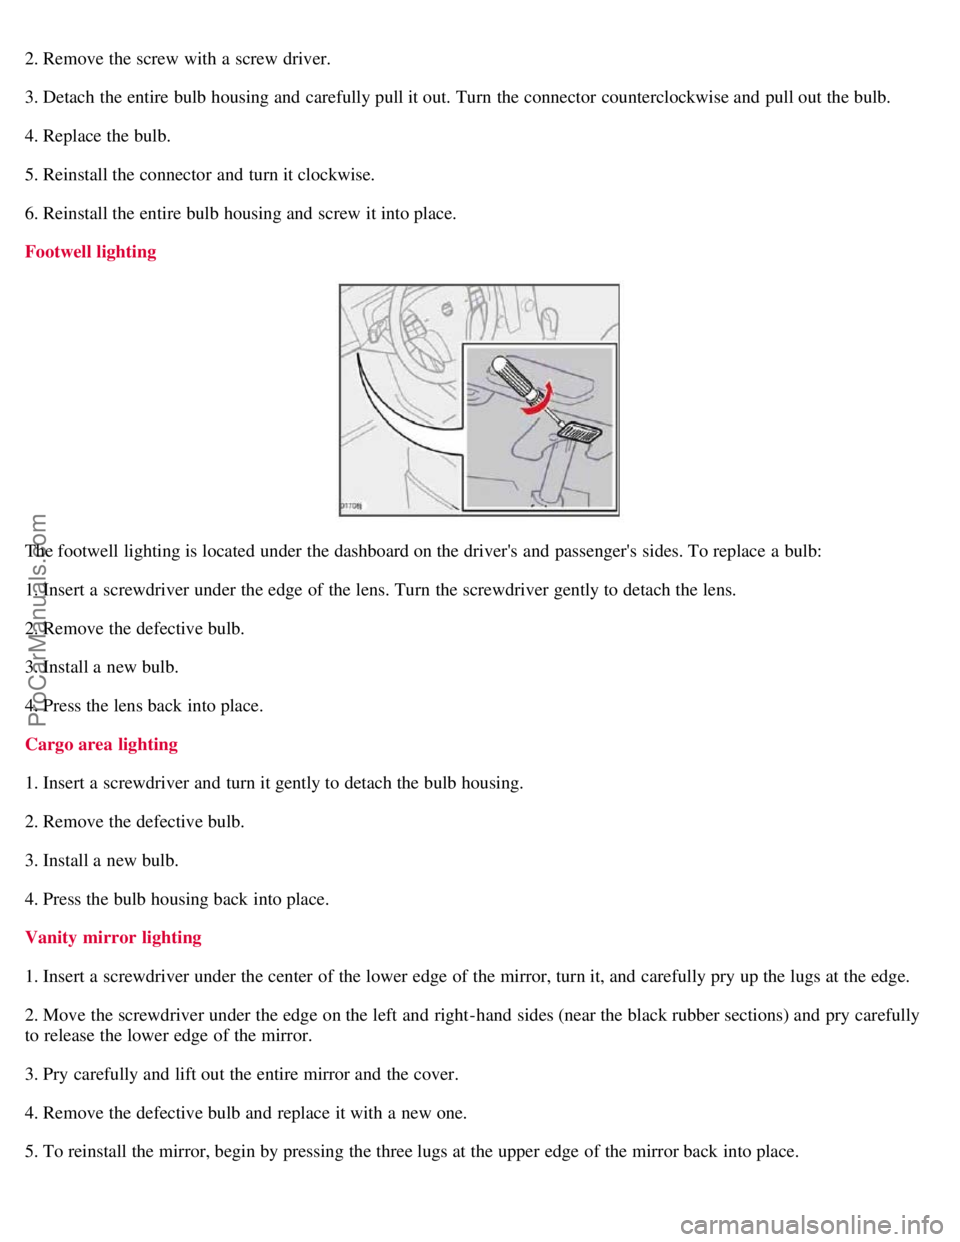
The footwell lighting is located under the dashboard on the driver's and passenger's sides. To replace a bulb:
1. Insert a screwdriver under the edge of the lens. Turn the screwdriver gently to detach the lens.
2. Remove the defective bulb.
3. Install a new bulb.
4. Press the lens back into place.
Cargo area lighting
1. Insert a screwdriver and turn it gently to detach the bulb housing.
2. Remove the defective bulb.
3. Install a new bulb.
4. Press the bulb housing back into place.
Vanity mirror lighting
1. Insert a screwdriver under the center of the lower edge of the mirror, turn it, and carefully pry up the lugs at the edge.
2. Move the screwdriver under the edge on the left and right-hand sides (near the black rubber sections) and pry carefully
to release the lower edge of the mirror.
3. Pry carefully and lift out the entire mirror and the cover.
4. Remove the defective bulb and replace it with a new one.
5. To reinstall the mirror, begin by pressing the three lugs at the upper edge of the mirror back into place.
ProCarManuals.com