2007 VOLKSWAGEN JETTA parking light
[x] Cancel search: parking lightPage 249 of 477
Booklet 3.1 Controls and Equipm ent
Lights and a clear view
Light s
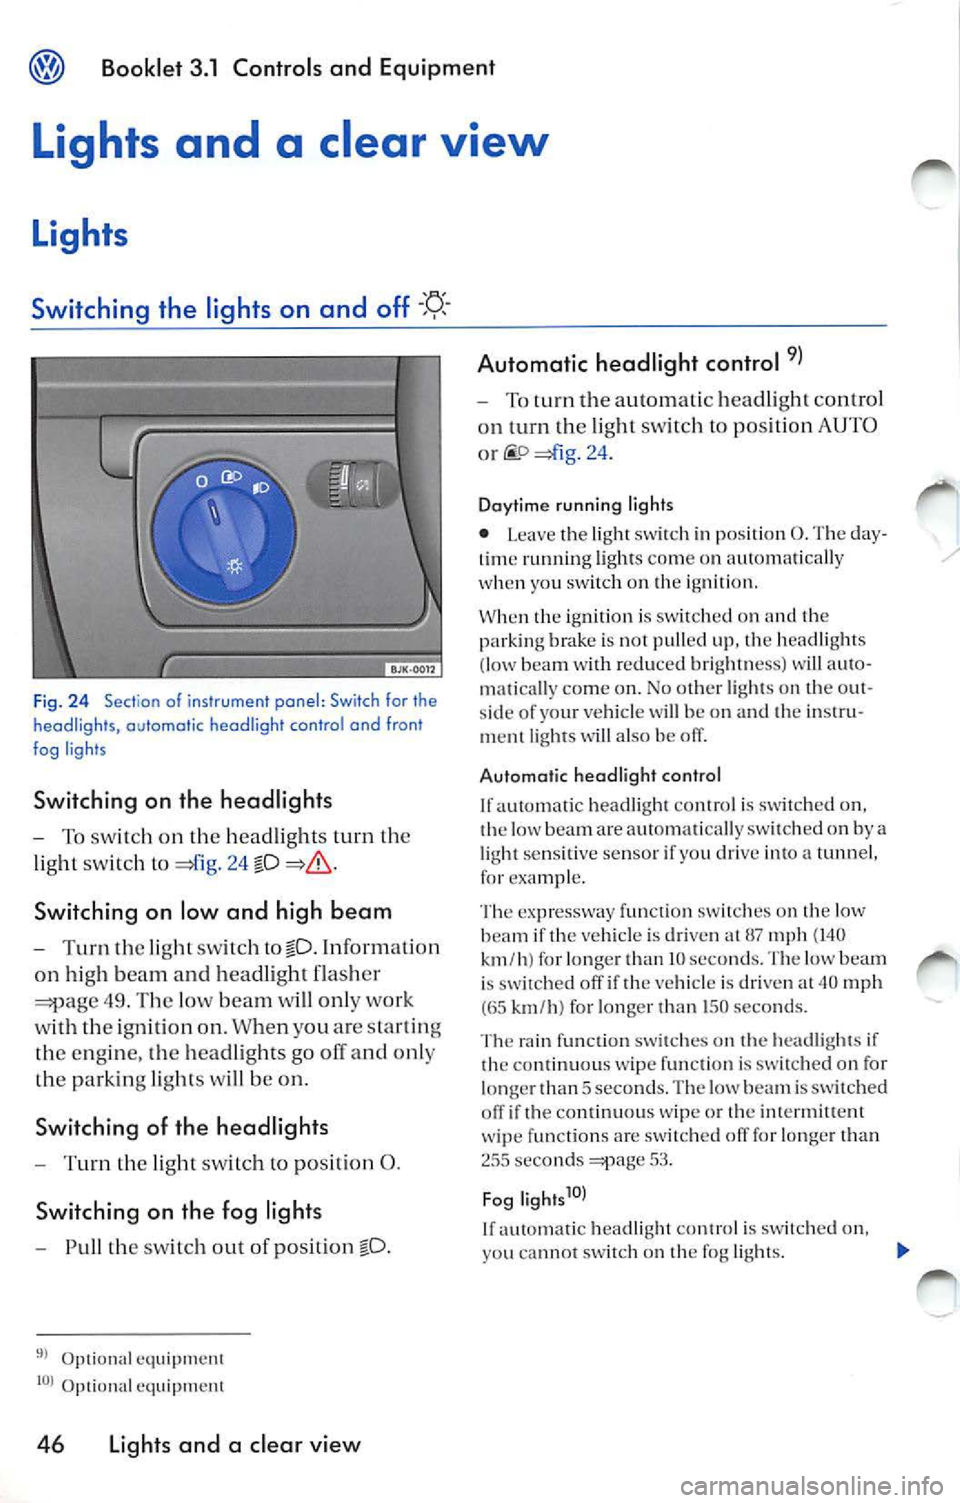
Switching the lights on and off
Fig. 24 Sectio n of i nstrument panel : Switch for the
headligh ts, automatic headlight contr o l and fron t
fog ligh ts
S w itching on the h eadl ights
T o sw itch on the head lig hts turn the
lig ht sw it c h to
24 fD
Switching on low and high b eam
T urn the lig ht sw itch tofD. Informati on
on hig h bea m and head light flas her
49 . Th e low beam will only wor k
with the ignition on. When you are startin g
th e engine, the hea dlights go ofT and only
the park in g lights will be on.
Switchin g of th e he adli ght s
Turn the ligh t sw itc h to posit ion 0.
S witchin g on th e fo g light s
Pull the switch ou t of po sit ion fD.
Optional equipm ent
Optiona l e quipment
46 Li ght s a nd a cl ea r vi ew Automatic headlight cont
rol
To turn the au tomatic headl ig ht control
o n tu rn th e lig ht sw itch to posit ion
AUTO
o r =)fig . 24 .
Da ytim e runni ng l ig hts
• L eave the light swi1ch in posit ion 0. The day
t im e ru nning ligh ts come on automa tica lly
when you switch o n the ignilion.
When 1he ignition is sw i1che
( low beam with r edu ced bri gh 111e ss) will au 10-
111a 1ica lly come on. No
lighls on the o ut
s ide of your vehicle will be on and 1h e in s1ru
men1 ligh ts will also be off.
Automatic hea dli g ht co ntrol
lfau10ma1ic headligh 1 co n1r ol is swi1c hed on,
th e low beam are auloma tica lly sw ilched on by
light sens it ive senso r if you drive in to tunne l,
for exam ple.
T he expre ssway func1io n swi 1c h es o n 1h e lo w
beam if 1he vehicle is dri ven al
mph (140 km /h ) for lon ger 1han IO seco nds. T he low beam
i s swi1ched off if 1he vehicle is dri ven 40 mph (65 km /h ) for lo n ge r th an 150 seco nds.
Th e rain fu nction switch es on the hea dlig ht s if
1h e
wipe function is swi tc h ed on for
long er 1h an 5 sec ond s. The low beam i s switched
o ff if th e co n1inuou s wipe o r 1he in1ermitt ent
w ip e funct ions are sw i1ch ecl
for lo nge r 1han seco nds 53.
Fog lig ht s
If a u1omatic hea dli gh 1 con ! rol is sw i1c hed on,
yo u canno t sw i1c h on 1h e fog ligh1 s.
Page 302 of 477

Booklet 3.1 Controls and Equipment
Applies lo vehicles: with on oulomolic transmission
Selector lever lock
Releasing the selector lever lock
-Depress and hold th e brake pedal and
pres s the release button in the selector
le ver handle at the same time.
The selecto r lever is lo cked whe n:
•
se lec to r lever is in P.
Applies to vehicles: with 6 -speed oulomolic transmission
• The selector lever is in N for more than about l second and you are driving slowe r than 3 mph (5 km/h}.
The selec tor lever lock will not enga ge if yo u
qu ickly move the selecto r leve r through p osition
N whe n shift ing between
and D. This makes it
p ossibl e, to "rock" the vehicl e backward and for
ward if it is stuck in snow or
Driving with an automatic transmission
The transmission upshifts and down.shifts automatically.
Fig. 80 Section of center console : selector lever
with lock button
Starting the engine
-Start the engine with the selector leve r
in po siti on P or N . Fo r m ore in formation
,iage95 .
Driving
-Dep ress and hold the brake pedal.
- Relea se the parkin g brake.
- Press and hold the release
in the
se lec to r leve r handl e.
- Move the selecto r leve r to
R (R everse), D
(D riv e) or S (Spo rt}. -
Relea se the lo ck button and wait for the
tr ansmission to en gage the gear (a s light
movement can be felt).
- Release the brake and depress the ac
Stopping briefly
-Always use the foot brak e to pr eve nt th e
ve hicl e fro m cre ep ing forward, for ex
amp le at a
lig ht. You do not need to
mo ve the selec tor leve r to
P (Park) or N
(Ne utral).
- Do not dep ress the acce le rator.
Parking
- Depress and hold the brake ped al until
th e ve hicle co mes to a full
- Apply the parking brake
104.
-Move the se lec tor lever to P with the re
l ease button press ed.
Driving down hills
- Se lect the "T iptroni c position.
- Pull th e leve r to th e"-" minus pos ition
to clo wnsh if t. ._
Driving 99
Page 307 of 477
@ Booklet 3.1 Controls and Equipment
Parking brake
Applying the parking brake
pa rking brake can b e use d to prevent the uehicle from moving
ally .
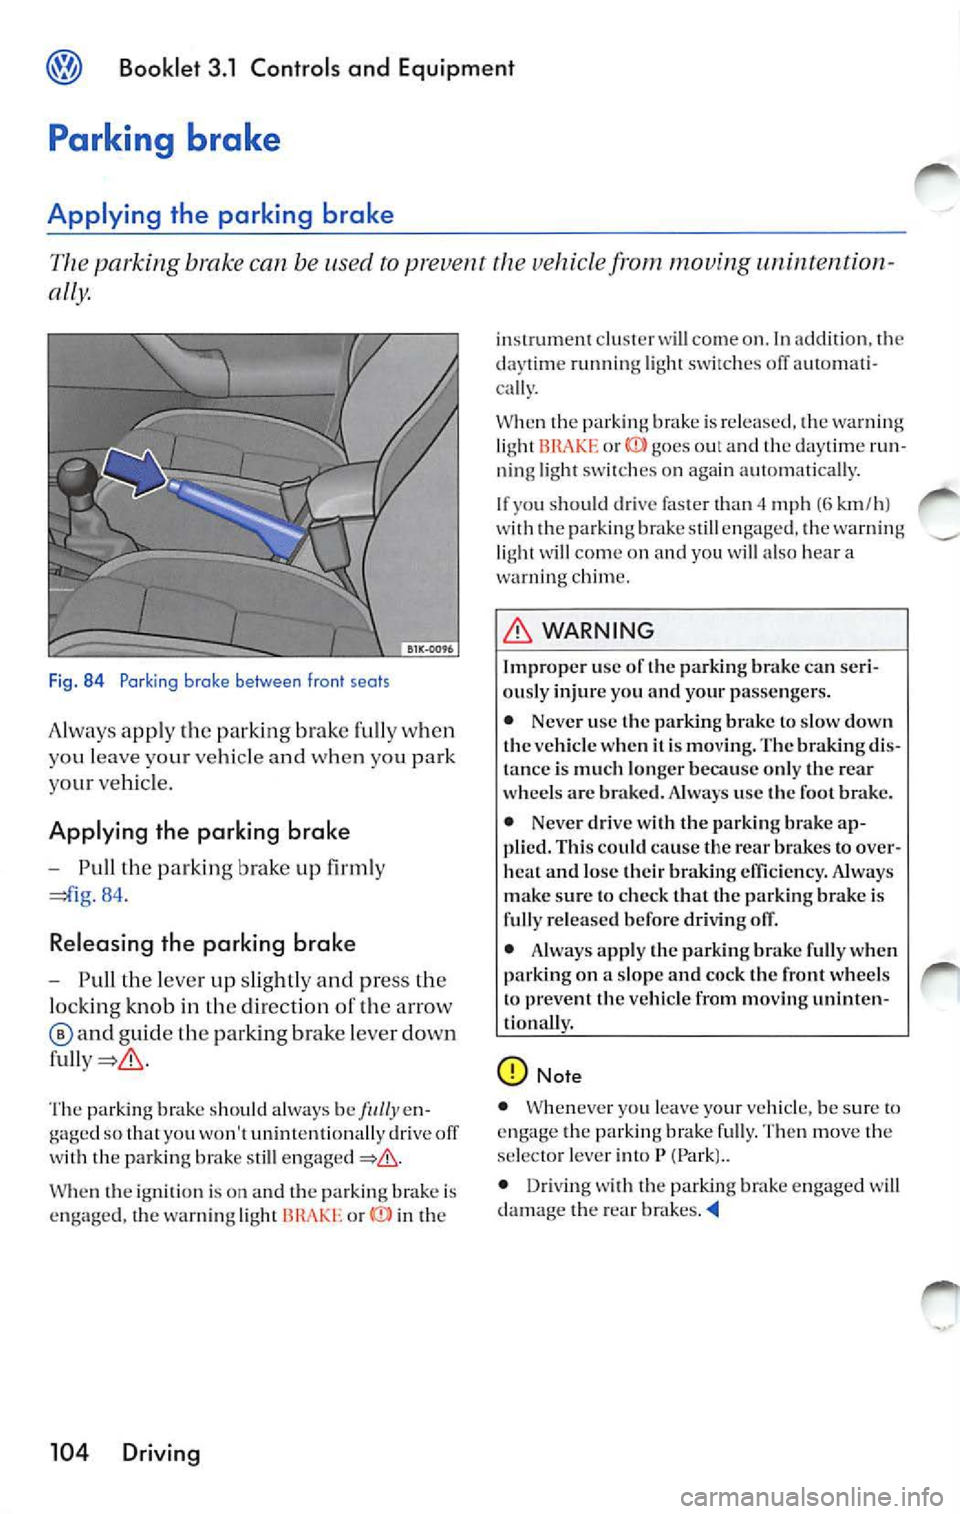
Fig . 84 Parking brake between front seats
Always app ly th e par kin g brak e fu lly w hen
you le ave your ve hicle w hen yo u pa rk
yo ur ve hicle.
Applying the parking brake
- Pull the parking brak e up firm ly
84 .
Rele a sing th e parking bra ke
-Pull the leve r up slig htly and pre ss the
lo cki ng kn ob in the dir ec tion of the arrow
a nd guide th e park ing brak e leve r down
T he park ing bra ke sh ou ld always be /111/ yen
gage d so that you won' t u ni nt enti ona lly dr ive off
wit h th e pa rk in g brake sti ll
W hen th e ignition is on t h e parking brake is
e n gaged, th e wa rnin g ligh t or in th e
104 Driving
instrum ent clust er w ill co me o n. In addit ion. the
daytime running light swi tch es olT a utomati
ca lly.
When the park ing brake is re leased, th e wa rning
li g h t
or goes o ut and the da ytim e run
ning ligh t sw itch es on again automatica lly.
If yo u shou ld dr ive faste r than 4 mph (6 k m/h )
w ith th e parkin g brak e still engaged, th e wa rning
lig ht will co me on
you w ill also hea r a
wa rnin g chim e.
WARNING
Imprope r use of the parki ng brak e ca n se ri
ou sly in jur e yo u and yo ur passe ngers.
• Never use th e parki ng brake to slow down
t h e veh icle when it is mov ing. T he braking dis
tanc e is mu ch l on ge r because on ly th e rea r
whee ls arc brak ed . A lways use the foo t brak e.
• Neve r drive with th e parki ng bra ke ap
pl ied. This cou ld cause t he rear brakes to o ver
h eat and l ose their b raking e fficie ncy . A lways
m ake sure to ch eck th at the parki ng bra ke is
f ull y re lea sed befo re dri ving olT.
• Alwa ys app ly th e par king brake f ully w hen
p arki ng o n a s lope and coc k the fron t w hee ls
to prevent t he ve hicle fro m movin g unin ten
ti onall y.
N ote
• Wheneve r yo u lea ve you r ve hicle, be sur e to
e ngage th e park in g b rake full y. Th en m ove the
lever int o P (Park ) ..
• Drivi ng wi th the parking brak e engaged will
damage the rear
Page 313 of 477

Booklet 3.1 Controls and Equipment
Conve nien ce open ing 41
Conven ie n ce operatio n (elec tric
w ind ows) 18
Coo lant
li ght 11
Coo lant leve l
Warn ing 24
Coo lant te mperature
Gauge 6
Warn ing 24
Coo ling the glo ve
69
C ru ise co111rol 107
Wa rnin g light 29
Cup ho ld ers
I n the rear armrest 72
C up holder s in the center co nso le 72
C urrent f uel cons umption 9
D
Day time runnin g lights
Warning lig ht 30
Daytime dri vin g ligh ts 46
Di gita l c loc k 5
Di sp lay 7, 12
D is plays
One-co lo r display 12
Distance trave lled 9
Door re lease hand le 3
Door s
Wa rnin g lig ht 26
Drain the bauery 52
Driving time 9
Driving
an automatic transmi ssion 99
Dust
88
E
See Electron ic D iffe rentia l Lock
EDS
Wa rnin g light 27
E lec tric seal a djustment
See Seat adj ustme nt
Ele ctrical accessories 73
Elec tro-mechanica l power steering syste m
Warning light 29
110 Alphabetical index
Electron ic Diffe re nti al Lock
Wa rnin g lig ht 27
Electronic immobilize r 94
Wa rnin g light 23
Electro nic parking assistance 106
E lectro nic Power Control (EPC)
light 23
E lec tron ic Stabi liza tion Program 28, 91
Wa rnin g lig ht 28
Emergency
48
E m erge ncy wa rning lights
light 24
Engi ne fault
Warning light 23
E ngin e hood
Warning light 26
E ngin e malfun ction
Warn in g light 23
E ngine mana gement
Warn ing lig ht 23
E ngine oil pr essure
Wa rnin g light 11 , 25
Environmental inform ation
Fuel economy 6
Environmental tip
Fue l economy 77
ESP 91
See E lectronic Stabil ization Program
Exhau st warning light
Warning lig ht 22
F
Firs t- aid kit 74
Fog lig ht s 46
Foo t brak e
Wa rning lig ht 30
cen te r a rmr est 70
Fron t passenger
backre st
Folding forward 6 1
F ront seats 60
E le ctri ca l adj ustab le 62
Manua l ad justab le 60
Fuel filler cap Wa rnin g light 29
Fue l g auge
Di splay 7
Fuel level 7
Page 315 of 477
Booklet 3.1 Controls and Equipment
R Ins ide mir ror 55
M ake- up mirror s 52
Outs ide mirror s, elec trica l 56
Mirrors lowe re d fun cti o n
18
M ulti -Fun cti o n Indi cator 9
M ulti -funct io n stee rin g whee l 4
0
O ne-to uch open in g and clo sin g
p owe r w indows
40
Ori entation lig hti ng 47
Ou ts id e te 111p erature disp lay JO
Ove rv ie w
p
In strument s 5
M ulti-function stee rin g w heel 4
Warn ing light s
20
Pan ic bu tton 32
Park assis t !06
Parking
LOS
Automat ic tran smi ssio n 99
C au tion w hen parkin g nea r a parki ng bar
rier or cur b
105 L ow b umper cover, spoil ers and
s u sp ens ion
10 5 When parking on slo pes !05
Park ing aid
106
Pa rkin g br ake l04
Warn ing lig ht 28, l04
Par king di stanc e wa rning sys te m 106
Pin ch prot ectio n
P owe r roof 43 W indows
Po llen fi lter 88
Po llu tion filt er 88
Power Roof 42
Pow er ou tlet 73
P owe r roof 42
Power steerin g
Wa rnin g light 29
P owe r w ind ows 39
112 Alphab etical inde x
Rain senso r 54
R ea din g light s
Front
5 1
R ear armr est 70
R ea r in te ri or light 52
R ea r lid 37
Clos ing 38
Wa rning light
26
Re ar se at ba ckres t
Folding forward 66
Ra isi ng into place
67
Rea r sea t bench 66
Rea r vent ilati on
86
Rea r view mirro r 55
Rea r w in dow 37
R ea r w in dow hea tin g
80, 81
Rea r w iper 53
R emot e co ntrol
Vehic le
32
Remote control key
13 utt ons 32
Repla cin g th e battery 32
Sy nchronizing 33
R emovi ng th e ignition key
94
R ep laceme nt keys 31
Rep lacing the ba ttery
R e111 ote contro l ke y
32
Rever se
A utoma tic tran s111i ssio n
102
Roof carrie r m ount s 76
Roof load 77
Ro of rack
76, 77
s
Safe ty ins1ru cti ons
Coo la nt te mp eratu re 25
Sea t adju stm ent 57,
60
Sea t h ea tin g
Fron t 65
Sec urin g load 77
Se lector lever loc k 99
Se lec tor leve r positions
102
Se lf-di111m in g in side day-night mir ror 55
Se rv ice int erva l di splay 8
Se rv ice pos ition
53
Page 335 of 477
Booklet 3.2 Tips and Advice
Parking Restarting
Afte r park ing, a lw ays block w hee ls o f ve hicl e and trail er. D o 1101 park a trail er on
a s lo pe. If ca n no 1 b e avo ided, do so onl y doi ng follo win g:
• App ly foo 1 brak e.
• Have so meo ne pl ace c hoc ks und er bo 1h ve
hi cle and ,railer w hee ls .
•
c h oc ks in p lace, s low ly re le ase
br akes until whee l bl ocks ab so rb lo ad .
• Turn w hee ls 10 c urb (v e hicl e fa ci ng d ow nh ill)
o r to 1h e s tr ee t (w hen facin g uphi ll) .
• App ly par kin g bra ke firm ly .
• Place a u1om a1ic
in P.
If you move
se lecto r leve r of tran smi ssion to P befo re app ly in g park ing
b rak e and befor e blo ckin g 1h e w hee ls . yo u ma y
ne ed mor e for ce to m ove
leve r of th e P
p os ition. W
hen resta rt in g a fter p ark ing on a slo pe, reve rse
pro cedur e:
• Start
e n gin e.
•
t ran smi ssio n int o gea r.
• Release
p arkin g bra ke a nd slo wly m ove from th e w hee l bl ock s.
•
h ave so meon e re 1r ieve 1he wh eel
b loc ks.
Note
• Never tow a traile r during the br ea k-in p erio d
o f yo ur vehicl e.
• If yo u to w a tr a ile r, your V olk swage n may re
qui re mor e frequ ent mainte nance due 10
lo ad . .
• Always c heck loca l re gula tion s reg ard in g
t rail er
dep end s on y our pers onal driving sty le .
Fu el eco no m y. imp act a nd on th e engin e, brak es and tir es dep end la rge ly
o n th ree thing s:
• Perso nal dri vin g s 1y le
• Condilions of use (wea th er. roa d su rface)
• Tec hni cal co ndi 1io n s
Think ahead when driving
A ve hicl e uses fu el w hen acce le ra1in g. If
y o u think ah ea d when dri vin g, yo u will n ee d to
brak e less and acce le ra 1e less. Whereve r po s- 13
y a do ptin g an e conom ic a l d riv in g sty le and an
tici patin g th e traffi c ahead, you can eas ily re
du ce fuel con sump tio n by 10 -15 % . T hi s sec tion
s u ggests some wa ys to re duc e th e imp act o n th e
e n viro nm ent whil e re ducin g opera tin g cos ts a l
th e sa me sibl e, vehicl e roll slowl y to a s top , for in
s tan ce when yo u ca n se e the next light is
14 Driving and protecting the environment
Page 337 of 477
® Booklet 3.2 Tips and Advice
Cleaning and protection
General notes
Regular washing and care help maintain value of your vehicle.
Regular care
Reg ular and expert ca re help s a ve hicl e to kee p
it s va lu e. Th is ma y als o be o ne of th e re qu ire
m ent s of
New Ve hicle Warrant y in the eve nt
of corro sio n r ep air s or if re painting should be
n ec essary.
Th e bes t way to pr otec t the ve hicl e aga inst en vi
ronm ental contamin ant s is
to w as h and wax it freq11 e111/ y. The long er thin gs lik e in sec ts. bird
droppin gs, tree sap , road dirt , indu stri al d e
p os its, ta r, s oo t or ro ad salt and oth er a ggress ive
m ate rial s stay on the ve hicle, the mor e dama ge
the y do to th e pa int. Hi gh t emp eratur es (in
clud ing s tron g sunlight ) in cre a se corro sive ef
fec ts .
A ft er roa ds have bee n salt ed it i s imp ortant
to w ash th e und erbody of th e ve hicle th orou ghl y.
Vehicle care products
Veh icle care product s are ava ilable from your
authori zed Volk swagen d eale r. K eep the produ ct
in struc tion s until you hav e use d up th e produ ct.
WARNING
Ve hicle care products can be dangerou s. Im
proper use can result in seriou s personal in
ju ry and /or poisoning.
• Always store vehicle care produ cts in a sa fe
place in original-containers that are securely
closed .
• To reduce the risk of poisoning, never use
empty food or beverage container s that might
mi slead so meone into drinking from them.
• Alwa ys keep vehicl e care products out of
the r eac h of c hildren .
16 Cleaning and protection
WARNING ( continu ed)
• Always read and heed all the instru ction s
a nd a ll WARN IN GS on the package before
u sing veh icle ca re products.
• When using product s w hi ch g ive off
ha rmfu l fume s, always work outdoor s or in a
we ll ventilated area.
• Neve r use fuel , turpentine, en gine oil,
poli sh remover or other vo latile nuid s for ve
hicl e care. They arc poisonou s and highly
flammable. They could cause
and exp lo
s ion s!
WARNING
Unintended vehicle mo vement can cause se
rious per so n al inju ry.
• Alway s turn ofTthe eng ine, apply th e
parking brake
and remov e th e ke y from
the ignition b efore wa shin g your veh icle, or
pe rform ing any maint enance or repair s.
Note
Neve r try
10 re mo ve dirt, mud or du st if th e ve
hicl e surface is dr y. Usin g dry cl oth or spon ge
fo r cl ea ning cou ld dama ge th e paint or glas s o n
yo ur vehicl e. So ak d irt, mud or du st w ith plent y
wat er befor e re m ovin g it.
For th e sake of environment
• Wh en bu yin g v eh icle car e produ cts , try to se
l ec t tho se that are not harmfu l to the environ
m ent.
• Never di spo se vehicl e ca re pro duct s with or
d ina ry house hold was te . A lw ays follo w the man
ufa ctu re r's instru ctio n s and hee d all