2007 VOLKSWAGEN GOLF PLUS tow
[x] Cancel search: towPage 79 of 541
information an d h eed the on page
The safety belts in the ve hicl e are part of th e 86 and have the lowin g important features:
Automatic safety
th e safe ty belt is pull ed out slowly , the s h o ulder b elt will extend to l et yo u m ove freely under normal
driv in g condition s. The auto m atic safe ty belt tra cto r locks th e belt when the belt is pull ed ou t fast, d uring hard brakin g and in collision. T he
b elt may also lock when you dri ve up or down steep hill o r th rou gh a sharp cu rve.
informatio n and heed the on page
The prete nsione rs are part o f th e safe ty belt s stalled at th e fro n t in your ve hicle . I nstallin g.
r e mov in g, serv ic ing, or rep airin g of sa fe ty belt ten sio ne rs c an damag e th e s afety belt sys te m
tion properly.
Th ere are some import ant things yo u have to kn ow
to m ake sure that th e effective ness o f th e system w ill not be impair ed and that discar ded nents do n ot ca use inj ury or pollut e the men t. Undeployed safet y belt pre te nsio n ers and air b ag mod ules co ntain explos ive mate ria ls can cause seri o us injuries to the ge neral public
and t o people
in are sc rapp ed. Und ep lo ye d safet y belt pre tensio ne rs
a n d airba g m odules can also pollut e th e en vir on -
B efore driving
s ion ers.
Th e pr eten sio ne rs
are activated by the e le ctronic
c ontrol unit for the airbag system in front, s id e, and rea r collisions. tight ening the s afet y belt , the prete nsio ner reduces th e occupan t's fonvard
m ove ment or movement towards th e point of pact. T he belt pr ete nsioner wo rks toge ther with
th e airbag syste m ; its fun ction is monito red by a
wa rning ligh t. Th e belt prete n sione r will not
va te d .
A
dus t b e re leased upon a ct iva tion. This
i s no rmal and is no t caused by a in th e vehicle .
load l imiter
The front and rear safe ty belt s also have load iters to help reduce the fo rces applie d to the b o d y
in
m ent. Neve r abandon vehicles or vehicl e pa rt s. If
your veh icle mu st be scrapp ed, please make sure
that it i s done safe ly , re sp o nsibly, and in
swage n Fac ility familiar with these
'
Impro per handli ng, care, servici ng, and re pa ir
p rocedures can increase th e risk of p erson al ju ry and death by prev ent in g a bel t p re te nsioner from act iv ating w he n n eeded or by ca usi ng it to
a c ti vate unex pec tedly.
Neve r repair, adjust, or c hange pretensioners or any o ther part of th e s afety belt syste m strongly recom mend that you have any work on th e safety belt sy ste m perform ed by a n
a uth o riz ed
page
Page 127 of 541
Sun protection
Introduction
In this sectio n yo u'll
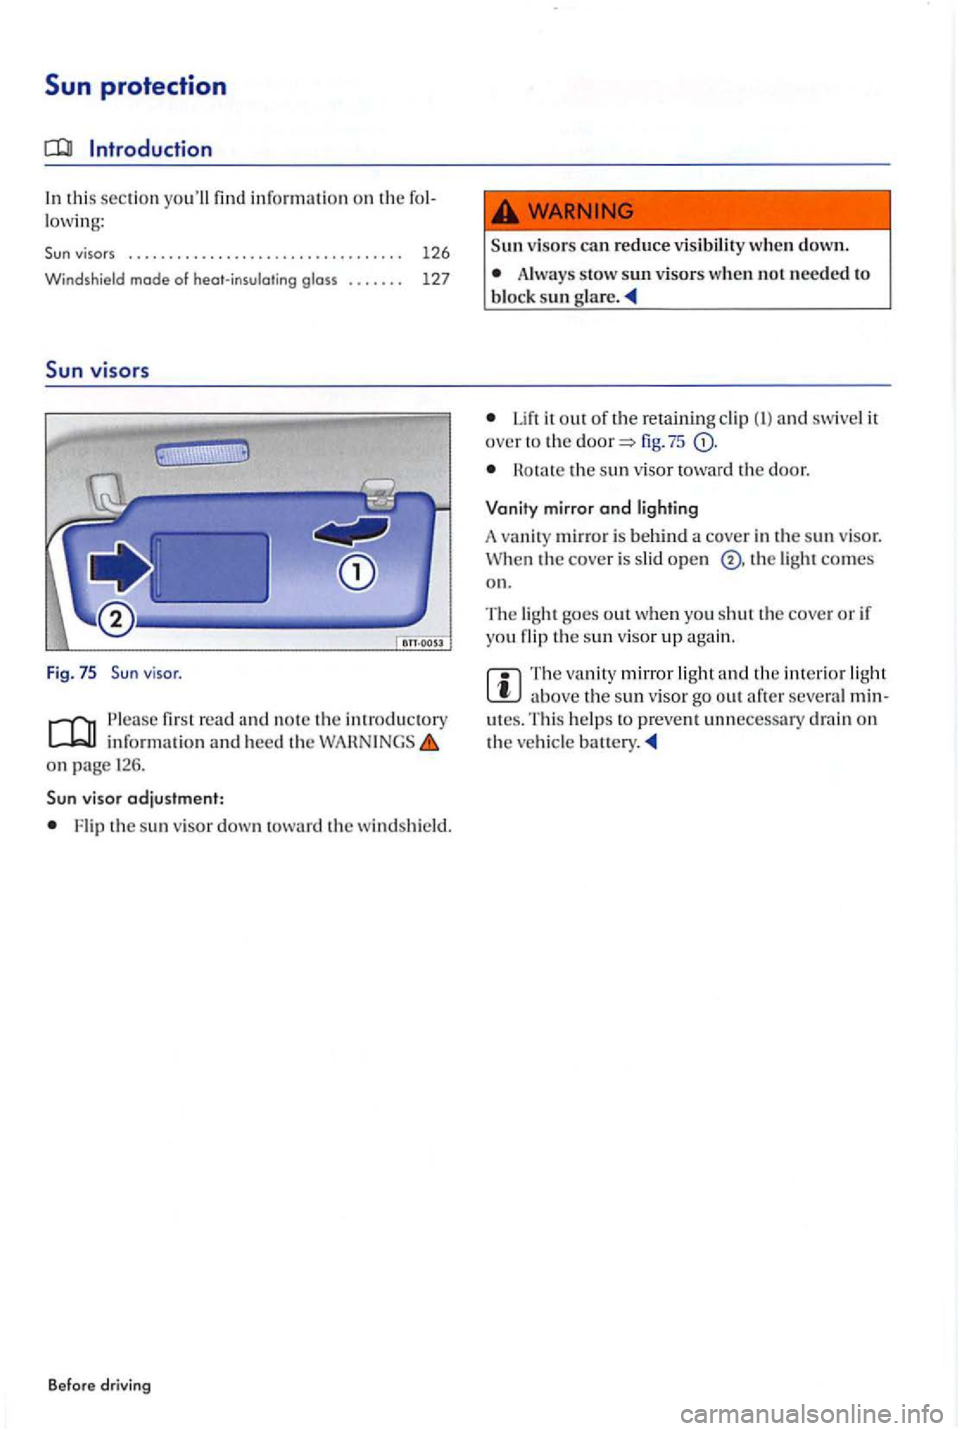
viso r.
P lease fir st read and no te th e introductory inrormatio n and heed th e on page 126.
v isor adjustment:
Flip th e s un visor down to wa rd the windshi eld.
Before driving
visors can reduce visibility when down.
Always stow sun visors when not needed to block sun g la re .
it out or the retaining clip and swivel it over to the fig. 75
H o ta te the sun visor toward the door.
Vanit y mirror
ond lighting
A
van ity mirror is behin d a cove r in th e s un v isor. When the cover is s lid open th e ligh t comes on.
T he light goes out when yo u shut th e cove r o r ir you the sun visor up again.
above th e sun visor go out artcr seve ral minutes. Thi s helps to prevent unnecessary drain on the ve hicle
Page 130 of 541
Windshield wiper lever
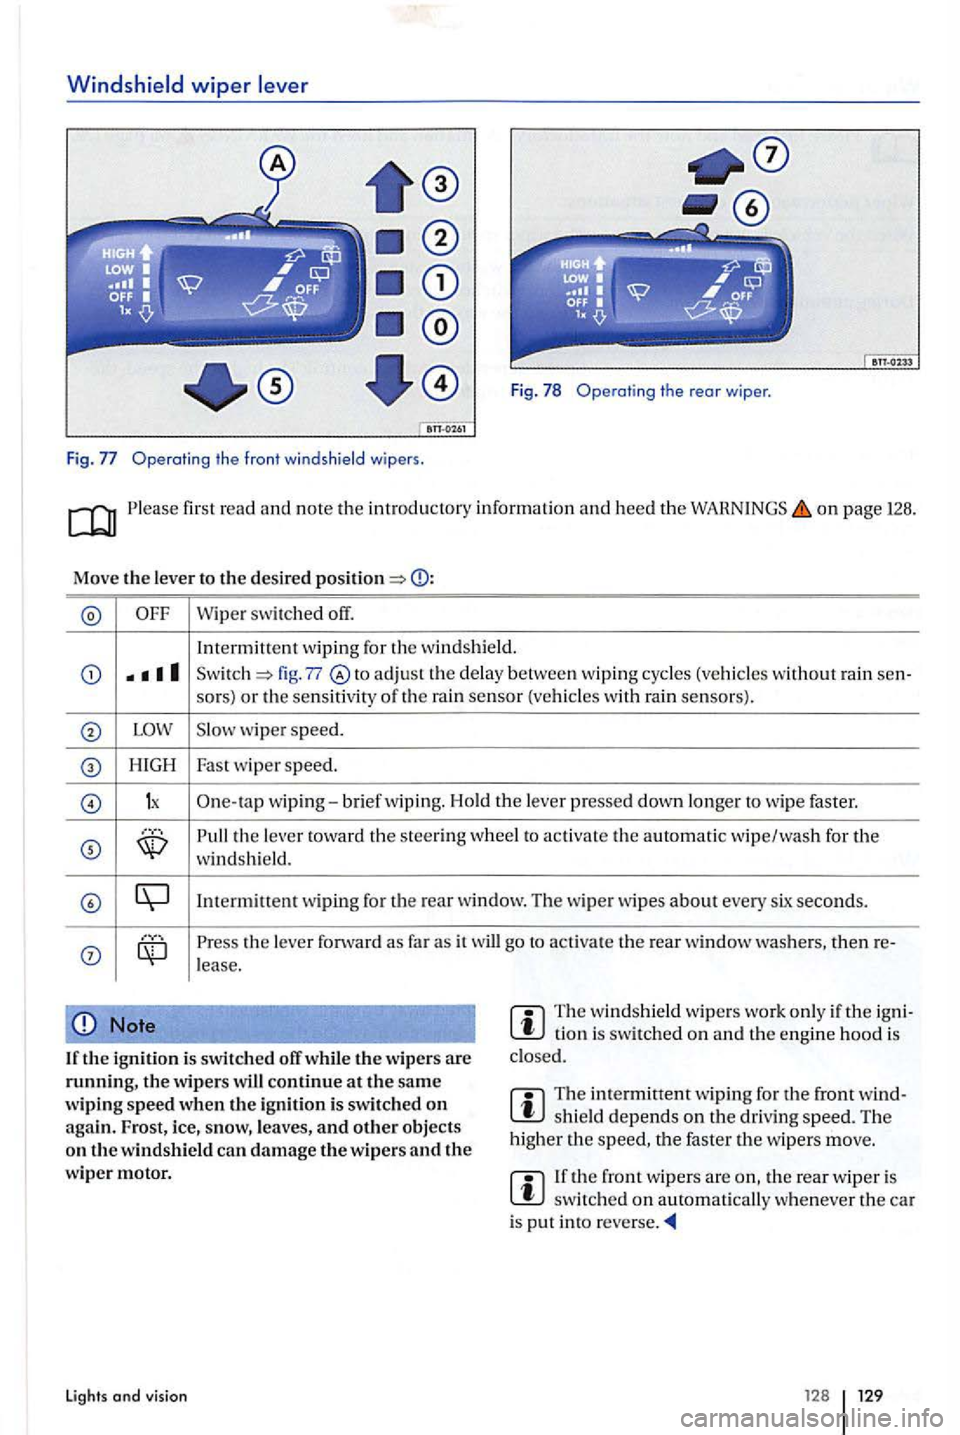
Fig . 78 Operating the rear wiper .
Fig. Operatin g t he front windsh ie ld wipers .
on page 128.
Move the leve r to t he des ired
Wipe r switched off.
In term itt
ent wiping for the w ind shield.
fig. 77 to adj ust the delay between wip ing cycles (vehicles wit hout rain sen-
so rs) or the sensit iv ity of th e rain sensor (vehicle s w ith rain senso rs).
w iper speed.
H IGH Fast wipe r speed.
1x One-ta p wip ing-brief wiping. Hold th e lever presse d down longer to wipe faster.
the le ve r towa rd t he stee ring whee l to activat e the au toma tic wipe/wa sh for the windsh ie ld.
the leve r forward as far as it will go to ac tiva te the rear window then re-lease.
Note
If the ig n it io n i s swi tc h ed off whil e the w ipers are th e w ipers continue a t the sa me
w ip ing sp eed when the ign ition i s swi tched on agai n.
The w in ds hield wipe rs work only if th e tio n i s sw itched on and th e engine hood is
clo sed.
Th e intermittent wip ing for the front shield depends on the driving speed. The
h igh er the the faster th e wipers move.
th e rear w ip e r is s witc hed on automatically w henever the car is pu t in to
Lights and visi o n 12 8
Page 131 of 541
Wiper functions
first read and note th e introductory informat ion an d heed the on page 126.
Wip
er p erformanc e in diffe rent situations:
W he n th e veh icle is
not mov ing : The wip er speed changes tempo ra ril y to the next lower speed.
W hil e
the washer sys te m is wo rking, the climate control
During automatic wipe/wash: sys
te m switches to recircul ation for about seconds h elp prevent th e w asher flu id odor from enterin g the ve hicl e int e-rior.
D urin g int e
rmittent wip ing: S
peed-dependent interval con tro l: The high er th e speed, the faste r the wipers m ove.
Heated washer nozzles
The heatin g tha ws frozen wash er nozzles, but not the fluid suppl y hoses. When the ig niti on is
sw itch ed on, th e heat applied to the was he r zles is au to mat ically regulate d d ep ending o n th e
outs id e ai r t emperature .
Headlight washer system
T he headlight washer sys te m clea ns the headli ght
glass.
I f th e ign it io n
and the headli ghts (high or lo w arc swit ch ed on, the headlight s time and every fifth time th e front windshi eld washers a re activa te d. Thi s happen s only when the low or hig h beams are on whe n th e
Windshiel d wi pe r service posit ion
Fig. 79 Wind sh ield wiper in ser vice position .
Before driving
windshi eld wip er leve r is pulle d towards th e
s teering w heel. Howeve r, th e headli ghts must s till
b e was hed by ha nd periodically (for i nstance, during fue ling) in order to get riel of move dirt insect splaller).
T o hel p
make sure th at th e headli gh t cleanin g syste m wo rk s during winter weather, a lways keep the headlight washer nozzles fre e of snow move an y ice w ith de- icer spray before drivi ng.
Use a de- icer spra y to re m ove an y ice.
wiper will try to wip e it away . fit continues bloc k the wiper, th e wiper wil l s top moving. move th e in terfer ence and swit ch th e wip er on
firs t read and note the introductory in formation and heed th e o n page 128 .
I n
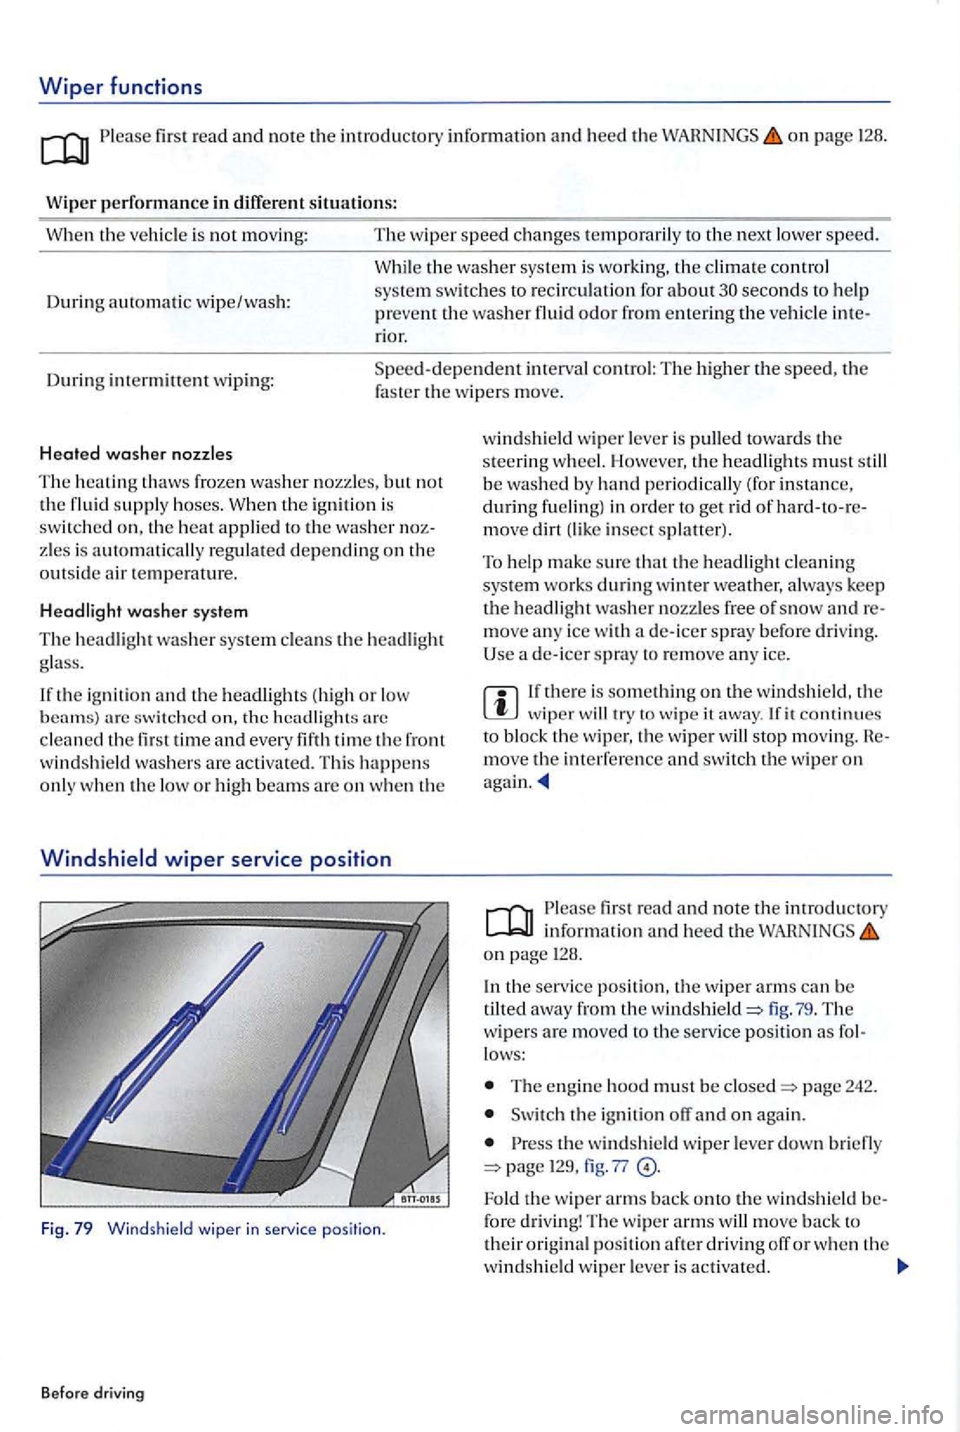
the service posit io n, th e wiper arms can be
tilted away from the windshield=> lig . 7 9 . The w ipers are move d to the ser vice pos it io n as lows:
T he e ngin e hood must b e closed=> page 242.
Switch the ig nition o n again .
th e windshie ld wiper leve r down brie fly page 129, fig . 77
Fold the wipe r arm s back onto the w indshi eld fo re driving! Th e w iper arms will move back t o their origin al positi on afte r dri vin g off or w he n th e
winds hi eld wip e r leve r is activa te d .
Page 136 of 541
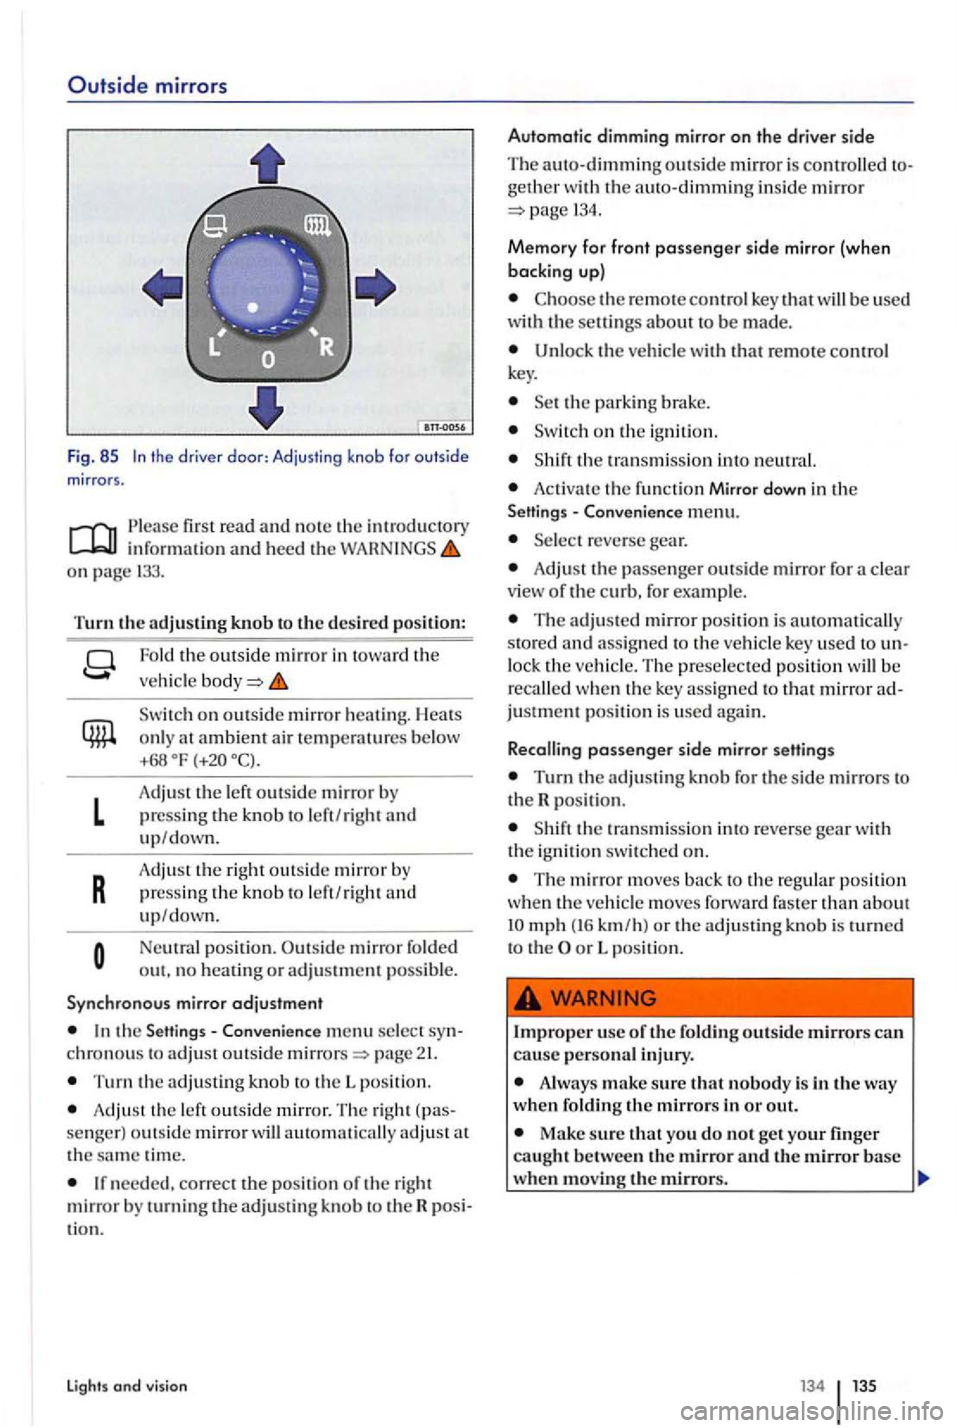
Outside mirrors
Fig. 85 the driver doo r: Adjusting knob for outside mirror s.
o n page 133.
Turn the adjusting knob to the desired po siti on :
L
R
Fold the outsi de mirror in toward the
veh i
cle
on outsid e mirror heating. Heats
o nl y at ambient air tempe ratures b e low +68
A dju st the left outside mirro r press ing the knob to le ft/righ t
pressing the knob to le ft/rig h t and up/down.
Neutral position . mirror fo ld ed out. no heatin g or adjustment possib le .
Syn ch rono us mirror adjustment
the Sett ing s- Conveni ence men u select chronous to adju st outside page
T urn the adj ustin g knob to th e L positi on.
Adjust th e left outs ide m irror. Th e righ t
th e sa m e tim e.
needed, correct the positi on of the right mirror turning the adjust in g kn ob to th e tio n.
Lights and vision
Automatic dimming mirror on the drive r side
Th e auto-dimming outs ide mirror is contr olled geth e r w ith the auto-dimming inside mirror 13 4.
Memory for front passenger sid e mirror (when
backing up)
the re m ote contr ol key that will be use d
with th e settin gs about be made.
Unloc k the veh icle with tha t re mote control
k ey.
o n the ign ition.
the transmiss ion into ne ut ral.
Acti vate the fun ctio n Mirror down in the - C onvenience menu.
reverse gear.
Adjus t the passenge r outsid e mirror for a clear view of the curb, for example.
The adjusted mirror positio n is automatically
s to red and ass igned to the ve hicl e key used to lock the vehicle. The preselecte d po sit ion w ill recalled w hen the ke y ass igned to that mirror justment pos it io n is used again .
Recalling
passenger s id e mirror setting s
Turn the adjusting for the sid e mirrors to the R posit ion.
T he mirror m ove s back to the re g ul ar position wh en the ve hicl e m oves forward faster than about mph (16 km /h) or the adjusting knob is to th e or L po sition.
use of the foldin g outside mirrors can cause persona l injury.
Alway s make sure that nobody is in the way w hen f oldin g the mirrors in or out.
Make sure that you do not get yo ur finger caught between the mirror and the mirror base when moving the mirrors.
Page 138 of 541
Transporting
Driving tips
In this sec tion yo u'll find informatio n on th e fol
l o w ing:
obj ects in th e luggage m ent and make su re
the vehic le lo ad, as well how it is di stributed, can vehicle hand ling and
page 45
F o lding th e pa sse nger backrest forward
page
Lugg age page
pag e
Trail er pag e
Tires and 27 6
Transporting
Uns ecured or in correc tly s tow ed item s can fly
through the vehicl e, causing serious personal injury during hard braking or sharp s teering or in an a cci dent. Loose items can also be s truck
a nd throw n through the passenge r compartment by an airbag if it infl ate s. To help reduce
the risk of inju ry:
all objects secure ly in the vehicl e. Always keep storage compartments closed dri vin g. Do not stow hard , heavy, or sharp objects in open bins in the ve hicl e or on top of the instrument panel.
A lways secure objects properly with s uitabl e
s traps so that th ey
Always secure objects in the passenger compartment properly so th at they cannot com e
int o the deploy ment area of a sid e or front airbag w hen the vehi cle is m ov ing.
Always keep stora ge compartments closed
w hil e dri ving.
A lways make sure th at the re is nothin g on the front passe nge r sca t w hen the backres t is fo lded forward. When the backres t is folded for ward,
eve n light objects could be pushed int o the scat
c ushion and cau se the we ight- sensin g mat in
th e seat to registe r e n o ugh weig ht to turn th e airbagon.
Always make su re that the AIR BAG
must n eve r assume an incorrec t seating positi on becaus e of objects stow ed in th e vehicle_
No person should ev er sit in a seat that is
blocked by objec ts s towe d in the vehicle.
136 137
Page 139 of 541
Heavy loads innuence th e way your vehicle handles and increa se stopping distances. Heavy
load s that arc not properly stowed or secured can cause los s of contro l and serious injury . Always remember when transporting heavy
objects that a change in the center of gravity also
changes the way your vehicle handles:
- Always dis tribute the load as evenly as
possib le. -heavy objects properly as far forward
in th e luggage compa rtme nt as possible.
- Always tie down heavy items secure ly using
th e tiedowns provided and suitable straps.
Never exceed th e Gross Axle Weight Rating or the Gross Vehicle Weight Rating on the safety compliance sticker on the left door jamb. Excee
ding permissible weight can cause the vehicle to
skid and handl e diff erentl
y.
Always adapt your speed and driving to th e
heavi er load and the we ight distribution in the
vehicl e. Take road, weathe r, and visibility
cond itions into acco unt as we ll.
Stowing
on page 137.
Always stow all luggage securely in the vehicle
Distribut e loads in the vehicle, on th e roof and the trail er as even ly as possible.
Secu re lu ggage in the luggag e compartment with suit able tightening strap s to the tie-down page 142.
Adjust the headli ght page
Before driving
Drive especia lly carefully and accelerate
gently.
Avoid sudden braking and driving maneu
ve rs.
Brake earlie r than yo u would if you were not driving a loaded
tire pressure. Heed the information on the tir e pressure page 276.
sure Monitor ing Syste m, the system may need to
be adjusted for the new page
CD Note
The heating wires in the rear window can be se
vere ly damaged by hard or sharp things on the sh elf below the rear window.
review inf ormation about loading a page 152 and a roof rack 149.
Page 140 of 541
Driving with an open rear hatch
P lease read and not e the introd uctory information and hee d the on pag e 137.
Driv in g w ith an open rear hatch ca n lead to seriou s
perso nal injury. I f yo u have to drive w ith an op en
rear h a tch, make sure that objects an d th e hatch itse lf are properly secured and take appropria te
m easures to keep tox ic exhaust fumes from te rin g th e vehicle .
Driving w
itJ1 an unlatc hed o r open rear hatch
ca n l ead to seriou s pe rso nal injury.
Always driv e witJ1 the rear hatch closed to
h elp kee p poisonou s ex hau st gas from being
drawn into the ve hicle.
Never transport objec ts lar ger than those fittin g co mpletely int o the lu ggage area, beca use then the rear hatch cannot be full y clo sed.
Always stow all objects secu re ly in the
Dr ive care fully; a ntic ipat e what otJ1er driver s will do.
Avoid abrupt o r sudden driv in g or braking maneuv ers, as unla tch ed rear hatch can move suddenly .
A lways mark obje cts sti cking out from the lu ggage compartment clear ly for others to see .
Ob e applicabl e req uirements.
Transporting
Neve r u se the rear ha tc h t o or ob jec ts protruding from the luggage ment.
Alway s remove any lugga ge rack or other
rack mounte d on tJ1e rea r hatch (along with an y
l uggage on th e rack) befor e driving with an ope n
r ea r h atch .
Driving w
ith an open rear hatch can cause sonous carbon mon oxide in the en g in e exhaust
to get into the passe nger compartment.
monoxide cau ses drow sin ess,
inatt enti veness , poison ing , and loss of scio u snes s. can lead to accid ents and seve re
perso na l in juri es.
Always kee p th e rear hat ch closed whil e
driving to help keep poi sonous exha ust fum es
from b ein g drawn into the ve hicl e.
Neve r tran sport obj ec ts that are to o large
t o fit completely int o the lu ggage area, beca use
th en the rear hatch cannot be full y closed.
yo u abso lutely mus t driv e w ith open rea r h atch, do th e
all windows and the powe r sunro of.
- Switc h off the climat e
control sys te m's a ir
recirculation feature.
-
Open all air vents in the in strument pa nel.
- Se t th e fres h air fa n t o th e hi ghest speed.
Note
T he ope n rear hatc h ch anges th e ve hicle's lengt h and he ight .
138 139