Page 72 of 458

72
�Do not modify or remove any wir-
ing. Do not modify, remove, strike
or open any components, such as
the steering wheel pad, steering
wheel, column cover, dashboard
near the front passenger airbag,
front passenger airbag cover, front
passenger airbag or airbag sensor
assembly. Doing so may prevent the
front airbag system from activating
correctly, cause sudden front air-
bags activation of the system or
disable the system, which could re-
sult in death or serious injury.
Failure to follow these instructions
can result in death or serious injury.
Consult your Toyota dealer about any
repair and modification.
If you wish to modify your vehicle for
a person with a physical disability,
consult your Toyota dealer. It may
dangerously interfere with the SRS
front airbags operation.NOTICE
Do not perform any of the following
changes without consulting your
Toyota dealer. Such changes can in-
terfere with proper operation of the
SRS front airbag system in some
cases.
� Installation of electronic devices
such as a mobile two�way radio,
cassette tape player or compact
disc player
� Modification of the suspension sys-
tem
� Modification of the front end struc-
ture
� Attachment of a grille guard (bull
bar, kangaroo bar, etc.), snowplow,
winches or any other equipment to
the front end
� Repairs made on or near the front
fenders, front end structure, con-
sole, steering column, steering
wheel or dashboard near the front
passenger airbag
22p010a
This indicator comes on when the “IG�
ON” mode is enabled. It goes off after
about 6 seconds. This means the SRS
front airbags are operating properly.
The warning light system monitors the air-
bag sensor assembly, front airbag sen-
sors, side and curtain shield airbag sen-
sors, curtain shield airbag sensors,
driver ’s seat position sensor, driver ’s seat
belt buckle switch, front passenger occu-
pant classification system, “AIRBAG ON”
indicator light, “AIRBAG OFF” indicator
light, front passenger ’s seat belt buckle
switch, seat belt pretensioner assemblies,
interconnecting wiring and power sources.
(For details, see “Service reminder indica-
tors and warning buzzers” on page 125.)
Page 80 of 458

80
NOTICE
Do not perform any of the following
changes without consulting your
Toyota dealer. Such changes can
interfere with proper operation of the
SRS side airbag and curtain shield
airbag system in some cases.
�Installation of electronic devices
such as a mobile two�way radio,
cassette tape player or compact
disc player
� Modification of the suspension sys-
tem
� Modification of the side structure of
the passenger compartment
� Repairs made on or near the con-
sole or front seat
22p010a
This indicator comes on when the “IG�
ON” mode is enabled. It goes off after
about 6 seconds. This means the SRS
side airbags and curtain shield airbags
are operating properly. The warning light system monitors the air-
bag sensor assembly, front airbag sen-
sors, side and curtain shield airbag sen-
sors, curtain shield airbag sensors,
driver ’s seat position sensor, driver ’s seat
belt buckle switch, front passenger occu-
pant classification system and indicator
light, front passenger occupant classifica-
tion system, “AIRBAG ON” indicator light,
“AIRBAG OFF” indicator light, front pas-
senger ’s seat belt buckle switch, seat belt
pretensioner assemblies, interconnecting
wiring and power sources. (For details,
see “Service reminder indicators and
warning buzzers” on page 125.)
If any of the following conditions occurs,
this indicates a malfunction of the airbags
or seat belt pretensioners. Contact your
Toyota dealer as soon as possible.
�The light does not come on when the
“IG
−ON” mode is enabled or remains
on for more than 6 seconds.
�The light comes on while driving.
The SRS warning light and “AIRBAG OFF”
indicator light will come on if there is a
malfunction in the front passenger occu-
pant classification system.
Page 104 of 458

104
22p058f
To change the steering wheel angle,
hold the steering wheel, push down the
lock release lever, tilt the steering
wheel to the desired angle and push
the lever up to lock the steering wheel
in position.
CAUTION
�Do not adjust the steering wheel
while the vehicle is moving. Doing
so may cause the driver to mishan-
dle the vehicle and an accident may
occur resulting in death or serious
injuries.
�After adjusting the steering wheel,
try moving it up and down to make
sure it is locked in position.
When you move the steering wheel, an
electrical motor noise may be heard. This
is the power steering motor noise, and is
not a malfunction.
22p059a
Adjust the mirror so that you can just
see the side of your vehicle in the mir-
ror.
Be careful when judging the size or dis-
tance of any object seen in the outside
rear view mirror on the passenger ’s side
because it is a convex mirror. Any object
seen in a convex mirror will look smaller
and farther away than when seen in a flat
mirror.
When you touch the rear window defogger
switch, the heater panels in the outside
rear view mirrors will quickly clear the
mirror surface. (See “Rear window and
outside rear view mirror defoggers” on
page 118.)
Tilt steering wheelOutside rear view mirrors—
Page 105 of 458
105
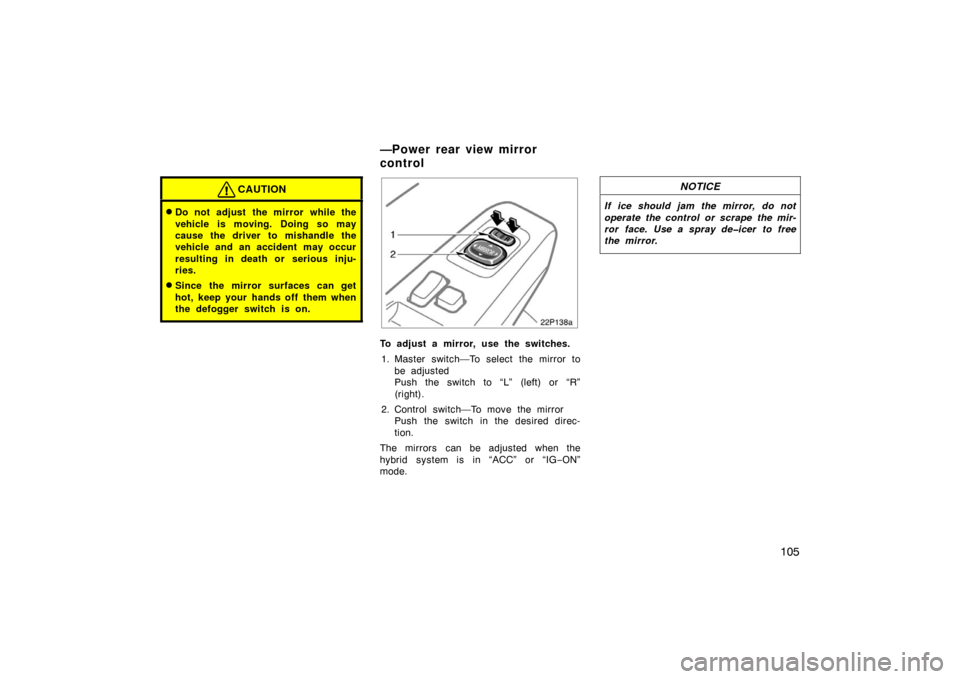
CAUTION
�Do not adjust the mirror while the
vehicle is moving. Doing so may
cause the driver to mishandle the
vehicle and an accident may occur
resulting in death or serious inju-
ries.
�Since the mirror surfaces can get
hot, keep your hands off them when
the defogger switch is on.
22p138a
To adjust a mirror, use the switches.1. Master switch—To select the mirror to be adjusted
Push the switch to “L” (left) or “R”
(right).
2. Control switch—To move the mirror Push the switch in the desired direc-
tion.
The mirrors can be adjusted when the
hybrid system is in “ACC” or “IG −ON”
mode.
NOTICE
If ice should jam the mirror, do not
operate the control or scrape the mir-
ror face. Use a spray de�icer to free
the mirror.
—Power rear view mirror
control
Page 110 of 458

11 0
23p137a
HEADLIGHTS
To turn on the following lights: Twist
the headlight/turn signal lever knob.
Position 1—Parking, tail, license plate,
side marker and instrument panel lights
Position 2—Headlights and all of the
above
Position 3 (“AUTO”)—Headlights and/or all
of the lights in position 1
They automatically turn on or off depend-
ing on the darkness of the surroundings.
Manually twist the knob to the position 2
to turn on the headlights if they are need-
ed immediately when entering a dark tun-
nel, parking structure, etc.
23p124_1
The automatic light control sensor is on
the top of the driver’s side instrument
panel.
Do not place anything on the instrument
panel, and/or do not affix anything on the
windshield to block this sensor.
Automatic light cut off system
The lights automatically turn off when the
driver ’s door is opened with the hybrid
system off. To turn them on again, press
the “POWER” switch twice from the off
setting to select the “IG−ON” mode with-
out depressing the brake pedal or actuate
the headlight switch. If you are going to
park for over one week, make sure the
headlight switch is off. When the headlight switch is turned to the
first or second clickstop, the brightness of
the instrument cluster will be reduced
slightly unless the instrument panel light
control dial is turned fully on.
NOTICE
To prevent the battery from being dis-
charged, do not leave the switch on
longer than necessary when the hy-
brid system is not running.
Headlights and turn signals
(with automatic light control system)
Page 112 of 458
 on the instrument panel flash faster
than normal, a front or rear turn signal
bulb is burned out. See “Replacing light
bulbs—” on page 422")
11 2
If the turn signal indicator lights (green
lights) on the instrument panel flash faster
than normal, a front or rear turn signal
bulb is burned out. See “Replacing light
bulbs—” on page 422.
23p001e
HEADLIGHTS
To turn on the following lights: Twist
the headlight/turn signal lever knob.
Position 1—Parking, tail, license plate,
side marker and instrument panel lights
Position 2—Headlights and all of the
aboveAutomatic light cut off system
The lights automatically turn off when the
driver ’s door is opened with the hybrid
system off. To turn them on again, press
the “POWER” switch twice from the off
setting to select the “IG
−ON” mode with-
out depressing the brake pedal or actuate
the headlight switch. If you are going to
park for over one week, make sure the
headlight switch is off.
When the headlight switch is turned to the
first or second clickstop, the brightness of
the instrument cluster will be reduced
slightly unless the instrument panel light
control dial is turned fully on.
NOTICE
To prevent the battery from being dis-
charged, do not leave the lights on
longer than necessary when the hy-
brid system is not running.
Headlights and turn signals
(without automatic light control system)
Page 123 of 458
123
25p127a
Ty p e 1
24p109a
Ty p e 2
At the first blinking of the light, the master
warning light in the instrument cluster
comes on and the message appears on
the multi−information display to remind the
driver to fill fuel.
On inclines or curves, due to the move-
ment of fuel in the tank, the low fuel level
indicator light may come on earlier than
usual.
24p004e
This meter displays the odometer and
two trip meters.
1. Odometer—Shows the total distance the vehicle has been driven.
2. Two trip meters—Show two different distances independently driven since
the last time each trip meter was set
to zero.
You can use one trip meter to calculate
the fuel economy and the other to
measure the distance on each trip. All
trip meter data is cancelled if the elec-
trical power source is disconnected.
Odometer and two trip
meters
Page 125 of 458
125
If the indicator or buzzer comes on...Do this.
(a)
or
(red indicator and buzzer)If parking brake is off, stop immediately and contact Toyota dealer.
(yellow indicator)
Take vehicle to Toyota dealer. If red brake system warning light is also on, stop imme-
diately and contact Toyota dealer.
(b)
(indicator and buzzer)
Fasten driver ’s seat belt.
(c)
(indicator and buzzer)
Fasten front passenger ’s seat belt.
(d)Take vehicle to Toyota dealer.
(e)See multi −information display.
(f)orTake vehicle to Toyota dealer. If red brake system warning light is also on, stop imme-
diately and contact Toyota dealer.
If any warning comes on, the hybrid system may not start by pu shing the “POWER” switch. In that case, push it once again.
Service reminder indicators and warning buzzers


or
(red indicator and buzzer)If parking brake is off, stop immediately and contact Toyota dealer.
(yellow indicator)
Take vehicle to Toyota deale")