Page 1 of 374

Publication No. OM60C79U
Part No. 01999-60C79
Printed in Japan 01−0608 −00
(U)
Quick index
� If a service reminder indicator or warning buzzer comes on 132 . . . .
� If your vehicle will not start 280 . . . . . . . . . . . . . . . . . . . . . . . . . . . . . . . . . . .
� If your engine stalls while driving 284 . . . . . . . . . . . . . . . . . . . . . . . . . . . . . .
� If your vehicle overheats 284 . . . . . . . . . . . . . . . . . . . . . . . . . . . . . . . . . . . . .\
.
� If you have a flat tire 285 . . . . . . . . . . . . . . . . . . . . . . . . . . . . . . . . . . . . .\
. . . .
� If your vehicle needs to be towed 297 . . . . . . . . . . . . . . . . . . . . . . . . . . . . .
� Tips for driving during break-in period 235 . . . . . . . . . . . . . . . . . . . . . . . . . .
� How to start the engine 262 . . . . . . . . . . . . . . . . . . . . . . . . . . . . . . . . . . . . .\
. .
� General maintenance 313 . . . . . . . . . . . . . . . . . . . . . . . . . . . . . . . . . . . . .\
. . . . .
� Complete index NO TAG . . . . . . . . . . . . . . . . . . . . . . . . . . . . . . . . . . . . .\
. . . . .
Gas station information
Fuel type:
UNLEADED gasoline, Octane Rating 87 (Research Octane Number 91)
or higher. For improved vehicle performance, the use of premium unleaded
gasoline with an Octane Rating of 91 (Research Octane Number 96) or
higher is recommended.
See page 235 for detailed information.
Fuel tank capacity: 96 L (25.4 gal., 21.1 lmp.gal.)
Engine oil:
ILSAC multigrade engine oil is recommended.
See page 325 for detailed information.
Tire information: See pages 330 through 338.
Tire inflation pressure: See page 354.
U�8
I
Page 3 of 374
Where to obtain the Repair Manual
The repair manual for LAND CRUISER may be
purchased from any Toyota dealer or the Mate-
rial Distribution Center. To purchase the repair
manual, please contact your Toyota dealer or
call the Material Distribution Center toll�free
at 1�800�622�2033.
Maintenance procedures for the engine,
chassis, body, electric al system, and more,
are clearly explained and illustrated.
Periodic maintenance and tune�up
Periodic maintenance and tune�up helps to pre-
vent small problems from growing into larger ones lat-
er on. The repair manual outlines exactly what main-
tenance is required and clearly explains how to do the
work yourself step�by�step.
Areas covered include such things as spark plug re-
placement, valve clearance adjustment and engine oil
and filter replacement.
Page 10 of 374

vi
New vehicle warranty
Your new vehicle is covered by the following Toyota
limited warranties:� New vehicle warranty
� Emission control systems warranty
� Others
For further information, please refer to the “Owner’s
Warranty Information Booklet” or “Owner ’s Manual Sup-
plement”.
Your responsibility for maintenance
It is the owner ’s responsib ility to make sure the speci-
fied maintenance is performed. Section 6 gives details
of these maintenance requirements. Also included in
Section 6 is general maintenance. For scheduled mainte-
nance information, please refer to the “Scheduled Main-
tenance Guide” or “Owner ’s Manual Supplement”.
Important health and safety
information about your Toyota
CAUTION
�WARNING: Engine exhaust, some of its constitu-
ents, and a wide variety of automobile compo-
nents contain or emit chemicals known to the
State of California to cause cancer and birth de-
fects and other reproductive harm. In addition,
oils, fuels and fluids contained in vehicles as well
as waste produced by component wear contain or
emit chemicals known to the State of California
to cause cancer and birth defects or other repro-
ductive harm.
�Battery posts, terminals and related accessories
contain lead and lead compounds. Wash your
hands after handling. Used engine oil contains
chemicals that have caused cancer in laboratory
animals. Always protect your skin by washing
thoroughly with soap and water.
Page 20 of 374
6
Instrument cluster overview
11C501b
1. Voltmeter
2. Speedometer
3. Service reminder indicators and indicator lights 4. Tachometer
5. Height control indicator light
6. Engine oil pressure gauge
7. Engine coolant temperature gauge 8. Odometer and two trip meters
9. Trip meter reset knob
10. Fuel gauge
Page 21 of 374
7
Indicator symbols on the instrument panel
Brake system warning light∗1
Malfunction indicator lamp∗1Headlight high beam indicator light Turn signal indicator lights
Driver ’s seat belt reminder light∗1
Anti −lock brake system warning light∗
1
Open door warning light∗1
SRS warning light∗1
Low fuel level warning light∗1
Automatic transmission fluid temperature warning
light∗1
Unengaged “Park” warning light∗1
Charging system warning light∗1
Engine oil replacement reminder light
Center differential lock indicator light Driving pattern (“POWER” mode) indicator
light
Automatic transmission second start indicator
light
Cruise control indicator light∗2
Tire pressure warning light∗1
Page 32 of 374

18
11C523a
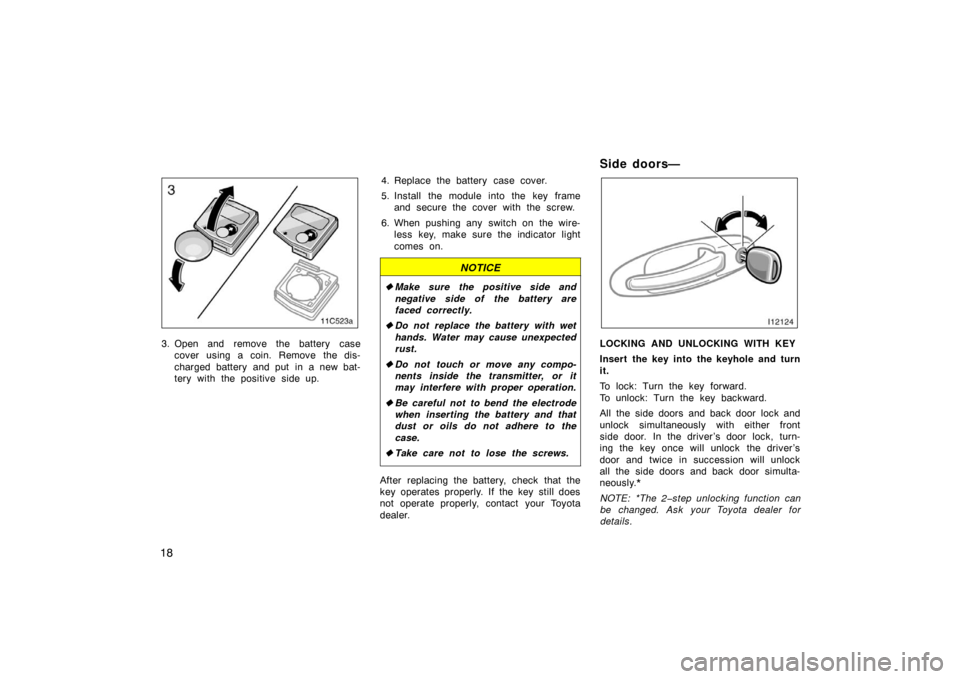
3. Open and remove the battery casecover using a coin. Remove the dis-
charged battery and put in a new bat-
tery with the positive side up. 4. Replace the battery case cover.
5. Install the module into the key frame
and secure the cover with the screw.
6. When pushing any switch on the wire- less key, make sure the indicator light
comes on.
NOTICE
�Make sure the positive side and
negative side of the battery are
faced correctly.
� Do not replace the battery with wet
hands. Water may cause unexpected
rust.
� Do not touch or move any compo-
nents inside the transmitter, or it
may interfere with proper operation.
� Be careful not to bend the electrode
when inserting the battery and that
dust or oils do not adhere to the
case.
� Take care not to lose the screws.
After replacing the battery, check that the
key operates properly. If the key still does
not operate properly, contact your Toyota
dealer.
Side doors—
LOCKING AND UNLOCKING WITH KEY
Insert the key into the keyhole and turn
it.
To lock: Turn the key forward.
To unlock: Turn the key backward.
All the side doors and back door lock and
unlock simultaneously with either front
side door. In the driver’s door lock, turn-
ing the key once will unlock the driver’s
door and twice in succession will unlock
all the side doors and back door simulta-
neously.*
NOTE: *The 2�step unlocking function can
be changed. Ask your Toyota dealer for
details.
Page 141 of 374
127
OPERATION OF INSTRUMENTS AND
CONTROLS
Gauges, Meters and Service reminder indicators
Fuel gauge128
. . . . . . . . . . . . . . . . . . . . . . . . . . . . . . . . . . . . .\
. . . . . . . . . . .
Engine coolant temperature gauge 128
. . . . . . . . . . . . . . . . . . . . . . . . . . .
Engine oil pressure gauge 129
. . . . . . . . . . . . . . . . . . . . . . . . . . . . . . . . . . .
Vo ltme te r 130
. . . . . . . . . . . . . . . . . . . . . . . . . . . . . . . . . . . . \
. . . . . . . . . . . . . .
Tachometer 130
. . . . . . . . . . . . . . . . . . . . . . . . . . . . . . . . . . . . \
. . . . . . . . . . . .
Odometer and two trip meters 131
. . . . . . . . . . . . . . . . . . . . . . . . . . . . . . . .
Service reminder indicators and warning buzzers 132
. . . . . . . . . . . . . .
Trip information display 140
. . . . . . . . . . . . . . . . . . . . . . . . . . . . . . . . . . . . \
. .
SECTION 1� 6
Page 143 of 374

129
NOTICE
�Do not remove the thermostat in
the engine cooling system as this
may cause the engine to overheat.
The thermostat is designed to con-
trol the flow of coolant to keep the
temperature of the engine within
the specified operating range.
� Do not continue driving with an
overheated engine. See “If your ve-
hicle overheats” on page 284.
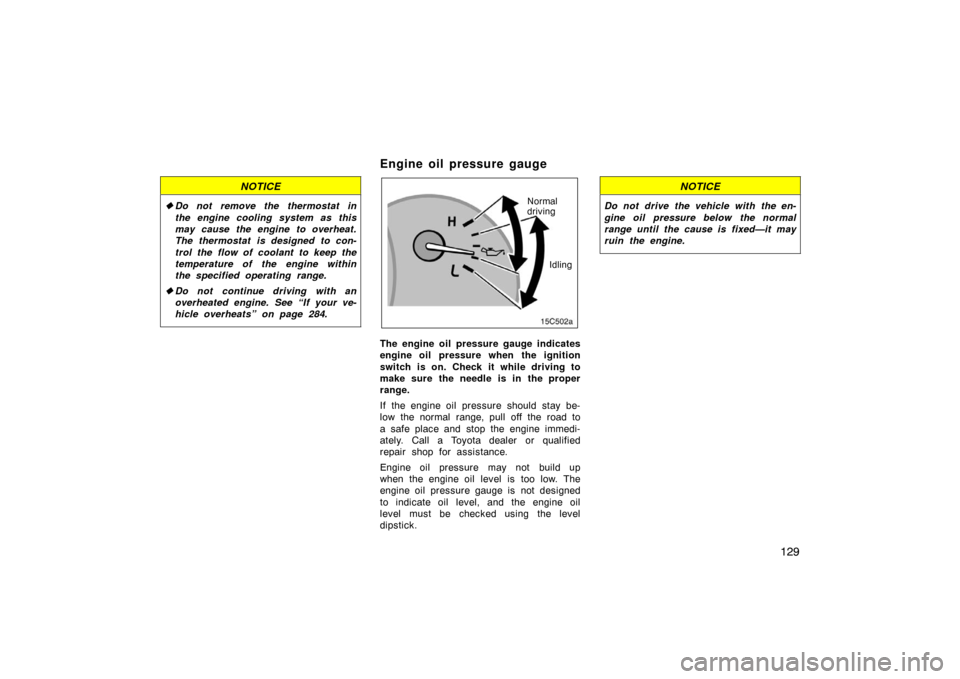
Engine oil pressure gauge
Idling
Normal
driving
The engine oil pressure gauge indicates
engine oil pressure when the ignition
switch is on. Check it while driving to
make sure the needle is in the proper
range.
If the engine oil pressure should stay be-
low the normal range, pull off the road to
a safe place and stop the engine immedi-
ately. Call a Toyota dealer or qualified
repair shop for assistance.
Engine oil pressure may not build up
when the engine oil level is too low. The
engine oil pressure gauge is not designed
to indicate oil level, and the engine oil
level must be checked using the level
dipstick.
NOTICE
Do not drive the vehicle with the en-
gine oil pressure below the normal
range until the cause is fixed—it may
ruin the engine.