Page 71 of 436

’07 HIGHLANDER HV_U (L/O 0608)
59
2007 HIGHLANDER HV from July ’06 Prod. (OM48685U)
CAUTION
�Be careful that the seat does not
hit a passenger or luggage.
�After folding down the right side
seat, try pushing the seat forward
and rearward to make sure it is se-
cured in place.
NOTICE
Do not fold the second seat seatback
forward with the luggage cover hooks
attached.
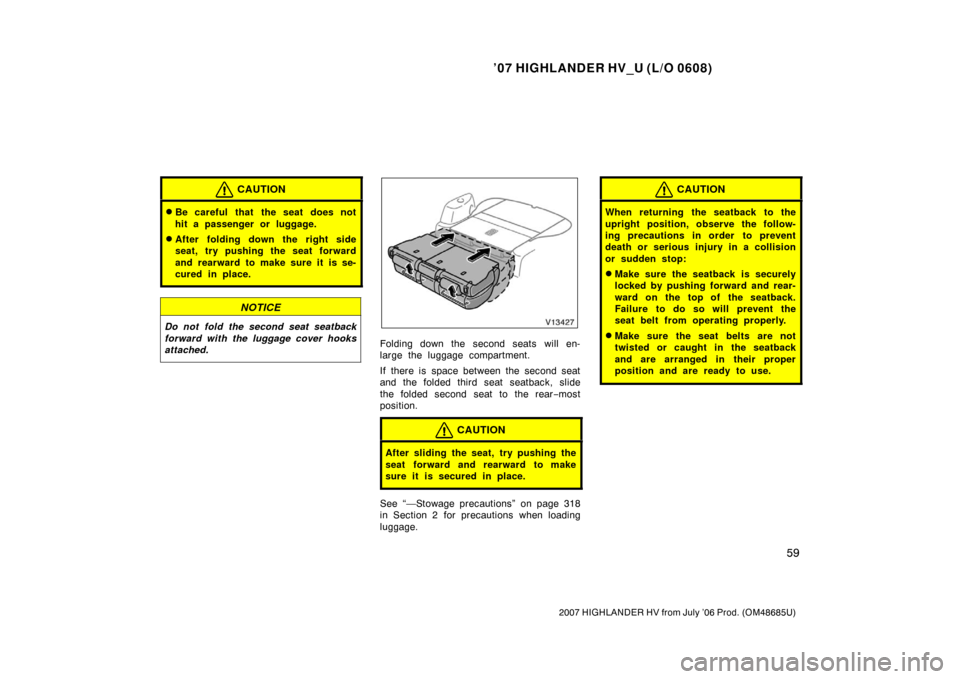
Folding down the second seats will en-
large the luggage compartment.
If there is space between the second seat
and the folded third seat seatback, slide
the folded second seat to the rear−most
position.
CAUTION
After sliding the seat, try pushing the
seat forward and rearward to make
sure it is secured in place.
See “—Stowage precautions” on page 318
in Section 2 for precautions when loading
luggage.
CAUTION
When returning the seatback to the
upright position, observe the follow-
ing precautions in order to prevent
death or serious injury in a collision
or sudden stop:
�Make sure the seatback is securely
locked by pushing forward and rear-
ward on the top of the seatback.
Failure to do so will prevent the
seat belt from operating properly.
�Make sure the seat belts are not
twisted or caught in the seatback
and are arranged in their proper
position and are ready to use.
Page 72 of 436

’07 HIGHLANDER HV_U (L/O 0608)
60
2007 HIGHLANDER HV from July ’06 Prod. (OM48685U)
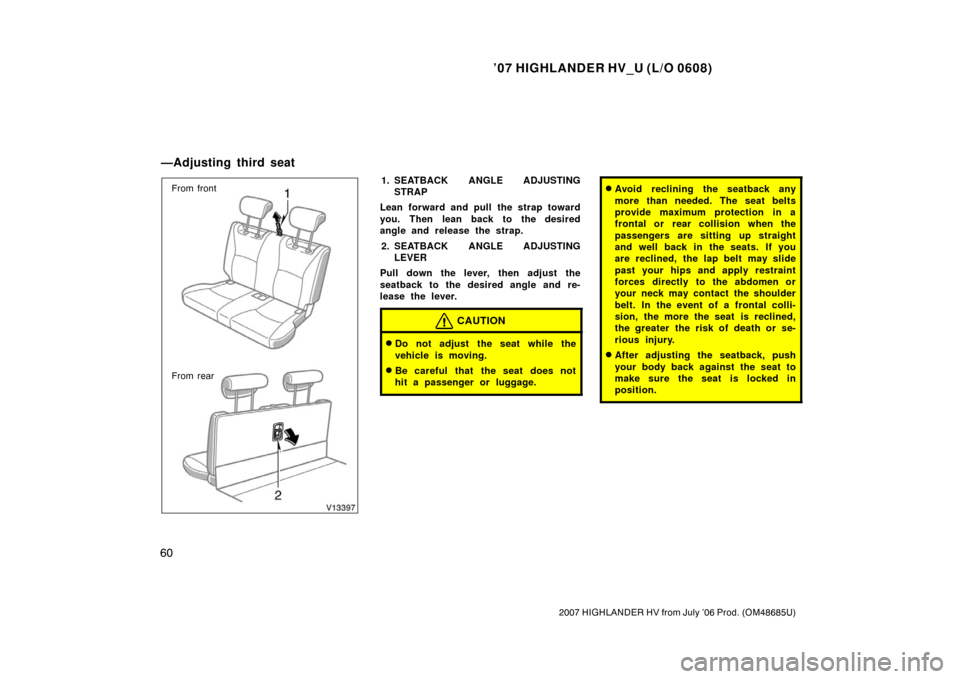
From front
From rear1. SEATBACK ANGLE ADJUSTINGSTRAP
Lean forward and pull the strap toward
you. Then lean back to the desired
angle and release the strap.
2. SEATBACK ANGLE ADJUSTING LEVER
Pull down the lever, then adjust the
seatback to the desired angle and re-
lease the lever.
CAUTION
�Do not adjust the seat while the
vehicle is moving.
�Be careful that the seat does not
hit a passenger or luggage.
�Avoid reclining the seatback any
more than needed. The seat belts
provide maximum protection in a
frontal or rear collision when the
passengers are sitting up straight
and well back in the seats. If you
are reclined, the lap belt may slide
past your hips and apply restraint
forces directly to the abdomen or
your neck may contact the shoulder
belt. In the event of a frontal colli-
sion, the more the seat is reclined,
the greater the risk of death or se-
rious injury.
�After adjusting the seatback, push
your body back against the seat to
make sure the seat is locked in
position.
—Adjusting third seat
Page 73 of 436
’07 HIGHLANDER HV_U (L/O 0608)
61
2007 HIGHLANDER HV from July ’06 Prod. (OM48685U)
BEFORE FOLDING DOWN THIRD SEAT
Make sure that the seat is clear of
people and luggage.1. Stow the third seat seat belt buckles as shown in the illustration.
NOTICE
The seat belt buckles must be stowed
before you fold the third seat.
2. To stow the seat belt, first insert tab1 into the slot and then insert tab 2
into the slot. Make sure the tabs are
securely locked in the slot.
NOTICE
The seat belt must be stowed before
you fold the seatback.
—Folding down third seat
Page 74 of 436
’07 HIGHLANDER HV_U (L/O 0608)
62
2007 HIGHLANDER HV from July ’06 Prod. (OM48685U)
From front
From rearFOLDING DOWN THIRD SEAT
Lower the head restraints to the lowest
position. Pull the seatback angle adjust-
ing strap toward you or pull down the
seatback angle adjusting lever to un-
lock the seatback and fold the seatback
down until it locks.
CAUTION
Be careful that the seat does not hit
a passenger or luggage.
Folding down the third seat will enlarge
the luggage compartment. See “—Stowage
precautions” on page 318 in Section 2 for
precautions when loading luggage.RETURNING THIRD SEAT
Pull the seatback adjusting lever to un-
lock the seatback and fold up the seat-
back to its upright lock position.
Page 75 of 436
’07 HIGHLANDER HV_U (L/O 0608)
63
2007 HIGHLANDER HV from July ’06 Prod. (OM48685U)
CAUTION
When returning the seatback to the
upright position, observe the follow-
ing precautions in order to prevent
death or serious injury in a collision
or sudden stop:
�Make sure the seatback is securely
locked by pushing forward and rear-
ward on the top of the seatback.
Failure to do so will prevent the
seat belt from operating properly.
�Make sure the seat belts are not
twisted or caught under the seat
and are arranged in their proper
position and are ready to use.To flatten the seatbacks, do the follow-
ing:1. Hold the center of the lever and pull it up, sliding the second seat to the
rear�most position. Then pull the
seat forward slightly until it locks.2. Remove the head restraint. Hold thecenter of the lever and pull it up.
Then slide the front seat further for-
ward than the front�most lock posi-
tion.
Flattening seatbacks
(manual seat)
Page 76 of 436
’07 HIGHLANDER HV_U (L/O 0608)
64
2007 HIGHLANDER HV from July ’06 Prod. (OM48685U)
3. Pull the seatback angle adjusting le-ver up to unlock and push down the
seatback.
When returning the seatback to the up-
right position, be careful not to make
yourself hit by the seatback which will
bound with considerable spring force.
After returning the seat to its original
position, be certain to replace the head
restraint.
CAUTION
�Do not allow passengers to ride on
the flattened seat while driving; use
the seat in the normal position.
�After returning the seat to its origi-
nal position, try pushing the seat
and seatback forward and rearward
to make sure it is secured in place.
Be certain to replace head restraint.
To flatten the seatbacks, do the follow-
ing:
1. Hold the center of the lever and pull it up, sliding the second seat to the
rear�most position. Then pull the
seat forward slightly until it locks.
Flattening seatbacks
(power seat)
Page 79 of 436
’07 HIGHLANDER HV_U (L/O 0608)
67
2007 HIGHLANDER HV from July ’06 Prod. (OM48685U)
Front seats
Second seats
Third seats
For your safety and comfort, adjust the
head restraint before driving.
To raise: Pull it up.
To lower: Push it down while pressing the
lock release button.
Front head restraints only—On some mod-
els, you can also move the front head
restraint forward or backward. If such ad-
justment is desired, pull or push the base
of the head restraint.Second and third seat head restraints—
When an occupant sits in the second or
third seat, always raise the head restraint
to the lock position.
The head restraint is most effective when
it is close to your head. Therefore, using
a cushion on the seatback is not recom-
mended.
CAUTION
�Adjust the center of the head re-
straint so that it is closest to the
top of your ears.
�After adjusting the head restraint,
make sure it is locked in position.
�Do not drive with the head re-
straints removed.
Head restraints
Page 82 of 436

’07 HIGHLANDER HV_U (L/O 0608)
70
2007 HIGHLANDER HV from July ’06 Prod. (OM48685U)
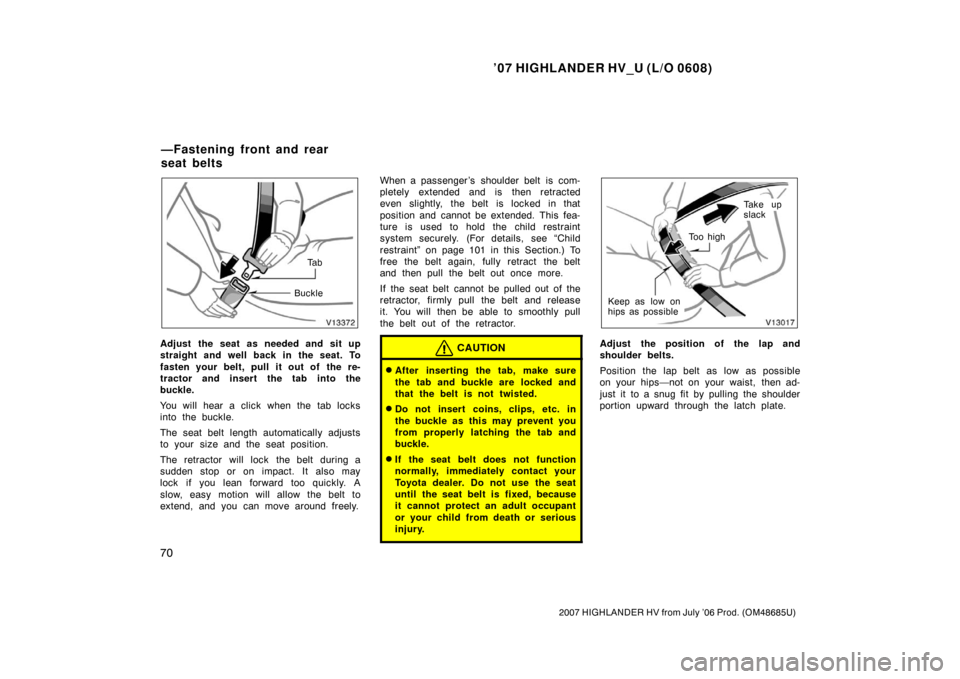
Ta b
Buckle
Adjust the seat as needed and sit up
straight and well back in the seat. To
fasten your belt, pull it out of the re-
tractor and insert the tab into the
buckle.
You will hear a click when the tab locks
into the buckle.
The seat belt length automatically adjusts
to your size and the seat position.
The retractor will lock the belt during a
sudden stop or on impact. It also may
lock if you lean forward too quickly. A
slow, easy motion will allow the belt to
extend, and you can move around freely. When a passenger ’s shoulder belt is com-
pletely extended and is then retracted
even slightly, the belt is locked in that
position and cannot be extended. This fea-
ture is used to hold the child restraint
system securely. (For details, see “Child
restraint” on page 101 in this Section.) To
free the belt again, fully retract the belt
and then pull the belt out once more.
If the seat belt cannot be pulled out of the
retractor, firmly pull the belt and release
it. You will then be able to smoothly pull
the belt out of the retractor.CAUTION
�After inserting the tab, make sure
the tab and buckle are locked and
that the belt is not twisted.
�Do not insert coins, clips, etc. in
the buckle as this may prevent you
from properly latching the tab and
buckle.
�If the seat belt does not function
normally, immediately contact your
Toyota dealer. Do not use the seat
until the seat belt is fixed, because
it cannot protect an adult occupant
or your child from death or serious
injury.
Ta k e u p
slack
To o h i g h
Keep as low on
hips as possible
Adjust the position of the lap and
shoulder belts.
Position the lap belt as low as possible
on your hips—not on your waist, then ad-
just it to a snug fit by pulling the shoulder
portion upward through the latch plate.
—Fastening front and rear
seat belts