Page 57 of 436

45
2007 HIGHLANDER HV from July ’06 Prod. (OM48685U)
Sliding operation
Tilting operation
To operate the moonroof, use the
switch between the personal lights.
The moo")
’07 HIGHLANDER HV_U (L/O 0608)
45
2007 HIGHLANDER HV from July ’06 Prod. (OM48685U)
Sliding operation
Tilting operation
To operate the moonroof, use the
switch between the personal lights.
The moonroof works when the ignition
switch is in the “ON” position.
The sun shade can be opened or closed
by hand.
Sliding operation—
To open: Push the switch toward the
“SLIDE OPEN” side.
The roof will open and stop partway 45
mm (1.8 in.) from the fully opened posi-
tion. When you push the switch toward
the “SLIDE OPEN” side again, the moon
roof will open fully. To stop the roof part-
way, push the switch toward either the
“SLIDE OPEN” or “TILT UP” side quickly
while the roof is moving.
As driving with the moon roof opened fully
will cause wind throbs, we recommend
you to drive with the moon roof partway
45 mm (1.8 in.) from the fully opened
position.
When you quickly push and release the
switch, the moonroof will open while the
switch is depressed and stop when re-
leased.
The sun shade will be opened together
with the roof.To close: Push the switch toward the
“TILT UP” side.
The roof will fully close automatically. To
stop the roof partway, push the switch
toward either the “SLIDE OPEN” or “TILT
UP” side quickly.
When you quickly push and release the
switch, the moonroof will close while the
switch is depressed and stop when re-
leased.
Tilting operation—
To tilt up: Push the switch toward the
“TILT UP” side.
The roof will fully tilt up automatically. To
stop the roof partway, push the switch
toward either the “SLIDE OPEN” or “TILT
UP” side quickly.
When you quickly push and release the
switch, the moonroof will tilt up while the
switch is depressed and stop when re-
leased.
To tilt down: Push the switch toward the
“SLIDE OPEN” side.
The roof will fully tilt down automatically.
To stop the roof partway, push the switch
toward either the “SLIDE OPEN” or “TILT
UP” side quickly.
Electric moonroof
Page 58 of 436

46
2007 HIGHLANDER HV from July ’06 Prod. (OM48685U)
When you quickly push and release the
switch, the moonroof will tilt down while
the switch is depressed and stop")
’07 HIGHLANDER HV_U (L/O 0608)
46
2007 HIGHLANDER HV from July ’06 Prod. (OM48685U)
When you quickly push and release the
switch, the moonroof will tilt down while
the switch is depressed and stop when
released.
Open moonroof reminder: If the moon-
roof is left open when you turn the ignition
key to the “ACC” or “LOCK” position and
open the driver ’s door, a message
“MOONROOF OPEN” appears on the mul-
ti −information display and a warning tone
sounds.
Key off operation: If all the side doors
and back door are closed, it works for 43
seconds even after the ignition switch is
turned off. It stops working when either
front door is opened. Jam protection function:
�If something gets caught between the
moonroof and frame during slide clos-
ing operation, the moonroof stops and
then opens slightly.
�If something gets caught between the
moonroof and frame during tilting down
operation, the moonroof stops and then
tilts up fully.
If the moonroof receives a strong impact,
this function may work even if nothing is
caught.
CAUTION
To avoid death or serious personal
injury, you must do the following.
�While the vehicle is moving, always
keep the heads, hands and other
parts of the bodies of all occupants
away from the roof opening. Other-
wise, they could be killed or seri-
ously injured if the vehicle stops
suddenly or if the vehicle is in-
volved in an accident.
�Before you close the moonroof, al-
ways make sure there is nobody
around the moonroof. You must
also make sure nobody places his
or her head, hands and other parts
of the body in the roof opening. If
someone’s neck, head or hands get
caught in the closing roof, it could
result in death or serious injury.
When anyone closes the moonroof,
first make sure it is safe to do so.
�Be sure to remove the ignition key
when you leave your vehicle.
Page 62 of 436

50
2007 HIGHLANDER HV from July ’06 Prod. (OM48685U)
While the vehicle is being driven, all ve-
hicle occupants should have the seatback
upright, sit well back in t")
’07 HIGHLANDER HV_U (L/O 0608)
50
2007 HIGHLANDER HV from July ’06 Prod. (OM48685U)
While the vehicle is being driven, all ve-
hicle occupants should have the seatback
upright, sit well back in the seat and prop-
erly wear the seat belts provided.
CAUTION
�Do not drive the vehicle unless the
occupants are properly seated. Do
not allow any passengers to sit on
top of a folded�down seatback, or
in the luggage compartment or car-
go area. Persons not properly
seated and/or not properly re-
strained by seat belts can be killed
or severely injured in the event of
emergency braking or a collision.
�During driving, do not allow any
passengers to stand up or move
around between seats. Otherwise,
death or severe injuries can occur
in the event of emergency braking
or a collision.
Driver seat
CAUTION
The SRS driver airbag deploys with
considerable force, and can cause
death or serious injury especially if
the driver is very close to the airbag.
The National Highway Traffic Safety
Administration (“NHTSA”) advises:
Since the risk zone for driver airbag
is the first 50—75 mm (2—3 in.) of
inflation, placing yourself 250 mm (10
in.) from your driver airbag provides
you with a clear margin of safety.
This distance is measured from the
center of the steering wheel to your
breastbone. If you sit less than 250
mm (10 in.) away now, you can
change your driving position in sever-
al ways:
�Move your seat to the rear as far
as you can while still reaching the
pedals comfortably.
�Slightly recline the back of the
seat. Although vehicle designs vary,
many drivers can achieve the 250
mm (10 in.) distance, even with the
driver seat all the way forward, sim-
ply by reclining the back of the
seat somewhat. If reclining the back
of your seat makes it hard to see
the road, raise yourself by using a
firm, non�slippery cushion, or raise
the seat if your vehicle has that
feature.
�If your steering wheel is adjustable,
tilt it downward. This points the air-
bag toward your chest instead of
your head and neck.
The seat should be adjusted as rec-
ommended by NHTSA above, while
still maintaining control of the foot
pedals, steering wheel, and your view
of the instrument panel controls.
Seats Front seats—
—Front seat precautions
Page 64 of 436
’07 HIGHLANDER HV_U (L/O 0608)
52
2007 HIGHLANDER HV from July ’06 Prod. (OM48685U)
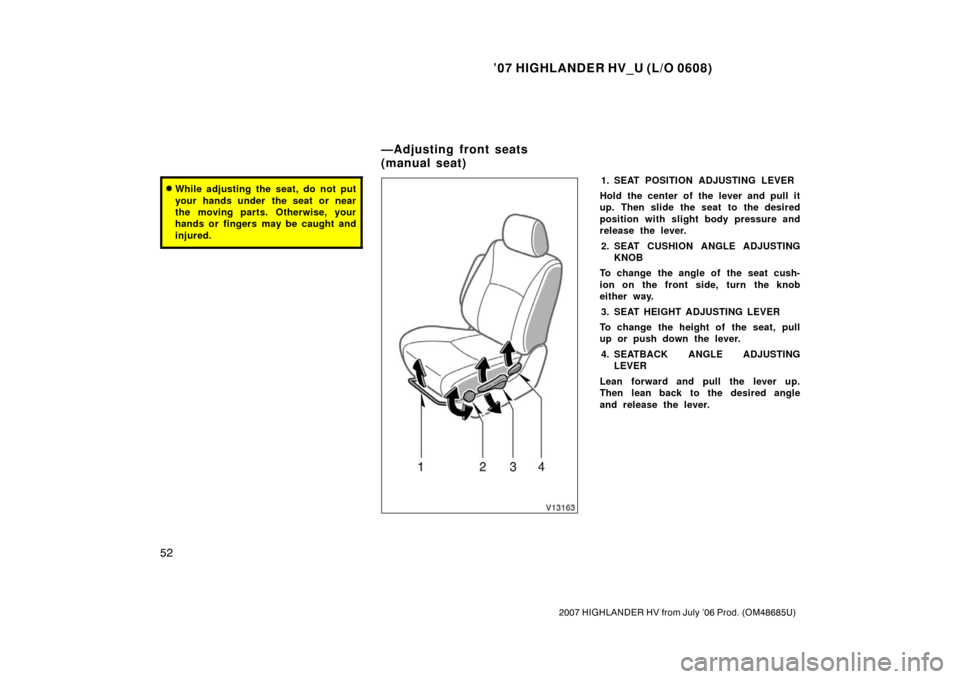
�While adjusting the seat, do not put
your hands under the seat or near
the moving parts. Otherwise, your
hands or fingers may be caught and
injured.1. SEAT POSITION ADJUSTING LEVER
Hold the center of the lever and pull it
up. Then slide the seat to the desired
position with slight body pressure and
release the lever.
2. SEAT CUSHION ANGLE ADJUSTING KNOB
To change the angle of the seat cush-
ion on the front side, turn the knob
either way.
3. SEAT HEIGHT ADJUSTING LEVER
To change the height of the seat, pull
up or push down the lever.
4. SEATBACK ANGLE ADJUSTING LEVER
Lean forward and pull the lever up.
Then lean back to the desired angle
and release the lever.
—Adjusting front seats
(manual seat)
Page 67 of 436
’07 HIGHLANDER HV_U (L/O 0608)
55
2007 HIGHLANDER HV from July ’06 Prod. (OM48685U)
Vehicles with third seatVehicles without third seat
1. SEAT POSITION ADJUSTING LEVER
Hold the center of the lever and pull it
up. Then slide the seat to the desired
position with slight body pressure and
release the lever.
2. SEATBACK ANGLE ADJUSTING LEVER
Pull the lever up. Then lean back to the
desired angle and release the lever.
CAUTION
�Do not adjust the seat while the
vehicle is moving.
�Be careful that the seat does not
hit a passenger or luggage.
—Adjusting second seats
Page 68 of 436

56
2007 HIGHLANDER HV from July ’06 Prod. (OM48685U)
�Avoid reclining the seatback any
more than needed. The seat belts
provide maximum protection in a
frontal or r")
’07 HIGHLANDER HV_U (L/O 0608)
56
2007 HIGHLANDER HV from July ’06 Prod. (OM48685U)
�Avoid reclining the seatback any
more than needed. The seat belts
provide maximum protection in a
frontal or rear collision when the
passengers are sitting up straight
and well back in the seats. If you
are reclined, the lap belt may slide
past your hips and apply restraint
forces directly to the abdomen or
your neck may contact the shoulder
belt. In the event of a frontal colli-
sion, the more the seat is reclined,
the greater the risk of death or se-
rious injury.
�After adjusting the seat position, re-
lease the lever and try sliding the
seat forward and backward to make
sure it is locked in position.
�After adjusting the seatback, push
your body back against the seat to
make sure the seat is locked in
position.
NOTICE
Do not fold the second seat seatback
forward with the luggage cover hooks
attached.
For easy access to the third seat:1. Lift the lever on the side of the seat- back and fold the seatback.
The seat will slide forward.
2. Move the seat to the front −most posi-
tion.
After passengers are in, lift up the seat-
back and return the seat until it locks.
CAUTION
After putting back the seat, try push-
ing the seat forward and rearward to
make sure it is secured in place.
To fold down the second seat after it has
been moved to access the third seat,
push the seatback up slightly and then
pull the seatback adjusting lever before
folding the seatback down. (See “—Fold-
ing down second seats” described below
for instructions about folding down the
second seat.)
—Moving second seat for
third seat access
Page 75 of 436
’07 HIGHLANDER HV_U (L/O 0608)
63
2007 HIGHLANDER HV from July ’06 Prod. (OM48685U)
CAUTION
When returning the seatback to the
upright position, observe the follow-
ing precautions in order to prevent
death or serious injury in a collision
or sudden stop:
�Make sure the seatback is securely
locked by pushing forward and rear-
ward on the top of the seatback.
Failure to do so will prevent the
seat belt from operating properly.
�Make sure the seat belts are not
twisted or caught under the seat
and are arranged in their proper
position and are ready to use.To flatten the seatbacks, do the follow-
ing:1. Hold the center of the lever and pull it up, sliding the second seat to the
rear�most position. Then pull the
seat forward slightly until it locks.2. Remove the head restraint. Hold thecenter of the lever and pull it up.
Then slide the front seat further for-
ward than the front�most lock posi-
tion.
Flattening seatbacks
(manual seat)
Page 76 of 436
’07 HIGHLANDER HV_U (L/O 0608)
64
2007 HIGHLANDER HV from July ’06 Prod. (OM48685U)
3. Pull the seatback angle adjusting le-ver up to unlock and push down the
seatback.
When returning the seatback to the up-
right position, be careful not to make
yourself hit by the seatback which will
bound with considerable spring force.
After returning the seat to its original
position, be certain to replace the head
restraint.
CAUTION
�Do not allow passengers to ride on
the flattened seat while driving; use
the seat in the normal position.
�After returning the seat to its origi-
nal position, try pushing the seat
and seatback forward and rearward
to make sure it is secured in place.
Be certain to replace head restraint.
To flatten the seatbacks, do the follow-
ing:
1. Hold the center of the lever and pull it up, sliding the second seat to the
rear�most position. Then pull the
seat forward slightly until it locks.
Flattening seatbacks
(power seat)

55
2007 HIGHLANDER HV from July ’06 Prod. (OM48685U)
Vehicles with third seatVehicles without third seat
1. SEAT POSITION ADJUSTING LEVER
Hold the center of the leve")

63
2007 HIGHLANDER HV from July ’06 Prod. (OM48685U)
CAUTION
When returning the seatback to the
upright position, observe the follow-
ing precautions in order to pr")

64
2007 HIGHLANDER HV from July ’06 Prod. (OM48685U)
3. Pull the seatback angle adjusting le-ver up to unlock and push down the
seatback.
When returning the seatback")