Page 376 of 436

’07 HIGHLANDER HV_U (L/O 0608)
364
2007 HIGHLANDER HV from July ’06 Prod. (OM48685U)
2. Wash with a mild car−wash soap,
mixed according to the manufacturer ’s
instructions. Use a soft cotton mitt and
keep it wet by dipping it frequently into
the wash water. Do not rub hard—let
the soap and water remove the dirt.
Fuel filler door: Do not apply water (high −
pressure car wash, for example) at or
near the fuel tank inlet with the fuel filler
door opened. If the water enters the air
vent, you may experience trouble with re-
fueling or rough engine idling.
Plastic wheel ornaments: The plastic
wheel ornaments are damaged easily by
organic substances. If any organic sub-
stances splash an ornament, be sure to
wash them off with water and check if the
ornament is damaged.
Aluminum wheels: Use only a mild soap
or neutral detergent.
Plastic bumpers: Wash carefully. Do not
scrub with abrasive cleaners. The bumper
faces are soft.
Exterior lights: Wash carefully. Do not use
organic substances or scrub them with a
hard brush. This may damage the sur-
faces of the lights. Road tar: Remove with turpentine or
cleaners that are marked safe for painted
surfaces.
3. Rinse thoroughly—dried soap can cause streaking. In hot weather you
may need to rinse each section right
after you wash it.
4. To prevent water spots, dry the vehicle using a clean soft cotton towel. Do not
rub or press hard—you might scratch
the paint.
NOTICE
�Do not use organic substances
(gasoline, kerosene, benzine or
strong solvents), which may be tox-
ic or cause damage.
� Do not scrub any part of the ve-
hicle with a hard brush, which may
cause damage.
Automatic car wash
Your vehicle may be washed in an auto-
matic car wash, but remember that the
paint can be scratched by some type of
brushes, unfiltered washing water, or the
washing process itself. Scratching reduces
paint durability and gloss, especially on
darker colors. The manager of the car
wash should be able to advise you wheth-
er the process is safe for the paint on
your vehicle.
Waxing your Toyota
Polishing and waxing is recommended
to maintain the original beauty of your
Toyota’s finish.
Once a month or if the vehicle surface
does not repel water well, apply wax.
1. Always wash and dry the vehicle be- fore you begin waxing, even if you are
using a combined cleaner and wax.
2. Use a good quality polish and wax. If the finish has become extremely weath-
ered, use a car −cleaning polish, fol-
lowed by a separate wax. Carefully fol-
low the manufacturer ’s instructions and
precautions. Be sure to polish and wax
the chrome trim as well as the paint.
Page 384 of 436

’07 HIGHLANDER HV_U (L/O 0608)
372
2007 HIGHLANDER HV from July ’06 Prod. (OM48685U)
Exhaust system
If you notice any change in the sound of
the exhaust or smell exhaust fumes, have
the cause located and corrected immedi-
ately. (See “Engine exhaust cautions” on
page 303 in Section 2.)
INSIDE THE VEHICLE
Items listed below should be checked
regularly, e.g. while performing periodic
services, cleaning the vehicle, etc.
Lights
Make sure the headlights, stop lights, tail
lights, turn signal lights, and other lights
are all working. Check headlight aim.
Service reminder indicators and warning
buzzers
Check that all service reminder indicators
and warning buzzers function properly.
Steering wheel
Check that it has the specified free play.
Be alert for changes in steering condition,
such as hard steering or strange noise.Seats
Check that all seat controls such as seat
adjusters, seatback recliner, etc. operate
smoothly and that all latches lock securely
in any position. Check that the head re-
straints move up and down smoothly and
that the locks hold securely in any latched
position. For folding
−down rear seatbacks,
check that the latches lock securely.
Seat belts
Check that the seat belt system such as
buckles, retractors and anchors operate
properly and smoothly. Make sure the belt
webbing is not cut, frayed, worn or dam-
aged.
Accelerator pedal
Check the pedal for smooth operation and
uneven pedal effort or catching.
Brake pedal
Check the pedal for smooth operation and
that the pedal has the proper clearance.
Check the brake booster function.
Brakes
In a safe place, check that the brakes do
not pull to one side when applied. Parking brake
Check that the pedal has the proper travel
and that, on a safe incline, your vehicle
is held securely with only the parking
brake applied.
Transmission “Park” mechanism
Check the lock release button of the se-
lector lever for proper and smooth opera-
tion. On a safe incline, check that your
vehicle is held securely with the selector
lever in “P” position and all brakes re-
leased.
OUTSIDE THE VEHICLE
Items listed below should be performed
from time to time, unless otherwise
specified.
Fluid leaks
Check underneath for leaking fuel, oil, wa-
ter or other fluid after the vehicle has
been parked for a while. If you smell fuel
fumes or notice any leak, have the cause
found and corrected immediately.
Doors and engine hood
Check that all side doors and back door
operate smoothly and all latches lock se-
curely. Make sure the engine hood sec-
ondary latch secures the hood from open-
ing when the primary latch is released.
Page 390 of 436
’07 HIGHLANDER HV_U (L/O 0608)
378
2007 HIGHLANDER HV from July ’06 Prod. (OM48685U)
Removing clip
Installing clip
Before checking the fuse or replacing
the left front light bulbs, etc. in the
engine compartment, remove the engine
compartment covers as shown in the
illustrations:1. Push the core of the clips and remove the clips.
2. Remove the cover.
Be careful not to lose the removed plastic
clips.
After checking the items, install the en-
gine compartment covers and insert the
plastic clips in their original positions.
NOTICE
After installing the engine compart-
ment covers, make sure the covers
are securely in their original posi-
tions.
Fuse locations
Page 398 of 436

’07 HIGHLANDER HV_U (L/O 0608)
386
2007 HIGHLANDER HV from July ’06 Prod. (OM48685U)
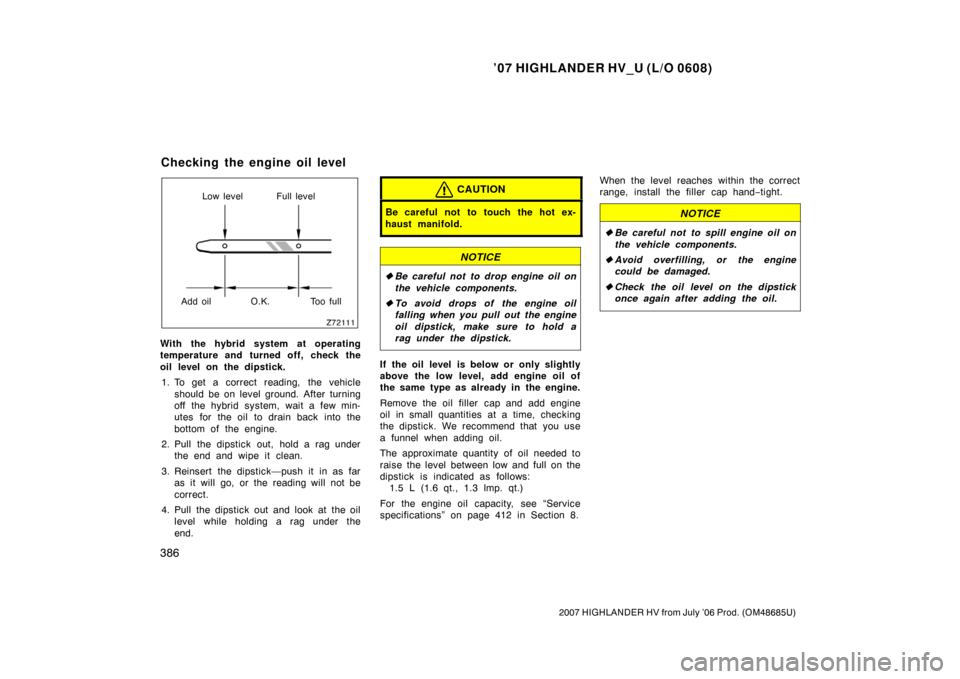
Low level Full level
Add oil O.K. Too full
With the hybrid system at operating
temperature and turned off, check the
oil level on the dipstick. 1. To get a correct reading, the vehicle should be on level ground. After turning
off the hybrid system, wait a few min-
utes for the oil to drain back into the
bottom of the engine.
2. Pull the dipstick out, hold a rag under the end and wipe it clean.
3. Reinsert the dipstick—push it in as far as it will go, or the reading will not be
correct.
4. Pull the dipstick out and look at the oil level while holding a rag under the
end.
CAUTION
Be careful not to touch the hot ex-
haust manifold.
NOTICE
�Be careful not to drop engine oil on
the vehicle components.
� To avoid drops of the engine oil
falling when you pull out the engine
oil dipstick, make sure to hold a
rag under the dipstick.
If the oil level is below or only slightly
above the low level, add engine oil of
the same type as already in the engine.
Remove the oil filler cap and add engine
oil in small quantities at a time, checking
the dipstick. We recommend that you use
a funnel when adding oil.
The approximate quantity of oil needed to
raise the level between low and full on the
dipstick is indicated as follows:
1.5 L (1.6 qt., 1.3 lmp. qt.)
For the engine oil capacity, see “Service
specifications” on page 412 in Section 8. When the level reaches within the correct
range, install the filler cap hand−
tight.
NOTICE
�Be careful not to spill engine oil on
the vehicle components.
� Avoid overfilling, or the engine
could be damaged.
� Check the oil level on the dipstick
once again after adding the oil.
Checking the engine oil level