Page 263 of 436

251
2007 HIGHLANDER HV from July ’06 Prod. (OM48685U)
Fan speed selector
Turn the knob to adjust the fan speed—to
the right to increase, to the left to de-
crease.")
’07 HIGHLANDER HV_U (L/O 0608)
251
2007 HIGHLANDER HV from July ’06 Prod. (OM48685U)
Fan speed selector
Turn the knob to adjust the fan speed—to
the right to increase, to the left to de-
crease.
Temperature selector
Turn the knob to adjust the temperature—
to the right to warm, to the left to cool.
Turning the knob fully counterclockwise
sets the air intake selector to the
RECIRCULATE mode automatically for
quick cooling. To set to the FRESH mode,
press the air intake selector button.
Air flow selector
Turn the knob to select the vents used for
air flow.1. Panel— Air flows from the instrument
panel vents.
2. Bi�level— Air flows from both the floor
vents and the instrument panel vents.
3. Floor— Air flows mainly from the floor
vents.
4. Floor/Windshield— Air flows mainly
from the floor vents and windshield
vents.
Turning the air flow selector to the
floor/windshield position turns on the
defogging function with the purpose of
clearing the front view. This position allows the air intake to
select FRESH automatically. This is to
clean up the front view more quickly.
If you want to return the setting to
RECIRCULATE mode, press the air in-
take selector button once again.
5. Windshield— Air flows mainly from the
windshield vents.
Turning the air flow selector to the
windshield position turns on the defog-
ging function with the purpose of clear-
ing the front view.
This position allows the air intake to
select FRESH automatically. This is to
clean up the front view more quickly.
It is not possible to select the
RECIRCULATE mode in the windshield
mode if you press the air intake control
button.
For details about air flow selector settings,
see “—Air flow selector settings” de-
scribed blow.
Page 265 of 436

253
2007 HIGHLANDER HV from July ’06 Prod. (OM48685U)
�To cool off your Toyota after it has
been parked in the hot sun, drive with
the windows open for a few minutes")
’07 HIGHLANDER HV_U (L/O 0608)
253
2007 HIGHLANDER HV from July ’06 Prod. (OM48685U)
�To cool off your Toyota after it has
been parked in the hot sun, drive with
the windows open for a few minutes.
This vents the hot air, allowing the air
conditioning to cool the interior more
quickly.
�Make sure the air intake grilles in front
of the windshield are not blocked (by
leaves or snow, for example).
�On humid days, do not blow cold air
on the windshield. The windshield could
fog up because of the difference in air
temperature on the inside and outside
of the windshield.
�Keep the area under the front seats
clear to allow air to circulate through-
out the vehicle.
�On cold days, set the fan speed to
high for a minute to help clear the
intake ducts of snow or moisture. This
can reduce the amount of fogging on
the windows.
�When driving on dusty roads, close all
windows. If dust thrown up by the ve-
hicle is still drawn into the vehicle after
closing the windows, it is recommended
that the air intake selector be set to
FRESH and the fan speed selector to
any setting except “OFF”.
—Air flow selector settings—Operating tips
Page 272 of 436

260
2007 HIGHLANDER HV from July ’06 Prod. (OM48685U)
�To cool off your Toyota after it has
been parked in the hot sun, drive with
the windows open for a few minutes")
’07 HIGHLANDER HV_U (L/O 0608)
260
2007 HIGHLANDER HV from July ’06 Prod. (OM48685U)
�To cool off your Toyota after it has
been parked in the hot sun, drive with
the windows open for a few minutes.
This vents the hot air, allowing the air
conditioning to cool the interior more
quickly.
�Make sure the air intake grilles in front
of the windshield are not blocked (by
leaves or snow, for example).
�On humid days, do not blow cold air
on the windshield. The windshield could
fog up because of the difference in air
temperature on the inside and outside
of the windshield.
�Keep the area under the front seats
clear to allow air to circulate through-
out the vehicle.
�On cold days, set the fan speed to
high for a minute to help clear the
intake ducts of snow or moisture. This
can reduce the amount of fogging on
the windows.
�When driving on dusty roads, close all
windows. If dust thrown up by the ve-
hicle is still drawn into the vehicle after
closing the windows, it is recommended
that the air intake selector be set to
FRESH and the fan speed selector to
any setting except “OFF”.
—Air flow selector settings—Operating tips
Page 281 of 436

269
2007 HIGHLANDER HV from July ’06 Prod. (OM48685U)
OPERATION OF INSTRUMENTS AND
CONTROLS
Other equipment
Trip information270
. . . . . . . . . . . . . . . . . . .")
’07 HIGHLANDER HV_U (L/O 0608)
269
2007 HIGHLANDER HV from July ’06 Prod. (OM48685U)
OPERATION OF INSTRUMENTS AND
CONTROLS
Other equipment
Trip information270
. . . . . . . . . . . . . . . . . . . . . . . . . . . . . . . . . . . . .\
. . . . . . . .
Clock 274
. . . . . . . . . . . . . . . . . . . . . . . . . . . . . . . . . . . . \
. . . . . . . . . . . . . . . . . .
Compass 274
. . . . . . . . . . . . . . . . . . . . . . . . . . . . . . . . . . . . \
. . . . . . . . . . . . . .
Ashtrays 279
. . . . . . . . . . . . . . . . . . . . . . . . . . . . . . . . . . . . \
. . . . . . . . . . . . . . .
Power outlets 280
. . . . . . . . . . . . . . . . . . . . . . . . . . . . . . . . . . . . \
. . . . . . . . . .
Power outlet 281
. . . . . . . . . . . . . . . . . . . . . . . . . . . . . . . . . . . . \
. . . . . . . . . . .
Glove box 282
. . . . . . . . . . . . . . . . . . . . . . . . . . . . . . . . . . . . \
. . . . . . . . . . . . . .
Garage door opener 283
. . . . . . . . . . . . . . . . . . . . . . . . . . . . . . . . . . . . \
. . . .
Auxiliary boxes 286
. . . . . . . . . . . . . . . . . . . . . . . . . . . . . . . . . . . . \
. . . . . . . . .
Container 288
. . . . . . . . . . . . . . . . . . . . . . . . . . . . . . . . . . . . \
. . . . . . . . . . . . . .
Cup holders 289
. . . . . . . . . . . . . . . . . . . . . . . . . . . . . . . . . . . . \
. . . . . . . . . . . .
Bottle holders 291
. . . . . . . . . . . . . . . . . . . . . . . . . . . . . . . . . . . . \
. . . . . . . . . .
Tie −down hooks 291
. . . . . . . . . . . . . . . . . . . . . . . . . . . . . . . . . . . . \
. . . . . . . .
Luggage cover 292
. . . . . . . . . . . . . . . . . . . . . . . . . . . . . . . . . . . . \
. . . . . . . . .
Roof luggage carrier 294
. . . . . . . . . . . . . . . . . . . . . . . . . . . . . . . . . . . . \
. . . .
Floor mat 296
. . . . . . . . . . . . . . . . . . . . . . . . . . . . . . . . . . . . \
. . . . . . . . . . . . . .
For information about the clock of a vehicle equipped with Naviga-
tion system, please refer to the separate “Navigation System Own-
er’s Manual”.
SECTION 1� 10
Page 286 of 436

274
2007 HIGHLANDER HV from July ’06 Prod. (OM48685U)
Energy Monitor screen
Touching the “Energy” switch turns on
the “Energy Monitor” that displays the
hybr")
’07 HIGHLANDER HV_U (L/O 0608)
274
2007 HIGHLANDER HV from July ’06 Prod. (OM48685U)
Energy Monitor screen
Touching the “Energy” switch turns on
the “Energy Monitor” that displays the
hybrid system operating condition.
The arrow on the screen indicates the
movement of the energy. See “Energy
monitor” on page 2 for the representative
screen.
The segment of the battery on the screen
indicates the status of the hybrid battery.
See “—Hybrid battery status” on page 4
for details.
To reset the hour: Push the “H” button.
To reset the minutes: Push the “M” button.
The key must be in the “ACC” or “ON”
position.
If the electrical power source has been
disconnected from the clock, the time dis-
play will automatically be set to 1:00 (one
o’clock).The direction is indicated on the inside
rear view mirror.
If the ignition switch was turned off with
the system on, the system will automati-
cally turn back on when the ignition switch
is turned on.
Push the “
” switch to turn the compass
system on and off.
Clock Compass
Page 290 of 436

278
2007 HIGHLANDER HV from July ’06 Prod. (OM48685U)
CALIBRATING THE COMPASS (circling
calibration)
Sometimes the direction display on the
compass may not change")
’07 HIGHLANDER HV_U (L/O 0608)
278
2007 HIGHLANDER HV from July ’06 Prod. (OM48685U)
CALIBRATING THE COMPASS (circling
calibration)
Sometimes the direction display on the
compass may not change after a turn. To
rectify this, stop the vehicle and push and
hold the “
” switch until “C” appears on
the display.
If “C” appears on the display because of
a drastic change in the magnetic field,
perform circling calibration.
Drive the vehicle in a circle at 8 km/h (5
mph) or less. If there is not enough space
to drive in a circle, drive around the
block.
After driving 1 to 3 circles in the above
method, calibration is completed when the
direction is shown on the display.
If calibration cannot be performed because
of the magnetized vehicle etc., take your
vehicle to Toyota dealer. Perform circling calibration just after
you have purchased your Toyota. And
then always perform circling calibration
after the 12 volt battery has been re-
moved, replaced or disconnected.
�Do not perform circling calibration of
the compass in a place where the
earth’s magnetic field is subject to in-
terference by artificial magnetic fields
(underground parking, under a steel
tower, between buildings, roof parking,
near a crossing, near a large vehicle,
etc.).
�During calibration, do not operate elec-
tric systems (moonroof, power win-
dows, etc.) as they may interfere with
the calibration.
Page 291 of 436

279
2007 HIGHLANDER HV from July ’06 Prod. (OM48685U)
CAUTION
�When doing the circling calibration,
be sure to secure a wide space,
and watch out for people and ve-")
’07 HIGHLANDER HV_U (L/O 0608)
279
2007 HIGHLANDER HV from July ’06 Prod. (OM48685U)
CAUTION
�When doing the circling calibration,
be sure to secure a wide space,
and watch out for people and ve-
hicles in the neighborhood. Do not
violate any local traffic rules while
performing circling calibration.
�Do not adjust the display while the
vehicle is moving. Be sure to adjust
the display only when the vehicle is
stopped.
Front
Rear
Front ashtray: To use the ashtray, open
the lid.
When finished with your cigarette, thor-
oughly extinguish it in the ashtray to pre-
vent other cigarette butts from catching
fire. After using the ashtray, close the lid
completely.
To remove the ashtray, pull the lid and
pull it out.
Rear ashtray: To use the ashtray, pull
it out.
When finished with your cigarette, thor-
oughly extinguish it in the ashtray to pre-
vent other cigarette butts from catching
fire. After using the ashtray, close the lid
completely.
To remove the ashtray, press down on the
lock spring plate and pull out.
CAUTION
To reduce the chance of injury in
case of an accident or sudden stop
while driving, always completely close
the ashtray after use.
Ashtrays
Page 294 of 436
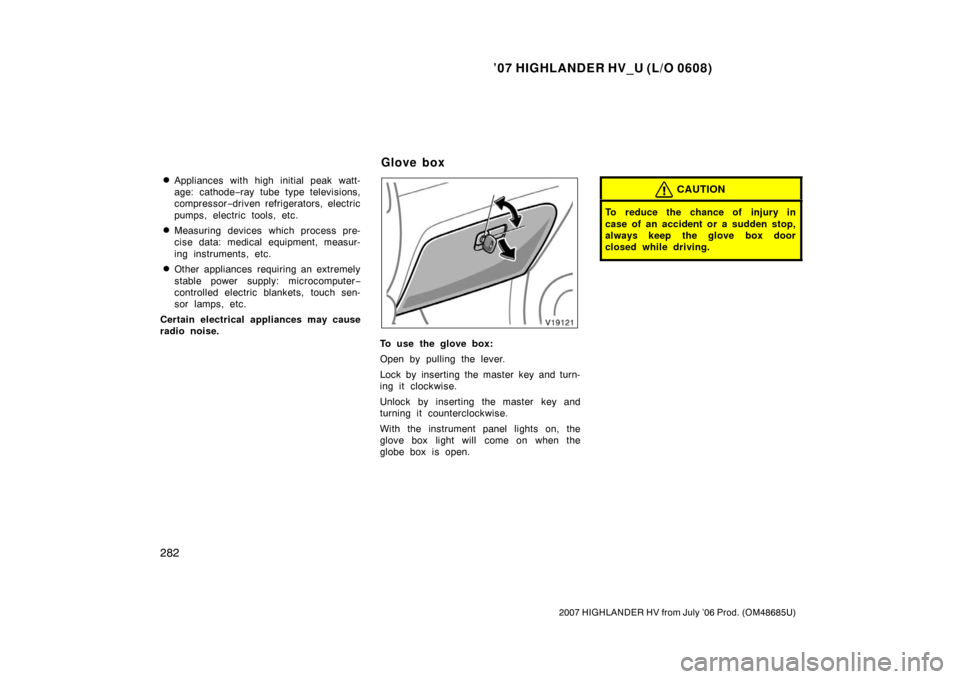
’07 HIGHLANDER HV_U (L/O 0608)
282
2007 HIGHLANDER HV from July ’06 Prod. (OM48685U)
�Appliances with high initial peak watt-
age: cathode−ray tube type televisions,
compressor −driven refrigerators, electric
pumps, electric tools, etc.
�Measuring devices which process pre-
cise data: medical equipment, measur-
ing instruments, etc.
�Other appliances requiring an extremely
stable power supply: microcomputer −
controlled electric blankets, touch sen-
sor lamps, etc.
Certain electrical appliances may cause
radio noise.
To use the glove box:
Open by pulling the lever.
Lock by inserting the master key and turn-
ing it clockwise.
Unlock by inserting the master key and
turning it counterclockwise.
With the instrument panel lights on, the
glove box light will come on when the
globe box is open.
CAUTION
To reduce the chance of injury in
case of an accident or a sudden stop,
always keep the glove box door
closed while driving.
Glove box