Page 261 of 470
2512007 4Runner from Aug. ’06 Prod. (OM35866U)
Z17413
CHANGING THE SUBTITLE LANGUAGE
Push the “Sub Title” switch on the screen,
and then the changing subtitle language
screen will appear. You can also display
the screen by pushing the “SUB TITLE”
button on the controller.
Z17414
Each time you push the “Sub Title” switch,
another language stored on the disc is
selected.
To turn off the subtitles, push the “Hide
Buttons” switch.
Push the “Back” switch to return to the
previous screen.
The selected subtitle language will appear
on the screen.
Page 262 of 470
2522007 4Runner from Aug. ’06 Prod. (OM35866U)
Z17415
CHANGING AUDIO LANGUAGE
Push the “Audio” switch on the screen
and then the changing audio language
screen will appear. You can also display
the screen by pushing the “AUDIO” button
on the controller.
Z17416
Each time you push the “Audio” switch,
another language stored on the disc is
selected.
To turn off the audio language screen,
push the “Hide Buttons” switch.
Push the “Back” switch to return to the
previous screen.
DVD video—
The selected audio language will appear
on the screen.
Page 263 of 470
2532007 4Runner from Aug. ’06 Prod. (OM35866U)
Z17417
CHANGING ANGLE SCREEN
Push the “Angle” switch on the screen,
and then the changing angle screen will
appear. You can also display the screen
by pushing the “ANGLE” button on the
controller.
Z17418
The angle can be selected for discs that
are multi−angle compatible when the “
”
mark appears on the screen. Each time
you push the “Angle” switch, the angle
changes. The angle number which you
can select will appear on the screen.
To turn off the screen, push the “Hide
Buttons” switch.
Push the “Back” switch to return to the
previous screen.
Page 291 of 470

2812007 4Runner from Aug. ’06 Prod. (OM35866U)
“AUTO” button
For automatic operation of the air condi-
tioning, push the “AUTO” button. An indi-
cator light will illuminate to show that the
automatic operation mode has been se-
lected.
In the automatic operation mode, the air
conditioning selects the most suitable fan
speed, air flow, air intake and on−off of
the air conditioning according to the tem-
perature.
When you push the “AUTO” button with
the air intake mode at FRESH, internal
circulation may be applied for maximum
cooling.
You may use manual controls if you want
to select your own settings.
Fan speed selector
Select the mode button you desire to ad-
just the fan speed and push it. An indica-
tor light will illuminate to show which fan
speed mode is being selected.
In automatic operation, you do not have
to adjust the fan speed unless you desire
another fan speed mode. Temperature selector
To increase the temperature, push the
“UP” side, to decrease it, push the
“DOWN” side.
“LO” appears when you adjust to maxi-
mum cooling, and “HI” appears when you
adjust to maximum warming.
“OFF” button
Push the “OFF” button to turn off the air
conditioning system.
CY18014
Air flow selector
Push one of the buttons to select the
vents used for air flow. An indicator light
will illuminate to show which air flow
mode is being selected.
In automatic operation, you do not have
to select the air flow unless you desire
another air flow mode.
1. Panel— Air flows from the instrument
panel vents and rear vents.
2. Bi�level— Air flows from both the floor
vents, the instrument panel vents and
rear vents.
3. Floor— Air flows mainly from the floor
vents.
Page 294 of 470

2842007 4Runner from Aug. ’06 Prod. (OM35866U)
“AUTO” button
For automatic operation of the air condi-
tioning, push the “AUTO” button. An indi-
cator light will illuminate to show that the
automatic operation mode has been se-
lected.
In the automatic operation mode, the air
conditioning selects the most suitable fan
speed, air flow, air intake and on−off of
the air conditioning according to the tem-
perature.
When you push the “AUTO” button with
the air intake mode at FRESH, internal
circulation may be applied for maximum
cooling.
You may use manual controls if you want
to select your own settings.
Fan speed selector
Select the mode button you desire to ad-
just the fan speed and push it. An indica-
tor light will illuminate to show which fan
speed mode is being selected.
In automatic operation, you do not have
to adjust the fan speed unless you desire
another fan speed mode. Temperature selector
To increase the temperature, push the “
�”
side, to decrease it, push the “ �” side.
“LO” appears when you adjust to maxi-
mum cooling, and “HI” appears when you
adjust to maximum warming.
“DUAL” button
This button is used to set the tempera-
tures independently for the driver ’s seat
and front passenger seat.
Pushing the button changes the mode
from independent and linked.
Independent mode: Temperatures can be
set independently for the driver ’s seat and
front passenger ’s seat. An indicator light
will illuminated to show that the indepen-
dent mode has been selected.
Linked mode: The same temperature is
set for the driver’s seat and front passen-
ger ’s seat.
When the temperature for the front pas-
senger ’s seat is changed in linked mode,
the mode is changed automatically to in-
dependent mode.
“OFF” button
Push the “OFF” button to turn off the air
conditioning system.
CY18014
Air flow selector
Push one of the buttons to select the
vents used for air flow. An indicator light
will illuminate to show which air flow
mode is being selected.
In automatic operation, you do not have
to select the air flow unless you desire
another air flow mode.
1. Panel— Air flows from the instrument
panel vents and rear vents.
2. Bi�level— Air flows from both the floor
vents, the instrument panel vents and
rear vents.
3. Floor— Air flows mainly from the floor
vents.
Page 318 of 470
3082007 4Runner from Aug. ’06 Prod. (OM35866U)
CY19070
On some models, an auxiliary box is
located inside the glove box.
To increase the capacity of the glove box,
raise the lower panel of the auxiliary box.
CY19130
Indicator lightButtons
The garage door opener (\b
Universal Transceiver) is manufactured
under license from HomeLink\b and can
be programmed to operate garage
doors, gates, entry doors, door locks,
home lighting systems, and security
systems, etc.
Garage door opener
Page 319 of 470

3092007 4Runner from Aug. ’06 Prod. (OM35866U)
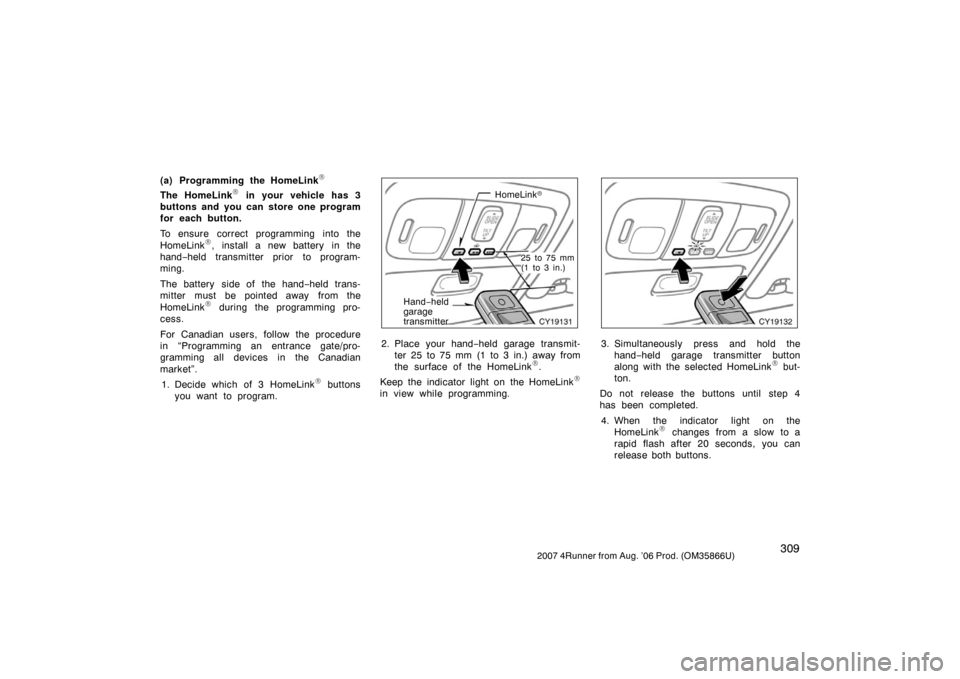
(a) Programming the HomeLink\b
The HomeLink\b in your vehicle has 3
buttons and you can store one program
for each button.
To ensure correct programming into the
HomeLink
\b, install a new battery in the
hand− held transmitter prior to program-
ming.
The battery side of the hand −held trans-
mitter must be pointed away from the
HomeLink
\b during the programming pro-
cess.
For Canadian users, follow the procedure
in “Programming an entrance gate/pro-
gramming all devices in the Canadian
market”.
1. Decide which of 3 HomeLink
\b buttons
you want to program.
CY19131
HomeLink �
25 to 75 mm
(1 to 3 in.)
Hand−held
garage
transmitter
2. Place your hand −held garage transmit-
ter 25 to 75 mm (1 to 3 in.) away from
the surface of the HomeLink
\b.
Keep the indicator light on the HomeLink
\b
in view while programming.
CY19132
3. Simultaneously press and hold the hand− held garage transmitter button
along with the selected HomeLink
\b but-
ton.
Do not release the buttons until step 4
has been completed.
4. When the indicator light on the HomeLink
\b changes from a slow to a
rapid flash after 20 seconds, you can
release both buttons.
Page 320 of 470

3102007 4Runner from Aug. ’06 Prod. (OM35866U)
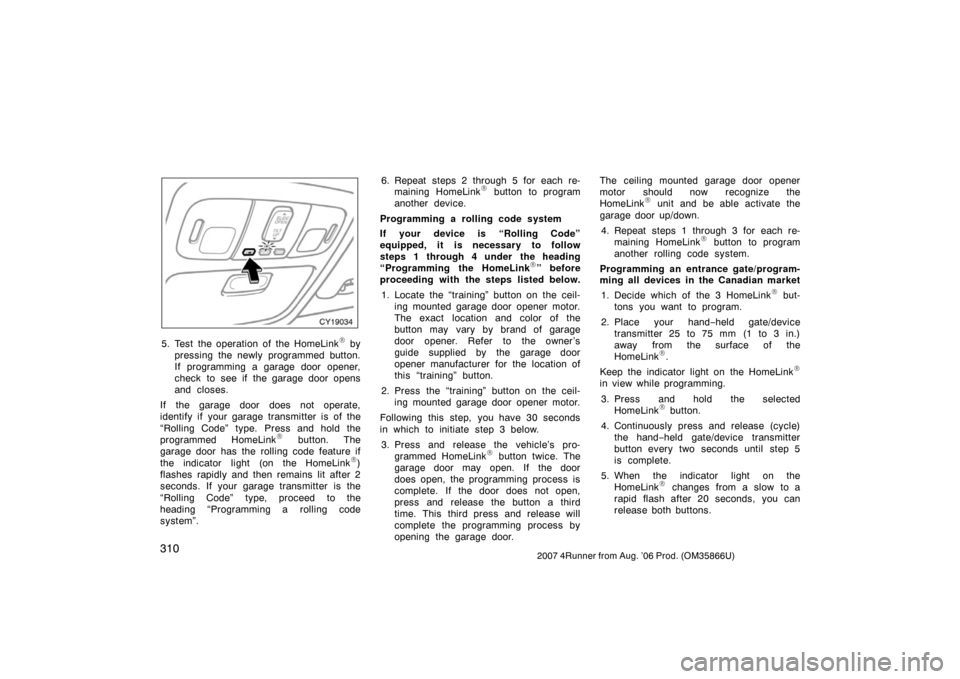
CY19034
5. Test the operation of the HomeLink\b by
pressing the newly programmed button.
If programming a garage door opener,
check to see if the garage door opens
and closes.
If the garage door does not operate,
identify if your garage transmitter is of the
“Rolling Code” type. Press and hold the
programmed HomeLink
\b button. The
garage door has the rolling code feature if
the indicator light (on the HomeLink
\b)
flashes rapidly and then remains lit after 2
seconds. If your garage transmitter is the
“Rolling Code” type, proceed to the
heading “Programming a rolling code
system”. 6. Repeat steps 2 through 5 for each re-
maining HomeLink
\b button to program
another device.
Programming a rolling code system
If your device is “Rolling Code”
equipped, it is necessary to follow
steps 1 through 4 under the heading
“Programming the HomeLink
\b” before
proceeding with the steps listed below.
1. Locate the “training” button on the ceil- ing mounted garage door opener motor.
The exact location and color of the
button may vary by brand of garage
door opener. Refer to the owner ’s
guide supplied by the garage door
opener manufacturer for the location of
this “training” button.
2. Press the “training” button on the ceil- ing mounted garage door opener motor.
Following this step, you have 30 seconds
in which to initiate step 3 below. 3. Press and release the vehicle’s pro- grammed HomeLink
\b button twice. The
garage door may open. If the door
does open, the programming process is
complete. If the door does not open,
press and release the button a third
time. This third press and release will
complete the programming process by
opening the garage door. The ceiling mounted garage door opener
motor should now recognize the
HomeLink
\b unit and be able activate the
garage door up/down.
4. Repeat steps 1 through 3 for each re- maining HomeLink
\b button to program
another rolling code system.
Programming an entrance gate/program-
ming all devices in the Canadian market 1. Decide which of the 3 HomeLink
\b but-
tons you want to program.
2. Place your hand− held gate/device
transmitter 25 to 75 mm (1 to 3 in.)
away from the surface of the
HomeLink
\b.
Keep the indicator light on the HomeLink
\b
in view while programming.
3. Press and hold the selected HomeLink
\b button.
4. Continuously press and release ( cycle)
the hand− held gate/device transmitter
button every two seconds until step 5
is complete.
5. When the indicator light on the HomeLink
\b changes from a slow to a
rapid flash after 20 seconds, you can
release both buttons.