2007 SUZUKI XL7 ECU
[x] Cancel search: ECUPage 208 of 274

5-24 SERVICE AND APPEARANCE CARE
78J00-03E
1802297
2) Remove the taillamp screw covers.
3) Remove the taillamp screws.
4) Pull the taillamp assembly towards you.
5) Turn the bulb socket counterclockwise
to disconnect it from the taillamp
assembly.
6) Pull the bulb out of the bulb socket.
7) Push the new bulb into the bulb socket.
8) Insert the bulb socket into the taillamp
assembly and turn it clockwise to
secure.
9) Reverse Steps 1 through 3 to reinstall
the taillamp assembly. When reinstall-
ing the screws, do not overtighten.
License Plate LampTo replace one of these bulbs, do the fol-
lowing:
1) Push tabs to remove the license plate
lamp from the liftgate.
1708173
2) Turn the bulb socket counterclockwise
and pull the bulb straight out of the
socket.
3) Install the new bulb.
4) Reverse Steps 1 through 3 to reinstall
the license plate lamp.
Replacement BulbsFor replacement bulbs not listed here, con-
tact your dealer.
Exterior LampBulb
Number
Back-up Lamp 921
License Plate Lamp 168
Rear Turn Signal/
Stoplamp/Sidemarker/Tail-
lamp3057K
Page 209 of 274

5-25 SERVICE AND APPEARANCE CARE
78J00-03E
Windshield Wiper Blade
ReplacementWindshield wiper blades should be
inspected for wear or cracking. Refer to
“Scheduled Maintenance” in “Mainte-
nance Schedule” in the “Maintenance
Schedule” section for more information.
Replacement blades come in different
types and are removed in different ways.
For proper type and length, refer to “Nor-
mal Maintenance Replacement Parts” in
“Maintenance Schedule” in the “Mainte-
nance Schedule” section.
Here’s how to replace the windshield wiper
blades:
1) Make sure the front wipers are turned
off.
2) Pull the windshield wiper arm away
from the windshield.
811525
3) Pull up the release clip, located at the
connecting point of the blade and the
arm. Then, pull the blade assembly
down toward the glass to remove it
from the wiper arm.
4) Push the new wiper blade securely on
the wiper arm until you hear the release
clip “click” into place.
5) Push the release clip, from Step 3,
down to secure the wiper blade into
place.Rear Window Wiper Blade Replacement
To replace the rear window wiper blade,
do the following:
1) Make sure that the rear wiper is off.
2) Pull the wiper away from the rear win-
dow.
3) Pull up the release clip, located at the
connecting point of the blade and the
arm. Then, pull the blade assembly
down toward the glass to remove it
from the wiper arm.
4) Push the new wiper blade securely on
the wiper arm until you hear the release
clip “click” into place.
5) Push the release clip, from Step 3,
down to secure the wiper blade into
place.
Page 229 of 274

5-45 SERVICE AND APPEARANCE CARE
78J00-03E
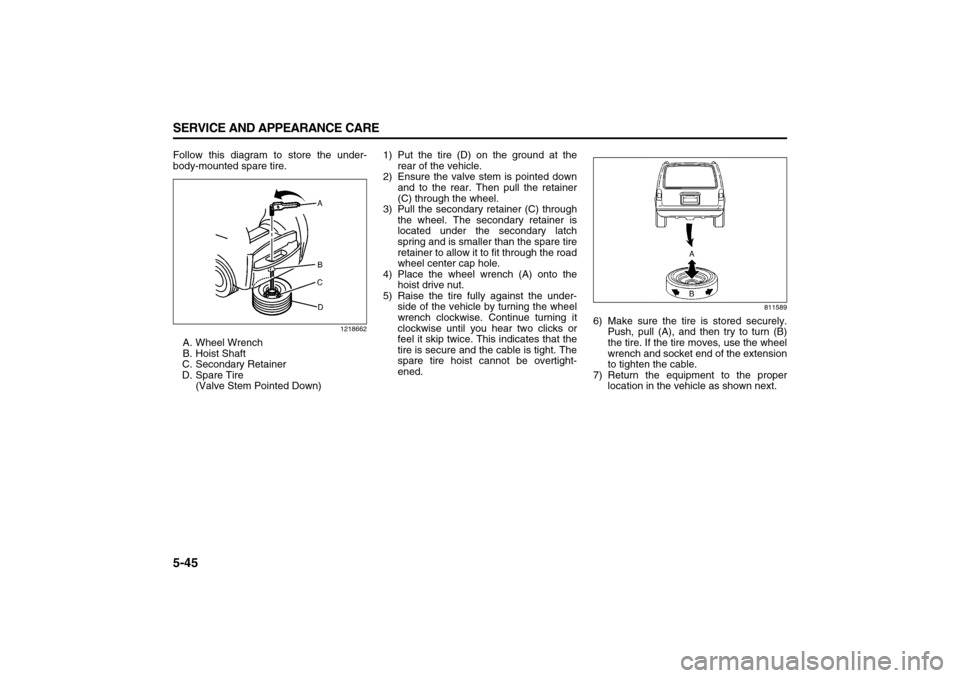
Follow this diagram to store the under-
body-mounted spare tire.
1218662
A. Wheel Wrench
B. Hoist Shaft
C. Secondary Retainer
D. Spare Tire
(Valve Stem Pointed Down)1) Put the tire (D) on the ground at the
rear of the vehicle.
2) Ensure the valve stem is pointed down
and to the rear. Then pull the retainer
(C) through the wheel.
3) Pull the secondary retainer (C) through
the wheel. The secondary retainer is
located under the secondary latch
spring and is smaller than the spare tire
retainer to allow it to fit through the road
wheel center cap hole.
4) Place the wheel wrench (A) onto the
hoist drive nut.
5) Raise the tire fully against the under-
side of the vehicle by turning the wheel
wrench clockwise. Continue turning it
clockwise until you hear two clicks or
feel it skip twice. This indicates that the
tire is secure and the cable is tight. The
spare tire hoist cannot be overtight-
ened.
811589
6) Make sure the tire is stored securely.
Push, pull (A), and then try to turn (B)
the tire. If the tire moves, use the wheel
wrench and socket end of the extension
to tighten the cable.
7) Return the equipment to the proper
location in the vehicle as shown next.
Page 230 of 274

5-46 SERVICE AND APPEARANCE CARE
78J00-03E
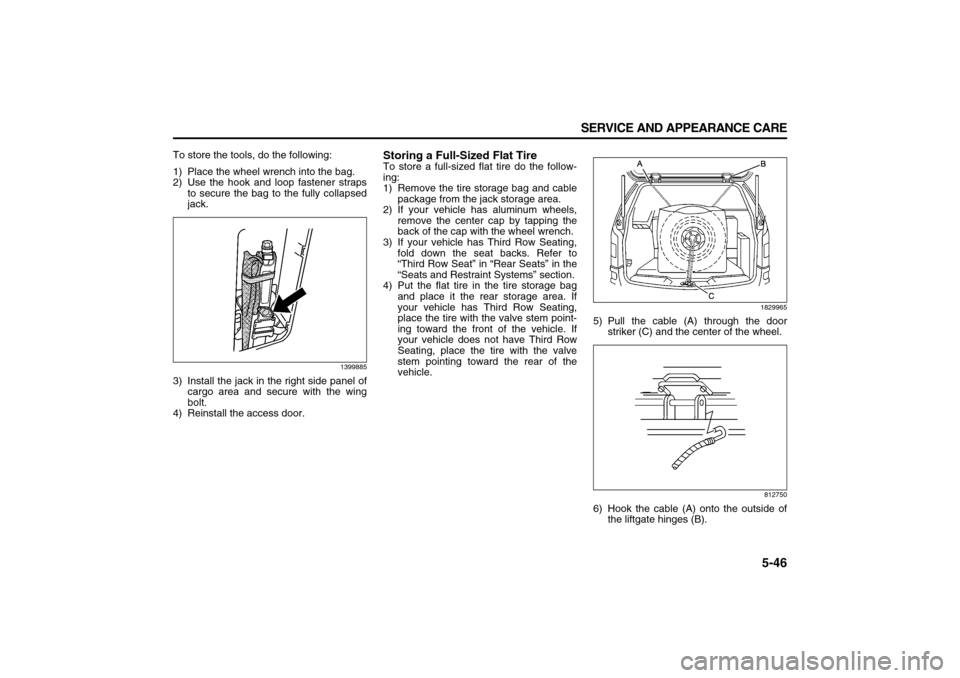
To store the tools, do the following:
1) Place the wheel wrench into the bag.
2) Use the hook and loop fastener straps
to secure the bag to the fully collapsed
jack.
1399885
3) Install the jack in the right side panel of
cargo area and secure with the wing
bolt.
4) Reinstall the access door.
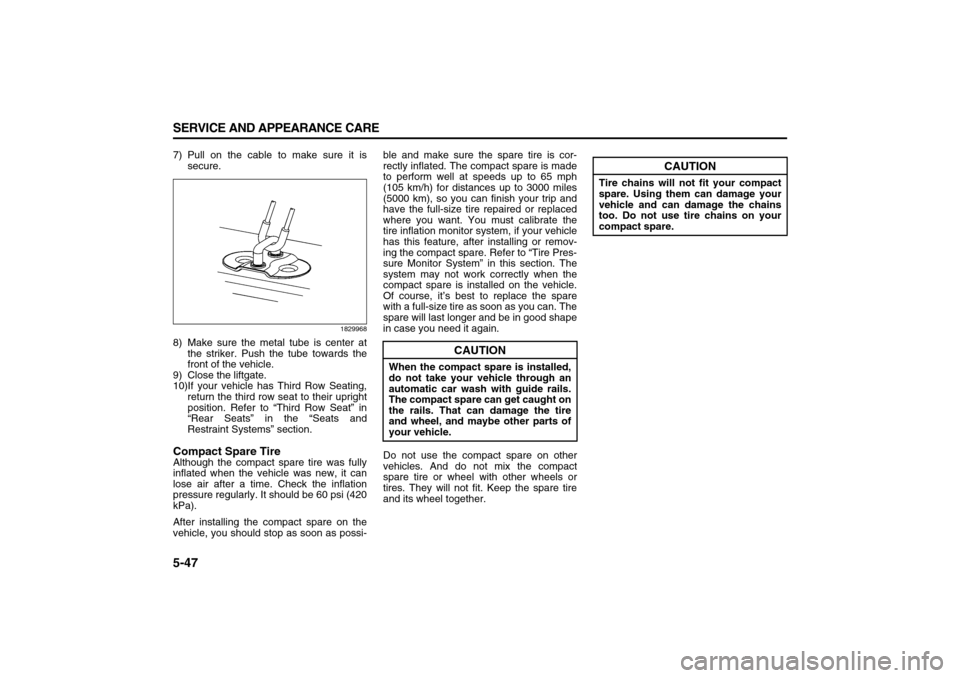
Storing a Full-Sized Flat TireTo store a full-sized flat tire do the follow-
ing:
1) Remove the tire storage bag and cable
package from the jack storage area.
2) If your vehicle has aluminum wheels,
remove the center cap by tapping the
back of the cap with the wheel wrench.
3) If your vehicle has Third Row Seating,
fold down the seat backs. Refer to
“Third Row Seat” in “Rear Seats” in the
“Seats and Restraint Systems” section.
4) Put the flat tire in the tire storage bag
and place it the rear storage area. If
your vehicle has Third Row Seating,
place the tire with the valve stem point-
ing toward the front of the vehicle. If
your vehicle does not have Third Row
Seating, place the tire with the valve
stem pointing toward the rear of the
vehicle.
1829965
5) Pull the cable (A) through the door
striker (C) and the center of the wheel.
812750
6) Hook the cable (A) onto the outside of
the liftgate hinges (B).
Page 231 of 274

5-47 SERVICE AND APPEARANCE CARE
78J00-03E
7) Pull on the cable to make sure it is
secure.
1829968
8) Make sure the metal tube is center at
the striker. Push the tube towards the
front of the vehicle.
9) Close the liftgate.
10)If your vehicle has Third Row Seating,
return the third row seat to their upright
position. Refer to “Third Row Seat” in
“Rear Seats” in the “Seats and
Restraint Systems” section.Compact Spare TireAlthough the compact spare tire was fully
inflated when the vehicle was new, it can
lose air after a time. Check the inflation
pressure regularly. It should be 60 psi (420
kPa).
After installing the compact spare on the
vehicle, you should stop as soon as possi-ble and make sure the spare tire is cor-
rectly inflated. The compact spare is made
to perform well at speeds up to 65 mph
(105 km/h) for distances up to 3000 miles
(5000 km), so you can finish your trip and
have the full-size tire repaired or replaced
where you want. You must calibrate the
tire inflation monitor system, if your vehicle
has this feature, after installing or remov-
ing the compact spare. Refer to “Tire Pres-
sure Monitor System” in this section. The
system may not work correctly when the
compact spare is installed on the vehicle.
Of course, it’s best to replace the spare
with a full-size tire as soon as you can. The
spare will last longer and be in good shape
in case you need it again.
Do not use the compact spare on other
vehicles. And do not mix the compact
spare tire or wheel with other wheels or
tires. They will not fit. Keep the spare tire
and its wheel together.
CAUTION
When the compact spare is installed,
do not take your vehicle through an
automatic car wash with guide rails.
The compact spare can get caught on
the rails. That can damage the tire
and wheel, and maybe other parts of
your vehicle.
CAUTION
Tire chains will not fit your compact
spare. Using them can damage your
vehicle and can damage the chains
too. Do not use tire chains on your
compact spare.
Page 256 of 274

6-14 MAINTENANCE SCHEDULE
78J00-03E
At Each Fuel FillIt is important to perform these underhood
checks at each fuel fill.
Engine Oil Level Check
Check the engine oil level and add the
proper oil if necessary. Refer to “Engine
Oil” in “Checking Things Under the Hood”
in the “Service and Appearance Care” sec-
tion for further details.
Engine Coolant Level Check
Check the engine coolant level and add
DEX-COOL
® coolant mixture if necessary.
Refer to “Engine Coolant” in “Checking
Things Under the Hood” in the “Service
and Appearance Care” section for further
details.
Windshield Washer Fluid Level Check
Check the windshield washer fluid level in
the windshield washer fluid reservoir and
add the proper fluid if necessary.
At Least Once a MonthTire Inflation Check
Visually inspect your vehicle’s tires and
make sure they are inflated to the correct
pressures. Do not forget to check the
spare tire. Open the driver’s door to find
the Tire Information Placard which lists the
recommended tire inflation pressures.
Check to make sure the spare tire is stored
securely. Refer to “Changing a Flat Tire” in
“Tires” in the “Service and Appearance
Care” section.
Tire Wear Inspection
Tire rotation may be required for high mile-
age highway drivers prior to the Engine Oil
Life System service notification. Check the
tires for wear and, if necessary, rotate the
tires. Refer to “Tire Inspection and Rota-
tion” in “Tires” in the “Service and Appear-
ance Care” section.
At Least Once a YearStarter Switch Check
1) Before you start, be sure you have
enough room around the vehicle.
2) Firmly apply both the parking brake and
the regular brake. Refer to “Parking
Brake” in “Starting and Operating Your
Vehicle” in the “Features and Controls”
section.
Do not use the accelerator pedal, and
be ready to turn off the engine immedi-
ately if it starts.
3) Try to start the engine in each gear.
The vehicle should start only in PARK
(P) or NEUTRAL (N). If the vehicle
starts in any other position, contact
your dealer for service.
CAUTION
It is important to check the engine oil
regularly and keep it at the proper
level. Failure to keep the engine oil at
the proper level can cause damage to
the engine not covered by your war-
ranty.
WARNING
When you are doing this inspection,
the vehicle could move suddenly. If
the vehicle moves, you or others
could be injured.
Page 271 of 274

8-4 INDEX
78J00-03E N
National Highway Traffic Safety Administration
(NHTSA)
................................................................................7-3
Navigation/Radio System
...................................................3-67
New Vehicle Break-In
..........................................................2-12
Normal Maintenance Replacement Parts
..........................6-17
OOff-Road Recovery
..............................................................4-7
Oil Pressure Light ................................................................3-23
Older Children
......................................................................1-18
On-Board Vehicle Computers and Event Data
Recorders
.............................................................................7-2
Other Warning Devices
.......................................................3-3
Outlet Adjustment
...............................................................3-13
Outside Convex Mirrors
......................................................2-21
Outside Power Mirrors ........................................................2-21
Owner Checks and Services
..............................................6-13
PParking Brake
......................................................................2-17
Parking Over Things That Burn
.........................................2-18
Passenger Airbag Status Indicator ....................................3-17
Passenger Compartment Air Filter ....................................3-14
Passenger Folding Seatback
..............................................1-5
Passenger Safety Belt Reminder Light
.............................3-16
Passenger Sensing System
................................................1-39
Passing
.................................................................................4-7
PASS-Key® III+
....................................................................2-10
Power Door Locks ...............................................................2-5
Power Seat
...........................................................................1-1
Power Steering Fluid
...........................................................5-16
Power Windows
...................................................................2-8Power Windows and Other Power Options
...................... 5-53
Programmable Automatic Door Locks
............................. 2-6
QQuestions and Answers About Safety Belts
.................... 1-10
RRadio Reception
.................................................................. 3-74
Radio with CD (Base)
.......................................................... 3-41
Radio with CD (MP3) ........................................................... 3-44
Radio with CD and DVD (MP3)
........................................... 3-49
Rear Air Conditioning and Heating System
..................... 3-13
Rear Air Conditioning and Heating System and
Electronic Climate Controls
............................................... 3-14
Rear Door Security Locks
.................................................. 2-6
Rear Seat Entertainment System
...................................... 3-67
Rear Seat Passengers
........................................................ 1-15
Rear Seats
........................................................................... 1-6
Rear Window Wiper/Washer
.............................................. 3-5
Recommended Fluids and Lubricants
.............................. 6-16
Recreational Vehicle Towing
............................................. 4-20
Reduced Engine Power Light ............................................ 3-24
Remote Keyless Entry (RKE) System
............................... 2-1
Remote Keyless Entry (RKE) System Operation
............. 2-2
Remote Vehicle Start
.......................................................... 2-4
Replacement Bulbs
............................................................. 5-24
Replacing Restraint System Parts After a Crash
............. 1-43
Reporting Safety Defects
................................................... 7-3
Restraint System Check ..................................................... 1-42
Retained Accessory Power (RAP)
..................................... 2-13
Right Front Passenger Position
........................................ 1-15
Running the Engine While Parked .................................... 2-19
Page 272 of 274

8-5 INDEX
78J00-03E S
Safety Belt Extender
............................................................1-18
Safety Belt Pretensioners
...................................................1-18
Safety Belt Reminder Light .................................................3-16
Safety Belts
: They Are for Everyone .................................1-9
Safety Certification Label
...................................................7-1
Scheduled Maintenance
......................................................6-2
Scheduled Maintenance except CANADA
.........................6-3
Securing a Child Restraint Designed for the LATCH
System
..................................................................................1-28
Securing a Child Restraint in a Rear Seat Position
..........1-29
Securing a Child Restraint in the Right Front Seat
Position
................................................................................1-31
Securing an Add-on Child Restraint in the Vehicle
..........1-23
Securing the Child Within the Child Restraint
..................1-23
Security Light
.......................................................................3-24
Service
..................................................................................5-1
Service All-Wheel Drive Light
.............................................3-25
Service Parts Identification Label
......................................5-53
Service Vehicle Soon Light
................................................3-26
Servicing Your Airbag-Equipped Vehicle
..........................1-42
Sheet Metal Damage
............................................................5-51
Shifting Into Park (P) ...........................................................2-17
Shifting Out of Park (P) .......................................................2-18
Speedometer and Odometer
..............................................3-15
Split Folding the Second Row Seat
...................................1-6
Starting and Operating Your Vehicle .................................2-12
Starting the Engine
..............................................................2-13
Steering
................................................................................4-6
Storage Areas
......................................................................2-21
Storing a Full-Sized Flat Tire
..............................................5-46Sun Visors
........................................................................... 2-9
Sunroof
................................................................................ 2-24
TTachometer
.......................................................................... 3-16
Taillamps, Turn Signal, Stoplamps and Back-up
Lamps
.................................................................................. 5-23
Theft-Deterrent Feature
...................................................... 3-73
Theft-Deterrent Systems .................................................... 2-9
Tilt Wheel
............................................................................. 3-3
Tire Chains .......................................................................... 5-37
Tire Inspection and Rotation
............................................. 5-33
Tire Pressure Light
............................................................. 3-21
Tire Pressure Monitor System
........................................... 5-31
Tire Sidewall Labeling
........................................................ 5-26
Tire Size
............................................................................... 5-27
Tire Terminology and Definitions
...................................... 5-28
Tires
............................................................................5-26
, 5-51
Top Tether Anchor
.............................................................. 1-27
Towing
................................................................................. 4-20
Towing Your Vehicle
........................................................... 4-20
Traction Control System (TCS)
.......................................... 4-5
Traction Control System (TCS) Warning Light
................ 3-20
Transfer Case (Power Transfer Unit)
................................ 5-22
Trip Odometer
..................................................................... 3-15
Turn Signal/Multifunction Lever
........................................ 3-3
UUnderbody Maintenance
.................................................... 5-51
Uniform Tire Quality Grading
............................................. 5-35
Using the Maintenance Schedule
...................................... 6-1
VVehicle Care/Appearance Materials
.................................. 5-52