2007 SUZUKI GRAND VITARA wheel
[x] Cancel search: wheelPage 53 of 211

Downloaded from www.Manualslib.com manuals search engine 2-39 BEFORE DRIVING
66J21-03E
63J030
If the “AIR BAG” light on the instrument
cluster does not blink when the ignition
switch is first turned to the “ON” position,
or the “AIR BAG” light stays on, or comes
on while driving, the air bag system (or the
seat belt pretensioner system) may not
work properly. Have the air bag system
inspected by an authorized SUZUKI dealer
as soon as possible.
Front Air Bags
62J112
64J032
The driver’s front air bag is located behind
the center pad of the steering wheel. The
words “SRS AIRBAG” are molded into the
air bag cover to identify the location of theair bag. The front passenger’s front air bag
is located behind the passenger’s side of
the dashboard. The words “SRS AIRBAG”
are molded into the air bag cover to iden-
tify the location of the air bag.
Frontal collision range
60G032
Front air bags are designed to inflate only
in severe frontal collisions.
EXAMPLEEXAMPLE
Supplemental Restraint System (air bags): 3, 9, 12
Page 59 of 211

Downloaded from www.Manualslib.com manuals search engine 2-45 BEFORE DRIVING
66J21-03E
the facial area against a front air bag. Also,
upon inflation, a loud noise will occur and
some powder and smoke will be released.
These conditions are not harmful and do
not indicate a fire in the car. Be aware,
however, that some air bag components
may be hot for a while after inflation.
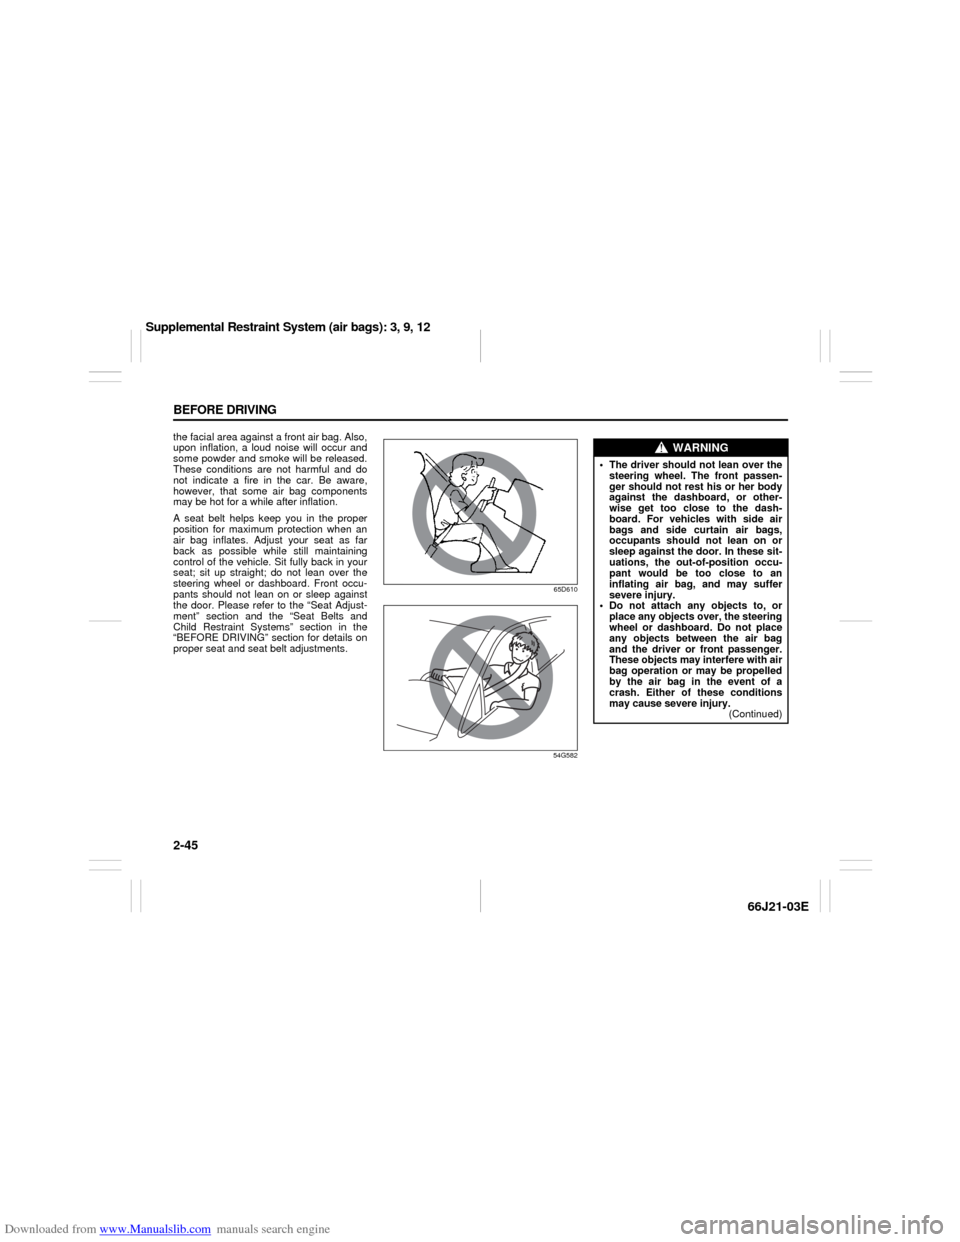
A seat belt helps keep you in the proper
position for maximum protection when an
air bag inflates. Adjust your seat as far
back as possible while still maintaining
control of the vehicle. Sit fully back in your
seat; sit up straight; do not lean over the
steering wheel or dashboard. Front occu-
pants should not lean on or sleep against
the door. Please refer to the “Seat Adjust-
ment” section and the “Seat Belts and
Child Restraint Systems” section in the
“BEFORE DRIVING” section for details on
proper seat and seat belt adjustments.
65D610
54G582
WARNING
The driver should not lean over the
steering wheel. The front passen-
ger should not rest his or her body
against the dashboard, or other-
wise get too close to the dash-
board. For vehicles with side air
bags and side curtain air bags,
occupants should not lean on or
sleep against the door. In these sit-
uations, the out-of-position occu-
pant would be too close to an
inflating air bag, and may suffer
severe injury.
Do not attach any objects to, or
place any objects over, the steering
wheel or dashboard. Do not place
any objects between the air bag
and the driver or front passenger.
These objects may interfere with air
bag operation or may be propelled
by the air bag in the event of a
crash. Either of these conditions
may cause severe injury.
(Continued)
Supplemental Restraint System (air bags): 3, 9, 12
Page 66 of 211

Downloaded from www.Manualslib.com manuals search engine 4-4 INSTRUMENT PANEL
66J21-03E
inflation pressure as specified in the vehi-
cle placard and owner’s manual.
The low tire pressure warning light is also
used to inform you of a TPMS malfunction.
When the system detects a malfunction,
this light will flash for approximately one
minute and then remain continuously illu-
minated. This sequence will be repeated
approximately ten minutes after subse-
quent vehicle start-ups as long as the mal-
function exists.
NOTE:
The low tire pressure warning light may not
come on immediately if you have a sudden
loss of air pressure.
Refer to “Tire Pressure Monitoring System”
in the “OPERATING YOUR VEHICLE”
section for additional details on the tire
pressure monitoring system. Refer to
“Tires” in the “INSPECTION AND MAIN-
TENANCE” section for information on
maintaining proper tire pressure.
WARNING
If the low tire pressure warning light
does not come on when the ignition
is turned to the “ON” position, or
comes on and blinks while driving
there may be a problem with the tire
pressure monitoring system. Have
your vehicle inspected by an autho-
rized SUZUKI dealer. Even if the light
turns off after blinking, indicating
that the monitoring system has
recovered, make sure to have an
authorized SUZUKI dealer check the
system.
WARNING
The load rating of your tires is
reduced at lower inflation pressures.
If your tires become even moderately
under-inflated, the vehicle load may
exceed the load rating of the tires,
which can lead to tire failure. The low
tire pressure warning light will not
alert you of this condition. The warn-
ing light will only come on when one
or more of your tires become signifi-
cantly under-inflated. Check and
adjust your tire inflation pressure at
least once a month. Refer to “Tires”
in the “INSPECTION AND MAINTE-
NANCE” section.
WARNING
If the low tire pressure warning light
comes on and stays on, reduce your
speed and avoid abrupt steering and
braking. Stop in a safe place as soon
as possible and check your tires.
If you have a flat tire, replace it with
the spare tire. Refer to “Jacking
Instructions” in the “EMERGENCY
SERVICE” section. Refer to
“Replacing Tires and/or Wheels”
for instructions on how to restore
normal operation of the tire pres-
sure monitoring system after you
have had a flat tire.
(Continued)
WARNING
(Continued)
If one or more of your tires is
under-inflated, adjust the inflation
pressure in all of your tires to the
recommended inflation pressure as
soon as possible.
Be aware that driving on a signifi-
cantly under-inflated tire can cause
the tire to overheat and can lead to
tire failure, and may affect steering
control and brake effectiveness. This
could lead to an accident, resulting in
severe injury or death.
Warning and Indicator Lights: 8
Page 73 of 211

Downloaded from www.Manualslib.com manuals search engine 4-11 INSTRUMENT PANEL
66J21-03E
(1): Neutral
(2): 4-wheel drive high range center differ-
ential lock mode
(2) & (3): 4-wheel drive low range center
differential lock mode
No indicators: 4-wheel drive high range
mode
For details, refer to “Using the Transfer
Switch” in the “OPERATING YOUR VEHI-
CLE” section.
If the indicators (all lights) continue to
blink, there is a problem in the transfer sys-
tem and you should have your vehicle
inspected by an authorized SUZUKI
dealer.
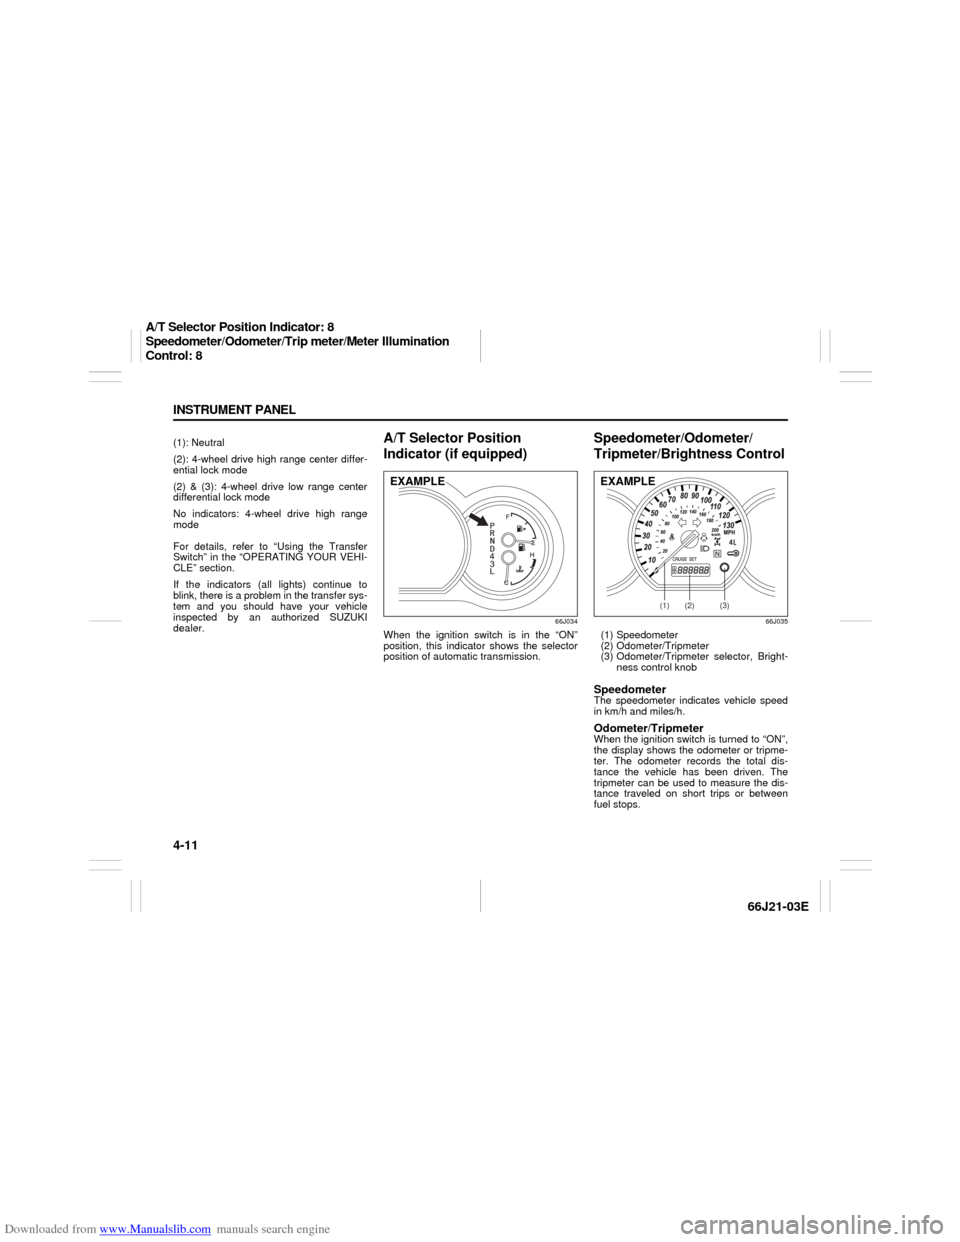
A/T Selector Position
Indicator (if equipped)
66J034
When the ignition switch is in the “ON”
position, this indicator shows the selector
position of automatic transmission.
Speedometer/Odometer/
Tripmeter/Brightness Control
66J035
(1) Speedometer
(2) Odometer/Tripmeter
(3) Odometer/Tripmeter selector, Bright-
ness control knobSpeedometerThe speedometer indicates vehicle speed
in km/h and miles/h.Odometer/TripmeterWhen the ignition switch is turned to “ON”,
the display shows the odometer or tripme-
ter. The odometer records the total dis-
tance the vehicle has been driven. The
tripmeter can be used to measure the dis-
tance traveled on short trips or between
fuel stops.
EXAMPLE
(1)
(2)
(3)
EXAMPLE
A/T Selector Position Indicator: 8
Speedometer/Odometer/Trip meter/Meter Illumination
Control: 8
Page 90 of 211

Downloaded from www.Manualslib.com manuals search engine 4-28 INSTRUMENT PANEL
66J21-03E
When you turn the air conditioning switch
off, the climate control system cannot
lower the inside temperature below outside
temperature.
To turn the climate control system off, turn
the blower speed selector (2) to the “OFF”
position.
NOTE:
To find your comfortable zone, start with
the 25°C (75°F) setting.
If you turn the temperature selector (1)
to the highest or lowest limit, the climate
control system will operate at the maxi-
mum cooling or heating and the blower
will run at full speed.
To avoid blowing cold air in cold weather
or hot air in hot weather, the system will
delay turning on the blower until warmed
or chilled air is available.
If your vehicle has been left in the sun
with the windows closed, it will cool
faster if you open the windows briefly.
Even under the automatic operation, you
can set some of the blower speed selec-
tor/air intake selector (2) and air flow
selector (3) into manual mode. Then the
manually selected function is maintained
preferentially, and the other functions
remain under automatic operation.
To return the air intake selector (2) to
automatic operation when both the
blower speed selector (2) and the air
flow selector (3) are in the “AUTO” posi-
tion, turn either the selector (2) or (3) toa position other than “AUTO”, then turn
to the “AUTO” position again.
64J080
Be careful not to cover the interior temper-
ature sensor (F) located between the
steering wheel and the climate control
panel, or the solar sensor (G) located at
the top of the driver’s side dashboard.
These sensors are used by the automatic
system to regulate temperature.
Manual operation
You can manually control the climate con-
trol system. Set the selectors to your
desired position.
64J074
NOTE:
If you need maximum defrosting:
set the air flow selector to “DEFROST”
(the air conditioning system will come on
and the “FRESH AIR” mode will be
selected automatically),
set the blower speed selector to HIGH,
adjust the temperature selector to the
HOT end, and
adjust the side outlets so the air blows
on the side windows.
(F)
(G)
EXAMPLE
Heating and Air Conditioning System: 4
Audio Systems:
Page 112 of 211

Downloaded from www.Manualslib.com manuals search engine 4-50 INSTRUMENT PANEL
66J21-03E
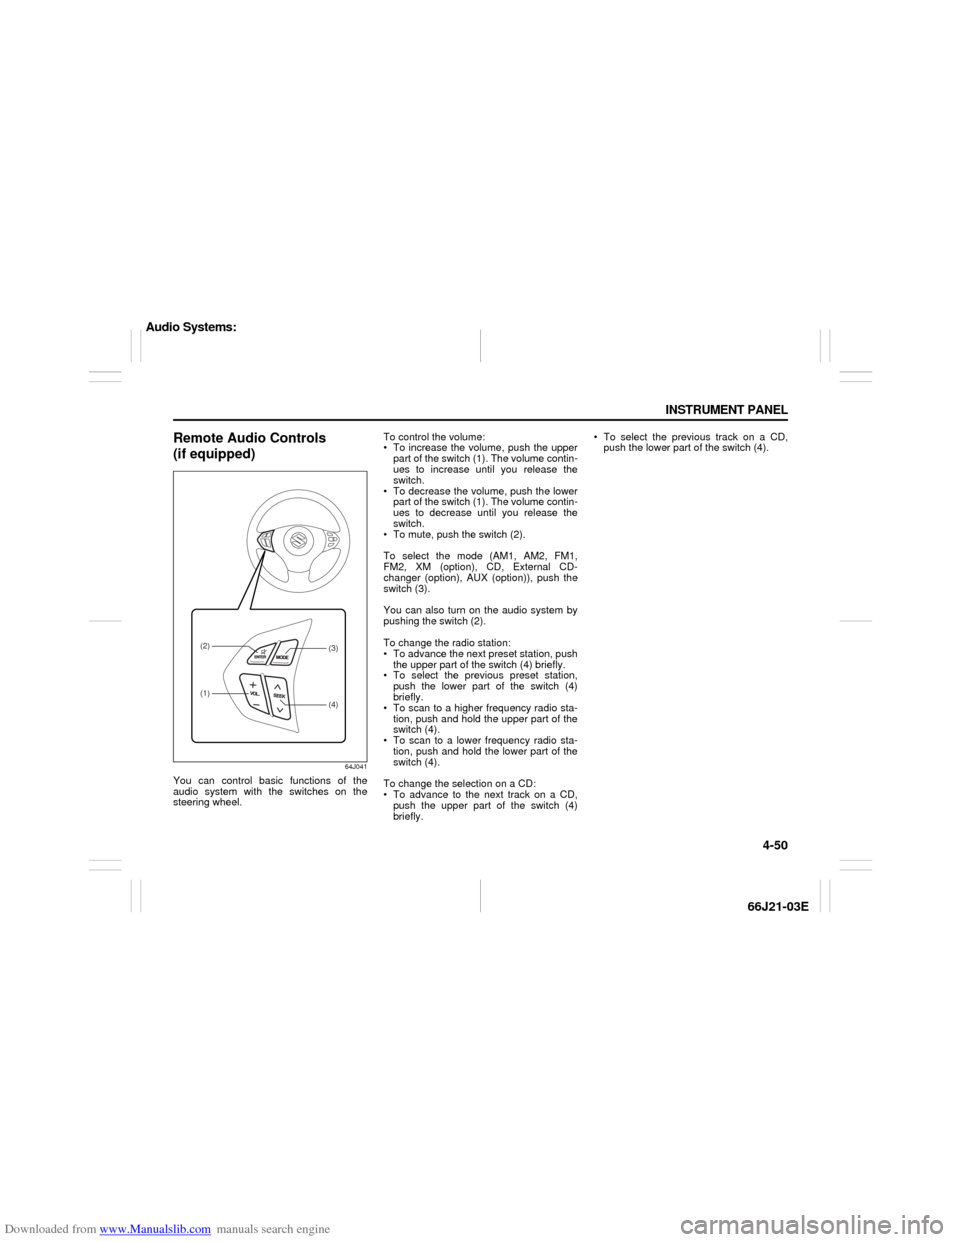
Remote Audio Controls
(if equipped)
64J041
You can control basic functions of the
audio system with the switches on the
steering wheel.To control the volume:
To increase the volume, push the upper
part of the switch (1). The volume contin-
ues to increase until you release the
switch.
To decrease the volume, push the lower
part of the switch (1). The volume contin-
ues to decrease until you release the
switch.
To mute, push the switch (2).
To select the mode (AM1, AM2, FM1,
FM2, XM (option), CD, External CD-
changer (option), AUX (option)), push the
switch (3).
You can also turn on the audio system by
pushing the switch (2).
To change the radio station:
To advance the next preset station, push
the upper part of the switch (4) briefly.
To select the previous preset station,
push the lower part of the switch (4)
briefly.
To scan to a higher frequency radio sta-
tion, push and hold the upper part of the
switch (4).
To scan to a lower frequency radio sta-
tion, push and hold the lower part of the
switch (4).
To change the selection on a CD:
To advance to the next track on a CD,
push the upper part of the switch (4)
briefly. To select the previous track on a CD,
push the lower part of the switch (4).
(1)(2)
(4)(3)
Audio Systems:
Page 120 of 211

Downloaded from www.Manualslib.com manuals search engine 7-2 DRIVING TIPS
66J21-03E
Shorter Wheelbase
Along with its higher ground clearance,
your vehicle has a shorter wheelbase and
shorter front and rear overhangs than
many passenger cars. These features
combine to allow you to drive your vehicle
over hillcrests without hanging up on them
or damaging the frame and chassis com-
ponents. The shorter wheelbase also
makes the steering of your vehicle more
responsive than that of vehicles with longer
wheelbases.
Narrower Body Width and Track
Your vehicle is narrower than the average
passenger car so that it can pass through
tight spaces.
Without the essential characteristics
described above: higher ground clearance,
shorter wheelbase and narrower body
width and track – your vehicle could not
provide you with excellent off road driving
performance. However, it is also true that
on-pavement driving, handling and steer-
ing will be different from what drivers expe-
rience with a conventional passenger car.
On-Pavement DrivingGovernment data show that most rollover
accidents for multi-purpose vehicles are
caused when a driver loses control of the
vehicle and leaves the paved portion of the
roadway striking a ditch, curb or other off-
road object that causes the vehicle to over-
turn. The following driving practices may
reduce the risk of rollover.
Vehicle Slides Off-Road
You can reduce the risk of this kind of roll-
over accident by always keeping the vehi-
cle under control. Typically, drivers lose
control of vehicles, often resulting in roll-
over accidents, when the driver is impaired
because of alcohol or other drugs, falls
asleep at the wheel or is otherwise inatten-
tive, or is driving too fast for the road condi-
tions.
Rollovers On the Roadway
If, for any reason, your vehicle slides side-
ways or spins out of control at highway
speeds, while on the paved portion of the
roadway, the risk of rollover is greatly
increased. This condition can be created
when two or more wheels drop off onto the
shoulder and you steer sharply in an
attempt to reenter the roadway. To reduce
the risk of rollover in these circumstances,
if conditions permit, you should hold the
steering wheel firmly and slow down
before pulling back into the travel lanes
with controlled steering movements.All Types of Rollover Accidents
As with many kinds of automobile acci-
dents, rollovers can be greatly reduced by
doing what all prudent drivers should do,
i.e., don’t drink and drive, don’t drive when
tired and don’t do anything behind the
wheel that could cause a loss of attention
to the driving task.
Additional guidelines are set out below for
your on-road driving.
Know Your Vehicle
Take time to familiarize yourself with the
unique handling characteristics of your
vehicle by first driving around in an area
away from traffic. Practice turning the vehi-
cle at a variety of speeds and in different
directions. Get a feel for the greater steer-
ing response that your vehicle has over a
conventional car.
Wear Your Seat Belts at All Times
The driver and all passengers should be
properly restrained at all times, using the
seat belts provided. Refer to the “Seat
Belts and Child Restraint Systems” section
for instructions on proper use of the seat
belts.
Important Vehicle Design Features To Know: NO
On-Pavement Driving: NO
Page 121 of 211

Downloaded from www.Manualslib.com manuals search engine 7-3 DRIVING TIPS
66J21-03E
Don’t Make Sharp Turns
As mentioned before, small multipurpose
vehicles have specific design characteris-
tics that allow them to perform in a wide
variety of applications. These characteris-
tics also change the cornering behavior
relative to conventional passenger cars.
Remember, small multipurpose vehicles
have more responsive steering and a
higher center of gravity than conventional
passenger cars. If at all possible, avoid
making sharp turns in your vehicle.
Slow Down on Curves
Learn to approach curves cautiously and
at a conservative speed. Do not attempt to
take curves at the same speeds that you
would in a vehicle with a lower center of
gravity. Just as you would not drive a
sports car on a trail, you should not
attempt to drive your vehicle around curves
like a sports car.
Slow Down and Use Caution on Slip-
pery Roads
Under wet road conditions you should
drive at a lower speed than on dry roads
due to possible slippage of tires during
braking. When driving on icy, snowcovered
or muddy roads, reduce your speed and
avoid sudden acceleration, abrupt braking
or sharp steering movements. Use 4-wheel
drive high range (4H) (if equipped) for bet-
ter traction.NOTE:
Avoid operating your vehicle in “4H LOCK”
or “4L LOCK” on wet pavement as much
as possible. Operating your vehicle in “4H
LOCK” or “4L LOCK” on wet pavement
may cause severe damage to the drive
train.
NOTE:
Operating your vehicle in “4H” on dry and
tight corner may cause some vibration on
your vehicle. This is not caused by the
vehicle malfunction, but caused by working
of the limited slip differential gear in the
center differential.
CAUTION
Do not operate your vehicle in “4H
LOCK” or “4L LOCK” on dry, hard
surfaces. Operating your vehicle in
“4H LOCK” or “4L LOCK” on dry,
hard surfaces puts severe stress to
the drive train, especially during tight
cornering, and can damage it. Also,
you may have some difficulty steer-
ing.
CAUTION
Unevenly worn tires can cause prob-
lems in the operation of the transfer
switch. Be sure to rotate the tires
according to the maintenance sched-
ule. Refer to “Tires” and “Mainte-
nance Schedule” in the
“INSPECTION AND MAINTENANCE”
section for proper tire rotation proce-
dures.
On-Pavement Driving: NO
Off-Road Driving: NO