2007 SUZUKI GRAND VITARA spare wheel
[x] Cancel search: spare wheelPage 66 of 211

Downloaded from www.Manualslib.com manuals search engine 4-4 INSTRUMENT PANEL
66J21-03E
inflation pressure as specified in the vehi-
cle placard and owner’s manual.
The low tire pressure warning light is also
used to inform you of a TPMS malfunction.
When the system detects a malfunction,
this light will flash for approximately one
minute and then remain continuously illu-
minated. This sequence will be repeated
approximately ten minutes after subse-
quent vehicle start-ups as long as the mal-
function exists.
NOTE:
The low tire pressure warning light may not
come on immediately if you have a sudden
loss of air pressure.
Refer to “Tire Pressure Monitoring System”
in the “OPERATING YOUR VEHICLE”
section for additional details on the tire
pressure monitoring system. Refer to
“Tires” in the “INSPECTION AND MAIN-
TENANCE” section for information on
maintaining proper tire pressure.
WARNING
If the low tire pressure warning light
does not come on when the ignition
is turned to the “ON” position, or
comes on and blinks while driving
there may be a problem with the tire
pressure monitoring system. Have
your vehicle inspected by an autho-
rized SUZUKI dealer. Even if the light
turns off after blinking, indicating
that the monitoring system has
recovered, make sure to have an
authorized SUZUKI dealer check the
system.
WARNING
The load rating of your tires is
reduced at lower inflation pressures.
If your tires become even moderately
under-inflated, the vehicle load may
exceed the load rating of the tires,
which can lead to tire failure. The low
tire pressure warning light will not
alert you of this condition. The warn-
ing light will only come on when one
or more of your tires become signifi-
cantly under-inflated. Check and
adjust your tire inflation pressure at
least once a month. Refer to “Tires”
in the “INSPECTION AND MAINTE-
NANCE” section.
WARNING
If the low tire pressure warning light
comes on and stays on, reduce your
speed and avoid abrupt steering and
braking. Stop in a safe place as soon
as possible and check your tires.
If you have a flat tire, replace it with
the spare tire. Refer to “Jacking
Instructions” in the “EMERGENCY
SERVICE” section. Refer to
“Replacing Tires and/or Wheels”
for instructions on how to restore
normal operation of the tire pres-
sure monitoring system after you
have had a flat tire.
(Continued)
WARNING
(Continued)
If one or more of your tires is
under-inflated, adjust the inflation
pressure in all of your tires to the
recommended inflation pressure as
soon as possible.
Be aware that driving on a signifi-
cantly under-inflated tire can cause
the tire to overheat and can lead to
tire failure, and may affect steering
control and brake effectiveness. This
could lead to an accident, resulting in
severe injury or death.
Warning and Indicator Lights: 8
Page 164 of 211

Downloaded from www.Manualslib.com manuals search engine 9-26 INSPECTION AND MAINTENANCE
66J21-03E
D. Construction Code
This letter code is used to indicate the
type of ply construction in the tire. The
letter “R” means radial ply tire con-
struction, the letter “D” means diago-
nal or bias ply construction, and the
letter “B” means belted-bias ply con-
struction.
E. Rim Diameter
This two-digit number is the wheel or
rim diameter in inches.
Tire Inflation PressureTire inflation pressure should be checked
when the tire is cold. “Cold tire inflation
pressure” is the pressure in a tire that has
been driven less than 1 mile (1.6 km) or
has been standing for three hours or more.
54G307
The front, rear and spare tire pressure
specifications for your vehicle are shown
below and are listed on the Tire and Load-
ing Information Label, which is located on
the driver’s door lock pillar. The Tire and
Loading Information Label contains the fol-
lowing information:
Seating Capacity
Maximum Allowed Combined Weight of
Occupants and Cargo
Original Tire Size
Recommended Cold Tire Inflation Pres-
sure of Original TiresMeasuring air pressure
Use the following steps to achieve proper
tire inflation:
1) Identify the recommended tire pressure
on the vehicle’s Tire and Loading Infor-
mation Label or in the owner’s manual.
2) Remove the valve cap from the tire
valve stem.
3) Using a reliable pressure gauge, mea-
sure the tire inflation pressure by press-
ing the tire gauge firmly onto the valve
to get a pressure measurement.
Remember that inflation pressures
should be checked when the tires are
“cold”, meaning before they have been
driven one mile or after sitting for three
hours or more allowing the tire to cool
to ambient air temperature.
4) If the air pressure is too high, slowly
release the air by pressing on the tire
valve stem with the edge of the tire
gauge until you reach the correct pres-
sure.
WARNING
Your SUZUKI is equipped with tires
which are all the same type and size.
This is important to ensure proper
steering and handling of the vehicle.
Never mix tires of different size or
type on the four wheels of your vehi-
cle. Mixing tires could cause you to
lose control while driving which may
lead to an accident. The size and type
of tires used should be only those
approved by SUZUKI Motor Corpora-
tion as standard or optional equip-
ment for your vehicle.
Recommended Cold Tire Inflation
Pressures
Front Tires220 kPa
32 psi
Rear Tires220 kPa
32 psi
Spare220 kPa
32 psi
Tires: 6
Page 165 of 211

Downloaded from www.Manualslib.com manuals search engine 9-27 INSPECTION AND MAINTENANCE
66J21-03E
5) If the air pressure is too low, fill the tire
with air at a service station until it
reaches the recommended pressure.
6) Make sure all tires have the same air
pressure (unless the owner’s manual
indicates otherwise).
Tire InspectionInspect your vehicle’s tires at least once a
month by performing the following checks:
1) Measure the air pressure with a tire
gauge. Adjust the pressure if neces-
sary. Remember to check the spare
tire, too. Refer to the “Measuring Air
Pressure” section.
54G136
(1) Tread wear indicator
(2) Indicator location mark
2) Check that the depth of the tread
groove is more than 1.6 mm (0.06 in.).
To help you check this, the tires have
molded-in tread wear indicators in the
grooves. When the indicators appear
on the tread surface, the remaining
depth of the tread is 1.6 mm (0.06 in.)
or less and the tire should be replaced.
3) Check for abnormal wear, cracks and
damage. Any tires with cracks or otherdamage should be replaced. If any tires
show abnormal wear, have them
inspected by your SUZUKI dealer.
4) Check for loose wheel nuts.
5) Check that there are no nails, stones or
other objects sticking into the tires.
WARNING
Air pressures should be checked
when the tires are cold or you may
get inaccurate readings.
Check the inflation pressure from
time to time while inflating the tire
gradually, until the specified pres-
sure is obtained.
Never underinflate or overinflate
the tires.
Underinflation can cause unusual
handling characteristics or can
cause the rim to slip on the tire
bead, resulting in an accident or
damage to the tire or rim.
Underinflation can also cause tires
to overheat, leading to tire failure.
Overinflation can cause the tire to
burst, resulting in personal injury.
Overinflation can also cause
unusual handling characteristics
which may result in an accident.
WARNING
Hitting curbs and running over rocks
can damage tires and affect wheel
alignment. Be sure to have tires and
wheel alignment checked periodically
by your SUZUKI dealer.
WARNING
Your SUZUKI is equipped with tires
which are all the same type and size.
This is important to ensure proper
steering and handling of the vehicle.
Never mix tires of different size or
type on the four wheels of your vehi-
cle. The size and type of tires used
should be only those approved by
SUZUKI Motor Corporation as stan-
dard or optional equipment for your
vehicle.
Tires: 6
Page 167 of 211

Downloaded from www.Manualslib.com manuals search engine 9-29 INSPECTION AND MAINTENANCE
66J21-03E
Motor Vehicle Safety Standard No. 109.
Grades B and A represent higher levels of
performance on the laboratory test wheel
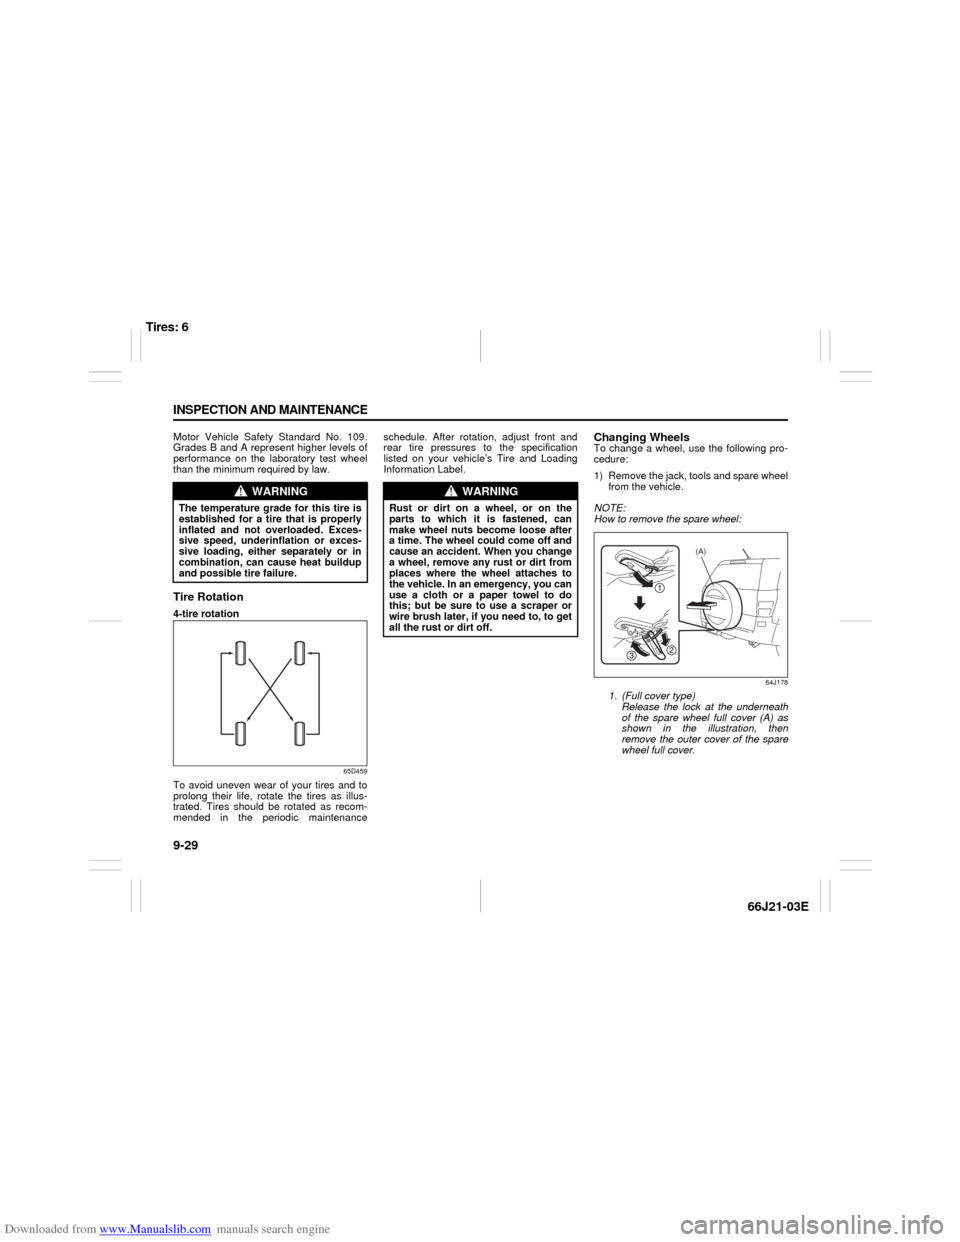
than the minimum required by law.Tire Rotation4-tire rotation
65D459
To avoid uneven wear of your tires and to
prolong their life, rotate the tires as illus-
trated. Tires should be rotated as recom-
mended in the periodic maintenanceschedule. After rotation, adjust front and
rear tire pressures to the specification
listed on your vehicle’s Tire and Loading
Information Label.
Changing WheelsTo change a wheel, use the following pro-
cedure:
1) Remove the jack, tools and spare wheel
from the vehicle.
NOTE:
How to remove the spare wheel:
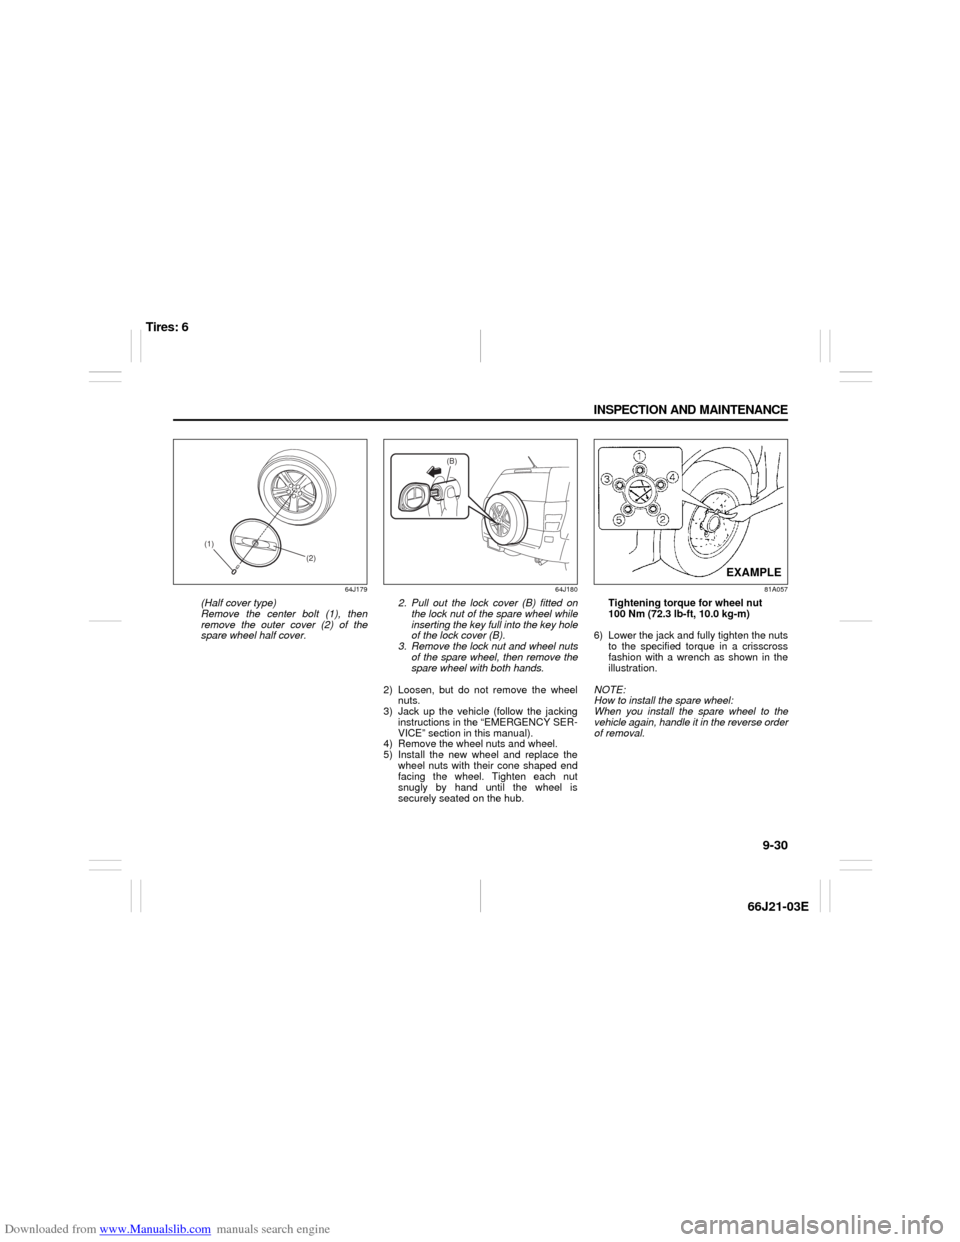
64J178
1. (Full cover type)
Release the lock at the underneath
of the spare wheel full cover (A) as
shown in the illustration, then
remove the outer cover of the spare
wheel full cover.
WARNING
The temperature grade for this tire is
established for a tire that is properly
inflated and not overloaded. Exces-
sive speed, underinflation or exces-
sive loading, either separately or in
combination, can cause heat buildup
and possible tire failure.
WARNING
Rust or dirt on a wheel, or on the
parts to which it is fastened, can
make wheel nuts become loose after
a time. The wheel could come off and
cause an accident. When you change
a wheel, remove any rust or dirt from
places where the wheel attaches to
the vehicle. In an emergency, you can
use a cloth or a paper towel to do
this; but be sure to use a scraper or
wire brush later, if you need to, to get
all the rust or dirt off.
(A)
Tires: 6
Page 168 of 211

Downloaded from www.Manualslib.com manuals search engine 9-30 INSPECTION AND MAINTENANCE
66J21-03E
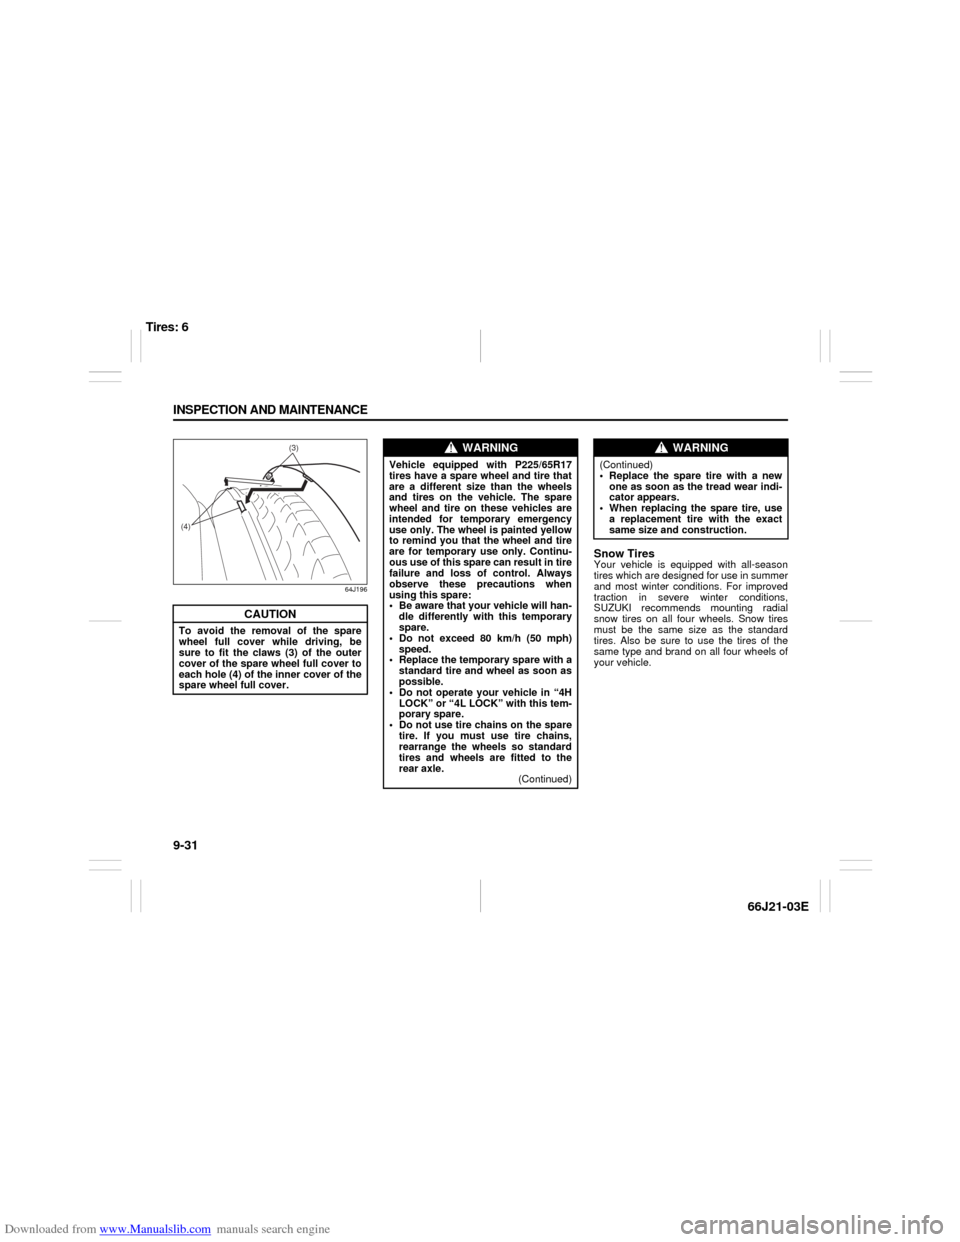
64J179
(Half cover type)
Remove the center bolt (1), then
remove the outer cover (2) of the
spare wheel half cover.
64J180
2. Pull out the lock cover (B) fitted on
the lock nut of the spare wheel while
inserting the key full into the key hole
of the lock cover (B).
3. Remove the lock nut and wheel nuts
of the spare wheel, then remove the
spare wheel with both hands.
2) Loosen, but do not remove the wheel
nuts.
3) Jack up the vehicle (follow the jacking
instructions in the “EMERGENCY SER-
VICE” section in this manual).
4) Remove the wheel nuts and wheel.
5) Install the new wheel and replace the
wheel nuts with their cone shaped end
facing the wheel. Tighten each nut
snugly by hand until the wheel is
securely seated on the hub.
81A057
Tightening torque for wheel nut
100 Nm (72.3 lb-ft, 10.0 kg-m)
6) Lower the jack and fully tighten the nuts
to the specified torque in a crisscross
fashion with a wrench as shown in the
illustration.
NOTE:
How to install the spare wheel:
When you install the spare wheel to the
vehicle again, handle it in the reverse order
of removal.
(2) (1)
(B)
EXAMPLE
Tires: 6
Page 169 of 211

Downloaded from www.Manualslib.com manuals search engine 9-31 INSPECTION AND MAINTENANCE
66J21-03E
64J196
Snow TiresYour vehicle is equipped with all-season
tires which are designed for use in summer
and most winter conditions. For improved
traction in severe winter conditions,
SUZUKI recommends mounting radial
snow tires on all four wheels. Snow tires
must be the same size as the standard
tires. Also be sure to use the tires of the
same type and brand on all four wheels of
your vehicle.
CAUTION
To avoid the removal of the spare
wheel full cover while driving, be
sure to fit the claws (3) of the outer
cover of the spare wheel full cover to
each hole (4) of the inner cover of the
spare wheel full cover.
(3)
(4)
WARNING
Vehicle equipped with P225/65R17
tires have a spare wheel and tire that
are a different size than the wheels
and tires on the vehicle. The spare
wheel and tire on these vehicles are
intended for temporary emergency
use only. The wheel is painted yellow
to remind you that the wheel and tire
are for temporary use only. Continu-
ous use of this spare can result in tire
failure and loss of control. Always
observe these precautions when
using this spare:
Be aware that your vehicle will han-
dle differently with this temporary
spare.
Do not exceed 80 km/h (50 mph)
speed.
Replace the temporary spare with a
standard tire and wheel as soon as
possible.
Do not operate your vehicle in “4H
LOCK” or “4L LOCK” with this tem-
porary spare.
Do not use tire chains on the spare
tire. If you must use tire chains,
rearrange the wheels so standard
tires and wheels are fitted to the
rear axle.
(Continued)
WARNING
(Continued)
Replace the spare tire with a new
one as soon as the tread wear indi-
cator appears.
When replacing the spare tire, use
a replacement tire with the exact
same size and construction.
Tires: 6
Page 209 of 211

Downloaded from www.Manualslib.com manuals search engine 15-4 INDEX
66J21-03E
Outside Rearview Mirrors
...................................................2-17
Overhead Console Box
.......................................................5-15
PParking Brake Lever
.................................................... 5-1
, 9-23
Pedals
...................................................................................5-1
Periodic Maintenance Schedule
.........................................9-3
Power Assisted Brakes
.......................................................6-16
Power Door Locking System
..............................................2-2
Power Mirror Control
...........................................................2-17
Power Steering
....................................................................9-24
Power Steering Fluid
...........................................................9-24
Power Window Controls
.....................................................2-14
RRadio Antenna
.....................................................................4-36
Rear Door
.............................................................................2-14
Rear Window Defroster and Outside Rearview Mirrors
Defroster Switch
..................................................................4-15
Rear Window Wiper/Washer Switch
..................................3-9
Refill with Oil and Check for Leaks ....................................9-12
Remote Audio Controls
......................................................3-12
,
................................................................................................4-50
Replace the Oil Filter
...........................................................9-11
Replacing Tires and/or Wheels
..........................................6-24
Reporting Safety Defects
....................................................12-4
Roof Rails or Roof Rack Anchors
......................................5-23
SSafety Certification Label
...................................................12-2
Seat Adjustment
..................................................................2-17
Seat Belt Extender ...............................................................2-35
Seat Belt Inspection ............................................................2-27
Seat Belt Pretensioner System
..........................................2-36Seat Belt Reminder
............................................................. 2-24
Seat Belts and Child Restraint Systems
........................... 2-20
Selection of Coolant
........................................................... 9-17
Shopping Hook
................................................................... 5-19
Shoulder anchor height adjuster
....................................... 2-26
Side Air Bags and Side Curtain Air Bags
......................... 2-40
Side Door Locks
.................................................................. 2-2
SLIP Indicator Light
.....................................................4-6
, 6-19
Snow Tires
........................................................................... 9-31
Spare Tire Nut Lock
............................................................ 2-1
Spark Plugs
......................................................................... 9-20
SPECIFICATIONS
................................................................ 14-1
Specified Fluid
.................................................................... 9-15
Specified Gear Oil ............................................................... 9-13
Specified Oil
........................................................................ 9-9
Speedometer ....................................................................... 4-11
Spot Light
............................................................................ 5-8
Stability Control System
.................................................... 6-18
Starting the Engine
............................................................. 6-2
Steering Wheel
.................................................................... 9-23
Sun Visor
............................................................................. 5-7
Sunroof
................................................................................ 5-11
Supplemental Restraint System (air bags)
....................... 2-37
TTachometer
.......................................................................... 4-13
Temperature Gauge
............................................................ 4-14
Theft Deterrent Light .......................................................... 4-20
Thermometer
....................................................................... 4-18
Tilt Steering Lock Lever
..................................................... 3-10
Tire Chains
.......................................................................... 7-5
Tire Changing Tool
............................................................. 5-18