Page 151 of 211
Downloaded from www.Manualslib.com manuals search engine 9-13 INSPECTION AND MAINTENANCE
66J21-03E
Gear OilSpecified Gear OilWhen replacing gear oil, use gear oil with
the appropriate viscosity and grade as
shown in the charts below. We highly rec-
ommend you use SAE 75W-90 gear oil
(SAE 80W-90 for front differential oil, rear
differential oil and transfer gear oil).
Transmission/Extension case
54G095
Differential/Transfer case
65D594
Manual transmission
52D087
Transfer case
66J005
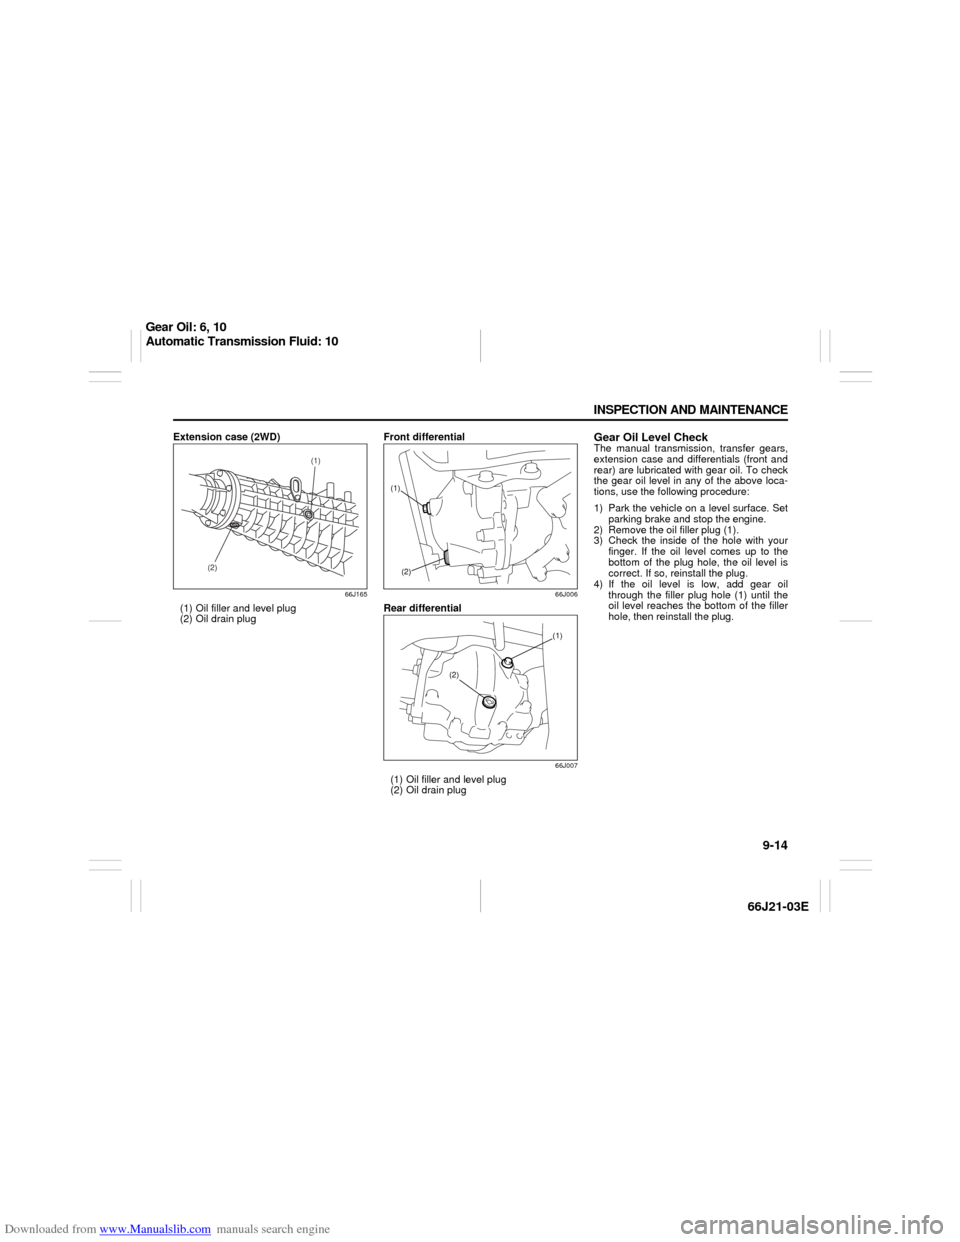
(1) Oil filler and level plug
(2) Oil drain plug
API GRADE
Transmission/
Extension caseGL-4
Transfer case
GL-5
(Hypoid gear oil)
DifferentialFront
Rear
(1)
(2)
Gear Oil: 6, 10
Page 152 of 211

Downloaded from www.Manualslib.com manuals search engine 9-14 INSPECTION AND MAINTENANCE
66J21-03E
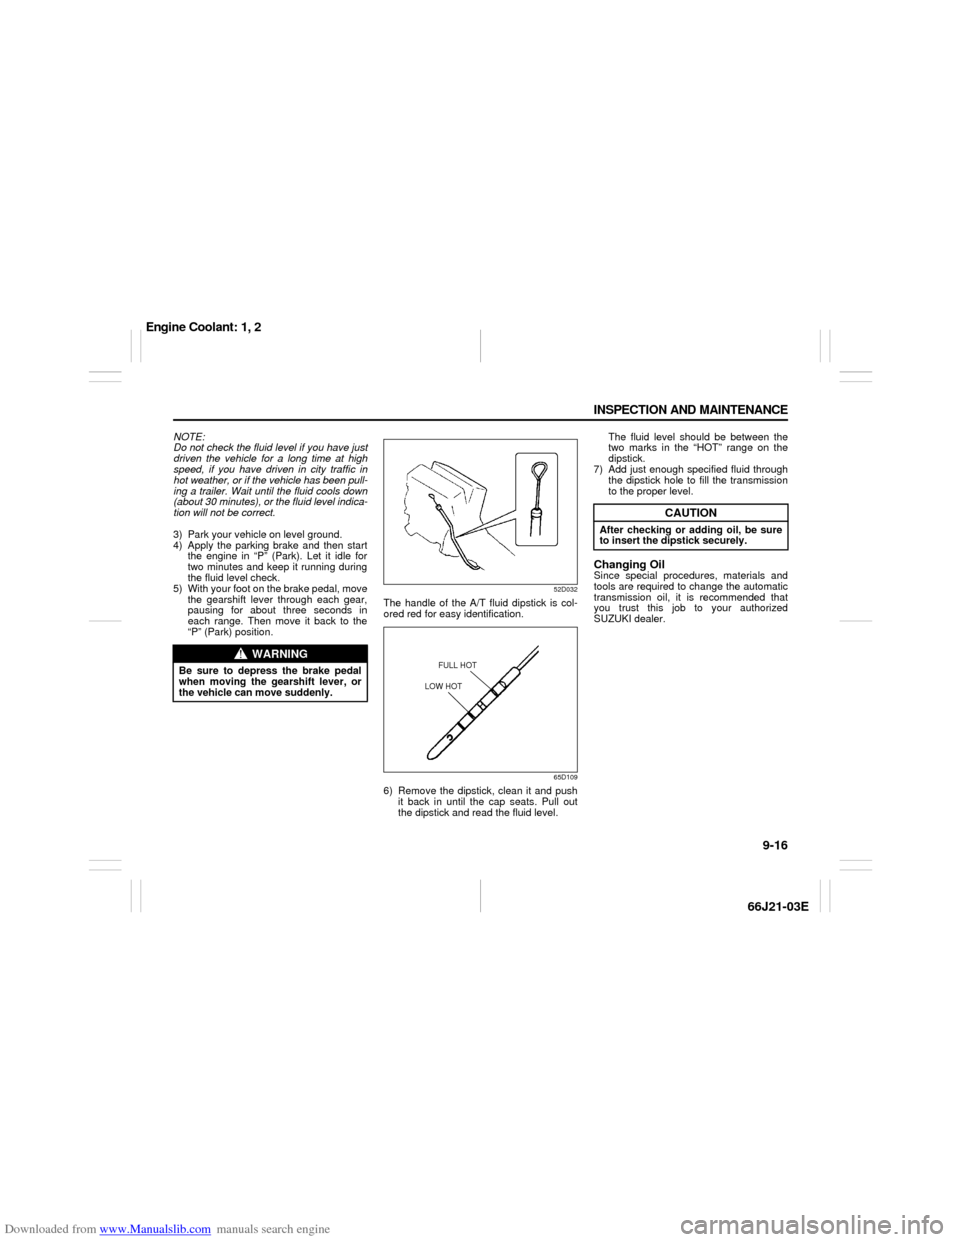
Extension case (2WD)
66J165
(1) Oil filler and level plug
(2) Oil drain plugFront differential
66J006
Rear differential
66J007
(1) Oil filler and level plug
(2) Oil drain plug
Gear Oil Level CheckThe manual transmission, transfer gears,
extension case and differentials (front and
rear) are lubricated with gear oil. To check
the gear oil level in any of the above loca-
tions, use the following procedure:
1) Park the vehicle on a level surface. Set
parking brake and stop the engine.
2) Remove the oil filler plug (1).
3) Check the inside of the hole with your
finger. If the oil level comes up to the
bottom of the plug hole, the oil level is
correct. If so, reinstall the plug.
4) If the oil level is low, add gear oil
through the filler plug hole (1) until the
oil level reaches the bottom of the filler
hole, then reinstall the plug.
(2)(1)
(1)
(2)
(1)
(2)
Gear Oil: 6, 10
Automatic Transmission Fluid: 10
Page 153 of 211

Downloaded from www.Manualslib.com manuals search engine 9-15 INSPECTION AND MAINTENANCE
66J21-03E
Gear Oil ReplacementTo change the gear oil in the manual trans-
mission, transfer case, extension case or
differential(s), use the following procedure:
1) Remove the oil filler plug (1).
2) Remove the drain plug (2), drain the oil
and reinstall the drain plug.
3) Pour new gear oil of the specified type
through the filler hole until the oil level
reaches the bottom of the filler hole.
4) Reinstall the filler plug.Tightening torque
Automatic Transmission
FluidSpecified FluidUse an automatic transmission fluid
SUZUKI ATF 3317 or Mobil ATF 3309.Fluid Level CheckYou must check the fluid level with the
automatic transmission fluid at normal
operating temperature.
To check the fluid level:
1) To warm up the transmission fluid, drive
the vehicle or idle the engine until the
temperature gauge indicates normal
operating temperature.
2) Then drive for ten more minutes.
WARNING
After driving the vehicle, gear oil tem-
perature may be high enough to burn
you. Wait until the oil filler plug is
cool enough to touch with your bare
hands before inspecting or replacing
gear oil.
CAUTION
When tightening these plugs, apply
sealing compound “SUZUKI Bond
No. 1215” or equivalent to the plug
threads to prevent oil leakage and
tighten them to the specified torque
shown below.
Oil Filler
PlugOil Drain
Plug
Manual
transmission23 Nm
(17.0 lb-ft)
(2.3 kg-m) 23 Nm
(17.0 lb-ft)
(2.3 kg-m)
Transfer23 Nm
(17.0 lb-ft)
(2.3 kg-m) 23 Nm
(17.0 lb-ft)
(2.3 kg-m)
Extension
case23 Nm
(17.0 lb-ft)
(2.3 kg-m) 23 Nm
(17.0 lb-ft)
(2.3 kg-m)
Front
differential23 Nm
(17.0 lb-ft)
(2.3 kg-m) 23 Nm
(17.0 lb-ft)
(2.3 kg-m)
Rear
differential23 Nm
(17.0 lb-ft)
(2.3 kg-m) 23 Nm
(17.0 lb-ft)
(2.3 kg-m)
CAUTION
Driving with too much or too little
fluid can damage the transmission.
CAUTION
Be sure to use the specified auto-
matic transmission fluid. Using auto-
matic transmission fluid other than
SUZUKI ATF 3317 or Mobil ATF 3309
may damage the automatic transmis-
sion of your vehicle.
Automatic Transmission Fluid: 10
Engine Coolant: 1, 2
Page 154 of 211

Downloaded from www.Manualslib.com manuals search engine 9-16 INSPECTION AND MAINTENANCE
66J21-03E
NOTE:
Do not check the fluid level if you have just
driven the vehicle for a long time at high
speed, if you have driven in city traffic in
hot weather, or if the vehicle has been pull-
ing a trailer. Wait until the fluid cools down
(about 30 minutes), or the fluid level indica-
tion will not be correct.
3) Park your vehicle on level ground.
4) Apply the parking brake and then start
the engine in “P” (Park). Let it idle for
two minutes and keep it running during
the fluid level check.
5) With your foot on the brake pedal, move
the gearshift lever through each gear,
pausing for about three seconds in
each range. Then move it back to the
“P” (Park) position.
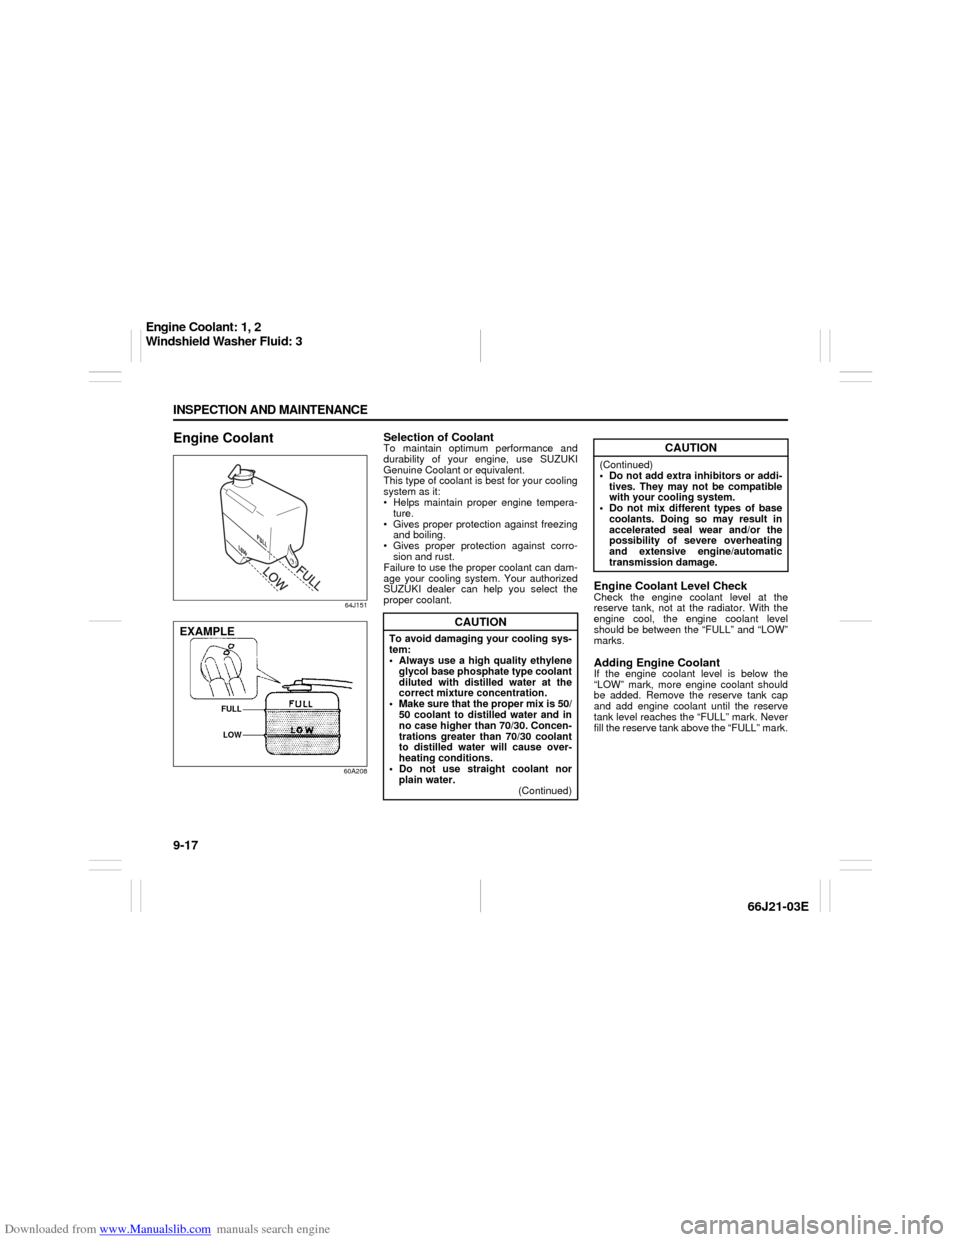
52D032
The handle of the A/T fluid dipstick is col-
ored red for easy identification.
65D109
6) Remove the dipstick, clean it and push
it back in until the cap seats. Pull out
the dipstick and read the fluid level. The fluid level should be between the
two marks in the “HOT” range on the
dipstick.
7) Add just enough specified fluid through
the dipstick hole to fill the transmission
to the proper level.
Changing OilSince special procedures, materials and
tools are required to change the automatic
transmission oil, it is recommended that
you trust this job to your authorized
SUZUKI dealer.
WARNING
Be sure to depress the brake pedal
when moving the gearshift lever, or
the vehicle can move suddenly.
FULL HOT
LOW HOT
CAUTION
After checking or adding oil, be sure
to insert the dipstick securely.
Engine Coolant: 1, 2
Page 155 of 211

Downloaded from www.Manualslib.com manuals search engine 9-17 INSPECTION AND MAINTENANCE
66J21-03E
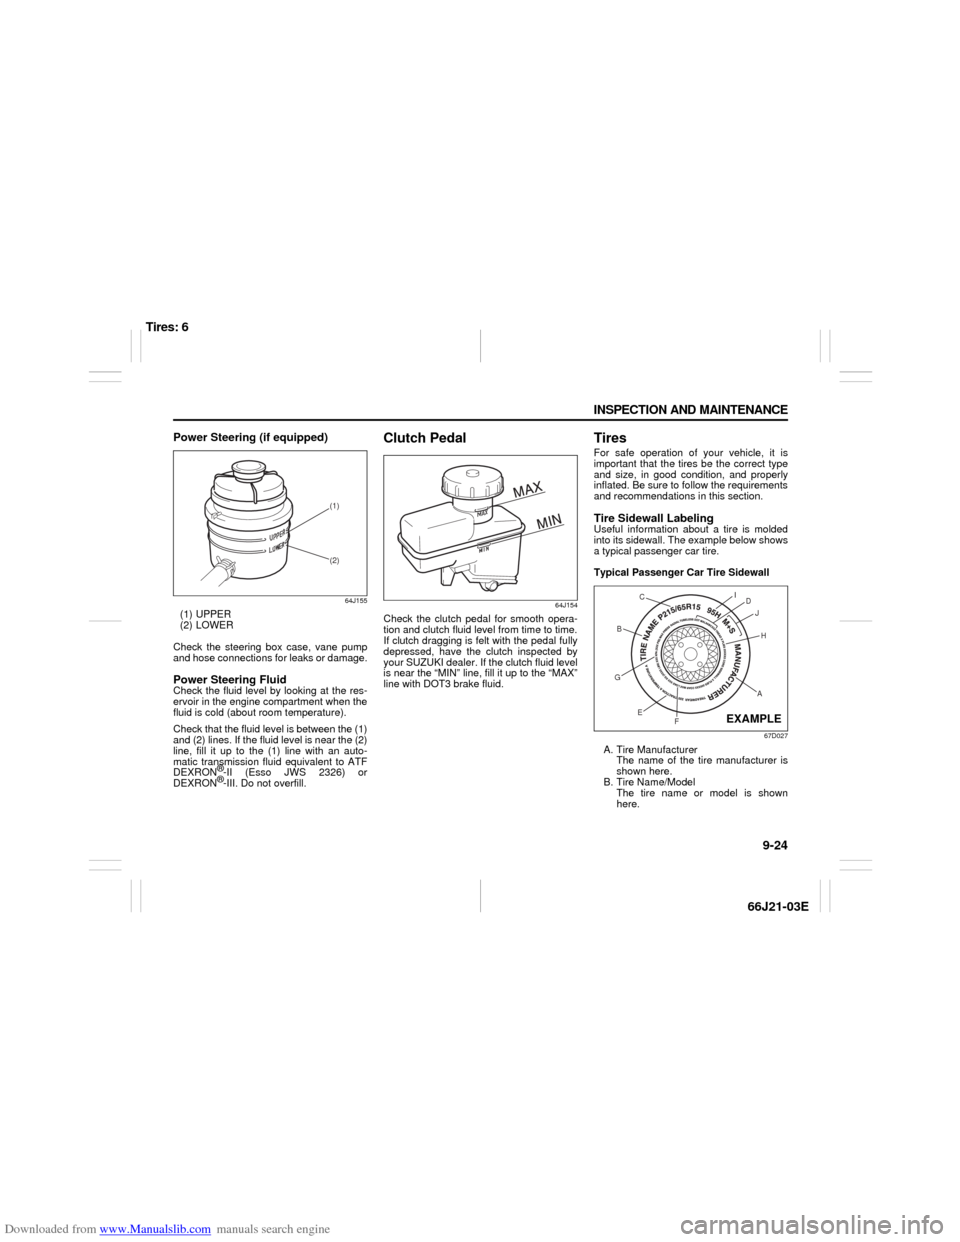
Engine Coolant
64J151
60A208
Selection of CoolantTo maintain optimum performance and
durability of your engine, use SUZUKI
Genuine Coolant or equivalent.
This type of coolant is best for your cooling
system as it:
Helps maintain proper engine tempera-
ture.
Gives proper protection against freezing
and boiling.
Gives proper protection against corro-
sion and rust.
Failure to use the proper coolant can dam-
age your cooling system. Your authorized
SUZUKI dealer can help you select the
proper coolant.
Engine Coolant Level CheckCheck the engine coolant level at the
reserve tank, not at the radiator. With the
engine cool, the engine coolant level
should be between the “FULL” and “LOW”
marks.Adding Engine CoolantIf the engine coolant level is below the
“LOW” mark, more engine coolant should
be added. Remove the reserve tank cap
and add engine coolant until the reserve
tank level reaches the “FULL” mark. Never
fill the reserve tank above the “FULL” mark.
EXAMPLE
FULL
LOW
CAUTION
To avoid damaging your cooling sys-
tem:
Always use a high quality ethylene
glycol base phosphate type coolant
diluted with distilled water at the
correct mixture concentration.
Make sure that the proper mix is 50/
50 coolant to distilled water and in
no case higher than 70/30. Concen-
trations greater than 70/30 coolant
to distilled water will cause over-
heating conditions.
Do not use straight coolant nor
plain water.
(Continued)
CAUTION
(Continued)
Do not add extra inhibitors or addi-
tives. They may not be compatible
with your cooling system.
Do not mix different types of base
coolants. Doing so may result in
accelerated seal wear and/or the
possibility of severe overheating
and extensive engine/automatic
transmission damage.
Engine Coolant: 1, 2
Windshield Washer Fluid: 3
Page 162 of 211

Downloaded from www.Manualslib.com manuals search engine 9-24 INSPECTION AND MAINTENANCE
66J21-03E
Power Steering (if equipped)
64J155
(1) UPPER
(2) LOWER
Check the steering box case, vane pump
and hose connections for leaks or damage.Power Steering FluidCheck the fluid level by looking at the res-
ervoir in the engine compartment when the
fluid is cold (about room temperature).
Check that the fluid level is between the (1)
and (2) lines. If the fluid level is near the (2)
line, fill it up to the (1) line with an auto-
matic transmission fluid equivalent to ATF
DEXRON
®-II (Esso JWS 2326) or
DEXRON®-III. Do not overfill.
Clutch Pedal
64J154
Check the clutch pedal for smooth opera-
tion and clutch fluid level from time to time.
If clutch dragging is felt with the pedal fully
depressed, have the clutch inspected by
your SUZUKI dealer. If the clutch fluid level
is near the “MIN” line, fill it up to the “MAX”
line with DOT3 brake fluid.
TiresFor safe operation of your vehicle, it is
important that the tires be the correct type
and size, in good condition, and properly
inflated. Be sure to follow the requirements
and recommendations in this section.Tire Sidewall LabelingUseful information about a tire is molded
into its sidewall. The example below shows
a typical passenger car tire.
Typical Passenger Car Tire Sidewall
67D027
A. Tire Manufacturer
The name of the tire manufacturer is
shown here.
B. Tire Name/Model
The tire name or model is shown
here.
(1)
(2)
AH B
G
E
FD
J I
C
EXAMPLE
Tires: 6
Page 198 of 211
Downloaded from www.Manualslib.com manuals search engine 13-1 FUSES AND PROTECTED CIRCUITS
66J21-03E
13
FUSES AND PROTECTED CIRCUITS
64J157
FUSES
No. COLOR (AMPS) PROTECTED CIRCUIT
MAIN FUSE
BOX(1) BLUE (15) CPRSR A/C compressor fuse
In engine
compartment (2) YELLOW (20) O2 HTR O2 sensor heater fuse
(3) BLUE (15) THR MOT Throttle motor fuse
(4) YELLOW (20) AT Automatic transmission fuse
(5) CLEAR (25) RR DEF Rear defogger fuse
(6) BLUE (15) HORN Horn fuse
(7) YELLOW (20) FR FOG Front fog light fuse
(8) YELLOW (20) MRR HTR Mirror heater fuse
(9) GREEN (40) FR BLW Front blower motor fuse
(10) PINK (30) ABS 2 ABS actuator fuse
Fuses and Protected Circuits: 7
Page 202 of 211
Downloaded from www.Manualslib.com manuals search engine 14-1 SPECIFICATIONS
66J21-03E
14
SPECIFICATIONSNOTE:
Specifications are subject to change with-
out notice.4WD: 4-wheel drive
2WD: 2-wheel driveM/T: Manual transmission
A/T: Automatic transmission
ITEM: Dimensions UNIT: mm (in.)
Overall length 4470 (176.0)
Overall width 1810 (71.3)
Overall height 4WD 1695 (66.7)
2WD 1683 (66.3)
Wheelbase 2640 (103.9)
Tread front 1540 (60.6)
rear 1560 (61.4)
Minimum running ground clearance 4WD 200 (7.9)
2WD 188 (7.4)
ITEM: Weight
Gross axle weight rating
See the safety certification label and the tire information label which
are located on the driver’s door lock pillar. Gross vehicle weight rating
Vehicle capacity weight
ITEM: Engine
Type H27A (24V DOHC)
Number of cylinders 6
Bore 88.0 mm (3.46 in.)
Stroke 75.0 mm (2.95 in.)
Piston displacement 2736 cm
3 (167.1 cu.in, 2736 cc)
Compression ratio 9.5 : 1
Specifications: 1, 2, 5, 6, 7, 10, 11