2007 SUZUKI GRAND VITARA belt
[x] Cancel search: beltPage 7 of 211
Downloaded from www.Manualslib.com manuals search engine 66J21-03E
LOCATION OF WARNING
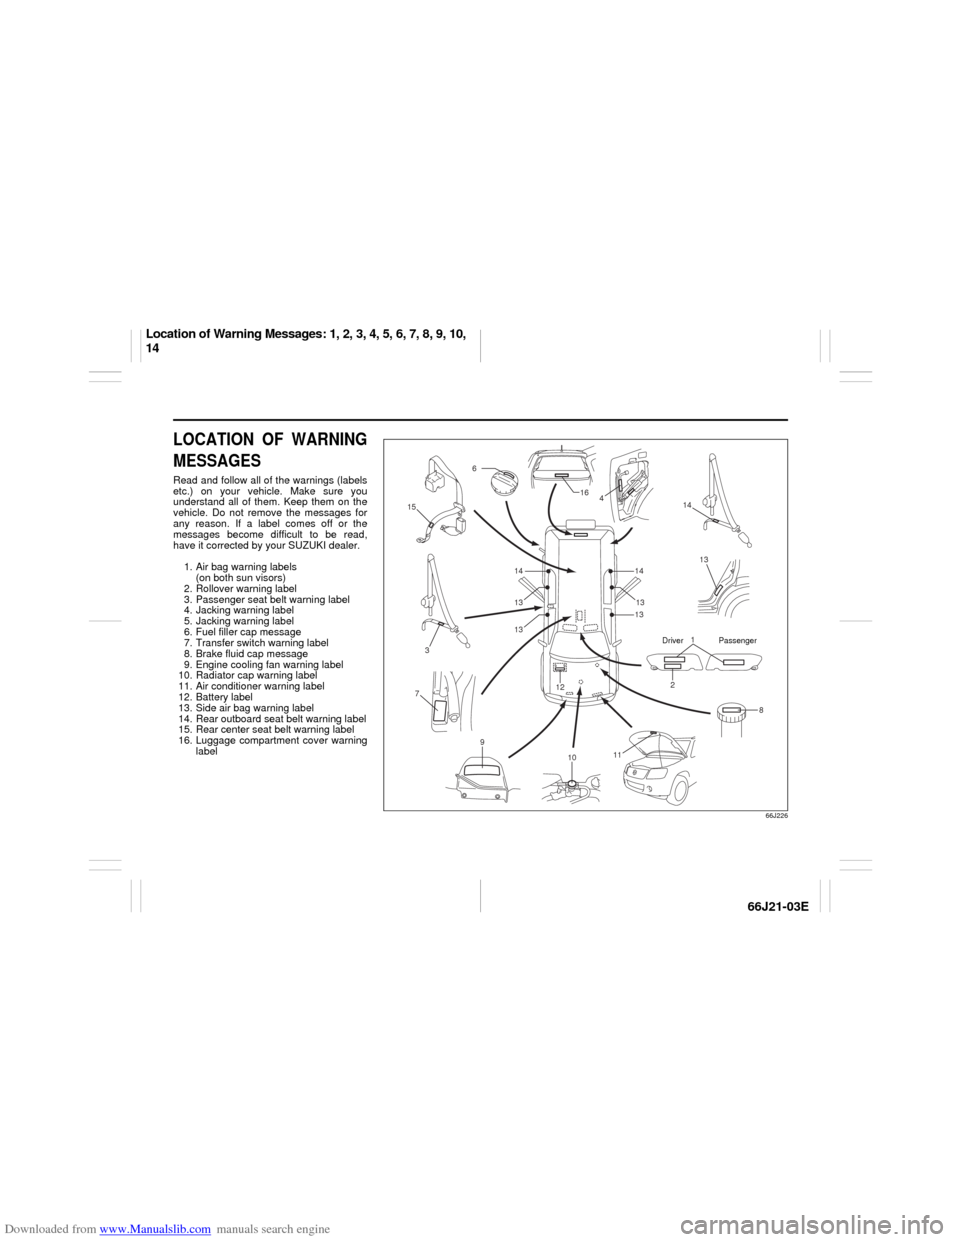
MESSAGESRead and follow all of the warnings (labels
etc.) on your vehicle. Make sure you
understand all of them. Keep them on the
vehicle. Do not remove the messages for
any reason. If a label comes off or the
messages become difficult to be read,
have it corrected by your SUZUKI dealer.
1. Air bag warning labels
(on both sun visors)
2. Rollover warning label
3. Passenger seat belt warning label
4. Jacking warning label
5. Jacking warning label
6. Fuel filler cap message
7. Transfer switch warning label
8. Brake fluid cap message
9. Engine cooling fan warning label
10. Radiator cap warning label
11. Air conditioner warning label
12. Battery label
13. Side air bag warning label
14. Rear outboard seat belt warning label
15. Rear center seat belt warning label
16. Luggage compartment cover warning
label
66J226
1
2
3
6
8 12
13 4 16
14
15
14
7
9
11
10
1413
13 1313
Driver Passenger
Location of Warning Messages: 1, 2, 3, 4, 5, 6, 7, 8, 9, 10,
14
Page 14 of 211

Downloaded from www.Manualslib.com manuals search engine BEFORE DRIVING
2
66J21-03E
60G404
BEFORE DRIVINGKeys ...................................................................................... 2-1
Spare Tire Nut Lock (if equipped) ...................................... 2-1
Door Locks .......................................................................... 2-2
Windows .............................................................................. 2-14
Mirrors .................................................................................. 2-16
Seat Adjustment .................................................................. 2-17
Head Restraints ................................................................... 2-19
Seat Belts and Child Restraint Systems ........................... 2-20
Supplemental Restraint System (air bags) ....................... 2-37
Page 31 of 211

Downloaded from www.Manualslib.com manuals search engine 2-17 BEFORE DRIVING
66J21-03E
Outside Rearview Mirrors
64J014
Adjust the outside rearview mirrors so you
can just see the side of your vehicle in the
mirrors.
The passenger’s side mirror is a convex
(curved surface) mirror. Objects seen in
this mirror will look smaller and appear far-
ther away than when seen in a flat mirror.
Power Mirror Control (if equipped)
64J015
The switch to control the power rearview
mirrors is located on the driver’s door
panel. You can adjust the mirrors when the
ignition switch is in the “ACC” or “ON” posi-
tion. To adjust the mirrors:
1) Move the selector switch to the left or
right to select the mirror you wish to
adjust.
2) Press the outer part of the switch that
corresponds to the direction in which
you wish to move the mirror.
3) Return the selector switch to the center
position to help prevent unintended
adjustment.
Seat Adjustment
WARNING
Be careful when judging the size or
distance of a vehicle or other object
seen in the side convex mirror. Be
aware that objects look smaller and
appear farther away than when seen
in a flat mirror.
(1)
(3) (2)
(4) (2)
(4)(3) (1)
WARNING
Never attempt to adjust the driver’s
seat or seatback while driving. The
seat or seatback could move unex-
pectedly, causing loss of control.
Make sure that the driver’s seat and
seatback are properly adjusted
before you start driving.
WARNING
To avoid excessive seat belt slack,
which reduces the effectiveness of
the seat belts as a safety device,
make sure that the seats are adjusted
before the seat belts are fastened.
Seat Adjustment: 14
Page 32 of 211
Downloaded from www.Manualslib.com manuals search engine 2-18 BEFORE DRIVING
66J21-03E
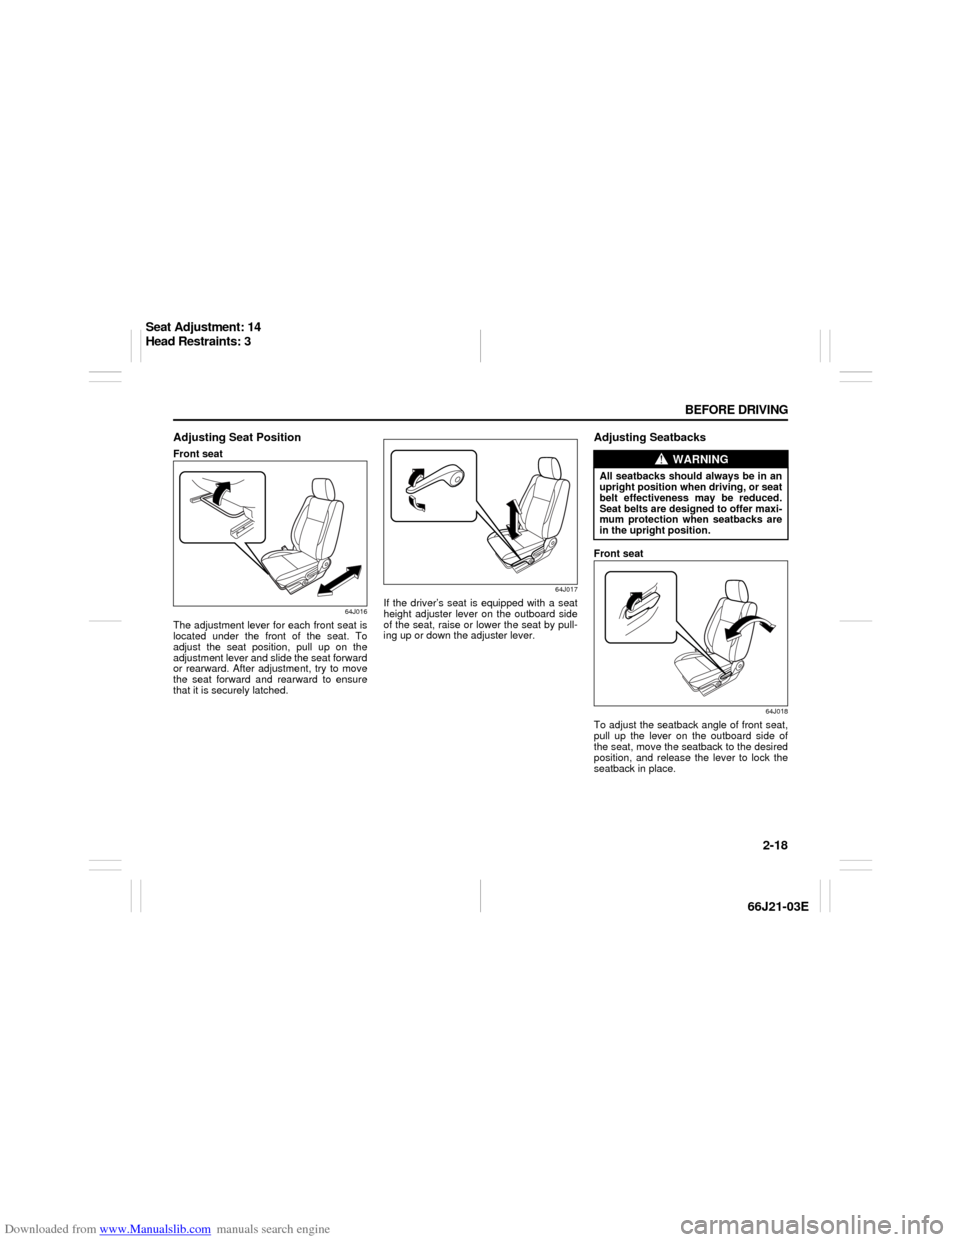
Adjusting Seat PositionFront seat
64J016
The adjustment lever for each front seat is
located under the front of the seat. To
adjust the seat position, pull up on the
adjustment lever and slide the seat forward
or rearward. After adjustment, try to move
the seat forward and rearward to ensure
that it is securely latched.
64J017
If the driver’s seat is equipped with a seat
height adjuster lever on the outboard side
of the seat, raise or lower the seat by pull-
ing up or down the adjuster lever.
Adjusting SeatbacksFront seat
64J018
To adjust the seatback angle of front seat,
pull up the lever on the outboard side of
the seat, move the seatback to the desired
position, and release the lever to lock the
seatback in place.
WARNING
All seatbacks should always be in an
upright position when driving, or seat
belt effectiveness may be reduced.
Seat belts are designed to offer maxi-
mum protection when seatbacks are
in the upright position.
Seat Adjustment: 14
Head Restraints: 3
Page 33 of 211
Downloaded from www.Manualslib.com manuals search engine 2-19 BEFORE DRIVING
66J21-03E
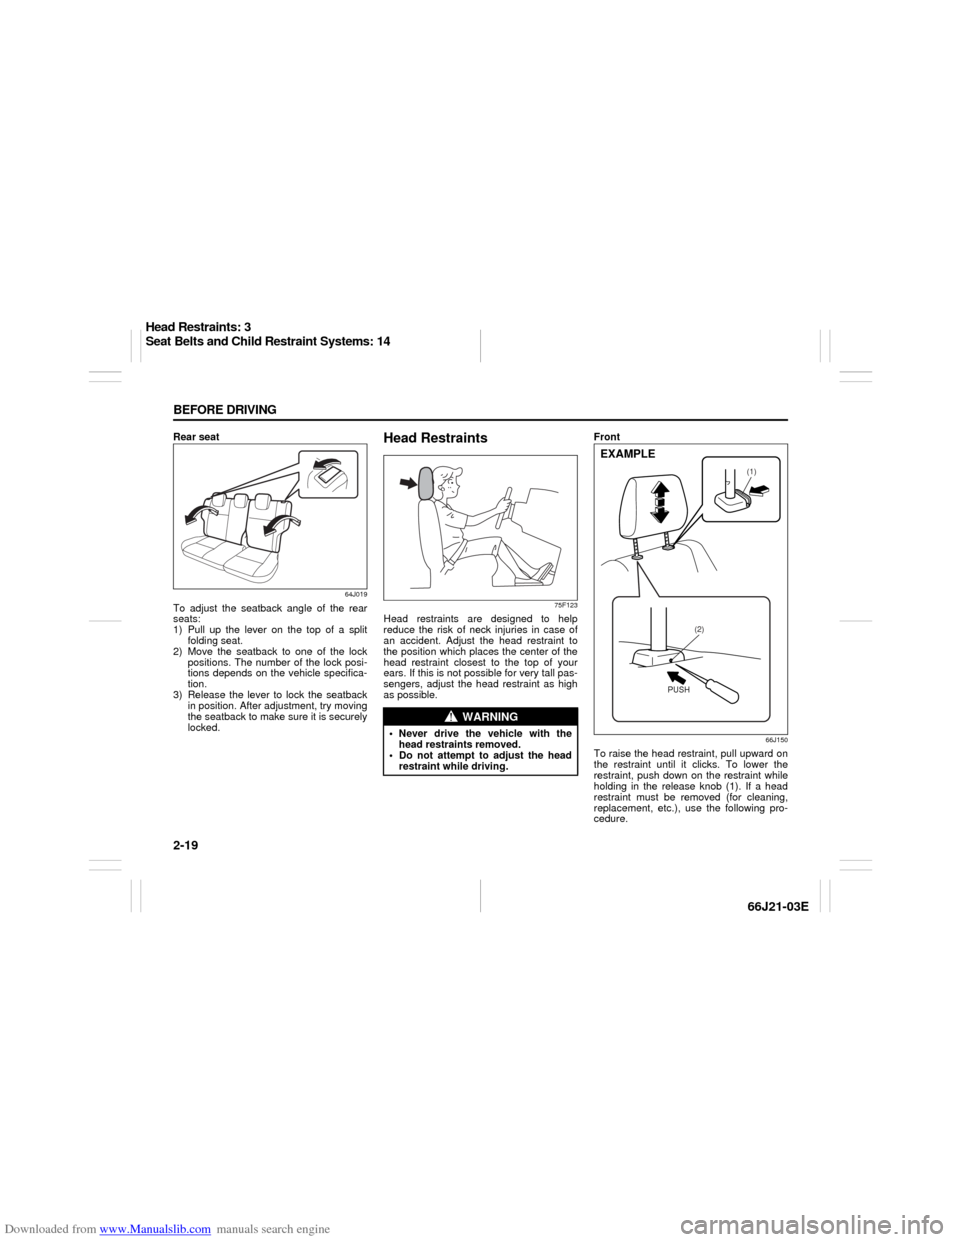
Rear seat
64J019
To adjust the seatback angle of the rear
seats:
1) Pull up the lever on the top of a split
folding seat.
2) Move the seatback to one of the lock
positions. The number of the lock posi-
tions depends on the vehicle specifica-
tion.
3) Release the lever to lock the seatback
in position. After adjustment, try moving
the seatback to make sure it is securely
locked.
Head Restraints
75F123
Head restraints are designed to help
reduce the risk of neck injuries in case of
an accident. Adjust the head restraint to
the position which places the center of the
head restraint closest to the top of your
ears. If this is not possible for very tall pas-
sengers, adjust the head restraint as high
as possible.Front
66J150
To raise the head restraint, pull upward on
the restraint until it clicks. To lower the
restraint, push down on the restraint while
holding in the release knob (1). If a head
restraint must be removed (for cleaning,
replacement, etc.), use the following pro-
cedure.
WARNING
Never drive the vehicle with the
head restraints removed.
Do not attempt to adjust the head
restraint while driving.
(1)
(2)
EXAMPLE
PUSH
Head Restraints: 3
Seat Belts and Child Restraint Systems: 14
Page 34 of 211
Downloaded from www.Manualslib.com manuals search engine 2-20 BEFORE DRIVING
66J21-03E
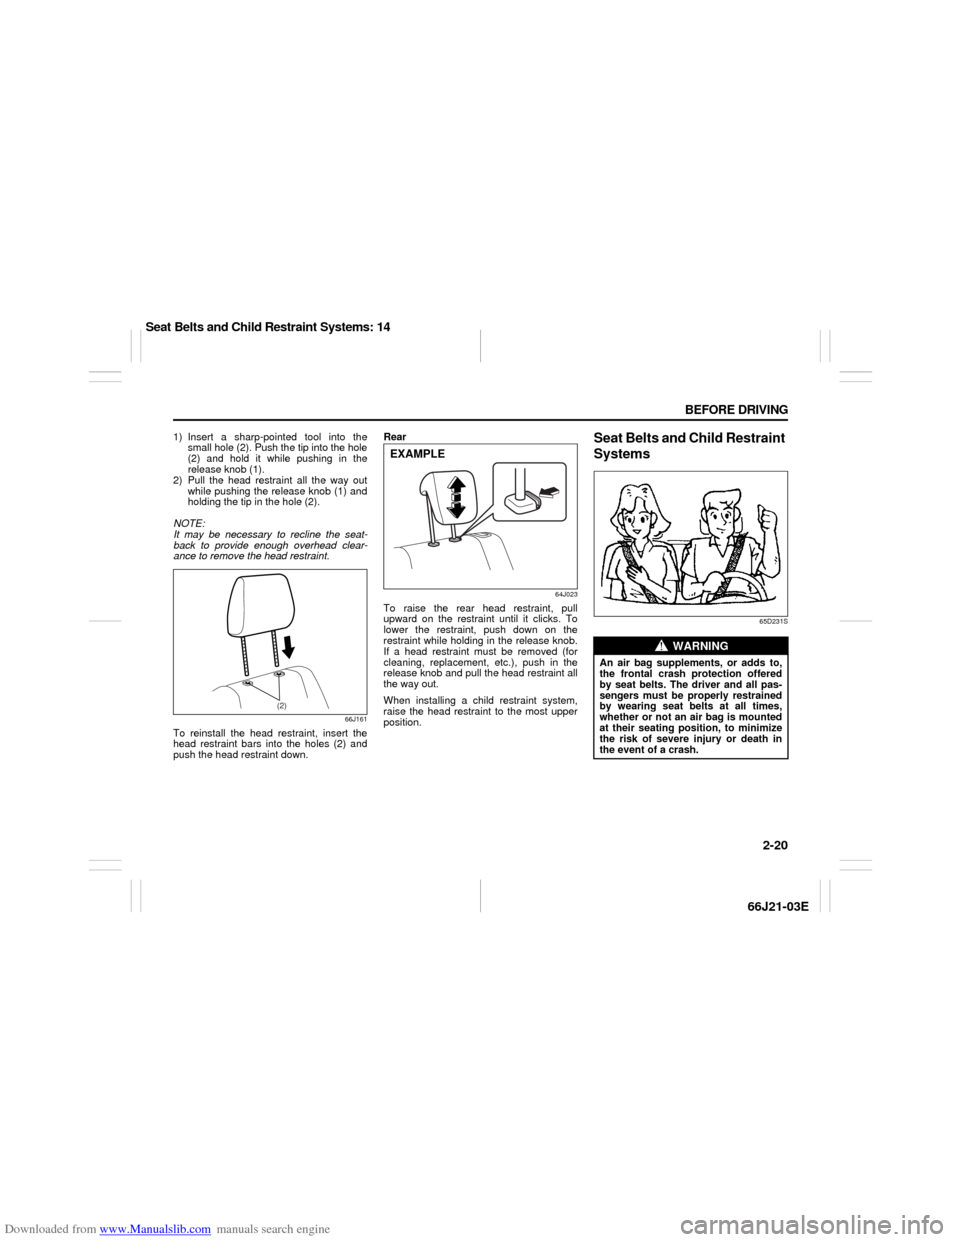
1) Insert a sharp-pointed tool into the
small hole (2). Push the tip into the hole
(2) and hold it while pushing in the
release knob (1).
2) Pull the head restraint all the way out
while pushing the release knob (1) and
holding the tip in the hole (2).
NOTE:
It may be necessary to recline the seat-
back to provide enough overhead clear-
ance to remove the head restraint.
66J161
To reinstall the head restraint, insert the
head restraint bars into the holes (2) and
push the head restraint down.Rear
64J023
To raise the rear head restraint, pull
upward on the restraint until it clicks. To
lower the restraint, push down on the
restraint while holding in the release knob.
If a head restraint must be removed (for
cleaning, replacement, etc.), push in the
release knob and pull the head restraint all
the way out.
When installing a child restraint system,
raise the head restraint to the most upper
position.
Seat Belts and Child Restraint
Systems
65D231S
(2)
EXAMPLE
WARNING
An air bag supplements, or adds to,
the frontal crash protection offered
by seat belts. The driver and all pas-
sengers must be properly restrained
by wearing seat belts at all times,
whether or not an air bag is mounted
at their seating position, to minimize
the risk of severe injury or death in
the event of a crash.
Seat Belts and Child Restraint Systems: 14
Page 35 of 211
Downloaded from www.Manualslib.com manuals search engine 2-21 BEFORE DRIVING
66J21-03E
65D606 65D201 65D199
WARNING
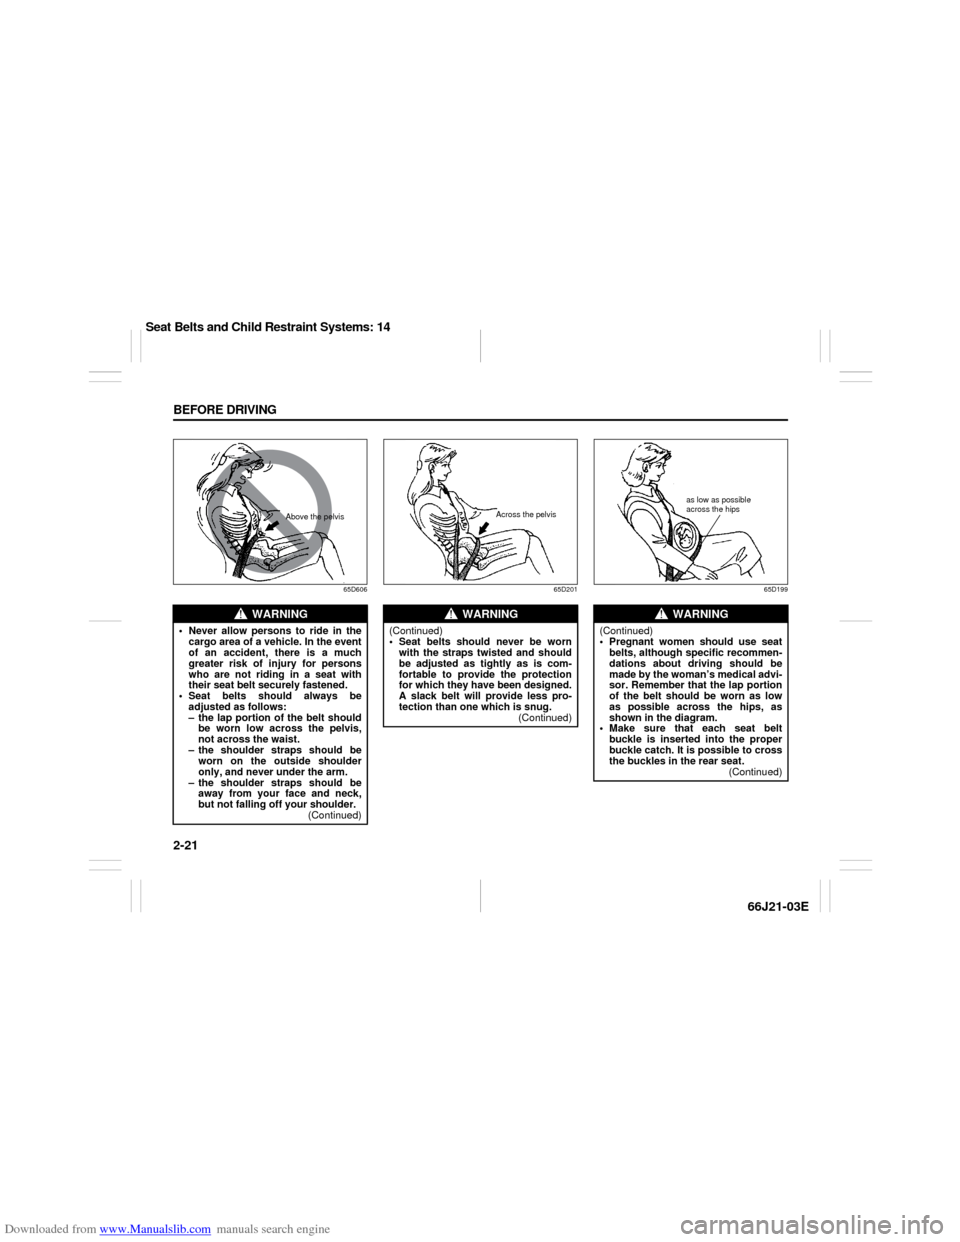
Never allow persons to ride in the
cargo area of a vehicle. In the event
of an accident, there is a much
greater risk of injury for persons
who are not riding in a seat with
their seat belt securely fastened.
Seat belts should always be
adjusted as follows:
– the lap portion of the belt should
be worn low across the pelvis,
not across the waist.
– the shoulder straps should be
worn on the outside shoulder
only, and never under the arm.
– the shoulder straps should be
away from your face and neck,
but not falling off your shoulder.
(Continued)
Above the pelvis
WARNING
(Continued)
Seat belts should never be worn
with the straps twisted and should
be adjusted as tightly as is com-
fortable to provide the protection
for which they have been designed.
A slack belt will provide less pro-
tection than one which is snug.
(Continued)
Across the pelvis
WARNING
(Continued)
Pregnant women should use seat
belts, although specific recommen-
dations about driving should be
made by the woman’s medical advi-
sor. Remember that the lap portion
of the belt should be worn as low
as possible across the hips, as
shown in the diagram.
Make sure that each seat belt
buckle is inserted into the proper
buckle catch. It is possible to cross
the buckles in the rear seat.
(Continued)
as low as possible
across the hips
Seat Belts and Child Restraint Systems: 14
Page 36 of 211
Downloaded from www.Manualslib.com manuals search engine 2-22 BEFORE DRIVING
66J21-03E
Lap-Shoulder BeltEmergency Locking Retractor (ELR)
The lap-shoulder seat belt has an emer-
gency locking retractor (ELR), which is
designed to lock the seat belt only during a
sudden stop or impact. It also may lock if
you pull the belt across your body very
quickly. If this happens, let the belt go back
to unlock it, then pull the belt across your
body more slowly.
Automatic Locking Retractor (ALR)
The front passenger’s seat belt and the
rear seat belts have emergency locking
retractors (ELRs) that can be temporarily
converted to function as automatic locking
retractors (ALRs). The ALR mode should
be used if you need to secure a child
restraint system in the seat. Refer to the
“Child Restraint Systems” section for
details.
WARNING
(Continued)
Do not wear your seat belt over
hard or breakable objects in your
pockets or on your clothing. If an
accident occurs, objects such as
glasses, pens, etc. under the seat
belt can cause injury.
Never use the same seat belt on
more than one occupant and never
attach a seat belt over an infant or
child being held on an occupant’s
lap. Such seat belt use could cause
serious injury in the event of an
accident.
Periodically inspect seat belt
assemblies for excessive wear and
damage. Seat belts should be
replaced if webbing becomes
frayed, contaminated, or damaged
in any way. It is essential to replace
the entire seat belt assembly after it
has been worn in a severe impact,
even if damage to the assembly is
not obvious.
Children age 12 and under should
ride properly restrained in the rear
seat, if equipped.
(Continued)
WARNING
(Continued)
Infants and small children should
never be transported unless they
are properly restrained. Restraint
systems for infants and small chil-
dren can be purchased commer-
cially and should be used. Make
sure that the system you purchase
meets Federal Motor Vehicle Safety
Standards. Read and follow all the
directions provided by the manu-
facturer.
Avoid contamination of seat belt
webbing by polishes, oils, chemi-
cals and particularly battery acid.
Cleaning may safely be carried out
using mild soap and water.
For children, if the shoulder belt
irritates the neck or face, move the
child closer to the center of the
vehicle.
All seatbacks should always be in
an upright position when driving,
or seat belt effectiveness may be
reduced. Seat belts are designed to
offer maximum protection when
seatbacks are in the upright posi-
tion.
Seat Belts and Child Restraint Systems: 14