2007 SUZUKI FORENZA transmission
[x] Cancel search: transmissionPage 68 of 225

2-20 FEATURES AND CONTROLS
85Z03-03E
Engine Exhaust Running Your Engine While You Are
Parked
It’s better not to park with the engine run-
ning. But if you ever have to, here are
some things to know.
Follow the proper steps to be sure your
vehicle won’t move. See “Shifting Into Park
(P)” or “Parking Your Vehicle (Manual
Transmission)” in this section.
WARNING
Engine exhaust can kill. It contains
the gas carbon monoxide (CO), which
you can’t see or smell. It can cause
unconsciousness and death.
You might have exhaust coming in if:
Your exhaust system sounds
strange or different.
Your vehicle gets rusty underneath.
Your vehicle was damaged in a col-
lision.
Your vehicle was damaged when
driving over high points on the
road or over road debris.
Repairs weren’t done correctly.
Your vehicle or exhaust system had
been modified improperly.
If you ever suspect exhaust is com-
ing into your vehicle:
Drive it only with all the windows
down to blow out any CO; and
Have your vehicle fixed immedi-
ately.
WARNING
Idling the engine with the climate
control system off could allow dan-
gerous exhaust into your vehicle. See
the earlier Warning under “Engine
Exhaust.”
Also, idling in a closed-in place can
let deadly carbon monoxide (CO) into
your vehicle even if the climate con-
trol fan is at the highest setting. One
place this can happen is a garage.
Exhaust – with CO – can come in eas-
ily. NEVER park in a garage with the
engine running.
Another closed-in place can be a bliz-
zard. See “Winter Driving” in the
Index.
WARNING
It is dangerous to get out of your
vehicle if the shift lever is not fully in
PARK (P) or the appropriate position
with the parking brake firmly set.
Your vehicle can roll. To determine
the appropriate position, see “Park-
ing Your Vehicle”. Don’t leave your
vehicle when the engine is running
unless you have to. If you’ve left the
engine running, the vehicle can move
suddenly. You or others could be
injured. To be sure your vehicle won’t
move, even when you’re on fairly
level ground, always set your parking
brake and move the shift lever to
PARK (P) or the appropriate position
as described under “Parking Your
Vehicle”.
Starting and Operating Your Vehicle:
Mirrors:
Page 83 of 225

3-7 INSTRUMENT PANEL
85Z03-03E
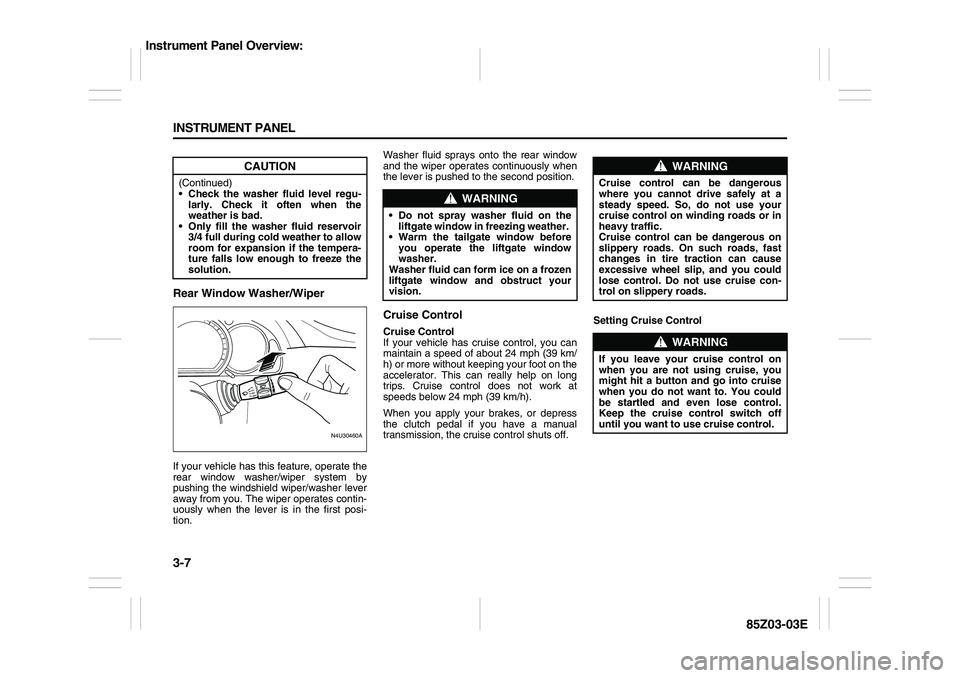
Rear Window Washer/WiperIf your vehicle has this feature, operate the
rear window washer/wiper system by
pushing the windshield wiper/washer lever
away from you. The wiper operates contin-
uously when the lever is in the first posi-
tion.Washer fluid sprays onto the rear window
and the wiper operates continuously when
the lever is pushed to the second position.
Cruise ControlCruise Control
If your vehicle has cruise control, you can
maintain a speed of about 24 mph (39 km/
h) or more without keeping your foot on the
accelerator. This can really help on long
trips. Cruise control does not work at
speeds below 24 mph (39 km/h).
When you apply your brakes, or depress
the clutch pedal if you have a manual
transmission, the cruise control shuts off.Setting Cruise Control
CAUTION
(Continued)
Check the washer fluid level regu-
larly. Check it often when the
weather is bad.
Only fill the washer fluid reservoir
3/4 full during cold weather to allow
room for expansion if the tempera-
ture falls low enough to freeze the
solution.
N4U30460A
FASTSLOW
WARNING
Do not spray washer fluid on the
liftgate window in freezing weather.
Warm the tailgate window before
you operate the liftgate window
washer.
Washer fluid can form ice on a frozen
liftgate window and obstruct your
vision.
WARNING
Cruise control can be dangerous
where you cannot drive safely at a
steady speed. So, do not use your
cruise control on winding roads or in
heavy traffic.
Cruise control can be dangerous on
slippery roads. On such roads, fast
changes in tire traction can cause
excessive wheel slip, and you could
lose control. Do not use cruise con-
trol on slippery roads.
WARNING
If you leave your cruise control on
when you are not using cruise, you
might hit a button and go into cruise
when you do not want to. You could
be startled and even lose control.
Keep the cruise control switch off
until you want to use cruise control.
Instrument Panel Overview:
Page 84 of 225

3-8 INSTRUMENT PANEL
85Z03-03E
The cruise control pad is located on the
right side of the steering wheel.
1) Press the ON/OFF button to turn cruise
control on.
2) Accelerate to the speed you want.
3) Press the SET button and release it. An
indicator light on the instrument panel
cluster will come on to show you that
the cruise control is on. See “Cruise
Control Light” in this section.
4) Take your foot off the accelerator pedal.
Resuming a Set Speed
Suppose you set your cruise control at a
desired speed and then you apply the
brake pedal, or depress the clutch pedal if
you have a manual transmission. This, of
course, shuts off the cruise control. But
you do not need to reset it. Once you aregoing about 24 mph (39 km/h) or more,
you can tap the RESUME button.
You will go right back up to your chosen
speed and stay there.
If you hold in the RESUME button longer,
the vehicle will keep going faster until you
release the button or apply the brake
pedal. So unless you want to go faster, do
not hold in the RESUME button.
Increasing Speed While Using Cruise
Control
There are two ways to go to a higher
speed:
Use the accelerator pedal to get to a
higher speed. Press the SET button,
then release the button and the acceler-
ator pedal. You will now cruise at the
higher speed.
Press the RESUME button. Hold it there
until you get up to the speed you want,
and then release the button. To increase
your speed in very small amounts, tap
the RESUME button and then release it.
Each time you do this, your vehicle will
go about 1 mph (1.6 km/h) faster. The
accelerate feature will only work after
you turn on the cruise control by press-
ing the SET button.
Reducing Speed While Using Cruise
Control
There are two ways to reduce your speed
while using cruise control: Press the SET button until you reach the
lower speed you want, then release it.
To slow down in very small amounts, tap
the SET button. Each time you do this,
you will go about 1 mph (1.6 km/h)
slower.
Passing Another Vehicle While Using
Cruise Control
Use the accelerator pedal to increase your
speed. When you take your foot off the
pedal, your vehicle will slow down to the
cruise control speed you set earlier.
Using Cruise Control on Hills
How well your cruise control will work on
hills depends upon your speed, load and
the steepness of the hills. When going up
steep hills, you may have to step on the
accelerator pedal to maintain your speed.
When going downhill, you may have to
brake or shift to a lower gear to keep your
speed down. Of course, applying the brake
pedal takes you out of cruise control. Many
drivers find this to be too much trouble and
do not use cruise control on steep hills.
Disengaging Cruise Control
There are two ways to turn off the cruise
control:
Step lightly on the brake pedal, or
depress the clutch pedal, if you have a
manual transmission.
Press the ON/OFF button on the cruise
control pad.
G7U3001A
RESUME
ACC
CRUISE
SET
COASTON-OFF
Instrument Panel Overview:
Page 99 of 225

3-23 INSTRUMENT PANEL
85Z03-03E
cated by the system before any problem is
apparent. This may prevent more serious
damage to your vehicle. This system is
also designed to assist your service techni-
cian in correctly diagnosing any malfunc-
tion.
When the ignition is on, this light should
come on and should go out after a few sec-
onds as a check to show you it is working.
If the light doesn’t come on, have it
repaired.This light will also come on during a mal-
function in one of two ways:
Light Flashing
A misfire condition has been detected. A
misfire increases vehicle emissions and
may damage the emission control sys-
tem on your vehicle. Diagnosis and ser-
vice may be required.
Light On Steady
An emission control system malfunction
has been detected on your vehicle. Diag-
nosis and service may be required.
If the Light Is Flashing
The following may prevent more serious
damage to your vehicle:
Reducing vehicle speed.
Avoiding hard accelerations.
Avoiding steep uphill grades.
If the light stops flashing and remains on
steady, see “If the Light Is On Steady” fol-
lowing.
If the light continues to flash, when it is
safe to do so, stop the vehicle. Find a safe
place to park your vehicle. Turn the key off,
wait at least 10 seconds and restart the
engine. If the light remains on steady, see
“If the Light Is On Steady” following. If the
light is still flashing, see your SUZUKI
dealer for service as soon as possible. Fol-
low the driving guidelines described above.If the Light Is On Steady
You also may be able to correct the emis-
sion system malfunction by considering the
following:
Did you recently put fuel into your vehicle?
If so, reinstall the fuel cap, making sure to
fully install the cap. See “Filling Your Tank”
in section 5. The diagnostic system can
determine if the fuel cap has been left off
or is improperly installed. A loose or miss-
ing fuel cap will allow fuel to evaporate into
the atmosphere. A few driving trips with the
cap properly installed should turn the light
off.
Did you just drive through a deep puddle of
water?
If so, your electrical system may be wet.
The condition will usually be corrected
when the electrical system dries out. A few
driving trips should turn the light off.
Have you recently changed brands of fuel?
If so, be sure to fuel your vehicle with qual-
ity fuel. See “Gasoline Octane” in section
5. Poor fuel quality will cause your engine
not to run as efficiently as designed. You
may notice stalling after start-up, stalling
when you put the vehicle into gear, misfir-
ing, hesitation on acceleration or stumbling
on acceleration. (These conditions may go
away once the engine is warmed up.) This
will be detected by the system and cause
the light to turn on.
CAUTION
If you keep driving your vehicle with
this light on, your emission controls
may not work as well, your fuel econ-
omy may not be as good, and your
engine may not run as smoothly. This
could lead to costly repairs that may
not be covered by your warranty.
CAUTION
Modifications made to the engine,
transmission, exhaust or intake or
fuel system of your vehicle can affect
your vehicle’s emission controls and
may cause this light to come on.
Modifications to these systems could
lead to costly repairs not covered by
your warranty. This may also result in
a failure to pass a required Emission
Inspection/Maintenance test.
Warning Lights, Gauges and Indicators:
Page 136 of 225

4-12 DRIVING YOUR VEHICLE
85Z03-03E
Tires: They are vitally important to a
safe, trouble-free trip. Is the tread good
enough for long-distance driving? Are
the tires all inflated to the recommended
pressure?
Weather Forecasts: What’s the weather
outlook along your route? Should you
delay your trip a short time to avoid a
major storm system?
Maps: Do you have up-to-date maps?Highway HypnosisIs there actually such a condition as “high-
way hypnosis”? Or is it just plain falling
asleep at the wheel? Call it highway hyp-
nosis, lack of awareness, or whatever.
There is something about an easy stretch
of road with the same scenery, along with
the hum of the tires on the road, the drone
of the engine, and the rush of the wind
against the vehicle that can make you
sleepy. Don’t let it happen to you! If it does,
your vehicle can leave the road in less than
a second, and you could crash and be
injured.
What can you do about highway hypnosis?
First, be aware that it can happen.
Then here are some tips:
Make sure your vehicle is well ventilated,
with a comfortably cool interior.
Keep your eyes moving. Scan the road
ahead and to the sides. Check your rear-
view mirrors and your instruments fre-
quently. If you get sleepy, pull off the road into a
rest, service or parking area and take a
nap, get some exercise, or both. For
safety, treat drowsiness on the highway
as an emergency.
Hill and Mountain RoadsDriving on steep hills or mountains is differ-
ent from driving in flat or rolling terrain.
If you drive regularly in steep country, or if
you’re planning to visit there, here are
some tips that can make your trips safer
and more enjoyable.
Keep your vehicle in good shape. Check
all fluid levels and also the brakes, tires,
cooling system and transmission. These
parts can work hard on mountain roads.
Know how to go down hills. The most
important thing to know is this: let your
engine do some of the slowing down.Shift to a lower gear when you go down
a steep or long hill.
Know how to go uphill. You may want to
shift down to a lower gear. The lower
gears help cool your engine and trans-
mission, and you can climb the hill bet-
ter.
Stay in your own lane when driving on
two-lane roads in hills or mountains.
Don’t swing wide or cut across the cen-
ter of the road. Drive at speeds that let
you stay in your own lane.
WARNING
If you don’t shift down, your brakes
could get so hot that they wouldn’t
work well. You would then have poor
braking or even none going down a
hill. You could crash. Shift down to let
your engine assist your brakes on a
steep downhill slope.
WARNING
Coasting downhill in NEUTRAL (N) or
with the ignition off is dangerous.
Your brakes will have to do all the
work of slowing you down. They
could get so hot that they wouldn’t
work well. You would then have poor
braking or even none going down a
hill. You could crash. Always have
your engine running and your vehicle
in gear when you go downhill.
Your Driving, the Road, and Your Vehicle:
Page 139 of 225

4-15 DRIVING YOUR VEHICLE
85Z03-03E
Run your engine only as long as you must.
This saves fuel. When you run the engine,
make it go a little faster than just idle. That
is, push the accelerator slightly. This uses
less fuel for the heat that you get and it
keeps the battery charged. You will need a
well-charged battery to restart the vehicle,
and possibly for signaling later on with your
headlamps. Let the heater run for a while.
Then, shut the engine off and close the
window almost all the way to preserve the
heat. Start the engine again and repeat
this only when you feel really uncomfort-
able from the cold. But do it as little as pos-
sible. Preserve the fuel as long as you can.
To help keep warm, you can get out of the
vehicle and do some fairly vigorous exer-
cises every half hour or so until help
comes.
If You Are Stuck: In Sand, Mud, Ice or
Snow
In order to free your vehicle when it is
stuck, you will need to spin the wheels, but
you don’t want to spin your wheels too fast.
The method known as “rocking” can help
you get out when you’re stuck, but you
must use caution.For information about using tire chains on
your vehicle, see “Tire Chains” in section 5.Rocking Your Vehicle To Get It Out
First, turn your steering wheel left and
right. That will clear the area around your
front wheels. Then shift back and forth
between REVERSE (R) and a forward
gear (or with a manual transmission,
between FIRST (1) or SECOND (2) and
REVERSE (R)), spinning the wheels as lit-
tle as possible. Release the accelerator
pedal while you shift, and press lightly on
the accelerator pedal when the transmis-
sion is in gear. By slowly spinning your
wheels in the forward and reverse direc-
tions, you will cause a rocking motion that
may free your vehicle. If that doesn’t get
you out after a few tries, you may need to
be towed out. If you do need to be towed
out, see “Towing Your Vehicle” in the fol-
lowing section.
WARNING
If you let your tires spin at high
speed, they can explode, and you or
others could be injured. And, the
transmission or other parts of the
vehicle can overheat. That could
cause an engine compartment fire or
other damage. When you’re stuck,
spin the wheels as little as possible.
Don’t spin the wheels above 35 mph
(55 km/h) as shown on the speedom-
eter.
CAUTION
Spinning your wheels can destroy
parts of your vehicle as well as the
tires. If you spin the wheels too fast
while shifting your transmission back
and forth, you can destroy your trans-
mission. See “Rocking Your Vehicle
To Get It Out.”
Your Driving, the Road, and Your Vehicle:
Page 154 of 225

5-10 SERVICE AND APPEARANCE CARE
85Z03-03E
km) or 3 months. If necessary, clean or
replace it.
How to Inspect the Engine Air Cleaner/
Filter
To inspect the air cleaner/filter, remove the
filter from the vehicle and lightly shake the
filter to release loose dust and dirt. If the fil-
ter remains “caked” with dirt, a new filter is
required.
To inspect or replace the filter, do the fol-
lowing:
1) Remove the four screws on the cover.
2) Lift off the cover.
3) Check or replace the engine air
cleaner/filter. See “Normal Mainte-
nance Replacement Parts” in this sec-
tion for replacement part numbers.
4) Reinstall the filter, put the cover back on
tightly, and tighten the screws.
Automatic Transmission FluidTo ensure proper functioning, efficiency,
and durability of the automatic transmis-
sion, be sure to keep the transmission fluid
at the proper level. Too much or too little
fluid can cause problems.
The fluid level must be checked with the
engine running and the selector lever in P
(Park). The vehicle must be up to normal
operating temperature and parked on level
ground.
The normal operating temperature for the
fluid will be reached after driving about 10
minutes.
Checking Automatic Transmission Fluid
Level
If the fluid is contaminated or discolored,
change the automatic transmission fluid.
A decrease in the fluid level indicates a
leak in the automatic transmission. If
noted, contact your SUZUKI dealer for
repair as soon as possible.1) Start the engine.
2) Warm up the engine until the tempera-
ture of the automatic transmission fluid
reaches approximately 40°C (104°F).
3) Move the selector lever from “P” to “1”
and return to “P”. Wait for a few sec-
onds at each select position until the
selected gears are fully engaged.
WARNING
Operating the engine with the air
cleaner/filter off can cause you or
others to be burned. The air cleaner
not only cleans the air, it helps to
stop flame if the engine backfires. If it
isn’t there and the engine backfires,
you could be burned. Don’t drive with
it off, and be careful working on the
engine with the air cleaner/filter off.
CAUTION
If the air cleaner/filter is off, a backfire
can cause a damaging engine fire.
And, dirt can easily get into your
engine, which will damage it. Always
have the air cleaner/filter in place
when you’re driving.
WARNING
This work requires special skill and
equipment. Before attempting to do
the work, be sure you are fully
acquainted with doing this job.
Have your SUZUKI dealer do this
work if you are not confident you can
complete the task safely.
Otherwise, you could be injured or
could damage the vehicle.
Checking Things Under the Hood:
Page 155 of 225

5-11 SERVICE AND APPEARANCE CARE
85Z03-03E
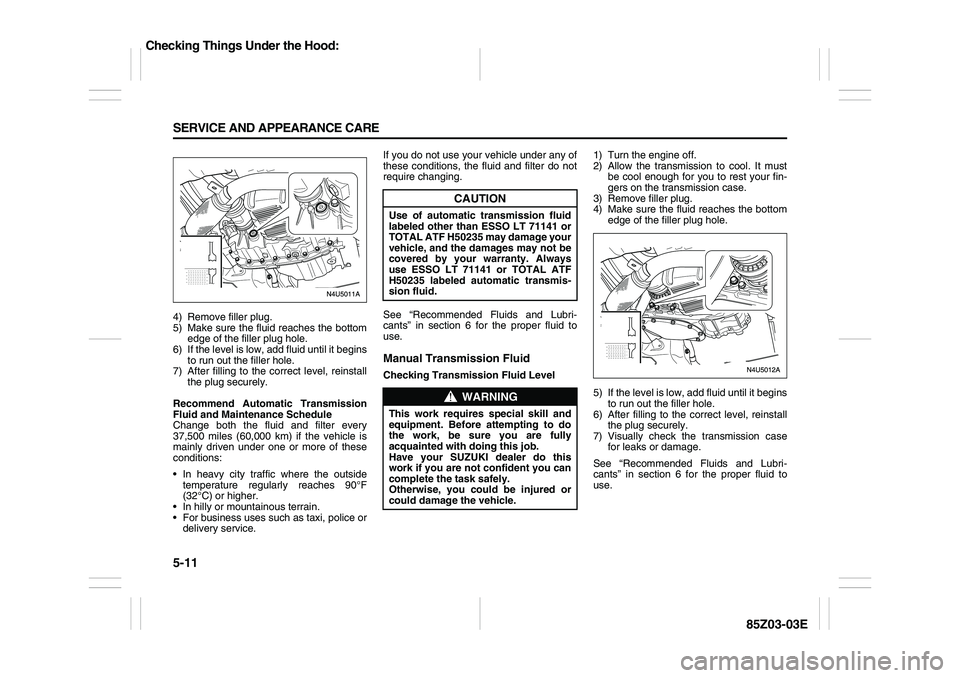
4) Remove filler plug.
5) Make sure the fluid reaches the bottom
edge of the filler plug hole.
6) If the level is low, add fluid until it begins
to run out the filler hole.
7) After filling to the correct level, reinstall
the plug securely.
Recommend Automatic Transmission
Fluid and Maintenance Schedule
Change both the fluid and filter every
37,500 miles (60,000 km) if the vehicle is
mainly driven under one or more of these
conditions:
In heavy city traffic where the outside
temperature regularly reaches 90°F
(32°C) or higher.
In hilly or mountainous terrain.
For business uses such as taxi, police or
delivery service.If you do not use your vehicle under any of
these conditions, the fluid and filter do not
require changing.
See “Recommended Fluids and Lubri-
cants” in section 6 for the proper fluid to
use.
Manual Transmission FluidChecking Transmission Fluid Level1) Turn the engine off.
2) Allow the transmission to cool. It must
be cool enough for you to rest your fin-
gers on the transmission case.
3) Remove filler plug.
4) Make sure the fluid reaches the bottom
edge of the filler plug hole.
5) If the level is low, add fluid until it begins
to run out the filler hole.
6) After filling to the correct level, reinstall
the plug securely.
7) Visually check the transmission case
for leaks or damage.
See “Recommended Fluids and Lubri-
cants” in section 6 for the proper fluid to
use.
CAUTION
Use of automatic transmission fluid
labeled other than ESSO LT 71141 or
TOTAL ATF H50235 may damage your
vehicle, and the damages may not be
covered by your warranty. Always
use ESSO LT 71141 or TOTAL ATF
H50235 labeled automatic transmis-
sion fluid.
WARNING
This work requires special skill and
equipment. Before attempting to do
the work, be sure you are fully
acquainted with doing this job.
Have your SUZUKI dealer do this
work if you are not confident you can
complete the task safely.
Otherwise, you could be injured or
could damage the vehicle.
Checking Things Under the Hood: