2007 SUZUKI FORENZA instrument cluster
[x] Cancel search: instrument clusterPage 44 of 225
1-32 SEATS AND RESTRAINT SYSTEMS
85Z03-03E
position, then sit upright in the seat, cen-
tered on the seat cushion, with the per-
son’s legs comfortably extended. Restart
the vehicle and have the person remain
in this position for about three minutes.
This will allow the system to detect that
person and then enable the passenger’s
air bag.
With the vehicle parked, ask the right
front passenger to get out of the seat for
more than three seconds, place the
seatback in the fully upright position, and
then sit upright in the seat, centered on
the seat cushion, with the person’s legs
comfortably extended. Have the person
remain in this position for about three
minutes. This will allow the system to
detect that person and then enable the
passenger’s air bag.
Adding Equipment to Your Air Bag-
Equipped VehicleQuestion: Because I have a disability, I
have to get my vehicle modified. How
can I find out whether this will affect my
advanced air bag system?
Answer: Changing or moving any parts of
the front seats, safety belts, the air bag
sensing and diagnostic module can affect
the operation of the advanced air bag sys-
tem. If it is necessary to modify the
advanced air bag system to accommodate
a person with disabilities, owners in the
continental United States can call Ameri-
can Suzuki toll-free at 1-800-934-0934, or
write to:
American Suzuki Motor Corporation
Automotive Customer Relations
3251 East Imperial Highway
Brea, CA 92821-6795
When Should an Air Bag Inflate?The driver’s and right front passenger’s
frontal air bags are designed to inflate in
moderate to severe frontal or near-frontal
crashes. But they are designed to inflate
only if the impact speed is above the sys-
tem’s designed “threshold level.”
If the front of your vehicle goes straight into
a wall that doesn’t move or deform, the
threshold level is about 9 to 14 mph (14.5
to 23 km/h). The threshold level can vary,
however, with specific vehicle design, so
that it can be somewhat above or below
this range.
If your vehicle strikes something that will
move or deform, such as a parked car, the
threshold level will be higher. The driver’s
and right front passenger’s frontal air bags
are not designed to inflate in rollovers, rear
impacts, or in many side impacts because
inflation would not help the occupant.
A side impact air bag is designed to inflate
in moderate to severe side crashes involv-
ing the front door. A side impact air bag will
inflate if the crash severity is above the
system’s designed “threshold level”. The
threshold level can vary with specific vehi-
cle design. A side impact air bag is not
designed to inflate in frontal or near-frontal
impacts, rollovers or rear impacts, because
inflation would not help the occupant.
In any particular crash, no one can say
whether an air bag should have inflated
simply because of the damage to a vehicle
WARNING
If the air bag readiness light in the
instrument panel cluster ever comes
on and stays on, it means that some-
thing may be wrong with the air bag
system. If this ever happens, have the
vehicle serviced promptly, because
an adult-size person sitting in the
right front passenger’s seat may not
have the protection of the air bags.
See “Air Bag Readiness Light” in
Section 3 for more on this, including
important safety information.
WARNING
A thick layer of additional material
such as a blanket, or aftermarket
equipment such as seat covers, seat
heaters and seat massagers can
affect how well the passenger sens-
ing system operates. Remove any
additional material from the seat
cushion before allowing a passenger
to use the front passenger’s seat, and
do not use aftermarket equipment
such as seat covers.
Supplemental Restraint System:
Page 77 of 225
3-1 INSTRUMENT PANEL
85Z03-03E
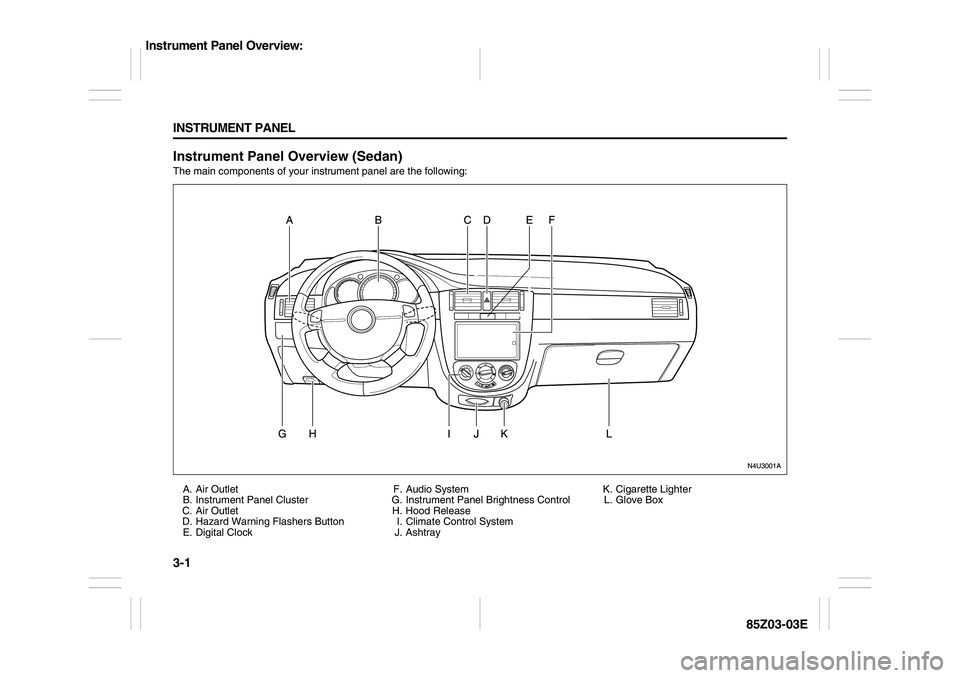
Instrument Panel Overview (Sedan)The main components of your instrument panel are the following:
A. Air Outlet
B. Instrument Panel Cluster
C. Air Outlet
D. Hazard Warning Flashers Button
E. Digital ClockF. Audio System
G. Instrument Panel Brightness Control
H. Hood Release
I. Climate Control System
J. AshtrayK. Cigarette Lighter
L. Glove Box
Instrument Panel Overview:
Page 78 of 225
3-2 INSTRUMENT PANEL
85Z03-03E
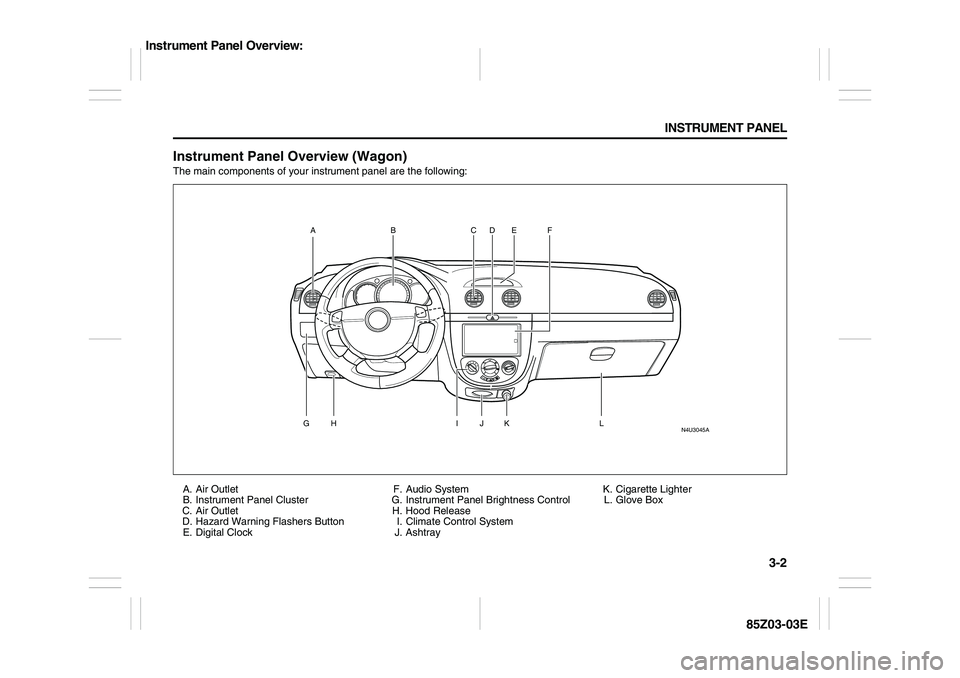
Instrument Panel Overview (Wagon)The main components of your instrument panel are the following:
A. Air Outlet
B. Instrument Panel Cluster
C. Air Outlet
D. Hazard Warning Flashers Button
E. Digital ClockF. Audio System
G. Instrument Panel Brightness Control
H. Hood Release
I. Climate Control System
J. AshtrayK. Cigarette Lighter
L. Glove Box
N4U3045A
AG
H
I
L
J
K CD E F
B
Instrument Panel Overview:
Page 80 of 225
3-4 INSTRUMENT PANEL
85Z03-03E
Tilt WheelYour vehicle has a tilt wheel which allows
you to adjust the steering wheel before you
drive. You can raise it to the highest level to
give your legs more room when you exit
and enter the vehicle.
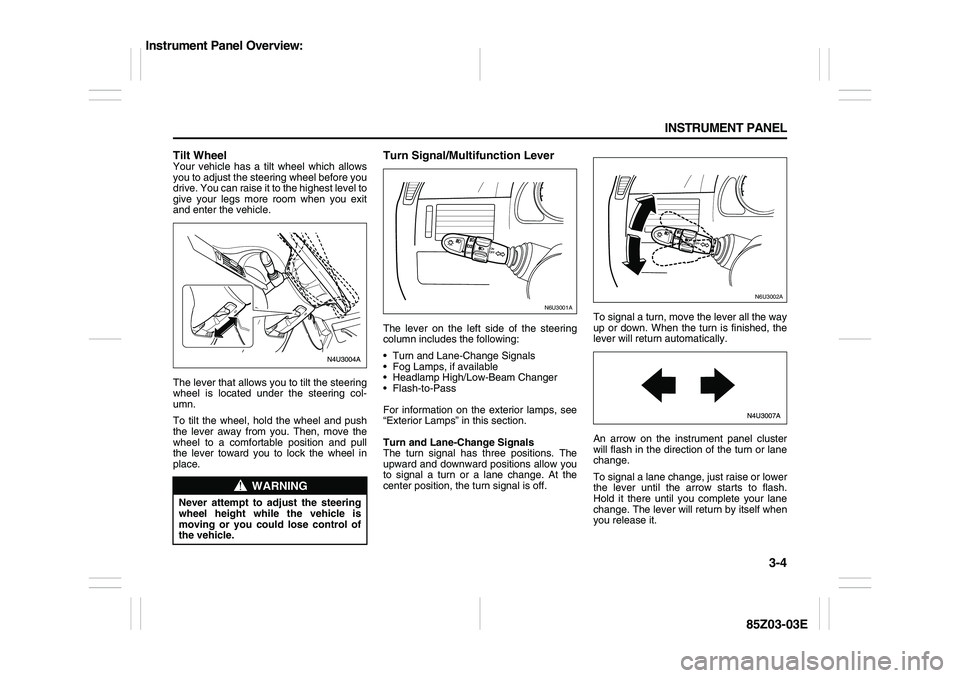
The lever that allows you to tilt the steering
wheel is located under the steering col-
umn.
To tilt the wheel, hold the wheel and push
the lever away from you. Then, move the
wheel to a comfortable position and pull
the lever toward you to lock the wheel in
place.
Turn Signal/Multifunction LeverThe lever on the left side of the steering
column includes the following:
Turn and Lane-Change Signals
Fog Lamps, if available
Headlamp High/Low-Beam Changer
Flash-to-Pass
For information on the exterior lamps, see
“Exterior Lamps” in this section.
Turn and Lane-Change Signals
The turn signal has three positions. The
upward and downward positions allow you
to signal a turn or a lane change. At the
center position, the turn signal is off.To signal a turn, move the lever all the way
up or down. When the turn is finished, the
lever will return automatically.
An arrow on the instrument panel cluster
will flash in the direction of the turn or lane
change.
To signal a lane change, just raise or lower
the lever until the arrow starts to flash.
Hold it there until you complete your lane
change. The lever will return by itself when
you release it.
WARNING
Never attempt to adjust the steering
wheel height while the vehicle is
moving or you could lose control of
the vehicle.
N6U3001A
N6U3002A
Instrument Panel Overview:
Page 81 of 225
3-5 INSTRUMENT PANEL
85Z03-03E
As you signal a turn or a lane change, if
the arrows flash rapidly, a signal bulb may
be burned out and other drivers won’t see
your turn signal.
If a bulb is burned out, replace it to help
avoid an accident. If the arrows don’t go on
at all when you signal a turn, check for
burned-out bulbs and then check the fuse.
See “Fuses and Circuit Breakers” in sec-
tion 5.
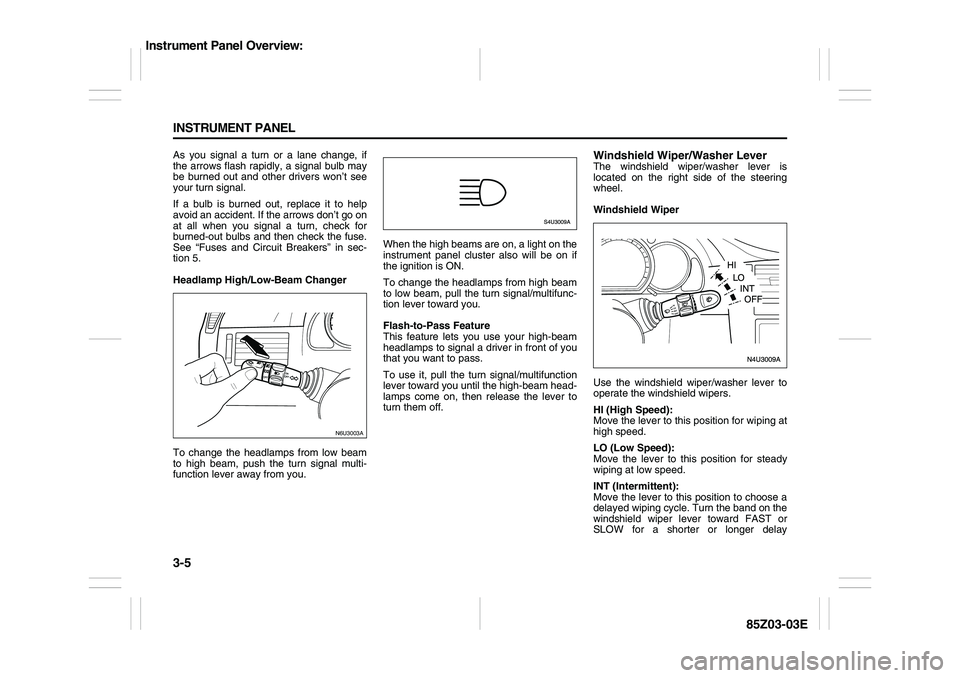
Headlamp High/Low-Beam Changer
To change the headlamps from low beam
to high beam, push the turn signal multi-
function lever away from you.When the high beams are on, a light on the
instrument panel cluster also will be on if
the ignition is ON.
To change the headlamps from high beam
to low beam, pull the turn signal/multifunc-
tion lever toward you.
Flash-to-Pass Feature
This feature lets you use your high-beam
headlamps to signal a driver in front of you
that you want to pass.
To use it, pull the turn signal/multifunction
lever toward you until the high-beam head-
lamps come on, then release the lever to
turn them off.
Windshield Wiper/Washer LeverThe windshield wiper/washer lever is
located on the right side of the steering
wheel.
Windshield Wiper
Use the windshield wiper/washer lever to
operate the windshield wipers.
HI (High Speed):
Move the lever to this position for wiping at
high speed.
LO (Low Speed):
Move the lever to this position for steady
wiping at low speed.
INT (Intermittent):
Move the lever to this position to choose a
delayed wiping cycle. Turn the band on the
windshield wiper lever toward FAST or
SLOW for a shorter or longer delay
N6U3003A
Instrument Panel Overview:
Page 84 of 225

3-8 INSTRUMENT PANEL
85Z03-03E
The cruise control pad is located on the
right side of the steering wheel.
1) Press the ON/OFF button to turn cruise
control on.
2) Accelerate to the speed you want.
3) Press the SET button and release it. An
indicator light on the instrument panel
cluster will come on to show you that
the cruise control is on. See “Cruise
Control Light” in this section.
4) Take your foot off the accelerator pedal.
Resuming a Set Speed
Suppose you set your cruise control at a
desired speed and then you apply the
brake pedal, or depress the clutch pedal if
you have a manual transmission. This, of
course, shuts off the cruise control. But
you do not need to reset it. Once you aregoing about 24 mph (39 km/h) or more,
you can tap the RESUME button.
You will go right back up to your chosen
speed and stay there.
If you hold in the RESUME button longer,
the vehicle will keep going faster until you
release the button or apply the brake
pedal. So unless you want to go faster, do
not hold in the RESUME button.
Increasing Speed While Using Cruise
Control
There are two ways to go to a higher
speed:
Use the accelerator pedal to get to a
higher speed. Press the SET button,
then release the button and the acceler-
ator pedal. You will now cruise at the
higher speed.
Press the RESUME button. Hold it there
until you get up to the speed you want,
and then release the button. To increase
your speed in very small amounts, tap
the RESUME button and then release it.
Each time you do this, your vehicle will
go about 1 mph (1.6 km/h) faster. The
accelerate feature will only work after
you turn on the cruise control by press-
ing the SET button.
Reducing Speed While Using Cruise
Control
There are two ways to reduce your speed
while using cruise control: Press the SET button until you reach the
lower speed you want, then release it.
To slow down in very small amounts, tap
the SET button. Each time you do this,
you will go about 1 mph (1.6 km/h)
slower.
Passing Another Vehicle While Using
Cruise Control
Use the accelerator pedal to increase your
speed. When you take your foot off the
pedal, your vehicle will slow down to the
cruise control speed you set earlier.
Using Cruise Control on Hills
How well your cruise control will work on
hills depends upon your speed, load and
the steepness of the hills. When going up
steep hills, you may have to step on the
accelerator pedal to maintain your speed.
When going downhill, you may have to
brake or shift to a lower gear to keep your
speed down. Of course, applying the brake
pedal takes you out of cruise control. Many
drivers find this to be too much trouble and
do not use cruise control on steep hills.
Disengaging Cruise Control
There are two ways to turn off the cruise
control:
Step lightly on the brake pedal, or
depress the clutch pedal, if you have a
manual transmission.
Press the ON/OFF button on the cruise
control pad.
G7U3001A
RESUME
ACC
CRUISE
SET
COASTON-OFF
Instrument Panel Overview:
Page 94 of 225
3-18 INSTRUMENT PANEL
85Z03-03E
3) Remove the old passenger compart-
ment air filter.
4) Then reverse the steps to install the
new air filter.
Ensure that the new filter is inserted in
the proper orientation.
Warning Lights, Gauges and
IndicatorsThis section describes the warning lights
and gauges that may be on your vehicle.
The pictures will help you locate them.
Warning lights and gauges can signal that
something is wrong before it becomes seri-
ous enough to cause an expensive repair
or replacement. Paying attention to your
warning lights and gauges could also save
you or others from injury.
Warning lights come on when there may
be or is a problem with one of your vehi-
cle’s functions. As you will see in the
details on the next few pages, some warn-
ing lights come on briefly when you start
the engine just to let you know they’re
working. If you are familiar with this sec-
tion, you should not be alarmed when this
happens.
Gauges can indicate when there may be or
is a problem with one of your vehicle’s
functions. Often gauges and warning lights
work together to let you know when there’s
a problem with your vehicle.
When one of the warning lights comes on
and stays on when you are driving, or
when one of the gauges shows there may
be a problem, check the gauge that tells
you what to do about it. Please follow this
manual’s advice. Waiting to do repairs can
be costly – and even dangerous. So pleaseget to know your warning lights and
gauges. They’re a big help.
Instrument Panel ClusterYour instrument panel cluster is designed
to let you know at a glance how your vehi-
cle is running. You’ll know how fast you’re
going, how much fuel you’re using and
many other things you’ll need to drive
safely and economically.
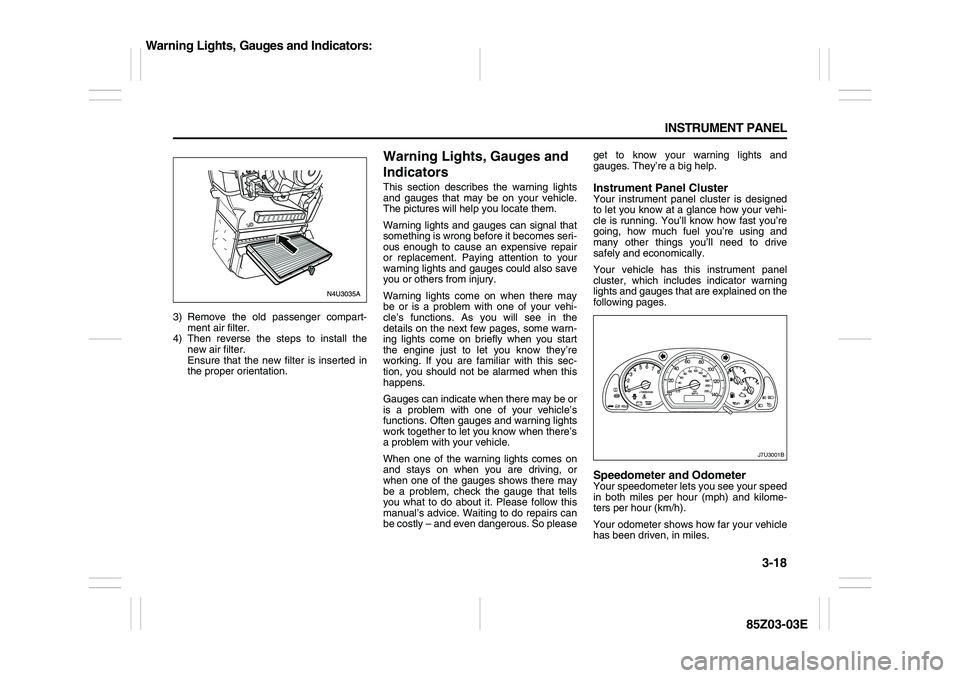
Your vehicle has this instrument panel
cluster, which includes indicator warning
lights and gauges that are explained on the
following pages.Speedometer and OdometerYour speedometer lets you see your speed
in both miles per hour (mph) and kilome-
ters per hour (km/h).
Your odometer shows how far your vehicle
has been driven, in miles.
J7U3001B
Warning Lights, Gauges and Indicators:
Page 102 of 225

3-26 INSTRUMENT PANEL
85Z03-03E
Door Ajar LightThis light will stay on until all doors are
closed and completely latched.
If the key is in the ignition while the driver’s
door is open, you will also hear a warning
chime.
Make sure that all doors are completely
closed and this light is out before driving.Trunk Ajar LightThis light will come on when the trunk is
not completely closed.
Make sure that the trunk is completely
closed and this light is out before driving.
Daytime Running Lamps Indicator
LightThis light will come on when the Daytime
Running Lamps (DRL) are on.
See “Daytime Running Lamps (DRL)”
under “Exterior Lamps” in this section for
further information on the DRL system.Passenger Air Bag Off IndicatorThe passenger air bag off indicator
appears in the clock display located in the
center of the instrument panel.
When the ignition key is turned to ON or
START, the passenger air bag off indicator
will light for several seconds as a system
check. Then, after several more seconds, if
the words “PASSENGER AIR BAG OFF”
remain lit, it means that the passenger
sensing system has turned off the rightfront passenger’s frontal air bag and side
air bag. See “Passenger Sensing System”
in Section 1 for more on this, including
important safety information.
Tire Pressure Monitoring System
Warning LightThe light comes on when the tire pressure
monitoring system detects that one or
more of your tires is significantly under-
inflated. This light will also come on for a
few seconds and then go off when you turn
the ignition to ON. This indicates that the
S4U2029AN5U3005A
S5U3002AN5U1002AS
PASSENGER
AIR BAG OFF
WARNING
If the air bag readiness light in the
instrument panel cluster ever comes
on and stays on, it means that some-
thing may be wrong with the air bag
system. If this ever happens, have the
vehicle serviced promptly, because
an adult-size person sitting in the
right front passenger’s seat may not
have the protection of the frontal air
bag and side air bag. See “Air Bag
Readiness Light” in this section.
L5U3012A
Warning Lights, Gauges and Indicators:
Audio System: