2007 SUZUKI ALTO CAP
[x] Cancel search: CAPPage 11 of 139

Downloaded from www.Manualslib.com manuals search engine 1159K,76G,844-74E
Annexure-A
List of parts covered under Emission Warranty
1. Fuel injection Assembly, Pressure Regulator, Throttle Body Assembly.
2. Electronic Control Module (ECM).
3. Intake Manifold.
4. EGR valve.
5. Distributor and internal parts.
6. Ignitions coil.
7. Canister Assembly.
8. Vapour Liquid Separator.
9. Fuel Tank and Filler Cap.
10. PCV (Positive Crankcase Ventilation) Valve.
11. Oil Filler Cap.
12. Catalytic Convertor.
13. Exhaust manifold.
14. All fuel injection System related SENSORS.
15. Maniverter
EMISSION WARRANTY
2-5
Page 56 of 139

Downloaded from www.Manualslib.com manuals search engine 5776G-74E
OTHER CONTROLS AND EQUIPMENT
6
OTHER CONTROLS AND EQUIPMENT
Parking Brake Lever.......................................................................................... 6-1
Pedals................................................................................................................... 6-2
Gear Lever........................................................................................................... 6-3
Fuel Filler Cap.................................................................................................... 6-3
Folding Rear Seats............................................................................................ 6-5
Sun Visor............................................................................................................. 6-5
Interior Light Switch.......................................................................................... 6-6
Assist Grips........................................................................................................ 6-6
Bonnet................................................................................................................... 6-6
Frame Hooks (if equipped).............................................................................. 6-7
Cup Holder (if equipped)................................................................................. 6-8
Tyre Changing Tools......................................................................................... 6-8
High Mount Stop Lamp.................................................................................... 6-9
Page 59 of 139

Downloaded from www.Manualslib.com manuals search engine 60
76G-74E
FUEL FILLER CAP
6-3
The fuel filler cap is located on the left rear
side of the vehicle. The fuel filler lid can be
unlocked by pulling up the opener lever (if
equipped) located on the outboard side of
the driver’s seat and locked by simply
closing the lid.
w ww w
w WARNING
OTHER CONTROLS AND EQUIPMENT
w ww w
w WARNING
GEAR LEVER
Your vehicle is equipped with a manual
transmission. The gear change pattern for
manual transmission is shown in the
illustration. For details on how to use the
transmission, refer to USING THE
TRANSMISSION in the OPERATING YOUR
VEHICLE section.
76G-06-00476G-06-005
MANUAL TRANSMISSIONALTO
76G-06-004A
ALTO K10TYPE-1 (ALTO / ALTO K10)
Remove the fuel filler cap slowly. The
fuel may be under pressure and may
spray out, causing injury.
Petrol is extremely flammable. Do not
smoke when refuelling, and make
sure there are no open flames or
sparks in the area.
Page 60 of 139

Downloaded from www.Manualslib.com manuals search engine 6176G-74E
6-4
OTHER CONTROLS AND EQUIPMENTIf you need to replace the fuel cap,
use only a cap specified for your
model. Using an improper fuel cap
can cause a serious malfunction of
the fuel system. You can get the
correct replacement cap from your
MARUTI SUZUKI dealer. The fuel tank filler cap has a "screw-on
ratcheting type" feature.
To remove - turn the cap counter clock-
wise. Turn the cap slowly to allow any
residual pressure to escape.
To install - turn the cap clockwise and
tighten it securely until a "ratcheting"
(clicking) sound is heard. The
"ratcheting" sound indicates that the cap
is on properly.
CAUTION
76G-06-007 76G-06-008
The fuel filler cap is located on the left rear
side of the vehicle. To unlock the fuel filler
lid, turn the key clockwise. To lock turn the
key anticlockwise.
76G-06-006
TYPE-2 (ALTO)EXAMPLE EXAMPLE
Page 84 of 139

Downloaded from www.Manualslib.com manuals search engine 8576G-74E
INSPECTION AND MAINTENANCE
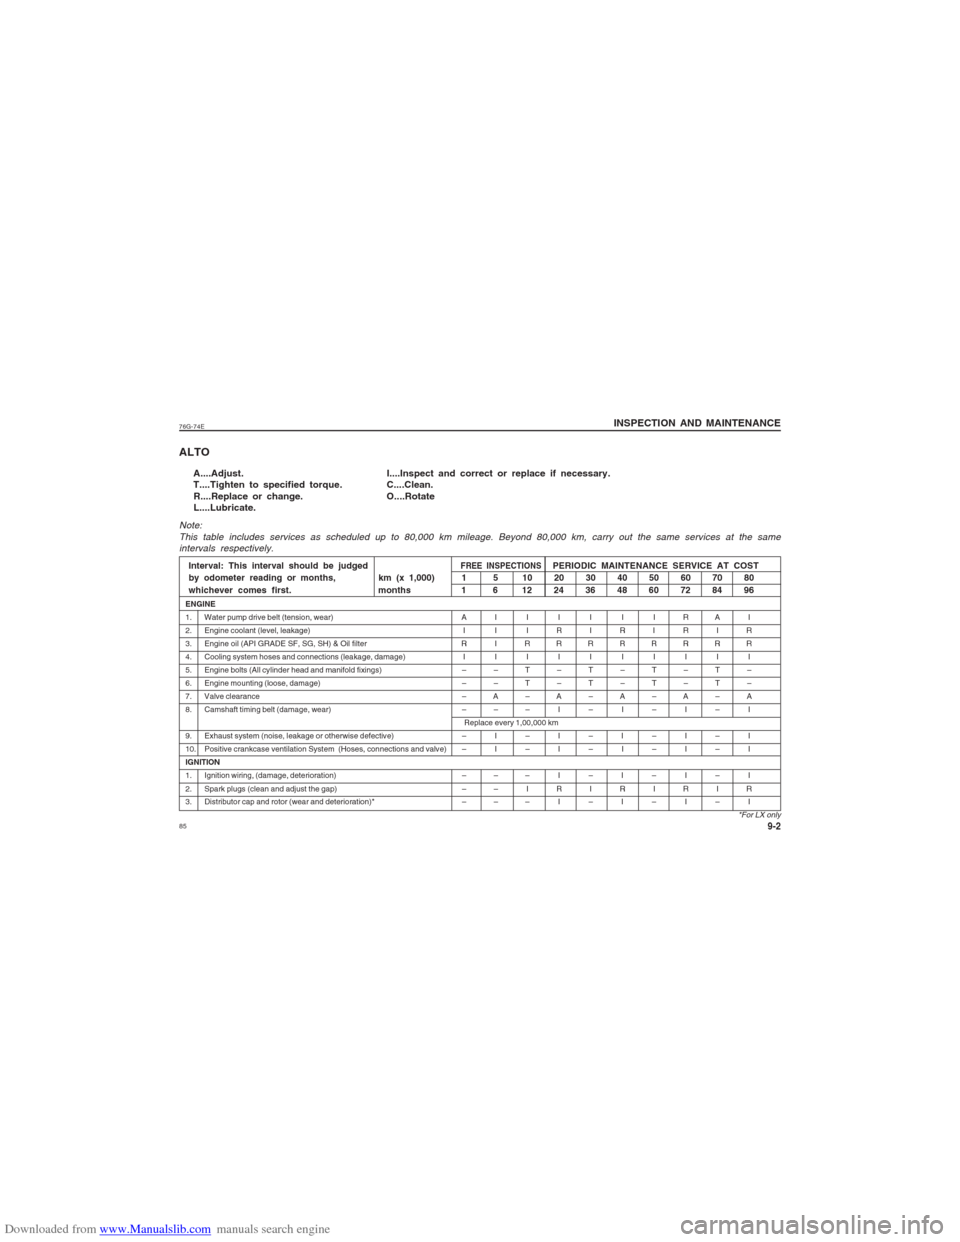
9-2
A....Adjust. I....Inspect and correct or replace if necessary.
T....Tighten to specified torque. C....Clean.
R....Replace or change. O....Rotate
L....Lubricate.
Note:
This table includes services as scheduled up to 80,000 km mileage. Beyond 80,000 km, carry out the same services at the same
intervals respectively.Interval: This interval should be judged
FREE INSPECTIONS
PERIODIC MAINTENANCE SERVICE AT COST
by odometer reading or months, km (x 1,000) 1 5 10 20 30 40 50 60 70 80
whichever comes first. months 1 6 12 24 36 48 60 72 84 96
ENGINE
1. Water pump drive belt (tension, wear) A I I I I I I R A I
2. Engine coolant (level, leakage) I I I R I R I R I R
3. Engine oil (API GRADE SF, SG, SH) & Oil filter R I R R R R R R R R
4. Cooling system hoses and connections (leakage, damage) I I I I I I I I I I
5. Engine bolts (All cylinder head and manifold fixings) – – T – T – T – T –
6. Engine mounting (loose, damage) – – T – T – T – T –
7. Valve clearance – A – A – A – A – A
8. Camshaft timing belt (damage, wear) – – – I – I – I – I
Replace every 1,00,000 km
9. Exhaust system (noise, leakage or otherwise defective) – I – I – I – I – I
10. Positive crankcase ventilation System (Hoses, connections and valve) – I – I – I – I – I
IGNITION
1. Ignition wiring, (damage, deterioration) – – – I – I – I – I
2. Spark plugs (clean and adjust the gap) – – I R I R I R I R
3. Distributor cap and rotor (wear and deterioration)* – – – I – I – I – I
*For LX only
ALTO
Page 85 of 139

Downloaded from www.Manualslib.com manuals search engine 86
76G-74E
INSPECTION AND MAINTENANCE9-3Interval: This interval should be judged
FREE INSPECTIONS
PERIODIC MAINTENANCE SERVICE AT COST
by odometer reading or months, km (x 1,000) 1 5 10 20 30 40 50 60 70 80
whichever comes first. months 1 6 12 24 36 48 60 72 84 96
FUEL
1. Air cleaner Paved-road Clean every 5,000 km. Replace every 40,000 km.
Dusty condition Clean every 2,500 km or as required. Replace every 40,000 km. More frequent
replacement if dust condition is severe.
2. Accelerator cable and Throttle shafts – I&L I&L I&L I&L I&L I&L I&L I&L I&L
3. Fuel tank cap, fuel lines & connections(leakage,damage) – I – – – I – – – I
4. Fuel filter (leakage) I I I I I R I I I R
CLUTCH AND TRANSMISSION
1. Clutch pedal (play) I I I I I I I I I I
2. Clutch slipping (dragging or excessive damage) I I I I I I I I I I
3. Manual Transmission/Transfer and Differential oil (level, leakage) I I I R I R I R I R
DRIVE SHAFTS
1. Drive shafts boots (bent of boots damage) – I I I I I I I I I
BRAKE
1. Brake fluid (level, leakage) I I I R I R I R I R
2. Brake pedal (pedal-to-wall clearance) I I I I I I I I I I
3. Parking brake lever and cable (play, damage) I I I I I I I I I I
4. a. Brake discs and pads, (wear) – I I I I I I I I I
b. Brake drums & shoes – – I I I I I I I I
5. Master cylinder and wheel cylinder or calliper (oil leakage, boot kit) I I I I I R I I I R
6. Brake hoses and pipes (leakage, damage) I I I I I I I I I I
Page 94 of 139

Downloaded from www.Manualslib.com manuals search engine 9576G-74E
INSPECTION AND MAINTENANCE
9-12
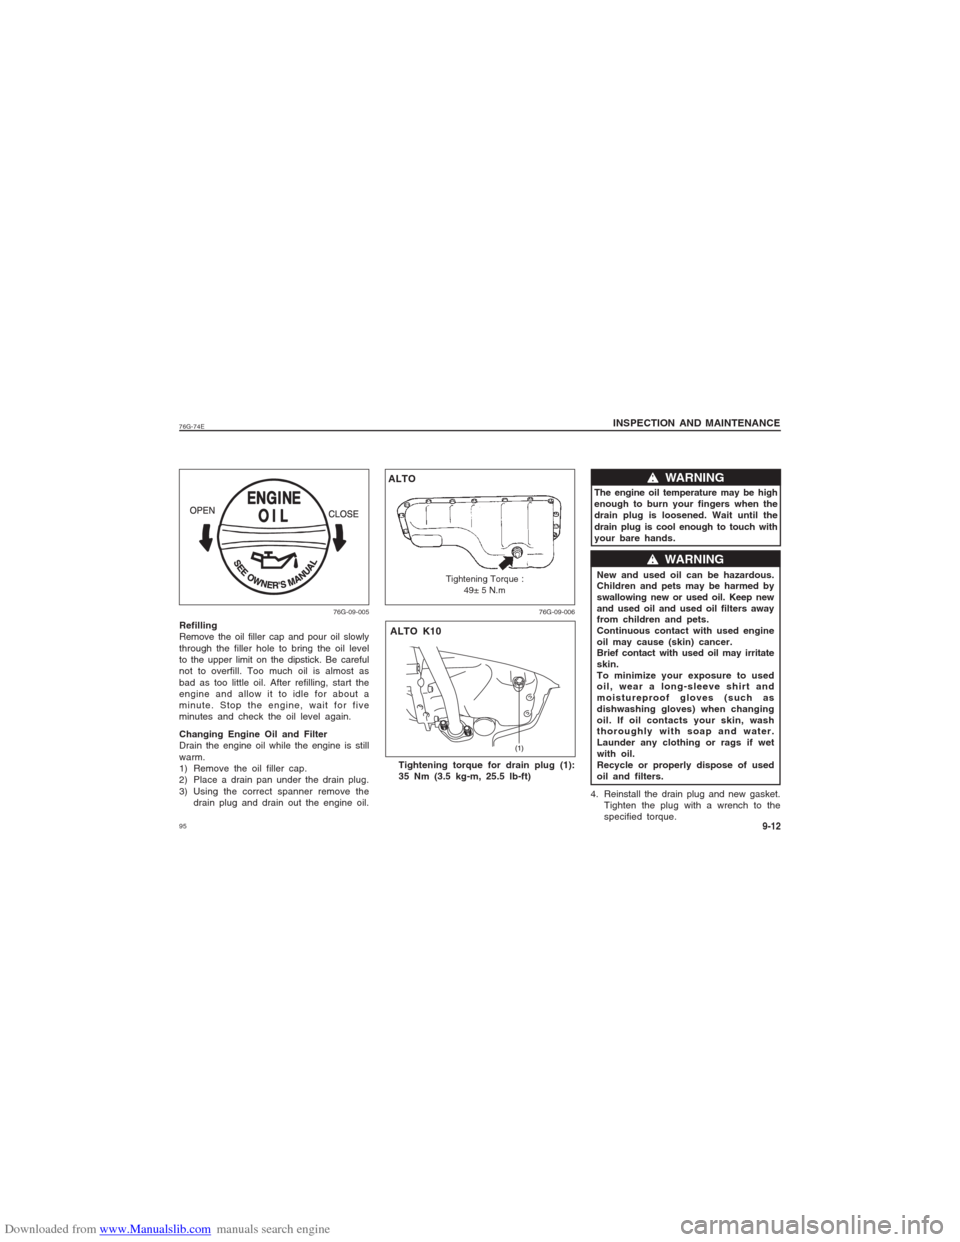
Refilling
Remove the oil filler cap and pour oil slowly
through the filler hole to bring the oil level
to the upper limit on the dipstick. Be careful
not to overfill. Too much oil is almost as
bad as too little oil. After refilling, start the
engine and allow it to idle for about a
minute. Stop the engine, wait for five
minutes and check the oil level again.
Changing Engine Oil and Filter
Drain the engine oil while the engine is still
warm.
1) Remove the oil filler cap.
2) Place a drain pan under the drain plug.
3) Using the correct spanner remove the
drain plug and drain out the engine oil.
The engine oil temperature may be high
enough to burn your fingers when the
drain plug is loosened. Wait until the
drain plug is cool enough to touch with
your bare hands.
w ww w
w WARNING
New and used oil can be hazardous.
Children and pets may be harmed by
swallowing new or used oil. Keep new
and used oil and used oil filters away
from children and pets.
Continuous contact with used engine
oil may cause (skin) cancer.
Brief contact with used oil may irritate
skin.
To minimize your exposure to used
oil, wear a long-sleeve shirt and
moistureproof gloves (such as
dishwashing gloves) when changing
oil. If oil contacts your skin, wash
thoroughly with soap and water.
Launder any clothing or rags if wet
with oil.
Recycle or properly dispose of used
oil and filters.
4. Reinstall the drain plug and new gasket.
Tighten the plug with a wrench to the
specified torque.
w ww w
w WARNING
76G-09-005 76G-09-006
Tightening torque for drain plug (1):
35 Nm (3.5 kg-m, 25.5 lb-ft)ALTO
ALTO K10
Tightening Torque :
49± 5 N.m
Page 95 of 139

Downloaded from www.Manualslib.com manuals search engine 96
76G-74E
INSPECTION AND MAINTENANCE9-13Replace the oil filter
1) Using an oil filter wrench, turn the oil
filter counterclockwise and remove it.
2) Using a clean rag, wipe off the mounting
surface on the engine where the new
filter will be seated.
3) Smear a little engine oil around the
rubber gasket of the new oil filter.
4) Screw on the new filter by hand until the
filter gasket contacts the mounting
surface.
To tighten the oil filter properly, it is
important to accurately identify the
position at which the filter gasket
first contacts the mounting surface.
5. Tighten the filter specified turn from the
point of contact with the mounting sur-
face (or to the specified torque) using an
oil filter wrench.
Tightening torque for oil filter
1 turn or
14 Nm (1.4 kg-m, 10.5 lb-ft)
CAUTION
Refill with oil and check for leaks.
1) Pour oil through the filler hole and install
the filler cap.
For the approximate capacity of the oil,
refer to the "CAPACITIES" item in the
"SPECIFICATIONS" section.
2) Start the engine and look carefully for
leaks at the oil filter and drain plug. Run
the engine at various speeds for at least
5 minutes.
3) Stop the engine and wait for 5 minutes.
Check the oil level again and add oil if
necessary. Check for leaks again.
When replacing the oil filter, it is
recommended that you use a genuine
MARUTI replacement filter.
Oil leaks from around the oil filter or
drain plug indicate incorrect installa-
tion or gasket damage. If you find any
leaks or are not sure that the filter
has been properly tightened, have the
vehicle inspected by your MARUTI
SUZUKI dealer.
CAUTIONCAUTIONCAUTION
76G-09-007 76G-09-008
To prevent oil leakage, make sure
that the oil filter is tight, but do not
overtighten it.
(1) Oil filter
(2) 1 Turn