2007 SUBARU OUTBACK height
[x] Cancel search: heightPage 41 of 442
1-14Seat, seatbelt and SRS airbags
If the shoulder portion of the belt crosses
the face or neck, adjust the shoulder belt
anchor height (window-side seating posi-
tions only) and then if necessary move the
child closer to the belt buckle to help
provide a good shoulder belt fit. Care must
be taken to securely place the lap belt as
low as possible on the hips and not on thechild ’s waist. If the shoulder portion of the
belt cannot be properly positioned, a child
restraint system should be used. Never
place the shoulder belt under the child ’s
arm or behind the child ’s back.
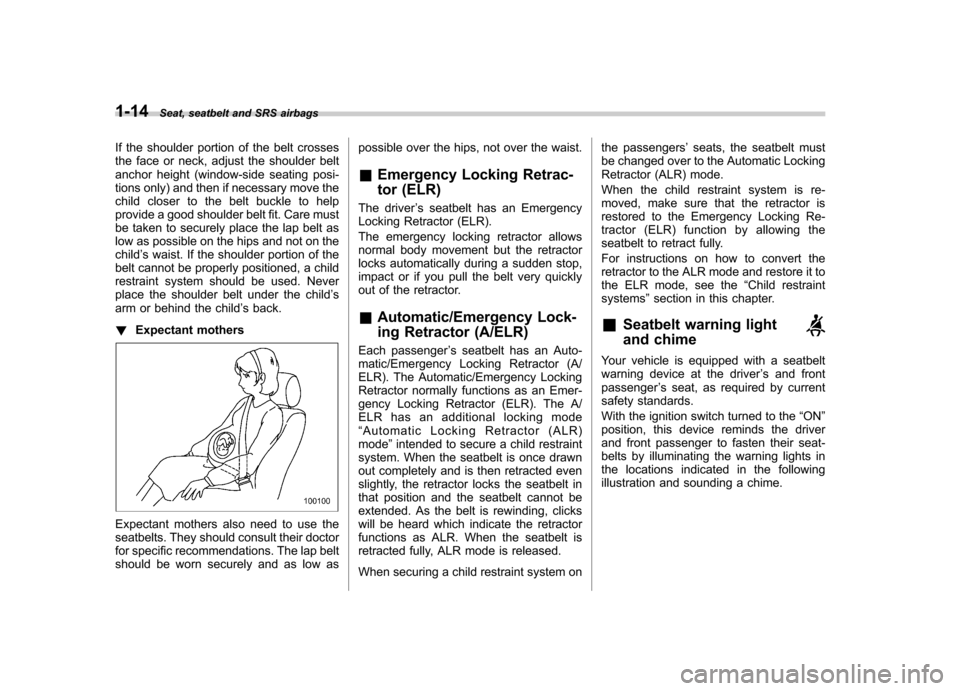
! Expectant mothers
Expectant mothers also need to use the
seatbelts. They should consult their doctor
for specific recommendations. The lap belt
should be worn securely and as low as possible over the hips, not over the waist.
& Emergency Locking Retrac-
tor (ELR)
The driver ’s seatbelt has an Emergency
Locking Retractor (ELR).
The emergency locking retractor allows
normal body movement but the retractor
locks automatically during a sudden stop,
impact or if you pull the belt very quickly
out of the retractor. & Automatic/Emergency Lock-
ing Retractor (A/ELR)
Each passenger ’s seatbelt has an Auto-
matic/Emergency Locking Retractor (A/
ELR). The Automatic/Emergency Locking
Retractor normally functions as an Emer-
gency Locking Retractor (ELR). The A/
ELR has an additional locking mode“ Automatic Locking Retractor (ALR)
mode ”intended to secure a child restraint
system. When the seatbelt is once drawn
out completely and is then retracted even
slightly, the retractor locks the seatbelt in
that position and the seatbelt cannot be
extended. As the belt is rewinding, clicks
will be heard which indicate the retractor
functions as ALR. When the seatbelt is
retracted fully, ALR mode is released.
When securing a child restraint system on the passengers
’seats, the seatbelt must
be changed over to the Automatic Locking
Retractor (ALR) mode.
When the child restraint system is re-
moved, make sure that the retractor is
restored to the Emergency Locking Re-
tractor (ELR) function by allowing the
seatbelt to retract fully.
For instructions on how to convert the
retractor to the ALR mode and restore it to
the ELR mode, see the “Child restraint
systems ”section in this chapter.
& Seatbelt warning light
and chime
Your vehicle is equipped with a seatbelt
warning device at the driver ’s and front
passenger ’s seat, as required by current
safety standards.
With the ignition switch turned to the “ON ”
position, this device reminds the driver
and front passenger to fasten their seat-
belts by illuminating the warning lights in
the locations indicated in the following
illustration and sounding a chime.
Page 45 of 442
1-18Seat, seatbelt and SRS airbags
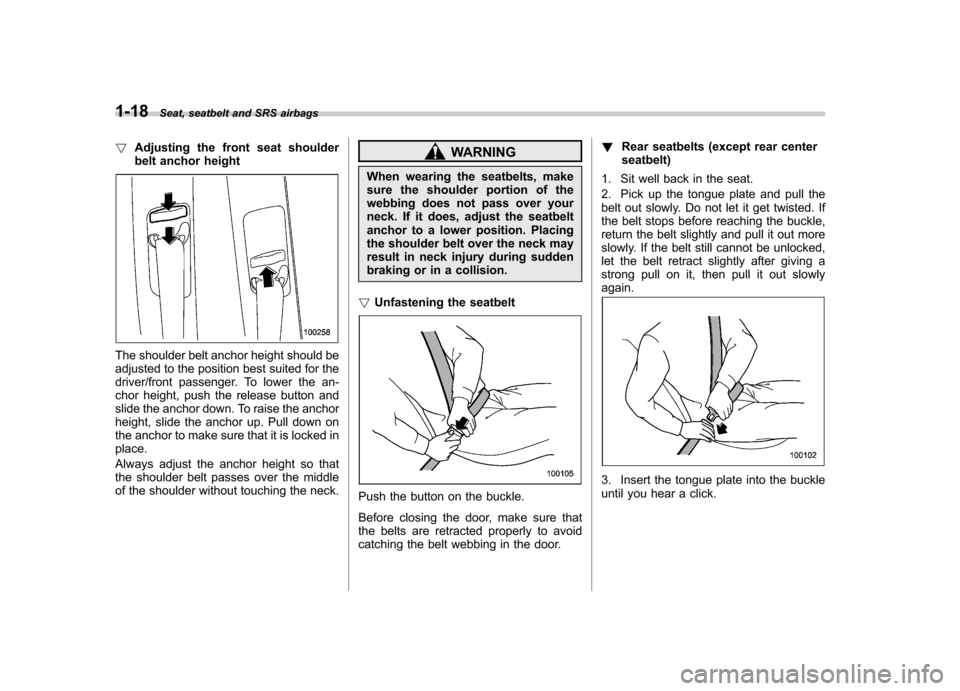
!Adjusting the front seat shoulder
belt anchor height
The shoulder belt anchor height should be
adjusted to the position best suited for the
driver/front passenger. To lower the an-
chor height, push the release button and
slide the anchor down. To raise the anchor
height, slide the anchor up. Pull down on
the anchor to make sure that it is locked inplace.
Always adjust the anchor height so that
the shoulder belt passes over the middle
of the shoulder without touching the neck.
WARNING
When wearing the seatbelts, make
sure the shoulder portion of the
webbing does not pass over your
neck. If it does, adjust the seatbelt
anchor to a lower position. Placing
the shoulder belt over the neck may
result in neck injury during sudden
braking or in a collision.
! Unfastening the seatbelt
Push the button on the buckle.
Before closing the door, make sure that
the belts are retracted properly to avoid
catching the belt webbing in the door. !
Rear seatbelts (except rear centerseatbelt)
1. Sit well back in the seat.
2. Pick up the tongue plate and pull the
belt out slowly. Do not let it get twisted. If
the belt stops before reaching the buckle,
return the belt slightly and pull it out more
slowly. If the belt still cannot be unlocked,
let the belt retract slightly after giving a
strong pull on it, then pull it out slowlyagain.
3. Insert the tongue plate into the buckle
until you hear a click.
Page 56 of 442
installing a child restraint system.
Some types of child restraints might not be
able to be secured firmly due to projection
of the seat cushion.
In this seating position, you should use
only a child restraint system that has a
bottom base that fits snugly against the
contours of the seat cushion and can be
securely retained using the seatbelt.
C: Rear seat, center seating position
Installing a child restraint system is not
recommended, although the A/ELR seat-
belt and an upper anchorage (tether
anchorage) are provided in this position.
Some types of child restraints might not be
able to be secured firmly due to projection
of the seat cushion.
In this seating position, you should use
only a child restraint system that has a
bottom base that fits snugly against the
contours of the seat cushion and can be
securely retained using the seatbelt.WARNING
Put children aged 12 and under in
the rear seat properly restrained at
all times. The SRS airbag deploys
with considerable speed and force
and can injure or even kill children,
especially if they are 12 years of age
and under and are not restrained or
improperly restrained. Because chil-
dren are lighter and weaker than
adults, their risk of being injured
from deployment is greater.
For that reason, be sure to secure
ALL types of child restraint devices
(including forward facing child
seats) in the REAR seats at all times.
You should choose a restraint de-
vice which is appropriate for thechild ’s age, height and weight. Ac-
cording to accident statistics, chil-
dren are safer when properly
restrained in the rear seating posi-
tions than in the front seating posi-tions.
WARNING
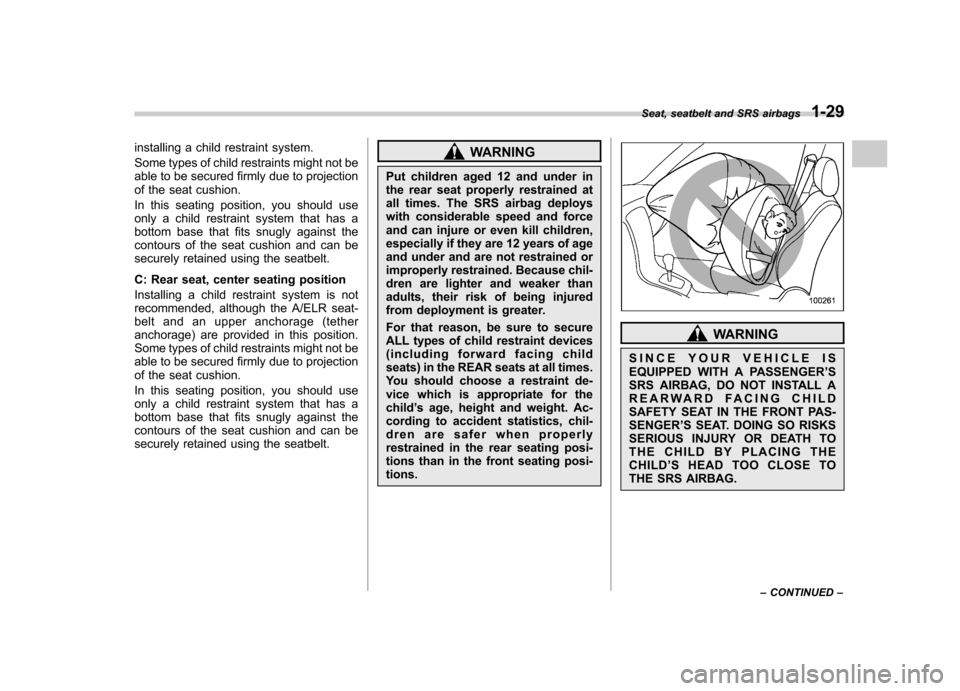
SINCE YOUR VEHICLE IS
EQUIPPED WITH A PASSENGER ’S
SRS AIRBAG, DO NOT INSTALL A
REARWARD FACING CHILD
SAFETY SEAT IN THE FRONT PAS-SENGER ’S SEAT. DOING SO RISKS
SERIOUS INJURY OR DEATH TO
THE CHILD BY PLACING THE
CHILD ’S HEAD TOO CLOSE TO
THE SRS AIRBAG. Seat, seatbelt and SRS airbags
1-29
– CONTINUED –
Page 57 of 442
1-30Seat, seatbelt and SRS airbags
&Choosing a child restraint system
Choose a child restraint system that is
appropriate for the child ’s age and size
(weight and height) in order to provide the
child with proper protection. The child
restraint system should meet all applic-
able requirements of Federal Motor Vehi-
cle Safety Standards for United States or
Canada Motor Vehicle Safety Standards
for Canada. It can be identified by looking
for the label on the child restraint system
or the manufacture ’s statement of com-
pliance in the document attached to the
system. Also it is important for you to
make sure that the child restraint system
is compatible with the vehicle in which it
will be used. &
Installing child restraint sys-
tems with A/ELR seatbelt
WARNING
. Child restraint systems and seat-
belts can become hot in a vehicle
that has been closed up in sunny
weather; they could burn a small
child. Check the child restraint
system before you place a child
in it.
. Do not leave an unsecured child
restraint system in your vehicle.
Unsecured child restraint sys-
tems can be thrown around in-
side of the vehicle in a sudden
stop, turn or accident; they can
strike and injure vehicle occu-
pants as well as result in serious
injuries or death to the child.
CAUTION
When you install a child restraint
system, follow the manufacturer ’s
instructions supplied with it. After
installing the child restraint system,
check to ensure that it is held
securely in position. If it is not held
tight and secure, the danger of your
child suffering personal injury in the
event of an accident may be in-creased.
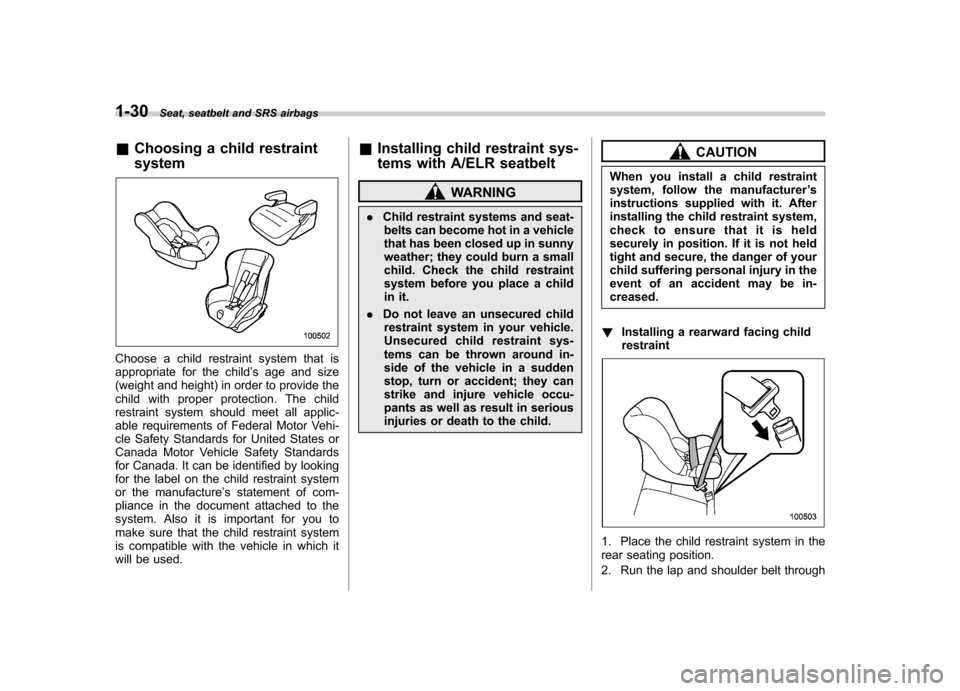
! Installing a rearward facing childrestraint
1. Place the child restraint system in the
rear seating position.
2. Run the lap and shoulder belt through
Page 68 of 442

injuries. Because the SRS airbag
needs enough space for deploy-
ment, the driver should always
sit upright and well back in the
seat as far from the steering
wheel as practical while still
maintaining full vehicle control
and the front passenger should
move the seat as far back as
possible and sit upright and well
back in the seat.
. Do not place any objects over or
near the SRS airbag cover or
between you and the SRS airbag.
If the SRS airbag deploys, those
objects could interfere with its
proper operation and could be
propelled inside the vehicle and
cause injury.
WARNING
. Put children aged 12 and under in
the rear seat properly restrained
at all times. The SRS airbag
deploys with considerable speed
and force and can injure or even
kill children, especially if they are
12 years of age and under and
are not restrained or improperly
restrained. Because children are
lighter and weaker than adults,
their risk of being injured from
deployment is greater.
Consequently, we strongly re-
commend that ALL children (in-
cluding those in child seats and
those that have outgrown child restraint devices) sit in the REAR
seat properly restrained at all
times in a child restraint device
or in a seatbelt, whichever is
appropriate for the child
’s age,
height and weight.
Secure ALL types of child re-
straint devices (including for-
ward facing child seats) in the
REAR seats at all times.
According to accident statistics,
children are safer when properly
restrained in the rear seating
positions than in the front seat-
ing positions.
For instructions and precautions
concerning the child restraint
system, see the “Child restraint
systems ”section in this chapter.
. NEVER INSTALL A REARWARD
FACING CHILD SEAT IN THE
FRONT SEAT. DOING SO RISKS
SERIOUS INJURY OR DEATH TO
THE CHILD BY PLACING THECHILD ’S HEAD TOO CLOSE TO
THE SRS AIRBAG.
. Never allow a child to stand up,
or to kneel on the front passen-ger ’s seat, or never hold a child
on your lap or in your arms. The
SRS airbag deploys with consid-
Seat, seatbelt and SRS airbags
1-41
– CONTINUED –
Page 312 of 442
1) Jack
2) Bathroom scale
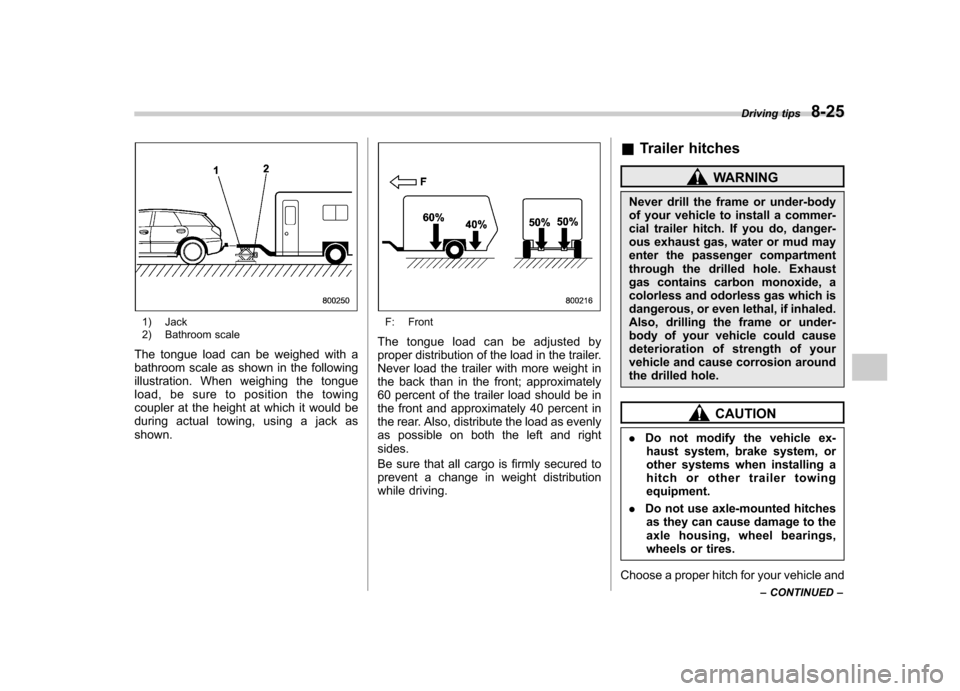
The tongue load can be weighed with a
bathroom scale as shown in the following
illustration. When weighing the tongue
load, be sure to position the towing
coupler at the height at which it would be
during actual towing, using a jack asshown.F: Front
The tongue load can be adjusted by
proper distribution of the load in the trailer.
Never load the trailer with more weight in
the back than in the front; approximately
60 percent of the trailer load should be in
the front and approximately 40 percent in
the rear. Also, distribute the load as evenly
as possible on both the left and rightsides.
Be sure that all cargo is firmly secured to
prevent a change in weight distribution
while driving. &
Trailer hitches
WARNING
Never drill the frame or under-body
of your vehicle to install a commer-
cial trailer hitch. If you do, danger-
ous exhaust gas, water or mud may
enter the passenger compartment
through the drilled hole. Exhaust
gas contains carbon monoxide, a
colorless and odorless gas which is
dangerous, or even lethal, if inhaled.
Also, drilling the frame or under-
body of your vehicle could cause
deterioration of strength of your
vehicle and cause corrosion around
the drilled hole.
CAUTION
. Do not modify the vehicle ex-
haust system, brake system, or
other systems when installing a
hitch or other trailer towingequipment.
. Do not use axle-mounted hitches
as they can cause damage to the
axle housing, wheel bearings,
wheels or tires.
Choose a proper hitch for your vehicle and Driving tips
8-25
– CONTINUED –
Page 374 of 442
Brake booster
If the brake booster does not operate as
described in the following, have it checked
by your SUBARU dealer.
1. With the engine off, depress the brake
pedal several times, applying the same
pedal force each time. The distance the
pedal travels should not vary.
2. With the brake pedal depressed, start
the engine. The pedal should move
slightly down to the floor.
3. With the brake pedal depressed, stop
the engine and keep the pedal depressed
for 30 seconds. The pedal height should
not change.
4. Start the engine again and run for
approximately one minute then turn it off.
Depress the brake pedal several times to
check the brake booster. The brake
booster operates properly if the pedal
stroke decreases with each depression.Brake pedal
Check the brake pedal free play and
reserve distance according to the main-
tenance schedule in the
“Warranty and
Maintenance Booklet ”.
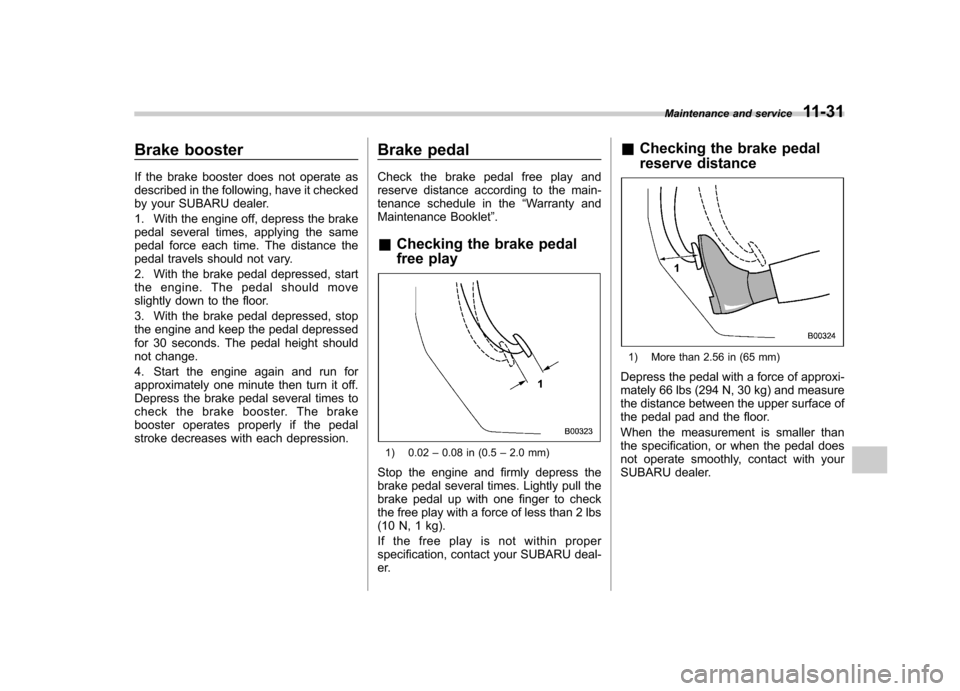
& Checking the brake pedal
free play
1) 0.02 –0.08 in (0.5 –2.0 mm)
Stop the engine and firmly depress the
brake pedal several times. Lightly pull the
brake pedal up with one finger to check
the free play with a force of less than 2 lbs
(10 N, 1 kg).
If the free play is not within proper
specification, contact your SUBARU deal-
er. &
Checking the brake pedal
reserve distance
1) More than 2.56 in (65 mm)
Depress the pedal with a force of approxi-
mately 66 lbs (294 N, 30 kg) and measure
the distance between the upper surface of
the pedal pad and the floor.
When the measurement is smaller than
the specification, or when the pedal does
not operate smoothly, contact with your
SUBARU dealer. Maintenance and service
11-31
Page 405 of 442

12-2Specifications
Specifications
These specifications are subject to change without notice. &Dimensions
in (mm)
Item Legacy OUTBACK
Sedan Station wagon Sedan Station wagon
Non-
turbo Turbo
2.5-liter 2.5-liter 3.0-liter 2.5-liter3.0-liter
Except 2.5GT
spec.B 2.5GT
spec.B Non-
turbo Turbo
Overall length 186.2 (4,730) 188.8 (4,795) 186.2 (4,730) 188.8 (4,795)
Overall width 68.1 (1,730) 68.1 (1,730) 69.7 (1,770) 69.7 (1,770)
Overall height 56.1
(1,425) 56.5
(1,435) 58.1 (1,475) 59.6 (1,515) 63.2 (1,605)
Wheel base 105.1 (2,670) 105.1 (2,670) 105.1 (2,670) 105.1 (2,670)
Tread Front 58.9 (1,495) 58.9 (1,495) 58.9 (1,495) 58.9 (1,495)
Rear 58.5 (1,485) 58.5 (1,485) 58.7 (1,490) 58.7 (1,490)
Ground clearance 5.9 (150)6.3
(160) 5.9
(150) 6.1
(155) 8.5 (215)
8.5
(215) 8.7
(220) 8.5 (215)