2007 SUBARU IMPREZA WRX rear view mirror
[x] Cancel search: rear view mirrorPage 66 of 364

WARNING
Do not attach accessories to the
windshield, or fit an extra-wide mir-
ror over the rear view mirror. If the
SRS airbag deploys, those objects
could become projectiles that could
seriously injure vehicle occupants.
! Driver ’s SRS frontal airbag
The driver ’s SRS frontal airbag uses a
dual stage inflator. The inflator operates in
different ways depending on the severity
of impact, backward-forward adjustment
of the driver ’s seat position and whether or
not he/she is wearing the seatbelt.
The backward-forward adjustment of the driver ’s seat position is monitored by the driver
’s seat position sensor under the
driver ’s seat.
Whether or not the driver is wearing the
seatbelt is monitored by the seatbelt
buckle switch.
Observe the following precautions. Failure
to do so may cause the seatbelt buckle
switch and/or the seat position sensor to
malfunction, preventing the Subaru ad-
vanced frontal airbag system from func-
tioning correctly or causing the system tofail. . Do not place articles/metal objects or
install any accessory other than a genuine
SUBARU accessory under the driver ’s
seat. Do not allow the rear seat occupant
to kick the driver ’s seat or push up its
bottom surface with his/her feet. . Do not place a magnet near the
seatbelt buckle or under the driver ’s seat.
If the seatbelt buckle switch and/or the driver ’s seat position sensor have failed,
the SRS airbag system warning light will
illuminate. Although the driver ’sSRS
frontal airbag can deploy regardless of
the backward-forward adjustment of the
driver ’s seat position even when the
warning light is on, have the system
inspected by your SUBARU dealer im-
mediately if the SRS airbag system warn-
ing light comes on. NOTE
The driver
’s SRS side airbag and
seatbelt pretensioner are not controlled
by the Subaru advanced frontal airbagsystem. ! Front passenger ’s SRS frontal air-
bag
The front passenger ’s SRS frontal airbag
uses a dual stage inflator. The inflator
operates in different ways depending on
the severity of impact.
The total load on the seat is monitored by
the occupant detection system ’s weight
sensor located under the seat.
The system has another sensor that
monitors the tension of the front passen-
ger seatbelt. Using the total seat load and
seatbelt tension data from the sensors,
the occupant detection system determines
whether the front passenger ’s SRS frontal
airbag should or should not be inflated.
The occupant detection system may not
inflate the front passenger ’s SRS frontal
airbag even when the driver ’s SRS frontal
airbag deploys. This is normal.
Observe the following precautions. Failure
to do so may prevent the Subaru ad-
vanced frontal airbag system from func-
tioning correctly or cause the system to fail. Seat, seatbelt and SRS airbags
1-41
– CONTINUED –
Page 142 of 364

cotton cloth or an applicator. !Compass calibration
1. For optimum calibration, switch off all
nonessential electrical accessories (rear
window defogger, heater/air conditioning
system, spotlight, etc.) and ensure all
doors are shut.
2. Drive to an open, level area away from
large metallic objects or structures and
make certain the ignition switch is in the“ ON ”position.
3. Press and hold the left button for 3
seconds then release, and the compass
will enter the calibration mode. “CAL ”and
direction will be displayed.
4. Drive slowly in a circle until “CAL ”
disappears from the display (approxi-
mately two or three circles). The compass
is now calibrated.
5. Further calibration may be necessary
should outside. Influences cause the
mirror to read inaccurately. You will know
that this has occurred if your compass
begins to read in only limited directions.
Should you encounter this situation, return
to step one of the above procedure and
recalibrate the mirror. !
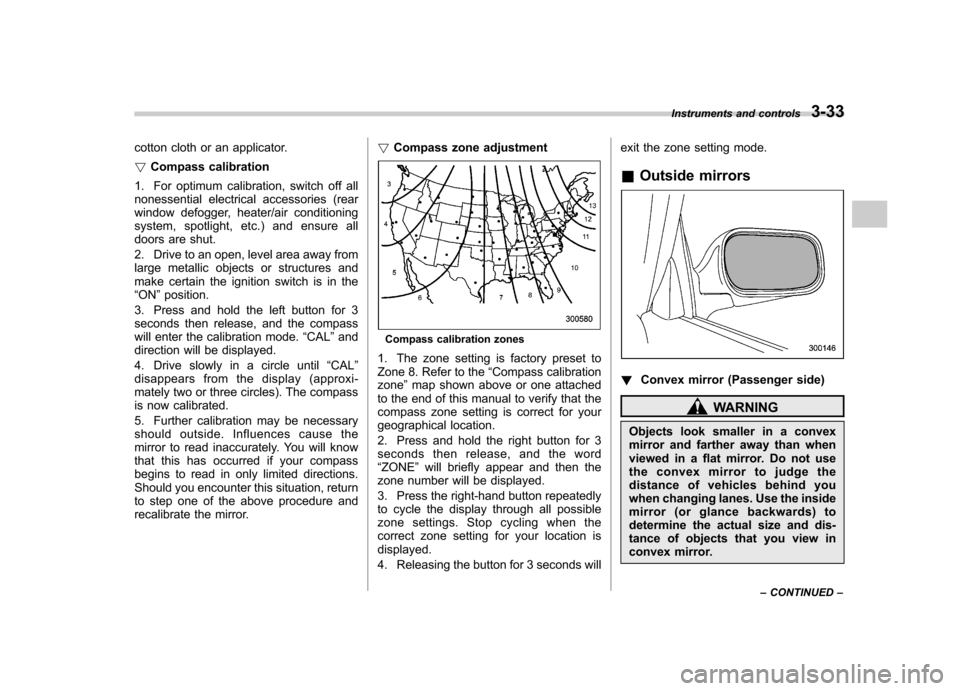
Compass zone adjustment
Compass calibration zones
1. The zone setting is factory preset to
Zone 8. Refer to the “Compass calibration
zone ”map shown above or one attached
to the end of this manual to verify that the
compass zone setting is correct for your
geographical location.
2. Press and hold the right button for 3
seconds then release, and the word“ ZONE ”will briefly appear and then the
zone number will be displayed.
3. Press the right-hand button repeatedly
to cycle the display through all possible
zone settings. Stop cycling when the
correct zone setting for your location isdisplayed.
4. Releasing the button for 3 seconds will exit the zone setting mode.
& Outside mirrors
! Convex mirror (Passenger side)
WARNING
Objects look smaller in a convex
mirror and farther away than when
viewed in a flat mirror. Do not use
the convex mirror to judge the
distance of vehicles behind you
when changing lanes. Use the inside
mirror (or glance backwards) to
determine the actual size and dis-
tance of objects that you view in
convex mirror. Instruments and controls
3-33
– CONTINUED –
Page 251 of 364

for your hitch and trailer.
WARNING
Always use safety chains between
your vehicle and the trailer. Towing a
trailer without safety chains could
create a traffic safety hazard if the
trailer separates from the hitch due
to coupling damage or hitch balldamage.
! Side mirrors
After hitching a trailer to your vehicle,
check that the standard side mirrors
provide a good rearward field of view
without significant blind spots. If significant
blind spots occur with the vehicle ’s stan-
dard side mirrors, use towing mirrors that conform with Federal, state/province and/
or other applicable regulations. !
Trailer lights
Connection of trailer lights to your vehi- cle ’s electrical system requires modifica-
tions to the vehicle ’s lighting circuit to
increase its capacity and accommodate
wiring changes. To ensure the trailer lights
are connected properly, please consult
your SUBARU dealer. Check for proper
operation of the turn signals, the brake
lights and parking lights each time you
hitch up.
CAUTION
Direct splicing or other improper
connection of trailer lights may
damage your vehicle ’s electrical
system and cause a malfunction of
your vehicle ’s lighting system.
! Tires
Make sure that all the tires on your vehicle
are properly inflated to the pressure
specified on the tire placard located on
the left center pillar of your vehicle.
Trailer tire condition, size, load rating and
proper inflation pressure should be in
accordance with the trailer manufacturer ’s specifications.
In the event your vehicle gets a flat tire
when towing a trailer, ask a commercial
road service to repair the flat tire.
If you carry a regular size spare tire in your
vehicle or trailer as a precaution against
getting a flat tire, be sure that the spare
tire is firmly secured.
WARNING
Never tow a trailer when the tem-
porary spare tire is used. The tem-
porary spare tire is not designed to
sustain the towing load. Use of the
temporary spare tire when towing
can result in failure of the spare tire
and/or less stability of the vehicle.
& Trailer towing tips
CAUTION
. Never exceed 45 mph (72 km/h)
when towing a trailer in hilly
country on hot days.
. When towing a trailer, steering,
stability, stopping distance and
braking performance will be dif-
ferent from normal operation. For Driving tips
8-25
– CONTINUED –
Page 252 of 364

8-26Driving tips
safety’s sake, you should employ
extra caution when towing a
trailer and you should never
speed. You should also keep the
following tips in mind:
! Before starting out on a trip
. Check that the vehicle and vehicle-to-
hitch mounting are in good condition. If
any problems are apparent, do not tow the
trailer. . Check that the vehicle sits horizontally
with the trailer attached. If the vehicle is
tipped sharply up at the front and down at
the rear, check the total trailer weight,
GVW, GAWs and tongue load again, then
confirm that the load and its distribution
are acceptable. . Check that the tire pressures are
correct.. Check that the vehicle and trailer are
connected properly. Confirm that
–the trailer tongue is connected
properly to the hitch ball. – the trailer lights connector is con-
nected properly and trailer ’s brake
lights illuminate when the vehicle ’s
brake pedal is pressed, and that the trailer ’s turn signal lights flash when
the vehicle ’s turn signal lever is oper-
ated. –
the safety chains are connected
properly. – all cargo in the trailer is secured
safely in position.– the side mirrors provide a good
rearward field of view without a sig-
nificant blind spot.
. Sufficient time should be taken to learn
the “feel ”of the vehicle/trailer combination
before starting out on a trip. In an area free
of traffic, practice turning, stopping and
backing up. ! Driving with a trailer
. You should allow for considerably more
stopping distance when towing a trailer.
Avoid sudden braking because it may
result in skidding or jackknifing and loss ofcontrol. . Avoid abrupt starts and sudden accel-
erations. If your vehicle has a manual
transmission, always start out in first gear
and release the clutch at moderate engine revolution. . Avoid uneven steering, sharp turns and
rapid lane changes.. Slow down before turning. Make a
longer than normal turning radius because
the trailer wheels will be closer than the
vehicle wheels to the inside of the turn. In
a tight turn, the trailer could hit yourvehicle. .
Crosswinds will adversely affect the
handling of your vehicle and trailer, caus-
ing sway. Crosswinds can be due to
weather conditions or the passing of large
trucks or buses. If swaying occurs, firmly
grip the steering wheel and slow down
immediately but gradually. . When passing other vehicles, consid-
erable distance is required because of the
added weight and length caused by
attaching the trailer to your vehicle.
1) Left turn
2) Right turn
. Backing up with a trailer is difficult and
takes practice. When backing up with a
trailer, never accelerate or steer rapidly.
When turning back, grip the bottom of the
steering wheel with one hand and turn it to
the left for a left turn, and turn it to the right
Page 335 of 364

12-6Specifications
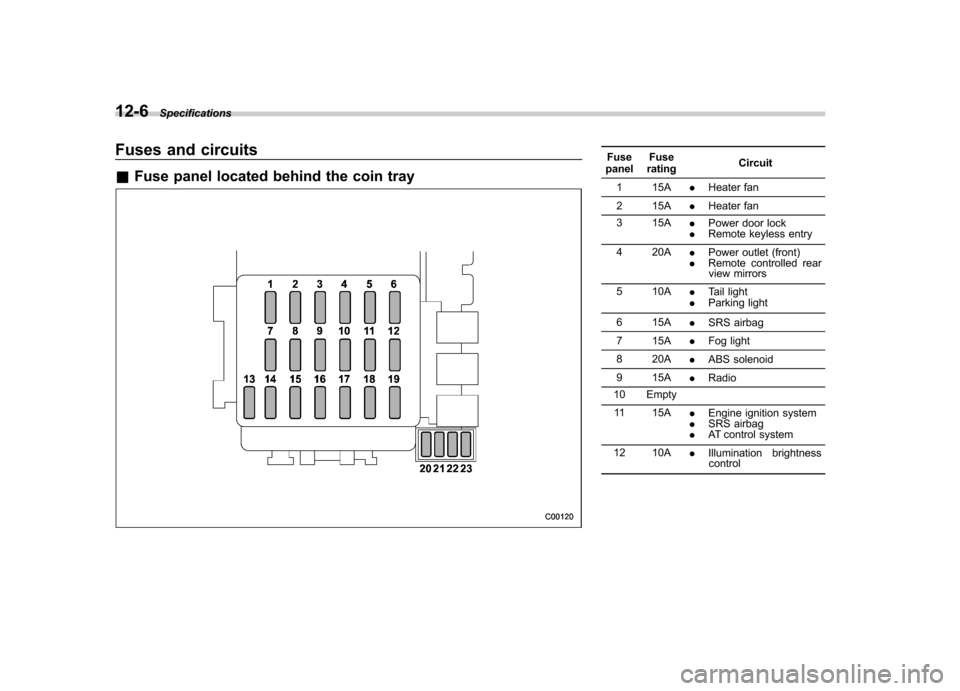
Fuses and circuits &Fuse panel located behind the coin trayFuse
panel Fuse
rating Circuit
1 15A .Heater fan
2 15A .Heater fan
3 15A .Power door lock
. Remote keyless entry
4 20A .Power outlet (front)
. Remote controlled rear
view mirrors
5 10A .Tail light
. Parking light
6 15A .SRS airbag
7 15A .Fog light
8 20A .ABS solenoid
9 15A .Radio
10 Empty
11 15A .Engine ignition system
. SRS airbag
. AT control system
12 10A .Illumination brightness
control