2007 SUBARU IMPREZA WRX radio
[x] Cancel search: radioPage 178 of 364

5-20Audio
& Auxiliary unit operation
(17) AUX button
(18) Category button
(19) Scan button
(20) Satellite radio* button
(21) Category selection button
(22) Preset buttons
(23) Channel selection dial
(*: Use of satellite radio (Sirius) requires a
tuner, antenna and a service contract. For
details, please contact your SUBARU
dealer.) “ Satellite Radio mode ”and “AUX mode ”
are available as well as the CD changer
mode when the unit is in the Auxiliary unitmode. NOTE . For use of the In-dash CD changer,
refer to the section of “In-dash 6 CD
auto changer ”in this chapter.
. Use of satellite radio (Sirius) re-
quires a tuner, antenna and a service
contract. For details, please contact
your SUBARU dealer.. The “AUX mode ”can be used when
the appropriate device is connected to
the AUX terminal.. The output sound of the portable
audio player is not loud, and the sound
via the vehicle ’s speakers that are
connected to the vehicle audio set is
very quiet. If you turn up the volume of
Page 179 of 364

the audio set, the volume becomes
louder. However, when you change
the audio to the radio mode or to a
CD player, the sound becomes a lot
louder. Remember to turn down the
volume when you change betweenthem. !AUX terminal (if equipped)
The AUX terminal is located behind the lid
under the climate controls. Push gently on
the lid to open it.
! Satellite Radio mode
Press the “SAT ”button (20) to select the
“ Satellite radio mode ”(when the SR-BB is
connected). NOTE
Use of satellite radio (Sirius) requires a
tuner, antenna and a service contract.
For details, please contact your
SUBARU dealer.or
Visit Sirius Satellite Radio at
sirius.com
or call 1-888-539-SIRIUS (7474) for
more information. Sirius, the Sirius
dog logo, channel names and logos
are trademarks of SIRIUS Satellite
Radio Inc. ! Satellite radio reception
Satellite radio signals are best received in
areas with a clear view of the open sky. In
areas where there are tall buildings, trees,
tunnels or other structures that may
obstruct the signal of the satellites, there
may be signal interruptions. Other circum-
stances that may result in signal loss
include driving near a wall, steep cliff or
hill, or driving on the lower level of a multi-
tiered road or inside a parking garage.
To help reduce this condition, satellite
radio providers have installed ground-
based repeaters in heavily populated
areas. However, you may still experience
reception problems in some areas. Audio
5-21
– CONTINUED –
Page 180 of 364

5-22Audio
! Displaying Sirius ID of tuner
When you activate Sirius, you should
have your Sirius tuner ID ready because
each tuner is identified by its unique Sirius
tuner ID.
The Sirius ID will be needed when you
activate Sirius and receive Sirius custo-
mer support.
The Sirius ID can be found on the audio
display by tuning the channel to “0 ”.
Turn the “TUNE/FOLDER/CH ”dial (23) to
select the satellite radio channel. ! Channel selection
Turn the “TUNE/FOLDER/CH ”dial (23) to
select the radio channel. Turn the tuning
dial clockwise to change the channel
upward and turn the dial counterclockwise
to change the channel downward with
each click of the dial. ! Category selection
Press the “SEEK/TRACK/CAT ”button
(18) to select the category of radio
channel. Press the “
”side of the button
(18) to change the category upward and the “
”side of the button to downward
with each press of the button. ! Channel preset
Presetting a channel with a preset button
(22) allows you to select that station in a
single operation. Up to six SR1, SR2 and SR3 channels each may be preset.
Press one of the preset buttons for
at
least 2 seconds to store the channel. The
number of the channel will flash once on
the display, and the unit produces a beep
sound at this time. ! Channel scan
Press the “SCAN ”button (19) to change
the radio to the SCAN mode. In this mode,
the radio scans through the channel until a
station is found. The radio will stop at the
station for 5 seconds while displaying the
channel number, after which scanning will
continue until the entire channel has been
scanned from the low end to the high end.
Press the “SCAN ”button (19) again to
cancel the SCAN mode and to stop on any
displayed station.
When the “SCAN ”button is pressed for
automatic tuning, stations are only
scanned in an upward direction. ! Category mode
Press the “CAT ”button (21) for at least 2
seconds to turn the category mode on. In
this mode, the radio operations (channel
selection, channel scan) are performed
only in the selected category. To cancel
the category mode, press the “CAT ”button
(21) for at least 2 seconds again. !
Band selection
Push the “SAT ”button (20) when the radio
is on to select SR1, SR2 or SR3 reception.
Each time this button is pressed, the band
will change in the following order:
! AUX mode
Press the “CD/AUX ”button (17) to select
the “AUX mode ”(when the AUX unit is
connected to the AUX terminal).
Page 182 of 364

5-24Audio
! To insert a disc
1. Press one of the disc selection buttons
(3) (numbered from 1 to 6) for which the
disc indicator light (2) is off.
The disc indicator lights are located
directly above the corresponding disc
selection buttons.
2. The indicator will begin blinking. The
blinking will last for 15 seconds.
During this period, insert a desired disc,
and the disc will begin to play. (If any disc
is not inserted during this period, the disc
slot (1) door will close. Repeat Step 1.)
Be sure to hold a disc with the label side
(the side where titles are printed) up.
3. To insert another disc, repeat Steps 1
and 2 choosing a different disc selectionbutton. ! To insert six discs at a time
1. Press and hold the disc selection
button (3) number 1 until all disc indicators
begin blinking (approximately 1.5 sec-onds).
2. The indicators will blink for 15 sec-
onds. During this period, insert six discs.
3. When all discs are loaded, the first
disc will begin to play. (If no disc is
inserted within this 15 seconds, the entire
disc load sequence will be canceled.) !
To remove a disc
1. Press the desired disc selection button
(3) (numbered from 1 to 6) for which the
disc indicator light is on.
2. Press the eject button “
”(4). The
selected disc will be ejected and the
indicator light will begin blinking.
3. To remove another disc, repeat Steps
1 and 2 choosing a different disc selectionbutton.
(To remove discs when the ignition switch
is in the “LOCK ”position, press the eject
button “
”, and the first disc will be
ejected. Press the eject button “”again,
and the next disc will be ejected and so
on. At this time, the disc selection buttons
are disabled.) ! To remove all discs at one time
1. Press and hold the eject button “
”(4)
until all disc indicators begin blinking
(approximately 1.5 seconds), and the first
disc will be ejected.
2. When the disc is removed, the next
one will be ejected, and so on. ! To replace a playing disc with another
Simply press the desired one of disc
selection buttons (3) (numbered from 1 to 6) or press the disc selection button on
the radio unit to select the desired disc,
and the disc will begin to play. !
Disc indicators
Lit: when the corresponding storage tray is
occupied by a disc.
Blinking: Disc player is either in loading,
eject or changing mode.
OFF: No disc is loaded or the ignition
switch is in the “LOCK ”position.
! Open/Closed disc slot indicator
When the disc slot is open, the disc
indicators on both sides of the slotilluminate. ! Function control
Refer to CD changer control operating
instructions described in the “Type A audio
set ”or “Type B audio set ”section.
Page 232 of 364

8-6Driving tips
Off road driving
WARNING
. Always maintain a safe driving
speed according to the road and
weather conditions in order to
avoid having an accident on a
sharp turn, during sudden brak-
ing or under other similar condi-tions.
. Always use the utmost care in
driving –overconfidence be-
cause you are driving an All-
Wheel Drive vehicle could easily
lead to a serious accident.
CAUTION
Do not drive on rough roads or over
curbs in a vehicle that has 17-inch
or other ultra-low-profile tires. The
wheels and tires could be damaged
by shock forces, leading to abnor-
mal vibration or poor straight-line
tracking. Driving would then be
more difficult. &
All AWD models except
OUTBACK SPORT
Your AWD vehicle is neither a conven-
tional off-road vehicle nor an all terrain
vehicle. It is a passenger vehicle designed
primarily for on-road use. The AWD
feature gives it some limited off-road
capabilities in situations in which driving
surfaces are relatively level, obstruction-
free and otherwise similar to on-road
driving conditions. Operating it under other
than those conditions could subject the
vehicle to excessive stress which might
result in damage not eligible for repair
under warranty. If you do take your
SUBARU off-road, you should review the
common sense precautions in the next
section (applicable to the OUTBACK
SPORT) for general guidance. But please
keep in mind that your vehicle ’s off-road
capabilities are more limited than those of
the OUTBACK SPORT.
Never attempt to drive through pools and
puddles, or roads flooded with water.
Water entering the engine air intake or
the exhaust pipe or water splashing onto
electrical parts may damage your vehicle
and may cause it to stall. & OUTBACK SPORT
Your Subaru can be driven on ordinary roads or off-road. But please keep in mind
that an AWD SUBARU is a passenger
vehicle and is neither a conventional off-
road vehicle nor an all-terrain vehicle. If
you do take your SUBARU off-road,
certain common sense precautions such
as the following should be taken: .
Make certain that you and all of your
passengers are wearing seatbelts.. Carry some emergency equipment,
such as a towing rope or chain, a shovel,
wheel blocks, first aid kit and cell phone or
citizens band radio. . Drive carefully. Do not take unneces-
sary risks by driving in dangerous areas or
over rough terrain. . Slow down and employ extra caution at
all times. When driving off-road, you will
not have the benefit of marked traffic
lanes, banked curves, traffic signs and
the like. . Do not drive across steep slopes.
Instead, drive either straight up or straight
down the slopes. A vehicle can much
more easily tip over sideways than it can
end over end. Avoid driving straight up or
down slopes that are too steep. . Avoid sharp turning maneuvers, espe-
cially at higher speeds.. Do not grip the inside or spokes of the
steering wheel. A bad bump could jerk the
wheel and injure your hands. Instead drive
Page 335 of 364

12-6Specifications
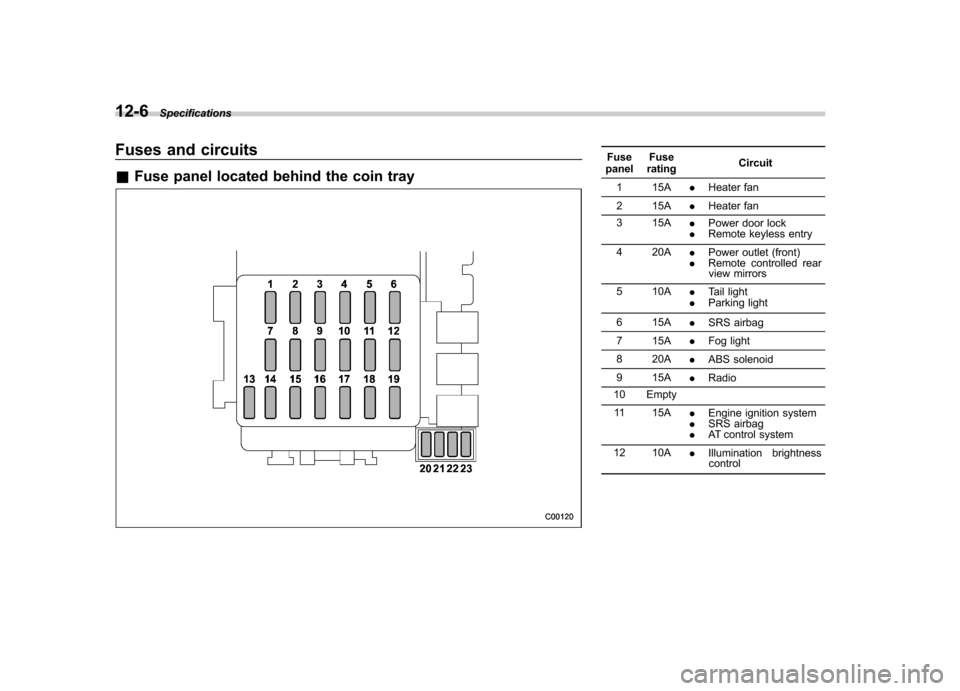
Fuses and circuits &Fuse panel located behind the coin trayFuse
panel Fuse
rating Circuit
1 15A .Heater fan
2 15A .Heater fan
3 15A .Power door lock
. Remote keyless entry
4 20A .Power outlet (front)
. Remote controlled rear
view mirrors
5 10A .Tail light
. Parking light
6 15A .SRS airbag
7 15A .Fog light
8 20A .ABS solenoid
9 15A .Radio
10 Empty
11 15A .Engine ignition system
. SRS airbag
. AT control system
12 10A .Illumination brightness
control
Page 340 of 364

Vehicle identification1) Vehicle identification number
2) Emission control label
3) Tire inflation pressure label
4) Certification plate
5) Bar code label (U.S. only)
6) Vehicle identification number plate
7) Model number plate
8) Radio noise label (Canada only)
9) Fuel label
10) HID headlight mercury caution label(U.S. only) Specifications
12-11