2007 SUBARU IMPREZA WRX change time
[x] Cancel search: change timePage 111 of 364

Instruments and controlsLight control switch ........................................... 3-22
Headlights. ......................................................... 3-22
High/low beam change (dimmer) ......................... 3-23
Headlight flasher ................................................ 3-23
Daytime running light system ............................. 3-23
Turn signal lever ................................................ 3-24
Illumination brightness control ......................... 3-25
Headlight beam leveler (U.S.-spec. WRX-STI) .......................................................... 3-25
Parking light switch ........................................... 3-25
Front fog light button (if equipped) .................. 3-26Wiper and washer
.............................................. 3-26
Windshield wiper and washer switches .............. 3-27
Rear window wiper and washer switch –
Wagon ............................................................. 3-28
Rear window defogger button .......................... 3-29
Windshield wiper deicer (if equipped) .............. 3-30
Intercooler water spray switch (WRX-STI) ....... 3-31
Mirrors ................................................................ 3-32
Inside mirror ...................................................... 3-32
Outside mirrors ................................................. 3-33
Tilt steering wheel ............................................. 3-35
Horn .................................................................... 3-35
Page 119 of 364

3-10Instruments and controls
NOTE
Even if the REV alarm system is not set,
the REV indicator light will come on
whenever the engine speed enters thetachometer ’s red zone.
& Setting the alarm-level en-
gine speed
1. Turn the REV setting knob clockwise
or counterclockwise, then release it and
let it return to its initial position. The buzzer
will sound. The REV alarm system is now
ready to be set.
2. Turn the REV setting knob to select
the desired alarm-level engine speed.
At this time, the outside temperature
indicator will show the engine-speed setting. .
Counterclockwise ( �): Speed setting
changes downward by 100 rpm. . Clockwise (+): Speed setting
changes upward by 100 rpm.
The speed setting will stop changing if
it reaches 0 rpm or the maximum
engine speed.
The alarm-level engine speed can be set
(in 100 rpm steps) within the range from
2,000 rpm to 7,000 rpm.
The indicator shows the setting as follows:
Speed (rpm) Indication 00 0
2,000 20
2,100 21 ––
7,000 70
Approximately 3 seconds after you stop
turning the knob, the REV alarm system
will automatically enter its next setting
mode (step 3 below), in which you can
activate or deactivate the buzzer.
3. Activate or deactivate the buzzer as
desired using the REV setting knob. .Turn the knob clockwise (+) to
activate the buzzer. The indicator willshow “ON ”, and the buzzer will sound three times. With the buzzer activated,
engine-speed warnings are given by
both the REV indicator light and the
buzzer. .
Turn the knob counterclockwise ( �)
to deactivate the buzzer. The indicator
will show “– –”, and the buzzer will not
sound. With the buzzer deactivated,
engine-speed warnings are given only
by the REV indicator light.
Approximately 3 seconds after you stop
turning the knob, the buzzer will sound
once to indicate the end of the setting
procedure. The indicator will return to
showing the outside temperature.
Also, the tachometer needle will return to approximately “0 ”.
NOTE . The REV alarm system does not
operate while settings are being en- tered.. The speed-setting mode terminates
if 0 rpm is selected.. The speed-setting mode is canceled
if the ignition switch is turned to OFF or
the vehicle starts moving before the
setting procedure is finished.. Speed setting is impossible when
the vehicle is moving.. The set engine speed may differ
Page 132 of 364

&High/low beam change (dim- mer)
To change from low beam to high beam,
push the turn signal lever forward. When
the headlights are on high beam, the high
beam indicator light “
”on the instru-
ment panel is also on.
To switch back to low beam, pull the lever
back to the detent position. &
Headlight flasher
To flash the headlights, pull the lever
toward you and then release it. The high
beam will stay on for as long as you hold
the lever. The headlight flasher works
even though the light switch is in the“OFF ”position.
When the headlights are on high beam,
the high beam indicator light “
”on the
instrument panel also comes on.
CAUTION
Do not hold the lever in the flashing
position for more than just a fewseconds. &
Daytime running light system
! WRX-STI
The low beam headlights, side marker
lights, tail lights, parking lights, and license
plate lights will automatically come on
when the engine has started, under the
following conditions: . The parking brake is fully released.
. The light switch is in the “OFF ”or “
”
position. . The automatic transmission selector
lever is set at other than the “P ”position.
WARNING
The light switch must always be
turned to the “
”position when it
is dark outside.
! Except WRX-STI
The low beam headlights will automati-
cally come on at reduced brightness when
the engine has started, under the followingconditions: . The parking brake is fully released.
. The light switch is in the “OFF ”or “
”
position. . The automatic transmission selector
lever is set at other than the “P ”position.
Instruments and controls
3-23
– CONTINUED –
Page 133 of 364

3-24Instruments and controls
WARNING
The tail lights, parking lights, and
side marker lights are not turned on
by the daytime running light system.
The light switch must always be
turned to the “
”position when it
is dark outside. Turn signal lever
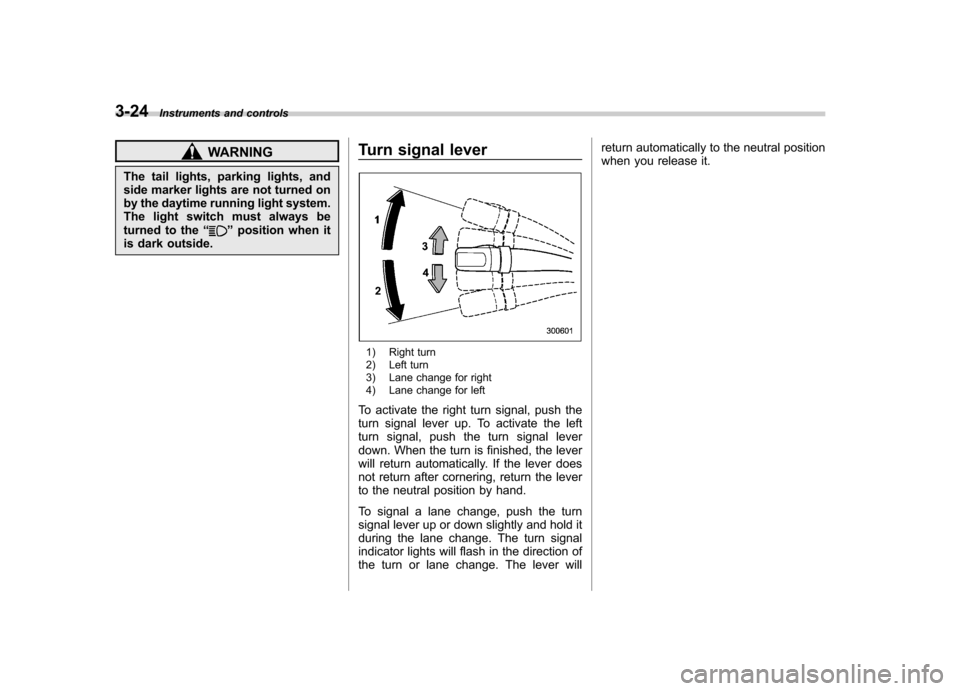
1) Right turn
2) Left turn
3) Lane change for right
4) Lane change for left
To activate the right turn signal, push the
turn signal lever up. To activate the left
turn signal, push the turn signal lever
down. When the turn is finished, the lever
will return automatically. If the lever does
not return after cornering, return the lever
to the neutral position by hand.
To signal a lane change, push the turn
signal lever up or down slightly and hold it
during the lane change. The turn signal
indicator lights will flash in the direction of
the turn or lane change. The lever will return automatically to the neutral position
when you release it.
Page 158 of 364

4-14Climate control
1) Service label
2) Caution label
8. LABEL installation (1) Fill out the information on the
service label (small).
(2) Attach the service label to the
driver side door pillar and the caution
label to the driver side end of the
instrument panel.
CAUTION
Contact your dealer if the following
occurs, even if it is not yet time to
change the filter: . Reduction of the air flow through
the vents.
. Windshield gets easily fogged or
misted.
NOTE
The filter can influence the air condi-
tioning, heating and defroster perfor-
mance if not properly maintained.
Page 163 of 364

Display Control mode
Turn counterclockwise Turn clockwise
BAS Bass control For less bass sound For more bass sound
TRE Treble control For less treble sound For more treble sound
BAL Balance control To increase left speaker volume and de-
crease right speaker volume To increase right speaker volume and
decrease left speaker volume
FA D Fader control
To increase rear speaker volume and
decrease front speaker volume To increase front speaker volume and
decrease rear speaker volume
VOL Volume control For less volume For more volume
! FM/AM selection button (FM/AM)
Push the “FM/AM ”button (4) when the
radio is off to turn on the radio.
Push the “FM/AM ”button when the radio
is on to select FM1, FM2 or AM reception.
Each time this button is pressed, the band
will change in the following order:
The display indicates which one is cur-
rently selected. !
Stereo indicator
The stereo indicator “ST ”will come on
when an FM stereo broadcast is received. Audio
5-5
– CONTINUED –
Page 164 of 364

5-6Audio
! Manual tuning (TUNE)
Push the “
”side of the tuning button (3)
to increase the tuning frequency and
press the “
”sideofthebuttonto
decrease it.
Each time the button is pressed, the
frequency changes 10 kHz in the AM
waveband and 0.2 MHz in the FM wave-band.
Constant pressure on the button causes a
continuous change in the frequency. ! Automatic tuning (SCAN)
Press the “SCAN ”button (1) to change the
radio to the SCAN mode. In this mode, the
radio scans through the radio band until a
station is found. The radio will stop at the
station for 5 seconds while displaying the
frequency, after which scanning will con-
tinue until the entire band has been
scanned from the low end to the high
end. Press the “SCAN ”button again to
cancel the SCAN mode and to stop on any
displayed frequency.
When the “SCAN ”button is pressed for
automatic tuning, stations are scanned in
the direction of low frequencies to high
frequencies only.
Automatic tuning may not function prop-
erly if the station reception is weakened by
distance from the station or proximity to
tall buildings and hills. !
Selecting preset stations
Presetting a station with a preset button
(5) allows you to select that station in a
single operation. Up to six AM, FM1 and
FM2 stations each may be preset. ! How to preset stations
1. Press the “FM/AM ”button (4) to select
AM, FM1 or FM2 reception.
2. Press the “SCAN ”button (1) or tune
the radio manually until the desired station
frequency is displayed.
3. Press one of the preset buttons (5) for
at least 2 seconds to store the frequency.
The frequency of the station will flash once
on the display at this time. If the button is
pressed for less than 2 seconds, the
preceding selection will remain in memory.
NOTE . If the connection between the radio
and battery is broken for any reason
such as vehicle maintenance or radio
removal, all stations stored in the
preset buttons are cleared. If this
occurs, it is necessary to reset the
preset buttons.. If a cell phone is placed near the
radio, it may cause the radio to emit
noise when it receives calls. This noise
does not indicate a radio fault.
Page 167 of 364

&CD changer control (if optional in-dash CD changer is con- nected)
An optional CD changer can be connected to this audio unit. Consult the instructions that
accompany the CD changer for operating the CD changer itself (e.g., how to load or
unload CDs). See your SUBARU dealer for more information.
(12) Track selection buttons
(13) Disc button
(14) Repeat/Random button
(15) Disc selection buttons !
To start playback
When the “DISC ”button (13) is pressed,
the CD changer will start playback. The
display shows the current disc number,
track number and the elapsed time duringplayback. NOTE . If a disc is in the player, the “DISC ”
button is used to change from CD
player operation to CD changer opera-
tion. Each time the “DISC ”button is
pressed, the operating mode will
change alternately. . At the end of the disc, the player
automatically continues with the next disc.. After playback on the last disc
finishes, playback will automatically
return to the first disc.. If you have loaded fewer than 6
discs, any missing disc is automati-
cally skipped. Audio
5-9
– CONTINUED –