2007 SUBARU IMPREZA WRX lock
[x] Cancel search: lockPage 180 of 364

5-22Audio
! Displaying Sirius ID of tuner
When you activate Sirius, you should
have your Sirius tuner ID ready because
each tuner is identified by its unique Sirius
tuner ID.
The Sirius ID will be needed when you
activate Sirius and receive Sirius custo-
mer support.
The Sirius ID can be found on the audio
display by tuning the channel to “0 ”.
Turn the “TUNE/FOLDER/CH ”dial (23) to
select the satellite radio channel. ! Channel selection
Turn the “TUNE/FOLDER/CH ”dial (23) to
select the radio channel. Turn the tuning
dial clockwise to change the channel
upward and turn the dial counterclockwise
to change the channel downward with
each click of the dial. ! Category selection
Press the “SEEK/TRACK/CAT ”button
(18) to select the category of radio
channel. Press the “
”side of the button
(18) to change the category upward and the “
”side of the button to downward
with each press of the button. ! Channel preset
Presetting a channel with a preset button
(22) allows you to select that station in a
single operation. Up to six SR1, SR2 and SR3 channels each may be preset.
Press one of the preset buttons for
at
least 2 seconds to store the channel. The
number of the channel will flash once on
the display, and the unit produces a beep
sound at this time. ! Channel scan
Press the “SCAN ”button (19) to change
the radio to the SCAN mode. In this mode,
the radio scans through the channel until a
station is found. The radio will stop at the
station for 5 seconds while displaying the
channel number, after which scanning will
continue until the entire channel has been
scanned from the low end to the high end.
Press the “SCAN ”button (19) again to
cancel the SCAN mode and to stop on any
displayed station.
When the “SCAN ”button is pressed for
automatic tuning, stations are only
scanned in an upward direction. ! Category mode
Press the “CAT ”button (21) for at least 2
seconds to turn the category mode on. In
this mode, the radio operations (channel
selection, channel scan) are performed
only in the selected category. To cancel
the category mode, press the “CAT ”button
(21) for at least 2 seconds again. !
Band selection
Push the “SAT ”button (20) when the radio
is on to select SR1, SR2 or SR3 reception.
Each time this button is pressed, the band
will change in the following order:
! AUX mode
Press the “CD/AUX ”button (17) to select
the “AUX mode ”(when the AUX unit is
connected to the AUX terminal).
Page 182 of 364

5-24Audio
! To insert a disc
1. Press one of the disc selection buttons
(3) (numbered from 1 to 6) for which the
disc indicator light (2) is off.
The disc indicator lights are located
directly above the corresponding disc
selection buttons.
2. The indicator will begin blinking. The
blinking will last for 15 seconds.
During this period, insert a desired disc,
and the disc will begin to play. (If any disc
is not inserted during this period, the disc
slot (1) door will close. Repeat Step 1.)
Be sure to hold a disc with the label side
(the side where titles are printed) up.
3. To insert another disc, repeat Steps 1
and 2 choosing a different disc selectionbutton. ! To insert six discs at a time
1. Press and hold the disc selection
button (3) number 1 until all disc indicators
begin blinking (approximately 1.5 sec-onds).
2. The indicators will blink for 15 sec-
onds. During this period, insert six discs.
3. When all discs are loaded, the first
disc will begin to play. (If no disc is
inserted within this 15 seconds, the entire
disc load sequence will be canceled.) !
To remove a disc
1. Press the desired disc selection button
(3) (numbered from 1 to 6) for which the
disc indicator light is on.
2. Press the eject button “
”(4). The
selected disc will be ejected and the
indicator light will begin blinking.
3. To remove another disc, repeat Steps
1 and 2 choosing a different disc selectionbutton.
(To remove discs when the ignition switch
is in the “LOCK ”position, press the eject
button “
”, and the first disc will be
ejected. Press the eject button “”again,
and the next disc will be ejected and so
on. At this time, the disc selection buttons
are disabled.) ! To remove all discs at one time
1. Press and hold the eject button “
”(4)
until all disc indicators begin blinking
(approximately 1.5 seconds), and the first
disc will be ejected.
2. When the disc is removed, the next
one will be ejected, and so on. ! To replace a playing disc with another
Simply press the desired one of disc
selection buttons (3) (numbered from 1 to 6) or press the disc selection button on
the radio unit to select the desired disc,
and the disc will begin to play. !
Disc indicators
Lit: when the corresponding storage tray is
occupied by a disc.
Blinking: Disc player is either in loading,
eject or changing mode.
OFF: No disc is loaded or the ignition
switch is in the “LOCK ”position.
! Open/Closed disc slot indicator
When the disc slot is open, the disc
indicators on both sides of the slotilluminate. ! Function control
Refer to CD changer control operating
instructions described in the “Type A audio
set ”or “Type B audio set ”section.
Page 187 of 364

When leaving the vehicle, make sure the
light is turned off to avoid battery dis-charge.Sun visors
To block out glare, swing down the visors.
To use the sun visor at a side window,
swing it down and move it sideways.&
Vanity mirror (if equipped)
CAUTION
Keep the vanity mirror cover closed
while the car is being driven to avoiddazzle.
To use the vanity mirror, swing down the
sun visor and open the vanity mirror cover. Interior equipment
6-3
Page 188 of 364

6-4Interior equipment
Storage compartment
CAUTION
. Always keep the storage com-
partment closed while driving to
reduce the risk of injury in the
event of a sudden stop or anaccident.
. Do not store spray cans, contain-
ers with flammable or corrosive
liquids or any other dangerous
items in the storage compart-ment. &
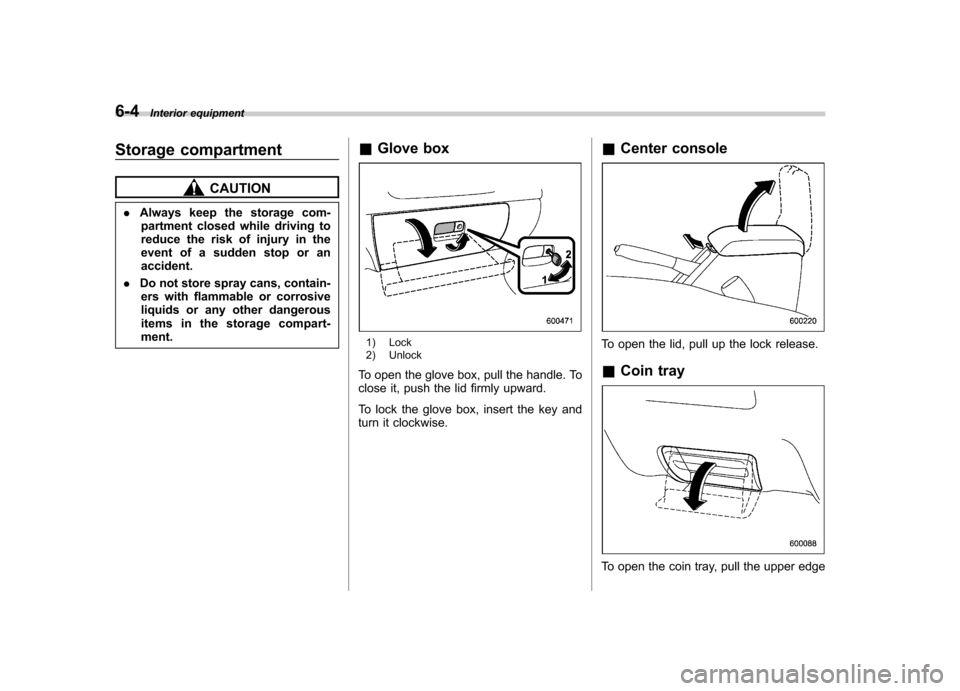
Glove box
1) Lock
2) Unlock
To open the glove box, pull the handle. To
close it, push the lid firmly upward.
To lock the glove box, insert the key and
turn it clockwise. &
Center consoleTo open the lid, pull up the lock release. &Coin tray
To open the coin tray, pull the upper edge
Page 198 of 364

Fuel...................................................................... 7-2
Fuel requirements ............................................... 7-2
Fuel filler lid and cap ........................................... 7-4
State emission testing (U.S. only) ...................... 7-5
Preparing to drive ............................................... 7-6
Starting the engine .............................................. 7-7
Manual transmission vehicle ................................ 7-7
Automatic transmission vehicle ........................... 7-7
Stopping the engine ............................................ 7-8
Manual transmission –6 speeds (WRX-STI) ..... 7-9
Selecting reverse gear ......................................... 7-9
Shifting speeds ................................................... 7-9
Driving tips ........................................................ 7-10
Manual transmission –5 speeds (except
WRX-STI) .......................................................... 7-11
Shifting speeds .................................................. 7-11
Driving tips ........................................................ 7-12
Driver ’s Control Center Differential (DCCD)
(WRX-STI) ........................................................ 7-12
Auto mode ......................................................... 7-13
Manual mode ..................................................... 7-13
Temporary release .............................................. 7-15
Automatic transmission ..................................... 7-15
Selector lever ..................................................... 7-16 Shift lock release
............................................... 7-19
Limited slip differential (LSD) (if equipped) .................................................... 7-20
Power steering ................................................... 7-20
Braking ............................................................... 7-20
Braking tips ....................................................... 7-20
Brake system .................................................... 7-21
Disc brake pad wear warning indicators ............. 7-21
ABS (Anti-lock Brake System) .......................... 7-21
ABS system self-check ...................................... 7-22
ABS warning light .............................................. 7-22
Electronic Brake Force Distribution (EBD) system ............................................................. 7-23
Steps to take if EBD system fails ....................... 7-23
Parking your vehicle ......................................... 7-24
Parking brake .................................................... 7-24
Parking tips ....................................................... 7-25
Cruise control .................................................... 7-26
To set cruise control .......................................... 7-26
To temporarily cancel the cruise control ............. 7-27
To turn off the cruise control .............................. 7-27
To change the cruising speed .. .......................... 7-28
Starting and operating
7
Page 201 of 364

7-4Starting and operating
&Fuel filler lid and cap
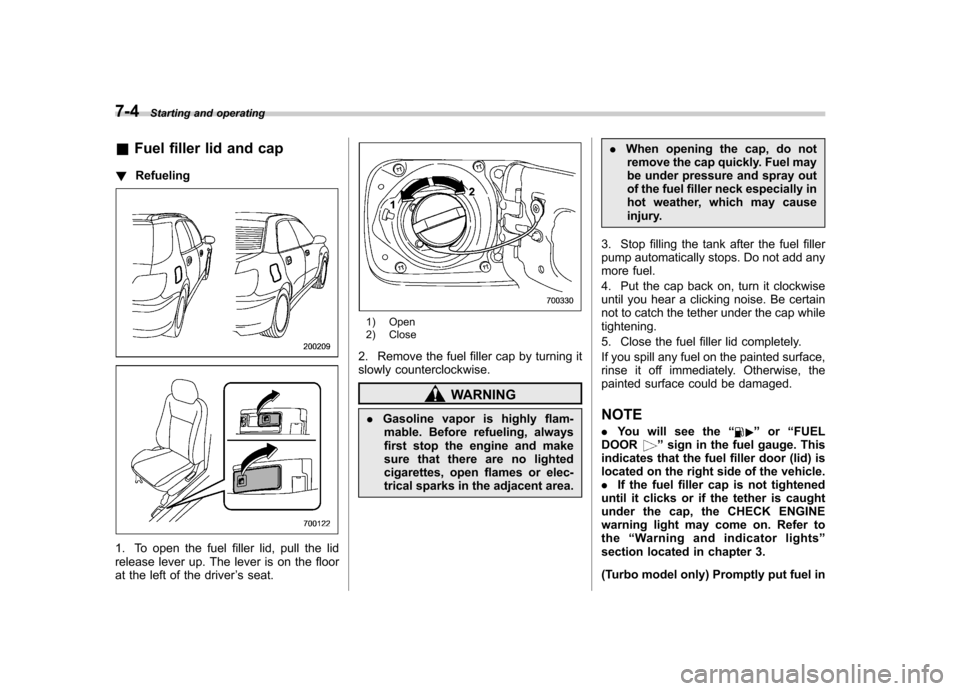
! Refueling
1. To open the fuel filler lid, pull the lid
release lever up. The lever is on the floor
at the left of the driver ’s seat.
1) Open
2) Close
2. Remove the fuel filler cap by turning it
slowly counterclockwise.
WARNING
. Gasoline vapor is highly flam-
mable. Before refueling, always
first stop the engine and make
sure that there are no lighted
cigarettes, open flames or elec-
trical sparks in the adjacent area. .
When opening the cap, do not
remove the cap quickly. Fuel may
be under pressure and spray out
of the fuel filler neck especially in
hot weather, which may cause
injury.
3. Stop filling the tank after the fuel filler
pump automatically stops. Do not add any
more fuel.
4. Put the cap back on, turn it clockwise
until you hear a clicking noise. Be certain
not to catch the tether under the cap whiletightening.
5. Close the fuel filler lid completely.
If you spill any fuel on the painted surface,
rinse it off immediately. Otherwise, the
painted surface could be damaged. NOTE . You will see the “
”or “FUEL
DOOR” sign in the fuel gauge. This
indicates that the fuel filler door (lid) is
located on the right side of the vehicle.. If the fuel filler cap is not tightened
until it clicks or if the tether is caught
under the cap, the CHECK ENGINE
warning light may come on. Refer tothe “Warning and indicator lights ”
section located in chapter 3.
(Turbo model only) Promptly put fuel in
Page 205 of 364

7-8Starting and operating
position without depressing the accelera-
tor pedal. Release the key immediately
after the engine has started.
If the engine does not start, try the following.
(1) Turn the ignition switch to the“OFF ”position and wait for at least
10 seconds. After checking that the
parking brake is firmly set, turn the
ignition switch to the “START ”position
while depressing the accelerator pedal
slightly (approximately a quarter of the
full stroke). Release the accelerator
pedal as soon as the engine starts.
(2) If this fails to start the engine, turn
the ignition switch back to the “OFF ”
position and wait for at least 10
seconds. Then fully depress the accel-
erator pedal and turn the ignition
switch to the “START ”position. If the
engine starts, quickly release the
accelerator pedal.
(3) If this fails to start the engine, turn
the ignition switch again to the “OFF ”
position. After waiting for 10 seconds
or longer, turn the ignition switch to the“ START ”position without depressing
the accelerator pedal.
(4) If the engine still refuses to start,
contact your nearest SUBARU dealer
for assistance. 6. Confirm that all warning and indicator
lights have gone out after the engine has
started. The fuel injection system auto-
matically lowers the idle speed as the
engine warms up.
While the engine is warming up, make
sure that the selector lever is at the
“P ”or
“ N ”position and that the parking brake is
applied.
NOTE
The engine may be difficult to start
when the battery has been discon-
nected and reconnected (for mainte-
nance or other purposes). This diffi-
culty is caused by the electronically
controlled throttle ’s self-diagnosis
function. To overcome it, keep the
ignition switch in the “ON ”position
for approximately 10 seconds before
starting the engine.
CAUTION
If you restart the engine while the
vehicle is moving, shift the selector
lever into the “N ” position. Do not
attempt to place the selector lever of
a moving vehicle into the “P ” posi-
tion. Stopping the engine
The ignition switch should be turned off
only when the vehicle is stopped and the
engine is idling.
WARNING
Do not stop the engine when the
vehicle is moving. This will cause
loss of power to the power steering
and the brake booster, making steer-
ing and braking more difficult. It
could also result in accidental acti-
vation of the “LOCK ”position on the
ignition switch, causing the steering
wheel to lock.
Page 207 of 364

7-10Starting and operating
!Maximum allowable speeds
The following table shows the maximum
speeds that are possible with each differ-
ent gear. The tachometer ’s needle will
enter the red area if these speeds areexceeded.
With the exception of cases where sudden
acceleration is required, the vehicle
should not be driven with the tachometer ’s
needle inside the red area. Failure to
observe this precaution can lead to
excessive engine wear and poor fuel
economy.
Gear mph (km/h)1st 33 (53)
2nd 53 (86) 3rd 78 (126)
4th 89 (169)
WARNING
When shifting down a gear, ensure
that the vehicle is not travelling at a
speed exceeding the Maximum Al-
lowable Speed for the gear which is
about to be selected. Failure to
observe this precaution can lead to
engine over-revving and this in turn
can result in engine damage. In addition, sudden application of
engine brakes when the vehicle is
travelling on a slippery surface can
lead to wheel locking; as a conse-
quence, control of the vehicle may
be lost and the risk of an accidentincreased.
NOTE
Never exceed posted speed limits. & Driving tips
Do not drive with your foot resting on the
clutch pedal and do not use the clutch to
hold your vehicle at a standstill on an
upgrade. Either of those actions may
cause clutch damage.
Do not drive with your hand resting on the
shift lever. This may cause wear on the
transmission components.
When it is necessary to reduce vehicle
speed due to slow traffic, turning corners,
or driving up steep hills, downshift to a
lower gear before the engine starts to
labor.
On steep downgrades, downshift the
transmission to 5th, 4th, 3rd or 2nd gear
as necessary; this helps to maintain a safe
speed and to extend brake pad life. In this way, the engine provides a braking
effect. Remember, if you
“ride ”(over use)
the brakes while descending a hill, they
may overheat and not work properly.
The engine may, on rare occasions, knock
when the vehicle rapidly accelerates or
rapidly pulls away from a standstill. This
phenomenon does not indicate a malfunc-tion.