2007 SUBARU IMPREZA WRX battery
[x] Cancel search: batteryPage 31 of 364

1-6Seat, seatbelt and SRS airbags
CAUTION
. There is a possibility that people
with delicate skin may suffer
slight burns even at low tempera-
tures if he/she uses the seat
heater for a long period of time.
When using the heater, always be
sure to warn the persons con-cerned.
. Do not put anything on the seat
which insulates against heat,
such as a blanket, cushion, or
similar items. This may cause the
seat heater to overheat.
NOTE
Use of the seat heater for a long period
of time while the engine is not running
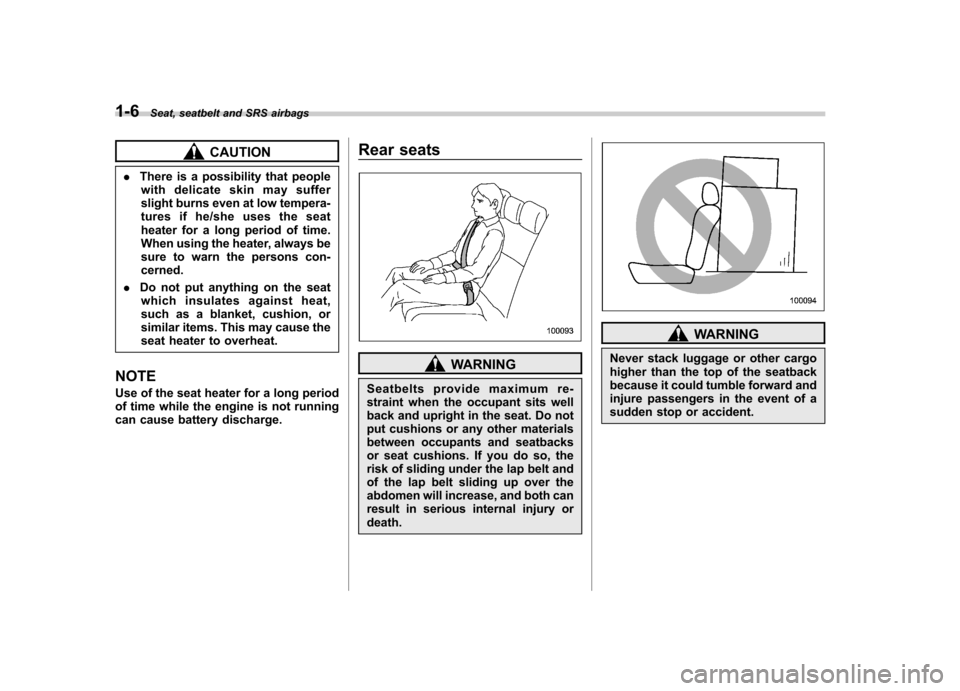
can cause battery discharge. Rear seats
WARNING
Seatbelts provide maximum re-
straint when the occupant sits well
back and upright in the seat. Do not
put cushions or any other materials
between occupants and seatbacks
or seat cushions. If you do so, the
risk of sliding under the lap belt and
of the lap belt sliding up over the
abdomen will increase, and both can
result in serious internal injury ordeath.
WARNING
Never stack luggage or other cargo
higher than the top of the seatback
because it could tumble forward and
injure passengers in the event of a
sudden stop or accident.
Page 43 of 364

1-18Seat, seatbelt and SRS airbags
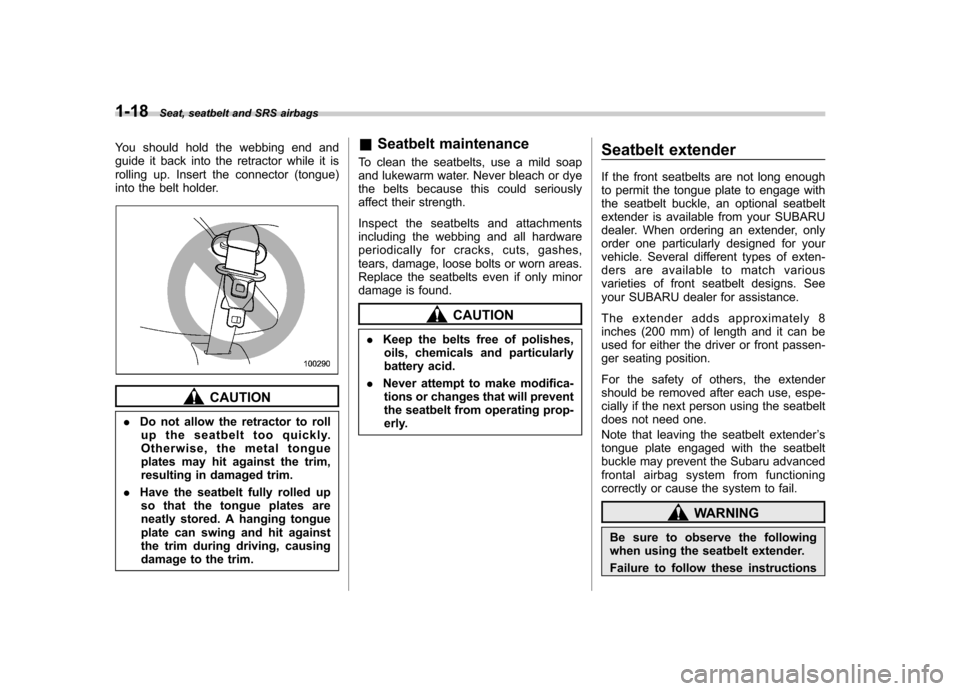
You should hold the webbing end and
guide it back into the retractor while it is
rolling up. Insert the connector (tongue)
into the belt holder.
CAUTION
. Do not allow the retractor to roll
up the seatbelt too quickly.
Otherwise, the metal tongue
plates may hit against the trim,
resulting in damaged trim.
. Have the seatbelt fully rolled up
so that the tongue plates are
neatly stored. A hanging tongue
plate can swing and hit against
the trim during driving, causing
damage to the trim. &
Seatbelt maintenance
To clean the seatbelts, use a mild soap
and lukewarm water. Never bleach or dye
the belts because this could seriously
affect their strength.
Inspect the seatbelts and attachments
including the webbing and all hardware
periodically for cracks, cuts, gashes,
tears, damage, loose bolts or worn areas.
Replace the seatbelts even if only minor
damage is found.
CAUTION
. Keep the belts free of polishes,
oils, chemicals and particularly
battery acid.
. Never attempt to make modifica-
tions or changes that will prevent
the seatbelt from operating prop-
erly. Seatbelt extender
If the front seatbelts are not long enough
to permit the tongue plate to engage with
the seatbelt buckle, an optional seatbelt
extender is available from your SUBARU
dealer. When ordering an extender, only
order one particularly designed for your
vehicle. Several different types of exten-
ders are available to match various
varieties of front seatbelt designs. See
your SUBARU dealer for assistance.
The extender adds approximately 8
inches (200 mm) of length and it can be
used for either the driver or front passen-
ger seating position.
For the safety of others, the extender
should be removed after each use, espe-
cially if the next person using the seatbelt
does not need one.
Note that leaving the seatbelt extender
’s
tongue plate engaged with the seatbelt
buckle may prevent the Subaru advanced
frontal airbag system from functioning
correctly or cause the system to fail.
WARNING
Be sure to observe the following
when using the seatbelt extender.
Failure to follow these instructions
Page 84 of 364

Keys..................................................................... 2-2
Key number plate ................................................ 2-2
Immobilizer (Turbo models) ................................ 2-3
Security ID plate .................................................. 2-3
Security indicator light ........................................ 2-4
Key replacement ................................................. 2-4
Door locks ........................................................... 2-4
Locking and unlocking from the outside .. ............ 2-4
Locking and unlocking from the inside ................ 2-5
Key lock-in prevention function ........................... 2-5
Power door locking switches ............................. 2-6
Remote keyless entry system ............................ 2-7
Locking the doors ............................................... 2-7
Unlocking the doors ............................................ 2-8
Illuminated entry ................................................. 2-8
Vehicle finder function ......................................... 2-8
Sounding a panic alarm ....................................... 2-8
Selecting audible signal operation ....................... 2-8
Replacing the battery .......................................... 2-9
Replacing lost transmitters ................................. 2-10
Alarm system ..................................................... 2-13
System operation ............................................... 2-13 Activating and deactivating the alarm system
..... 2-13
If you have accidentally triggered the alarm system ............................................................ 2-14
Arming the system ............................................ 2-14
Disarming the system ........................................ 2-15
Valet mode ........................................................ 2-16
Passive arming .................................................. 2-16
Tripped sensor identification .............................. 2-17
Shock sensors (dealer option).. .......................... 2-17
Child safety locks .............................................. 2-18
Windows ............................................................. 2-18
Power windows ................................................. 2-18
Trunk lid (Sedan) ............................................... 2-20
To open and close the trunk lid from outside . ..... 2-21
To open the trunk lid from inside. ....................... 2-21
To cancel the trunk lid release . .......................... 2-21
Internal trunk lid release handle ......................... 2-21
Rear gate (Wagon) ............................................. 2-23
Moonroof (if equipped) ...................................... 2-24
Tilt function ....................................................... 2-24
Sliding function ................................................. 2-25
Sun shade ......................................................... 2-26 Keys and doors
2
Page 92 of 364

side of the power door locking switch,
close the driver’s door once within 10
seconds after Step 4.
6. The turn signal lights flash 3 times to
indicate completion of the setting. NOTE
If you do not close the driver ’s door
within 10 seconds after Step 4, a flash
of the turn signal lights will signal
timeout. If this happens, repeat the
whole procedure from Step 1.
You may have the above settings done by
your SUBARU dealer. & Replacing the battery
When the transmitter battery begins to get
weak, transmitter range will begin to
decrease. Replace the battery as soon
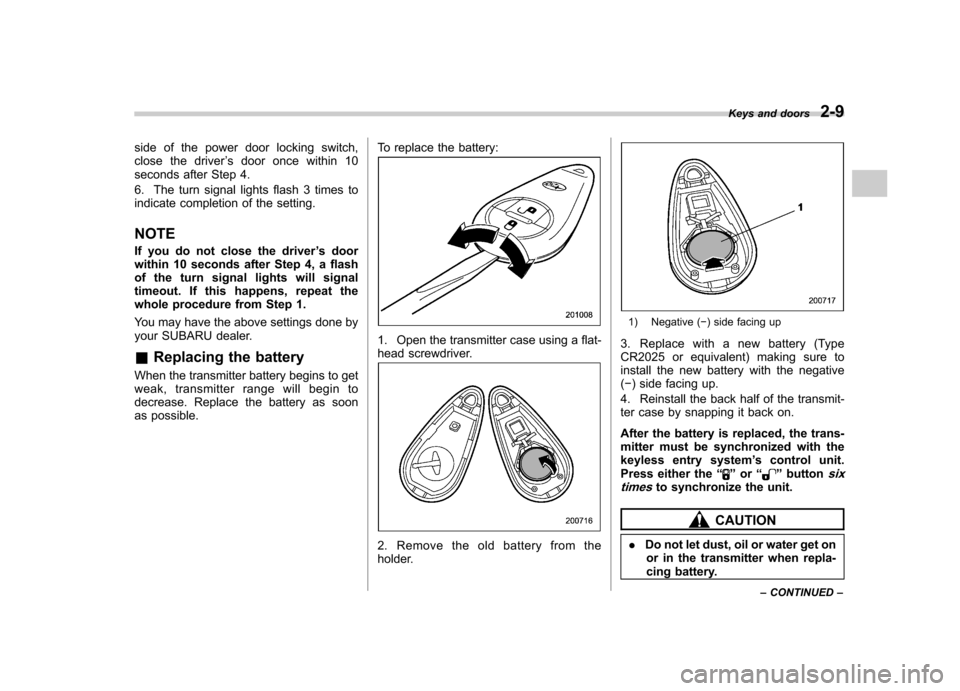
as possible. To replace the battery:
1. Open the transmitter case using a flat-
head screwdriver.
2. Remove the old battery from the
holder.
1) Negative (
�) side facing up
3. Replace with a new battery (Type
CR2025 or equivalent) making sure to
install the new battery with the negative( � ) side facing up.
4. Reinstall the back half of the transmit-
ter case by snapping it back on.
After the battery is replaced, the trans-
mitter must be synchronized with the
keyless entry system ’s control unit.
Press either the “
”or “”buttonsix
timesto synchronize the unit.
CAUTION
. Do not let dust, oil or water get on
or in the transmitter when repla-
cing battery. Keys and doors
2-9
– CONTINUED –
Page 93 of 364

2-10Keys and doors
.Be careful not to damage the
printed circuit board in the trans-
mitter when replacing the battery.
& Replacing lost transmitters
If you lose a transmitter or want to
purchase additional transmitters (up to
four can be programmed), you should re-
program all of your transmitters for secur-
ity reasons. It is recommended that you
have your dealer program all of your
transmitters into your system. ! Programming the transmitters
The keyless entry system is equipped with
a special code learning feature that allows
you to program new transmitter codes into
the system or to delete old ones. The
system can learn up to four unique
transmitter codes. The four transmitter
codes may be the same or different. Programming transmitter codes intosystem:
Bag containing transmitter
Transmitter circuit board
To register a new transmitter with the
keyless entry system, it is necessary to program the transmitter
’s code (identifica-
tion number) into the system. A label
showing the code is affixed to the bag
containing the transmitter, and another is
affixed to the circuit board inside the
transmitter. If there is no bag, open the
transmitter case and make a note of the
eight-digit number. Program the number
into the system in accordance with the
following procedure:
1. Firmly close the doors and the rear
gate, or trunk lid.
2. Open the driver ’sdoor,sitonthe
driver ’s seat, and close the door.
3. Perform the following steps within 45 seconds.(1) Open and close the driver ’s door
once.
Page 99 of 364

2-16Keys and doors
!Emergency disarming
If you cannot disarm the system using the
transmitter (i.e. the transmitter is lost,
broken or the transmitter battery is too
weak), you can disarm the system without
using the transmitter.
1. Unlock the door with the key and then
open the door.
2. Insert the key into the ignition switch
and cycle it from the “LOCK ”to the “ON ”
position three times within 5 seconds.
& Valet mode
When you choose the valet mode, the
alarm system does not operate. In valet
mode, the remote transmitter is used only
for locking and unlocking the doors and
rear gate (Wagon) and panic activation.
To enter the valet mode, change the
setting of your vehicle ’s alarm system for
deactivation mode. (Refer to “Activating
and deactivating the alarm system ”in this
section.) The security indicator light will
continue to flash once every 3 seconds
indicating that the system is in the valet
mode (only vehicle with an immobilizer).
To exit valet mode, change the setting of
your vehicle ’s alarm system for activation
mode. (Refer to “Activating and deactivat-
ing the alarm system ”in this section.) NOTE
If your vehicle is not equipped with an
immobilizer, the security indicator light
does not flash during the valet mode. &
Passive arming
When passive arming mode has been
programmed by the dealer, arming of the
system is automatically accomplished
without using the remote transmitter. Note
that in this mode, DOORS MUST BE
MANUALLY LOCKED. ! To enter the passive mode
If you wish to program the passive arming
mode, have it done by your SUBARU
dealer. ! Arming the system
CAUTION
In passive mode, the system will
automatically activate the alarm but
WILL NOT automatically lock the
doors. In order to lock the doors
you must either lock them as in-
dicated in step 4 below or with the
key once they have been closed.
Failure to lock the doors manually
will result in a higher security risk. 1. Turn the ignition switch to the
“ON ”
position.
1) ON
2) LOCK
2. Turn the ignition switch from “ON ”to
“ LOCK ”position and remove the key from
the ignition switch.
3. Open the doors and get out of the vehicle.
Page 107 of 364

2-24Keys and doors
To close the rear gate, lower it slowly and
push down firmly until the latch engages.
The rear gate can be lowered easily if you
pull it down holding the recessed grip.
WARNING
. To prevent dangerous exhaust
gas from entering the vehicle,
always keep the rear gate closed
while driving.
. Do not attempt to shut the rear
gate while holding the recessed
grip. Also avoid closing the rear
gate by pulling on the recessed
grip from inside the cargo space.
There is a danger of your hand
being caught and injured.
CAUTION
. Do not jam a plastic bag in or
place cellophane tape on the rear
gate stays or scratch the stays
while loading or unloading cargo.
That could cause leakage of gas
from the stays, which may result
in their inability to hold the rear
gate open.
. Be careful not to hit your head or
face on the rear gate when open-
ing or closing the rear gate and
when loading or unloading car-go.
NOTE
If the rear gate cannot be unlocked due
to a discharged battery, a fault in the
door locking/unlocking system or other
causes, you can unlock it by manually
operating the rear gate lock release
lever.
For the procedure, refer to “Rear gate –
if the rear gate cannot be unlocked ”
section in chapter 9 “In case of emer-
gency ”. Moonroof (if equipped)
The moonroof has both tilting and sliding functions.
The moonroof operates only when the
ignition switch is in the
“ON ”position.
& Tilt function
1) Tilt up
2) Tilt down
The tilting function will only operate when
the moonroof is fully closed.
Push the rear side of the “Tilt ”switch to
raise the moonroof.
Push the front side of the “Tilt ”switch to
lower the moonroof.
Release the switch after the moonroof has
Page 112 of 364

Ignition switch
WARNING
. Never turn the ignition switch to
“ LOCK ”while the vehicle is
being driven or towed because
that will lock the steering wheel,
preventing steering control. And
when the engine is turned off, it
takes a much greater effort than
usual to steer.
. Before leaving the vehicle, al-
ways remove the key from the
ignition switch for safety and
never allow an unattended child
to remain in the vehicle. Failure
to follow this procedure could
result in injury to a child or
others. Children could operate
the power windows, the moon-
roof or other controls or even
make the vehicle move.
CAUTION
Do not attach a large key holder or
key case to either key. If it banged
against your knees or hands while
you are driving, it could turn the
ignition switch from the “ON ”posi- tion to the
“Acc ”or “LOCK ”posi-
tion, thereby stopping the engine.
Also, if the key is attached to a
keyholder or to a large bunch of
other keys, centrifugal force may act
on it as the vehicle moves, resulting
in unwanted turning of the ignitionswitch.
The ignition switch has four positions:
LOCK, Acc, ON and START. NOTE . Keep the ignition switch in the
“ LOCK ”position when the engine is
not running. . Using electrical accessories for a
long time with the ignition switch in the
"ON" or “Acc ”position can cause the battery to go dead..
If the ignition switch will not move
from the “LOCK ”position to the “Acc ”
position, turn the steering wheel
slightly to the left and right as you turn
the ignition switch. & LOCK
The key can only be inserted or removed
in this position. The ignition switch will lock
the steering wheel when you remove the
key.
If turning the key is difficult, turn the
steering wheel slightly to the right and left
as you turn the key. ! Automatic transmission vehicles
Instruments and controls 3-3
– CONTINUED –