2007 SUBARU IMPREZA buttons
[x] Cancel search: buttonsPage 44 of 364

and warnings could reduce the
effectiveness of the seatbelt and
result in more serious injury in the
event of a collision. .Never use the extender when the
belt itself is long enough to
permit it to be buckled properly.
If removal of heavy clothing is all
that is needed to permit the
seatbelt to be buckled properly,
remove the heavy clothing and
do not use the extender.
. Do not use the extender if the
buckle of the extender rests over
the abdomen.
. Do not let someone else use the
extender. Use of an extender
when it is not needed could
reduce the effectiveness of the
seatbelt and result in more ser-
ious injury in the event of acollision.
. Use the extender only for the
front seatbelts and only for the
model for which it was originally
provided. Never use the extender
for the rear seatbelts or for a
different model. NOTE
When the seatbelt extender is used by
a pregnant passenger, consult a doctor
to get approval in advance.
To connect the extender to the seatbelt,
insert the tongue plate into the seatbelt
buckle so that the
“PRESS ”signs on the
buckle-release buttons of the extender
and the seatbelt are both facing outward
as shown in the diagram. You will hear a
click when the tongue plate locks into thebuckle.
When releasing the seatbelt, press on the
buckle-release button on the extender, not
on the seatbelt. This helps to prevent
damage to the vehicle interior and ex-
tender itself. Front seatbelt pretensioners
The driver
’s and front passenger ’s seat-
belts have a seatbelt pretensioner. The
seatbelt pretensioners are designed to be
activated in the event of an accident
involving a moderate to severe frontalcollision.
The pretensioner sensor also serves as
the frontal SRS airbag sensor. If the
sensor detects a certain predetermined
amount of force during a frontal collision,
the front seatbelt is quickly drawn back in
by the retractor to take up the slack so that
the belt more effectively restrains the front
seat occupant.
When a seatbelt pretensioner is activated,
an operating noise will be heard and a Seat, seatbelt and SRS airbags
1-19
– CONTINUED –
Page 92 of 364
side of the power door locking switch,
close the driver’s door once within 10
seconds after Step 4.
6. The turn signal lights flash 3 times to
indicate completion of the setting. NOTE
If you do not close the driver ’s door
within 10 seconds after Step 4, a flash
of the turn signal lights will signal
timeout. If this happens, repeat the
whole procedure from Step 1.
You may have the above settings done by
your SUBARU dealer. & Replacing the battery
When the transmitter battery begins to get
weak, transmitter range will begin to
decrease. Replace the battery as soon
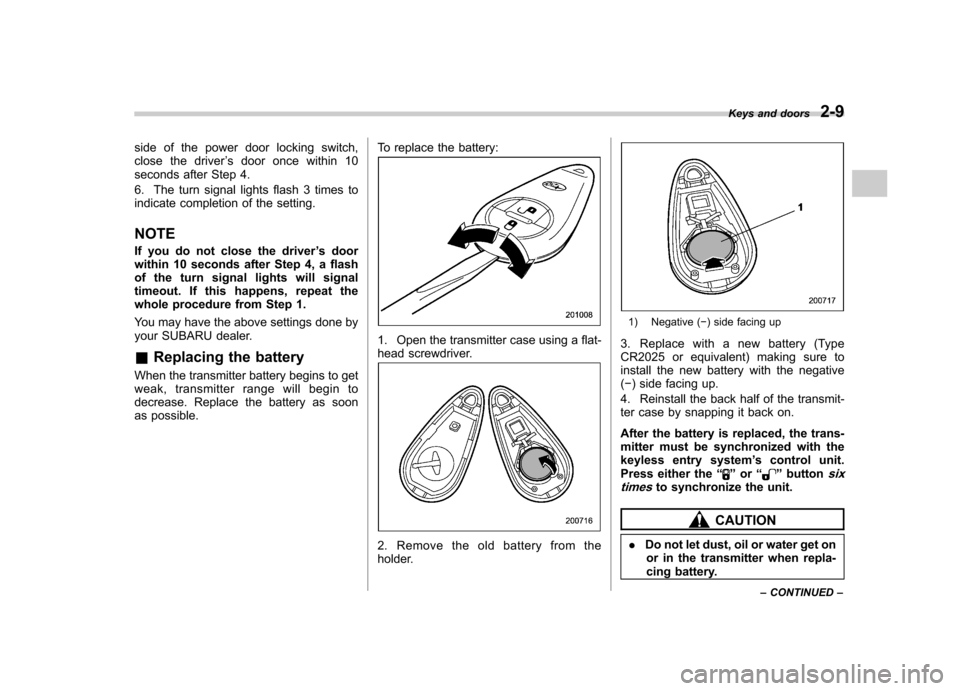
as possible. To replace the battery:
1. Open the transmitter case using a flat-
head screwdriver.
2. Remove the old battery from the
holder.
1) Negative (
�) side facing up
3. Replace with a new battery (Type
CR2025 or equivalent) making sure to
install the new battery with the negative( � ) side facing up.
4. Reinstall the back half of the transmit-
ter case by snapping it back on.
After the battery is replaced, the trans-
mitter must be synchronized with the
keyless entry system ’s control unit.
Press either the “
”or “”buttonsix
timesto synchronize the unit.
CAUTION
. Do not let dust, oil or water get on
or in the transmitter when repla-
cing battery. Keys and doors
2-9
– CONTINUED –
Page 152 of 364
4-8Climate control
Automatic climate control
system (if equipped)
Although this climate control system can
be used as a full-automatic climate control
system, it can also, if desired, be used as
a semi-automatic climate control system.
When it is used as a full-automatic climate
control system, the outlet air temperature,
fan speed, air flow distribution, air inlet
control, and air conditioner compressor
operation are all automatically controlled
to maintain a constant, comfortable tem-
perature inside the vehicle. NOTE .Operate the automatic climate con-
trol system when the engine is running. . When the engine coolant is cold, the
blower does not run.. In the “AUTO ”mode, when the air
temperature in the passenger compart-
ment is sufficiently cool, the air condi-
tioner compressor does not operate.
For efficient defogging or dehumidify-
ing in cold weather, press the “A/C ”
button to operate the air conditioner
compressor.. Even when cooling is not necessary,
setting the temperature much lower
than the current outlet air temperature
turns on the air conditioner compres- sor automatically and the
“A/C ”indi-
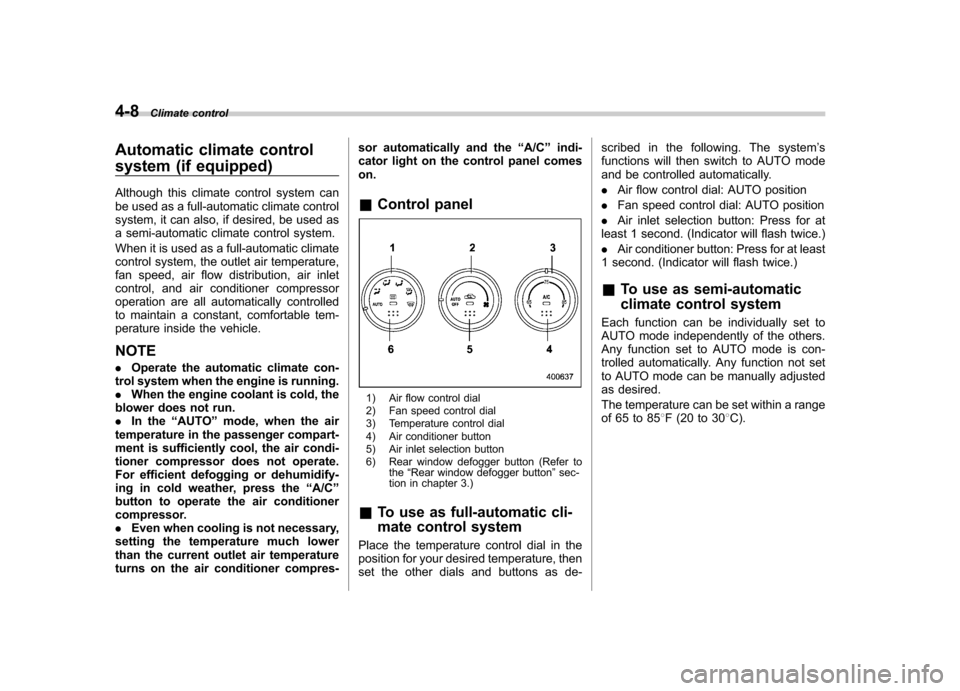
cator light on the control panel comeson. & Control panel
1) Air flow control dial
2) Fan speed control dial
3) Temperature control dial
4) Air conditioner button
5) Air inlet selection button
6) Rear window defogger button (Refer to
the“Rear window defogger button ”sec-
tion in chapter 3.)
& To use as full-automatic cli-
mate control system
Place the temperature control dial in the
position for your desired temperature, then
set the other dials and buttons as de- scribed in the following. The system
’s
functions will then switch to AUTO mode
and be controlled automatically. . Air flow control dial: AUTO position
. Fan speed control dial: AUTO position
. Air inlet selection button: Press for at
least 1 second. (Indicator will flash twice.). Air conditioner button: Press for at least
1 second. (Indicator will flash twice.)
& To use as semi-automatic
climate control system
Each function can be individually set to
AUTO mode independently of the others.
Any function set to AUTO mode is con-
trolled automatically. Any function not set
to AUTO mode can be manually adjusted
as desired.
The temperature can be set within a range
of 65 to 85 8F (20 to 30 8C).
Page 162 of 364
5-4Audio
Type A audio set (if equipped)
The audio set will operate only when the ignition switch is in the “Acc ”or “ON ”position.
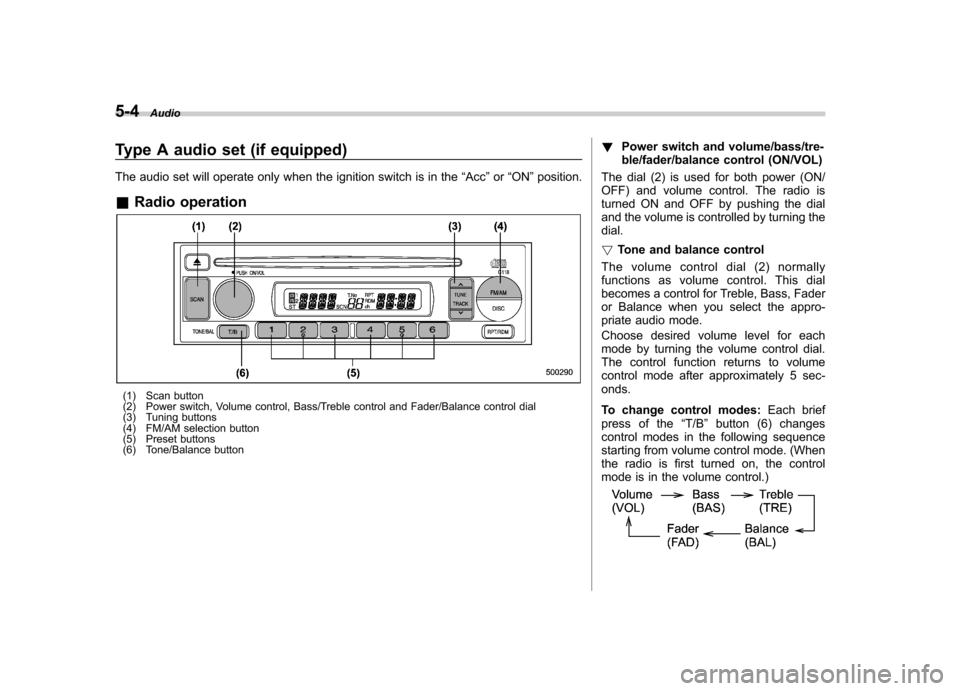
& Radio operation
(1) Scan button
(2) Power switch, Volume control, Bass/Treble control and Fader/Balance control dial
(3) Tuning buttons
(4) FM/AM selection button
(5) Preset buttons
(6) Tone/Balance button !
Power switch and volume/bass/tre-
ble/fader/balance control (ON/VOL)
The dial (2) is used for both power (ON/
OFF) and volume control. The radio is
turned ON and OFF by pushing the dial
and the volume is controlled by turning thedial. ! Tone and balance control
The volume control dial (2) normally
functions as volume control. This dial
becomes a control for Treble, Bass, Fader
or Balance when you select the appro-
priate audio mode.
Choose desired volume level for each
mode by turning the volume control dial.
The control function returns to volume
control mode after approximately 5 sec-onds.
To change control modes: Each brief
press of the “T/B ”button (6) changes
control modes in the following sequence
starting from volume control mode. (When
the radio is first turned on, the control
mode is in the volume control.)
Page 164 of 364
5-6Audio
! Manual tuning (TUNE)
Push the “
”side of the tuning button (3)
to increase the tuning frequency and
press the “
”sideofthebuttonto
decrease it.
Each time the button is pressed, the
frequency changes 10 kHz in the AM
waveband and 0.2 MHz in the FM wave-band.
Constant pressure on the button causes a
continuous change in the frequency. ! Automatic tuning (SCAN)
Press the “SCAN ”button (1) to change the
radio to the SCAN mode. In this mode, the
radio scans through the radio band until a
station is found. The radio will stop at the
station for 5 seconds while displaying the
frequency, after which scanning will con-
tinue until the entire band has been
scanned from the low end to the high
end. Press the “SCAN ”button again to
cancel the SCAN mode and to stop on any
displayed frequency.
When the “SCAN ”button is pressed for
automatic tuning, stations are scanned in
the direction of low frequencies to high
frequencies only.
Automatic tuning may not function prop-
erly if the station reception is weakened by
distance from the station or proximity to
tall buildings and hills. !
Selecting preset stations
Presetting a station with a preset button
(5) allows you to select that station in a
single operation. Up to six AM, FM1 and
FM2 stations each may be preset. ! How to preset stations
1. Press the “FM/AM ”button (4) to select
AM, FM1 or FM2 reception.
2. Press the “SCAN ”button (1) or tune
the radio manually until the desired station
frequency is displayed.
3. Press one of the preset buttons (5) for
at least 2 seconds to store the frequency.
The frequency of the station will flash once
on the display at this time. If the button is
pressed for less than 2 seconds, the
preceding selection will remain in memory.
NOTE . If the connection between the radio
and battery is broken for any reason
such as vehicle maintenance or radio
removal, all stations stored in the
preset buttons are cleared. If this
occurs, it is necessary to reset the
preset buttons.. If a cell phone is placed near the
radio, it may cause the radio to emit
noise when it receives calls. This noise
does not indicate a radio fault.
Page 165 of 364
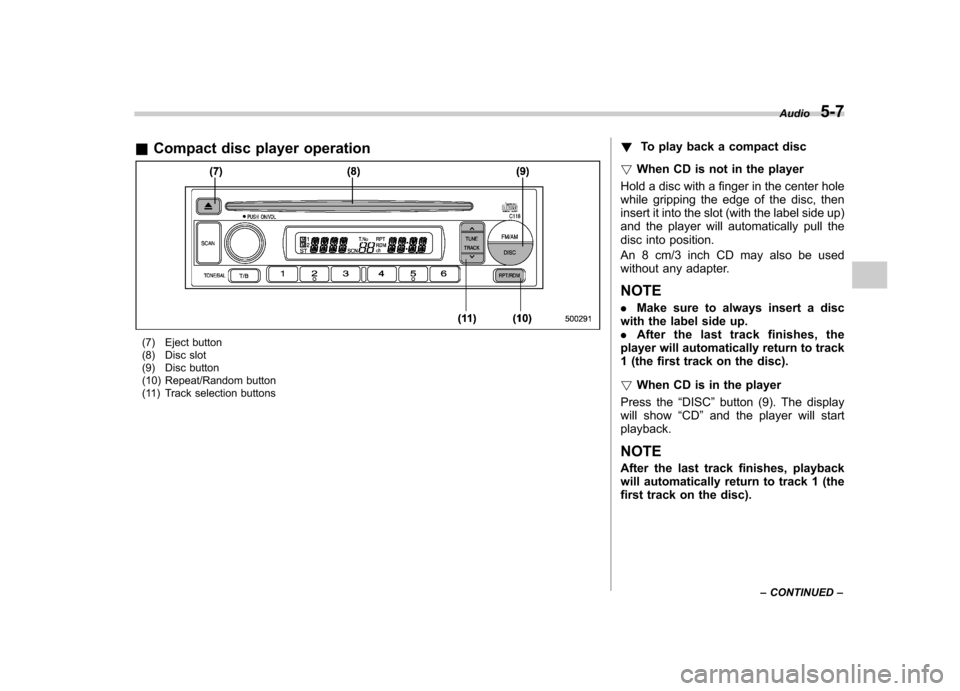
&Compact disc player operation
(7) Eject button
(8) Disc slot
(9) Disc button
(10) Repeat/Random button
(11) Track selection buttons !
To play back a compact disc
! When CD is not in the player
Hold a disc with a finger in the center hole
while gripping the edge of the disc, then
insert it into the slot (with the label side up)
and the player will automatically pull the
disc into position.
An 8 cm/3 inch CD may also be used
without any adapter. NOTE . Make sure to always insert a disc
with the label side up. . After the last trac k finishes, the
player will automatically return to track
1 (the first track on the disc). ! When CD is in the player
Press the “DISC ”button (9). The display
will show “CD ”and the player will start
playback. NOTE
After the last track finishes, playback
will automatically return to track 1 (the
first track on the disc). Audio
5-7
– CONTINUED –
Page 167 of 364
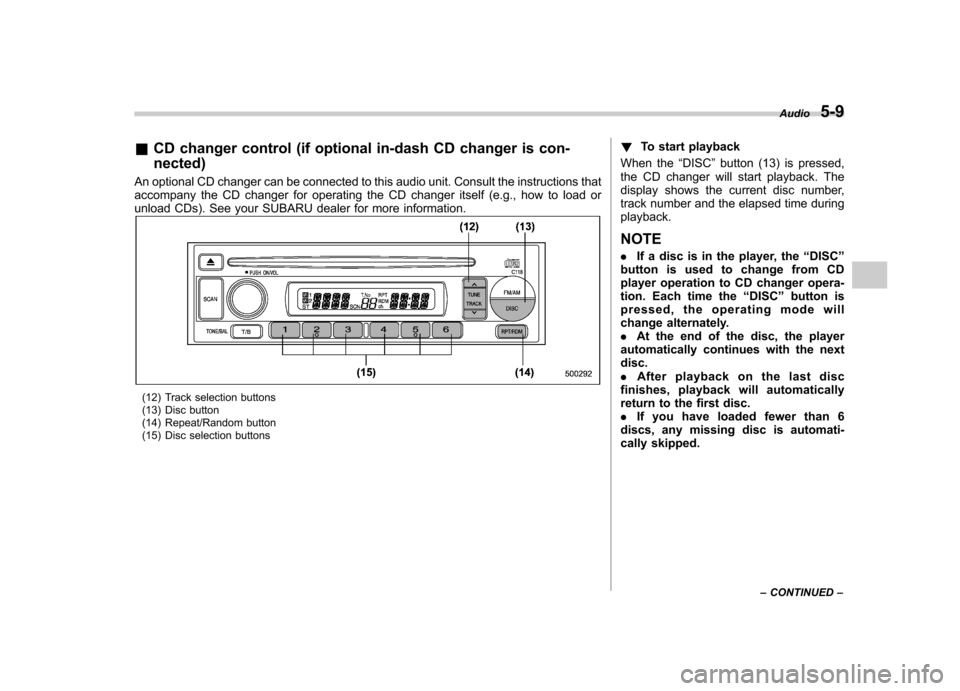
&CD changer control (if optional in-dash CD changer is con- nected)
An optional CD changer can be connected to this audio unit. Consult the instructions that
accompany the CD changer for operating the CD changer itself (e.g., how to load or
unload CDs). See your SUBARU dealer for more information.
(12) Track selection buttons
(13) Disc button
(14) Repeat/Random button
(15) Disc selection buttons !
To start playback
When the “DISC ”button (13) is pressed,
the CD changer will start playback. The
display shows the current disc number,
track number and the elapsed time duringplayback. NOTE . If a disc is in the player, the “DISC ”
button is used to change from CD
player operation to CD changer opera-
tion. Each time the “DISC ”button is
pressed, the operating mode will
change alternately. . At the end of the disc, the player
automatically continues with the next disc.. After playback on the last disc
finishes, playback will automatically
return to the first disc.. If you have loaded fewer than 6
discs, any missing disc is automati-
cally skipped. Audio
5-9
– CONTINUED –
Page 168 of 364
5-10Audio
! Selection of a desired disc
You can select a desired disc from among
the discs contained in the CD changer
only by pressing the corresponding num-
ber on one of the disc selection buttons
(15). If you are to listen to the 5th disc in
the CD changer, press the “5 ” button of the
disc selection buttons (15). All other discs
in the CD changer can also be selected in
a similar way. NOTE . No disc change takes place if the
button corresponding to the storage
tray in which no disc is loaded is pressed.. If the disc selection button (15)
corresponding to the disc now in play-
back is pressed again, the disc will be
replayed from its beginning. ! To select a song from its beginning
! Forward direction
Briefly press the “
”side of the button
(12) to skip to the beginning of the next
track. Each time this side of the button is
pressed, the indicated track number willincrease. ! Backward direction
Briefly press the “
”side of the button
(12) to skip to the beginning of the current track. Each time this side of the button is
pressed, the indicated track number willdecrease. !
Fast-forwarding and fast-reversing
! Fast-forwarding
Press the “
”side of the button (12)
continuously to fast-forward the disc.
Release the button to stop fast-forwarding.
If you continue fast-forwarding to the end
of the disc, the CD changer will auto-
matically stop fast-forwarding and start
playback beginning with the first track on
the current disc. ! Fast-reversing
Press the “
”side of the button (12)
continuously to fast-reverse the disc.
Release the button to stop fast-reversing.
If you continue fast-reverse to the begin-
ning of the disc, the CD changer will
automatically stop fast-reverse and start
playback beginning with the first track on
the current disc. ! Repeat playback
Use this to play a certain track repeatedly.
During playback, press the “RPT ”button
(14) and release it in less than 2 seconds.The “RPT ”indicator will come on and the
song will be played continuously. To
cancel the repeat mode, press the button again. Then the
“RPT ”indicator goes out,
and normal playback mode is restored. ! Random playback
Use this to play the tracks on the disc in
random order. During playback, press the“ RDM ”button (14) and hold it in for more
than 2 seconds. The “RDM ”indicator will
come on and all songs on the disc will be
played in a random order.
To cancel the random mode, press the
button again. Then the “RDM ”indicator
goes out, and normal playback mode isrestored.