2007 SUBARU IMPREZA wheel torque
[x] Cancel search: wheel torquePage 210 of 364

dealer.
The driver ’s control center differential
allows you to freely change the degree
of limitation of the differential action
(limited slip differential (LSD) torque) of
your vehicle ’s center differential.
By using the center differential control dial,
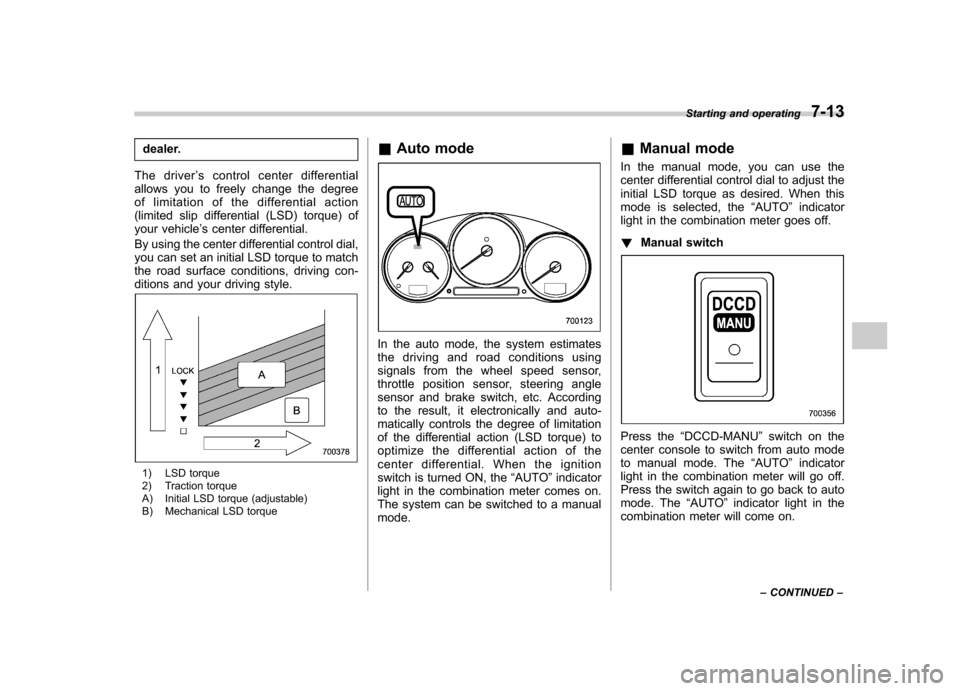
you can set an initial LSD torque to match
the road surface conditions, driving con-
ditions and your driving style.
1) LSD torque
2) Traction torque
A) Initial LSD torque (adjustable)
B) Mechanical LSD torque &
Auto mode
In the auto mode, the system estimates
the driving and road conditions using
signals from the wheel speed sensor,
throttle position sensor, steering angle
sensor and brake switch, etc. According
to the result, it electronically and auto-
matically controls the degree of limitation
of the differential action (LSD torque) to
optimize the differential action of the
center differential. When the ignition
switch is turned ON, the “AUTO ”indicator
light in the combination meter comes on.
The system can be switched to a manual mode. &
Manual mode
In the manual mode, you can use the
center differential control dial to adjust the
initial LSD torque as desired. When this
mode is selected, the “AUTO ”indicator
light in the combination meter goes off. ! Manual switch
Press the “DCCD-MANU ”switch on the
center console to switch from auto mode
to manual mode. The “AUTO ”indicator
light in the combination meter will go off.
Press the switch again to go back to auto
mode. The “AUTO ”indicator light in the
combination meter will come on. Starting and operating
7-13
– CONTINUED –
Page 211 of 364

7-14Starting and operating
!Center differential control dial and
indicator light
The control dial is located beside the
parking brake lever. By turning the control
dial forward and rearward, it is possible to
change the initial LSD torque.
The center differential indicator lights in
the combination meter give six levels of
indication. The indicator lights and control
dial are linked; when the dial is turned to
change the initial LSD torque, the illumi-
nation position of the indicator lights
changes accordingly.
Turn the dial forward to increase the initial
LSD torque; when the white line on the
dial reaches the frontmost position, the
initial LSD torque setting is maximum. The
center differential will then be almost
completely locked and the “LOCK ”indica-
tor light will come on.Turn the dial rearward to reduce the initial
LSD torque; when the white line reaches
the rearmost position, the initial LSD
torque will be minimum and the “
”
indicator light will come on. Under this
condition, only the Mechanical LSD torque
will limit the differential action.
CAUTION
. Do not turn the control dial when
a wheel slippage occurs. Wait
until the wheelspin has been
brought under control.
. Under any of the following con-
ditions, turn the center differen-
tial control dial to the rearmost
position to minimize the initial
LSD torque:
Page 212 of 364

.When a temporary spare tire is
installed
. When your vehicle is towed
. When the vehicle is stopped
with the manual mode se- lected
NOTE . A higher initial LSD torque setting
gives the vehicle greater traction when
driving straight ahead but makes cor-
nering more difficult. Remember this
when adjusting the initial LSD torque.
In general, higher initial LSD torque
settings assist driving on slippery
roads and lower settings for non-slip-
pery roads. If you become stuck in
snow or mud, turning the center differ-
ential control dial to the frontmost
position will help move the vehicle
out. (The “LOCK ”indicator will come
on at the frontmost position.). During cornering or when making
turns (especially when getting into the
garage), the rotational difference be-
tween the front and rear wheels may
cause a braking effect accompanied by
vibration and noise. This does not
indicate a problem. The phenomenon
will disappear when you turn the center
differential control dial to the rearmost position (minimum initial LSD torqueposition).
In the auto mode, it controls the initial
LSD torque automatically. While in the
auto mode, this phenomenon some-
times occurs depending on the driving
condition, however, it does not indicate
a problem..
Use the center differential indicator
light only as a rough indication of the
initial LSD torque.. If you operate the center differential
control dial while quickly accelerating
or turning a tight corner, you may feel
slight shocks. This is due to differential
action by the center differential and
does not indicate a problem.
& Temporary release
When the driver stops the vehicle and
pulls the parking brake lever after manu-
ally setting the initial LSD torque, the LSD
torque is temporarily minimized. However
the indicator in the combination meter
continues to show the driver ’s selected
initial LSD torque. When the driver re-
leases the parking brake lever, the initial
LSD torque set by the driver is restored. Automatic transmission
The automatic transmission is electroni-
cally controlled and provides 4 forward
speeds and 1 reverse speed. NOTE .
When the engine coolant tempera-
ture is still low, your vehicle ’s auto-
matic transmission will up-shift at high-
er engine speeds than when the cool-
ant temperature is sufficiently high in
order to shorten the warm-up time and
improve driveability. The gearshift tim-
ing will automatically shift to the nor-
mal timing after the engine has warmedup. . Immediately after ATF (automatic
transmission fluid) is replaced, you
may feel that the automatic transmis-
sion operation is somewhat unusual.
This results from invalidation of data
the on-board computer has collected
and stored in memory to allow the
transmission to shift at the most appro-
priate times for the current condition of
your vehicle. Optimized shifting will be
restored as the vehicle continues to be
driven for a while. Starting and operating
7-15
– CONTINUED –
Page 261 of 364

Jack-up points (Others)
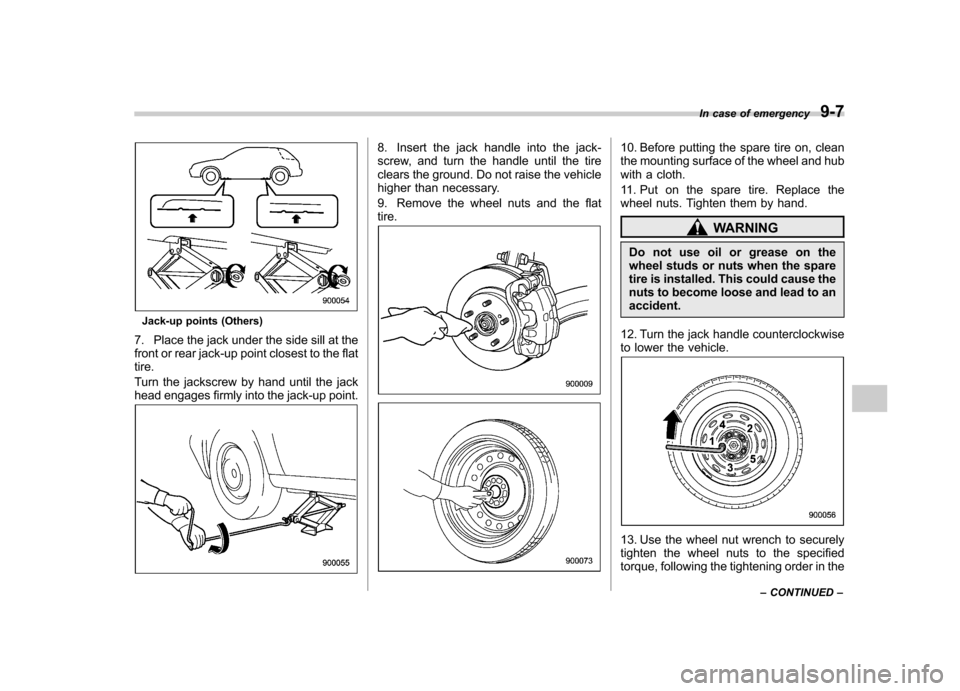
7. Place the jack under the side sill at the
front or rear jack-up point closest to the flattire.
Turn the jackscrew by hand until the jack
head engages firmly into the jack-up point.
8. Insert the jack handle into the jack-
screw, and turn the handle until the tire
clears the ground. Do not raise the vehicle
higher than necessary.
9. Remove the wheel nuts and the flat tire.10. Before putting the spare tire on, clean
the mounting surface of the wheel and hub
with a cloth.
11. Put on the spare tire. Replace the
wheel nuts. Tighten them by hand.
WARNING
Do not use oil or grease on the
wheel studs or nuts when the spare
tire is installed. This could cause the
nuts to become loose and lead to anaccident.
12. Turn the jack handle counterclockwise
to lower the vehicle.
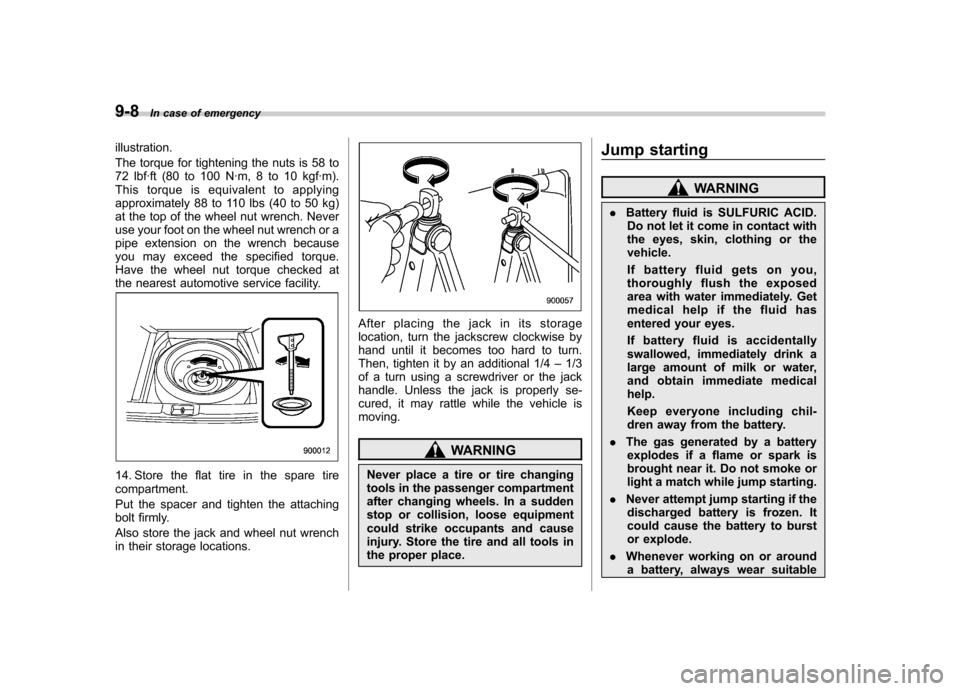
13. Use the wheel nut wrench to securely
tighten the wheel nuts to the specified
torque, following the tightening order in the In case of emergency
9-7
– CONTINUED –
Page 262 of 364

9-8In case of emergency
illustration.
The torque for tightening the nuts is 58 to
72 lbf·ft (80 to 100 N·m, 8 to 10 kgf·m).
This torque is equivalent to applying
approximately 88 to 110 lbs (40 to 50 kg)
at the top of the wheel nut wrench. Never
use your foot on the wheel nut wrench or a
pipe extension on the wrench because
you may exceed the specified torque.
Have the wheel nut torque checked at
the nearest automotive service facility.
14. Store the flat tire in the spare tire compartment.
Put the spacer and tighten the attaching
bolt firmly.
Also store the jack and wheel nut wrench
in their storage locations.
After placing the jack in its storage
location, turn the jackscrew clockwise by
hand until it becomes too hard to turn.
Then, tighten it by an additional 1/4 –1/3
of a turn using a screwdriver or the jack
handle. Unless the jack is properly se-
cured, it may rattle while the vehicle ismoving.
WARNING
Never place a tire or tire changing
tools in the passenger compartment
after changing wheels. In a sudden
stop or collision, loose equipment
could strike occupants and cause
injury. Store the tire and all tools in
the proper place. Jump starting
WARNING
. Battery fluid is SULFURIC ACID.
Do not let it come in contact with
the eyes, skin, clothing or thevehicle.
If battery fluid gets on you,
thoroughly flush the exposed
area with water immediately. Get
medical help if the fluid has
entered your eyes.
If battery fluid is accidentally
swallowed, immediately drink a
large amount of milk or water,
and obtain immediate medicalhelp.
Keep everyone including chil-
dren away from the battery.
. The gas generated by a battery
explodes if a flame or spark is
brought near it. Do not smoke or
light a match while jump starting.
. Never attempt jump starting if the
discharged battery is frozen. It
could cause the battery to burst
or explode.
. Whenever working on or around
a battery, always wear suitable
Page 311 of 364

recommends replacing all four tires at the
same time.
WARNING
. All four tires must be the same in
terms of manufacturer, brand
(tread pattern), construction, de-
gree of wear, speed symbol, load
index and size. Mixing tires of
different types, sizes or degrees
of wear can result in damage tovehicle ’s powertrain. Use of dif-
ferent types or sizes of tires can
also dangerously reduce con-
trollability and braking perfor-
mance and can lead to an acci- dent.
. Use only radial tires. Do not use
radial tires together with belted
bias tires and/or bias-ply tires.
Doing so can dangerously re-
duce controllability, resulting in
an accident.
& Wheel replacement
When replacing wheels due, for example,
to damage, make sure the replacement
wheels match the specifications of the
wheels that are fitted as standard equip-
ment. Replacement wheels are available from SUBARU dealers.WARNING
Use only those wheels that are
specified for your vehicle. Wheels
not meeting specifications could
interfere with brake caliper opera-
tion and may cause the tires to rub
against the wheel well housing dur-
ing turns. The resulting loss of
vehicle control could lead to anaccident.
NOTE
When any of the wheels are removed
and replaced for tire rotation or to
change a flat tire, always check the
tightness of the wheel nuts after driv-
ing approximately 600 miles (1,000 km).
If any nut is loose, tighten it to the
specified torque. Aluminum wheels
Aluminum wheels can be scratched and
damaged easily. Handle them carefully to
maintain their appearance, performance,
and safety. .
When any of the wheels are removed
and replaced for tire rotation or to change
a flat tire, always check the tightness of
the wheel nuts after driving approximately
600 miles (1,000 km). If any nut is loose,
tighten it to the specified torque. . Never apply oil to the threaded parts,
wheel nuts, or tapered surface of the wheel. . Never let the wheel rub against sharp
protrusions or curbs.. Be sure to fit tire chains on uniformly
and completely around the tire, otherwise
the chains may scratch the wheel. . When wheel nuts, balance weights, or
the center cap is replaced, be sure to
replace them with genuine SUBARU parts
designed for aluminum wheels. Maintenance and service
11-35
Page 347 of 364

an asymmetrical tire that has a
particular side that must always
face outward when mounting on a
vehicle.
. Accessory weight
The combined weight (in excess of
those standard items which may be
replaced) of floor mats, leather seats
and cross bars to the extent that these
items are available as factory-in-
stalled equipment (whether installed
or not). . Curb weight
The weight of a motor vehicle with
standard equipment including the
maximum capacity of fuel, oil, and
coolant and air conditioning. . Maximum loaded vehicle weight
The sum of curb weight, accessory
weight, vehicle capacity weight and
production options weight. . Normal occupant weight
150 lbs (68 kg) times the number of
occupants (3 occupants). . Occupant distribution
Distribution of occupants in a vehicle,
2 in front, 1 in rear seat. .
Production options weight
The combined weight of those in-
stalled regular production options
weighing over 5.1 lbs (2.3 kg) in
excess of those standards items
which they replace, not previously
considered in curb weight or acces-
sory weight. . Vehicle capacity weight
The total weight of cargo, luggage
and occupants that can be added to
the vehicle. . Vehicle maximum load on a tire
Load on an individual tire that is
determined by distributing to each
axle its share of the maximum loaded
vehicle weight and dividing by two. . Vehicle normal load on a tire
Load on an individual tire that is
determined by distributing to each
axle its share of the curb weight,
accessory weight, and normal occu-
pant weight and dividing by two. & Tire care –maintenance and
safety practices
. Check on a daily basis that the tires
are free from serious damage, nails,
and stones. At the same time, check the tires for abnormal wear. .
Inspect the tire tread regularly and
replace the tires before their tread
wear indicators become visible. When
a tire ’s tread wear indicator becomes
visible, the tire is worn beyond the
acceptable limit and must be replaced
immediately. With a tire in this condi-
tion, driving at even low speeds in wet
weather can cause the vehicle to
hydroplane. Possible resulting loss
of vehicle control can lead to an
accident. . To maximize the life of each tire
and ensure that the tires wear uni-
formly, it is best to rotate the tires
every 7,500 miles (12,500 km). Rotat-
ing the tires involves switching the
front and rear tires on the right-hand
side of the vehicle and similarly
switching the front and rear tires on
the left-hand side of the vehicle.
(Each tire must be kept on its original
side of the vehicle.) Replace any
damaged or unevenly worn tires at
the time of rotation. After tire rotation,
adjust the tire pressures and make
sure the wheel nuts are correctly
tightened. A tightening torque specifi-
Consumer information and Reporting safety defects
13-7
– CONTINUED –