2007 SUBARU IMPREZA ignition
[x] Cancel search: ignitionPage 210 of 364

dealer.
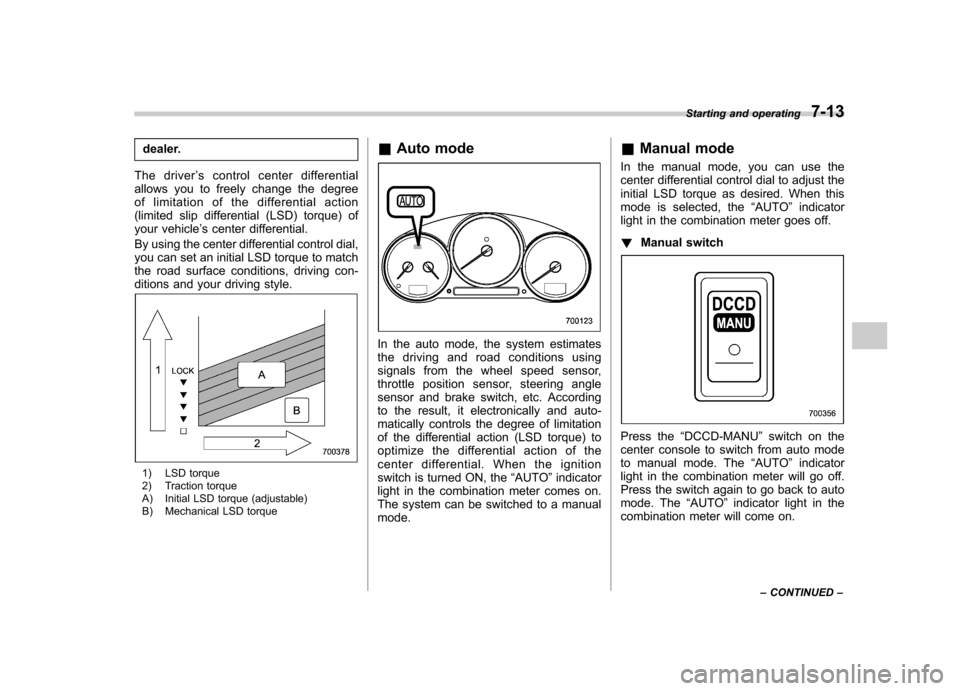
The driver ’s control center differential
allows you to freely change the degree
of limitation of the differential action
(limited slip differential (LSD) torque) of
your vehicle ’s center differential.
By using the center differential control dial,
you can set an initial LSD torque to match
the road surface conditions, driving con-
ditions and your driving style.
1) LSD torque
2) Traction torque
A) Initial LSD torque (adjustable)
B) Mechanical LSD torque &
Auto mode
In the auto mode, the system estimates
the driving and road conditions using
signals from the wheel speed sensor,
throttle position sensor, steering angle
sensor and brake switch, etc. According
to the result, it electronically and auto-
matically controls the degree of limitation
of the differential action (LSD torque) to
optimize the differential action of the
center differential. When the ignition
switch is turned ON, the “AUTO ”indicator
light in the combination meter comes on.
The system can be switched to a manual mode. &
Manual mode
In the manual mode, you can use the
center differential control dial to adjust the
initial LSD torque as desired. When this
mode is selected, the “AUTO ”indicator
light in the combination meter goes off. ! Manual switch
Press the “DCCD-MANU ”switch on the
center console to switch from auto mode
to manual mode. The “AUTO ”indicator
light in the combination meter will go off.
Press the switch again to go back to auto
mode. The “AUTO ”indicator light in the
combination meter will come on. Starting and operating
7-13
– CONTINUED –
Page 214 of 364

To shift the selector lever from the“P ”
position to any other position, you have to
depress the brake pedal fully when the
ignition switch is in the “ON ”position. This
prevents the vehicle from lurching when it
is started.
If the shift lever does not move from the “ P ” position with the brake pedal de-
pressed, refer to the “Shift lock release ”
section in this chapter. ! R (Reverse)
This position is for backing the vehicle.
To shift from the “N ” to “R ” position, first
stop the vehicle completely then move the
lever to the “R ”position.
! N (Neutral)
This position is for restarting a stalledengine.
In this position the wheels and transmis-
sion are not locked. In this position, the
transmission is neutral; the vehicle will roll
freely, even on the slightest incline unless
the parking brake or foot brake is on.
Avoid coasting with the transmission neutral.
During coasting, there is no engine brak-
ing effect. NOTE
If you stop the engine with the selector
lever in the
“N ” position, move the
selector lever to the “P ” position
immediately. Otherwise, you may find
that the selector lever soon cannot be
moved to the “P ” position. If you find
that the selector lever cannot be moved
from the “N ” position to the “P ” posi-
tion, turn the ignition switch to the“ ON ”position and try again.
WARNING
Do not drive the vehicle with the
selector lever in the “N ” (neutral)
position. Engine braking has no
effect in this condition and the risk
of an accident is consequently in-creased.
! D (Drive)
This position is for normal driving.
The transmission automatically shifts into
a suitable gear from 1st to 4th according to
the vehicle speed and the acceleration
you require.
When more acceleration is required in this
position, press the accelerator pedal fully
to the floor and hold that position. The
transmission will automatically downshift to 3rd, 2nd or 1st gear. When you release
the pedal, the transmission will return to
the original gear position. !
While climbing a grade
When driving up hill, undesired upshift to
4th gear is prevented from taking place
when the accelerator pedal is released.
This minimizes the chances of subse-
quent downshifting to a lower gear when
accelerating again. This prevents re-
peated upshifting and downshifting result-
ing in a smoother operation of the vehicle. NOTE
The transmission may downshift to 2nd
or 1st gear, depending on the way the
accelerator pedal is pressed to accel-
erate the vehicle again. ! While going down a hill
When descending a steep hill, depressing
the brake pedal will cause the transmis-
sion to downshift to 3rd gear, thus apply-
ing engine braking. Reacceleration for a
short time will cause the transmission to
upshift normally. NOTE
In some cases, depressing the brake
pedal on a downhill grade does not
result in an automatic downshift to 3rd
gear. This can happen when the auto- Starting and operating
7-17
– CONTINUED –
Page 216 of 364

.Always set the parking brake when
parking your vehicle. Do not hold the
vehicle with only the transmission. . Do not keep the vehicle in a stationary
position on an uphill grade by using the “ D ”, “3 ”, “2 ”,or “1 ” position. Use the brake
instead.
The engine may, on rare occasions, knock
when the vehicle rapidly accelerates or
rapidly pulls away from a standstill. This
phenomenon is not an indication of a
problem in your vehicle.
& Shift lock release
If the selector lever does not move fromthe “P ” position with the brake pedal
depressed and the ignition switch in the“ ON ”position, perform the following steps:
To override the shift lock:
1. Set the parking brake and stop the engine.
2. Take out the screwdriver from the tool bag.
3. Remove the cover by prying on the
edge with the screwdriver.
4. Insert the screwdriver into the hole.
5. Push down on the screwdriver and
move the selector lever from the “P ”to the
“ N ”position.
6. Remove the screwdriver from the hole.
Depress the brake pedal and start the engine.
Take your vehicle to the nearest SUBARU
dealer immediately to have the systemrepaired.
Starting and operating
7-19
Page 219 of 364

7-22Starting and operating
vehicles.
. When driving on badly surfaced
roads, gravel roads, icy roads, or
over deep newly fallen snow,
stopping distances may be long-
er for a vehicle with the ABS
system than one without. When
driving under these conditions,
therefore, reduce your speed and
leave ample distance from othervehicles.
. When you feel the ABS system
operating, you should maintain
constant brake pedal pressure.
Do not pump the brake pedal
since doing so may defeat the
operation of the ABS system.
& ABS system self-check
Just after the vehicle is started, you may
feel on the brake pedal a vibration similar
to when the ABS operates, and you may
also hear the sound of the ABS working
from the engine compartment. This is
caused by an automatic functional test of
the ABS system being carried out and
does not indicate any abnormal condition. &
ABS warning light
The ABS warning light comes on when the
ignition switch is turned to the “ON ”
position and goes out after approximately
2 seconds.
This is an indication that the ABS system
is working properly.
When driving with an insufficient battery
voltage such as when the engine is jump
started, the ABS warning light may come
on. This is due to the low battery voltage
and does not indicate a malfunction.
When the battery becomes fully charged,
the light will go out.
CAUTION
If the warning light behaves as
follows, the ABS system may not
be working properly.
When the warning light is on, the
ABS function shuts down; however,
the conventional brake system con-
tinues to operate normally. . The warning light does not come
on when the ignition switch is
turned to the “ON ”position.
. The warning light comes on when
the ignition switch is turned tothe “ON ”position, but it does not
go out even when the vehicle
speed exceeds approximately 8
mph (12 km/h).
. The warning light comes on dur-
ing driving.
If these occur, have the ABS system
repaired at the first available oppor-
tunity by your SUBARU dealer.
NOTE
If the warning light behavior is as
described in the following, the ABS
system may be considered normal. . The warning light comes on right
after the engine is started but goes out
Page 223 of 364

7-26Starting and operating
and other obstructions on the
ground when parking. The under-
spoilers could be damaged by con-
tact with them. Cruise control
Cruise control enables you to maintain a
constant vehicle speed without holding
your foot on the accelerator pedal and it is
operative when the vehicle speed is 25
mph (40 km/h) or more. Make sure the
main switch is turned
“OFF ”when the
cruise control is not in use to avoid
unintentionally setting the cruise control.
NOTE
If you move the cruise control lever or
press the main switch button while
turning the ignition switch “ON ”, the
cruise control function is deactivated
and the “CRUISE ”indicator light
flashes. To reactivate the cruise control
function, turn the ignition switch back
to the “Acc ”or “LOCK ”position, and
then turn it again to the “ON ”position.
WARNING
Do not use the cruise control under
any of the following conditions. This
may cause loss of vehicle control: . driving up or down a steep grade
. driving on slippery or winding
roads
. driving in heavy traffic &
To set cruise control
1. Push the main switch button.
The “”indicator light on the combina-
tion meter will come on.
2. Depress the accelerator pedal until the
Page 224 of 364

vehicle reaches the desired speed.
3. Push the control lever downward in the “SET/COAST ”direction and release it.
Then release the accelerator pedal.
At this time, the “”indicator light is
illuminated in the combination meter. The vehicle will maintain the desired speed.
Vehicle speed can be temporarily in-
creased while driving with the cruise
control activated. Simply depress the
accelerator pedal to accelerate the vehi-
cle. When the accelerator pedal is re-
leased, the vehicle will return to and
maintain the previous cruising speed.
& To temporarily cancel the
cruise control
There are five ways to cancel the cruise
control temporarily:
. Pull the control lever in the “CANCEL ”
direction. . Depress the brake pedal.
. Depress the clutch pedal (manual transmission vehicles only)..
Shift the selector lever into the “N ”
position (automatic transmission vehicles only). . Shift the shift lever into neutral position
(manual transmission vehicles only). The “
”indicator light in the combination
meter goes off when the cruise control is canceled.
To resume the cruise control after it has
been temporarily canceled and with vehi-
cle speed of approximately 20 mph (32
km/h) or more, push the control lever
upward in the “RES/ACC ”direction to
return to the original cruising speed auto-
matically. The “
”indicator light in the combination
meter will automatically come on at this time. & To turn off the cruise control
There are two ways to turn off the cruise control: . Push the main switch again.
. Turn the ignition switch to the “Acc ”or
“ LOCK ”position (but only when the
vehicle is completely stopped). Starting and operating
7-27
– CONTINUED –
Page 229 of 364

exhaust fumes are entering the
vehicle, have the problem
checked and corrected as soon
as possible. If you must drive
under these conditions, drive
only with all windows fully open.
. Keep the trunk lid (Sedan) or rear
gate (Wagon) closed while driv-
ing to prevent exhaust gas from
entering the vehicle.
NOTE
Due to the expansion and contraction
of the metals used in the manufacture
of the exhaust system, you may hear a
crackling sound coming from the ex-
haust system for a short time after the
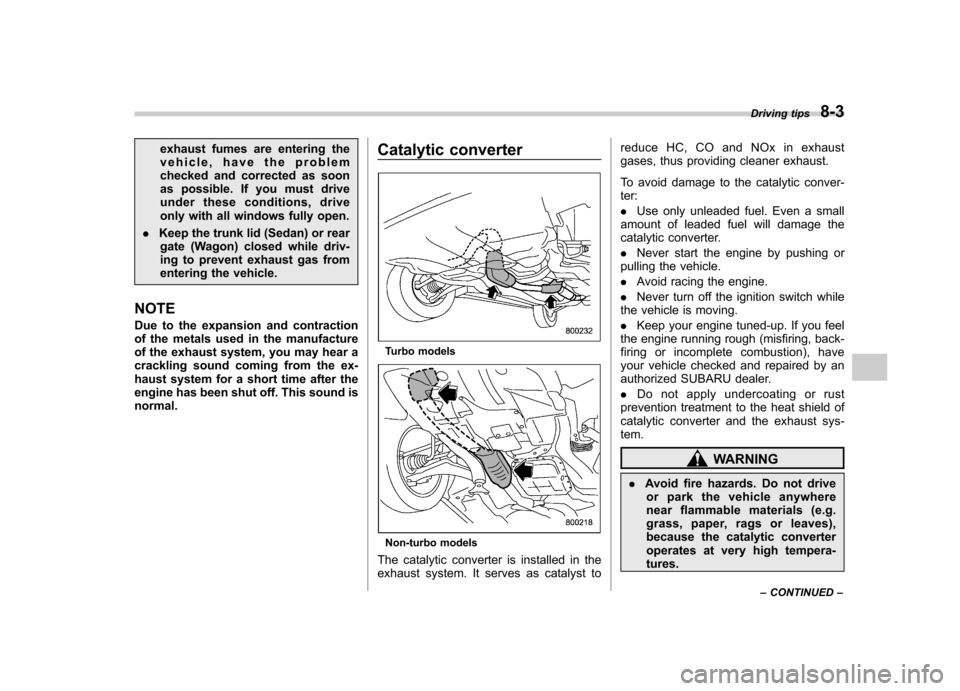
engine has been shut off. This sound isnormal. Catalytic converter
Turbo models
Non-turbo models
The catalytic converter is installed in the
exhaust system. It serves as catalyst to reduce HC, CO and NOx in exhaust
gases, thus providing cleaner exhaust.
To avoid damage to the catalytic conver- ter: .
Use only unleaded fuel. Even a small
amount of leaded fuel will damage the
catalytic converter. . Never start the engine by pushing or
pulling the vehicle.. Avoid racing the engine.
. Never turn off the ignition switch while
the vehicle is moving.. Keep your engine tuned-up. If you feel
the engine running rough (misfiring, back-
firing or incomplete combustion), have
your vehicle checked and repaired by an
authorized SUBARU dealer. . Do not apply undercoating or rust
prevention treatment to the heat shield of
catalytic converter and the exhaust sys-tem.
WARNING
. Avoid fire hazards. Do not drive
or park the vehicle anywhere
near flammable materials (e.g.
grass, paper, rags or leaves),
because the catalytic converter
operates at very high tempera-tures. Driving tips
8-3
– CONTINUED –
Page 256 of 364

9-2In case of emergency
If you park your vehicle in
case of an emergency
The hazard warning flasher should be
used in day or night to warn other drivers
when you have to park your vehicle under
emergency conditions.
Avoid stopping on the road. It is best to
safely pull off the road if a problem occurs.
The hazard warning flasher can be acti-
vated regardless of the ignition switchposition.
Turn on the hazard warning by pushing
the hazard warning flasher switch. Turn it
off by pushing the switch again. NOTE
When the hazard warning flasher is on,
the turn signals do not work.
Temporary spare tire
The temporary spare tire is smaller and
lighter than a conventional tire and is
designed for emergency use only. Re-
move the temporary spare tire and re-
install the conventional tire as soon as
possible because the spare tire is de-
signed only for temporary use.
Check the inflation pressure of the tem-
porary spare tire periodically to keep the
tire ready for use. The correct pressure is
60 psi (420 kPa, 4.2 kg/cm
2)
.
When using the temporary spare tire, note
the following. . Do not exceed 50 mph (80 km/h).
. Do not put a tire chain on the temporary
spare tire. Because of the smaller tire size,
a tire chain will not fit properly. . Do not use two or more temporary
spare tires at the same time.. Do not drive over obstacles. This tire
has a smaller diameter, so road clearance
is reduced.