2007 SUBARU IMPREZA ECO mode
[x] Cancel search: ECO modePage 212 of 364

.When a temporary spare tire is
installed
. When your vehicle is towed
. When the vehicle is stopped
with the manual mode se- lected
NOTE . A higher initial LSD torque setting
gives the vehicle greater traction when
driving straight ahead but makes cor-
nering more difficult. Remember this
when adjusting the initial LSD torque.
In general, higher initial LSD torque
settings assist driving on slippery
roads and lower settings for non-slip-
pery roads. If you become stuck in
snow or mud, turning the center differ-
ential control dial to the frontmost
position will help move the vehicle
out. (The “LOCK ”indicator will come
on at the frontmost position.). During cornering or when making
turns (especially when getting into the
garage), the rotational difference be-
tween the front and rear wheels may
cause a braking effect accompanied by
vibration and noise. This does not
indicate a problem. The phenomenon
will disappear when you turn the center
differential control dial to the rearmost position (minimum initial LSD torqueposition).
In the auto mode, it controls the initial
LSD torque automatically. While in the
auto mode, this phenomenon some-
times occurs depending on the driving
condition, however, it does not indicate
a problem..
Use the center differential indicator
light only as a rough indication of the
initial LSD torque.. If you operate the center differential
control dial while quickly accelerating
or turning a tight corner, you may feel
slight shocks. This is due to differential
action by the center differential and
does not indicate a problem.
& Temporary release
When the driver stops the vehicle and
pulls the parking brake lever after manu-
ally setting the initial LSD torque, the LSD
torque is temporarily minimized. However
the indicator in the combination meter
continues to show the driver ’s selected
initial LSD torque. When the driver re-
leases the parking brake lever, the initial
LSD torque set by the driver is restored. Automatic transmission
The automatic transmission is electroni-
cally controlled and provides 4 forward
speeds and 1 reverse speed. NOTE .
When the engine coolant tempera-
ture is still low, your vehicle ’s auto-
matic transmission will up-shift at high-
er engine speeds than when the cool-
ant temperature is sufficiently high in
order to shorten the warm-up time and
improve driveability. The gearshift tim-
ing will automatically shift to the nor-
mal timing after the engine has warmedup. . Immediately after ATF (automatic
transmission fluid) is replaced, you
may feel that the automatic transmis-
sion operation is somewhat unusual.
This results from invalidation of data
the on-board computer has collected
and stored in memory to allow the
transmission to shift at the most appro-
priate times for the current condition of
your vehicle. Optimized shifting will be
restored as the vehicle continues to be
driven for a while. Starting and operating
7-15
– CONTINUED –
Page 215 of 364
7-18Starting and operating
matic transmission fluid temperature is
very low, for example, during driving
shortly after the vehicle has been
parked for an extended period of time.
When the ATF temperature has risen to
a certain level, automatic downshift
normally takes place. In the meantime,
downshift manually for engine braking
as required.
Also, downshifting when braking
downhill will not occur at speeds above
approximately 48 mph (78 km/h). !3 (Third)
This position is for using engine braking
when going down a hill or for climbing agrade.
The transmission automatically shifts into
a suitable gear from 1st to 3rd according
to the vehicle speed and the acceleration
you require.
When more acceleration is required in this
position, press the accelerator pedal fully
to the floor and hold that position. The
transmission will automatically downshift
to 2nd or 1st gear. When you release the
pedal, the transmission will return to the
original gear position. ! 2 (Second)
This position is for using engine braking
when going down a hill or for climbing a steep grade.
In this position, the transmission holds in
the 2nd gear.
Use this position when starting off from a
standstill on slippery road surfaces such
as mud or snow. It will ensure greatertraction. !
1 (First)
This position is for driving up or down very
steep grades, or driving through mud or
sand, or on slippery surfaces. In this
position, the transmission holds in the
1st gear. ! Maximum speeds
The following table shows the maximum
speeds that are possible with each differ-
ent gear.
When shifting down a gear, it is important
to confirm that the current vehicle speed is
not in excess of the Maximum Allowable
Speed of the gear which is about to beselected. mph (km/h)
Non-turbo models Turbo models
1 28 (45) 28 (45)
2 62 (100) 65 (104)
3 97 (156) 104 (167) NOTE
In order to prevent over-revving during
deceleration of the vehicle, the trans-
mission will remain in the current gear
if the speed of the vehicle is in excess
of the Maximum Allowable Speed for
the gear to which the selector lever has
been moved.
WARNING
When shifting down a gear, ensure
that the vehicle is not travelling at a
speed exceeding the Maximum Al-
lowable Speed for the gear which is
about to be selected. Failure to
observe this precaution can lead to
engine over-revving and this in turn
can result in engine damage.
In addition, sudden application of
engine brakes when the vehicle is
travelling on a slippery surface can
lead to wheel locking; as a conse-
quence, control of the vehicle may
be lost and the risk of an accidentincreased.
! Driving tips
. Always apply the foot or parking brake
when the vehicle is stopped in the “D ”, “3 ”,
“ 2 ”, “1 ” or “R ”position.
Page 227 of 364

New vehicle break-in driving–the first
1,000 miles (1,600 km) ..................................... 8-2
Fuel economy hints ............................................ 8-2
Engine exhaust gas (Carbon monoxide) ........... 8-2
Catalytic converter .............................................. 8-3
Periodic inspections ........................................... 8-4
Driving in foreign countries ............................... 8-4
Driving tips for AWD vehicles ............................ 8-5
Off road driving ................................................... 8-6
All AWD models except OUTBACK SPORT .......... 8-6
OUTBACK SPORT ............................................... 8-6
Winter driving ...................................................... 8-8
Operation during cold weather ............................. 8-8
Driving on snowy and icy roads .......................... 8-9
Corrosion protection .......................................... 8-10
Snow tires ......................................................... 8-10
Tire chains ......................................................... 8-11 Rocking the vehicle
........................................... 8-12
Loading your vehicle ......................................... 8-12
Vehicle capacity weight ...................................... 8-13
GVWR and GAWR (Gross Vehicle Weight Rating and Gross Axle Weight Rating) ........................ 8-14
Roof rail and crossbar (if equipped) ................... 8-14
Trailer hitch (if equipped) .................................. 8-17
Connecting a trailer ........................................... 8-18
When you do not tow a trailer .. .......................... 8-19
Trailer towing ..................................................... 8-20
Warranties and maintenance .............................. 8-20
Maximum load limits .......................................... 8-20
Trailer hitches .................................................... 8-23
Connecting a trailer ........................................... 8-24
Trailer towing tips .............................................. 8-25
STI front lip spoiler (if equipped) ...................... 8-28Driving tips
8
Page 236 of 364
8-10Driving tips
CAUTION
Avoid prolonged continuous driving
in snowstorms. Snow will enter the
engine ’s intake system and may
hinder the air flow, which could
result in engine shutdown or evenbreakdown.
! Wiper operation when snowing
Before driving in cold weather, make sure
the wiper blades are not frozen to the
windshield or rear window. If the wiper
blades are frozen to the windshield or rear
window, use the defroster with the airflow
control dial in the “
”position and the
temperature control dial set for maximum
warmth until the wiper blades are com-
pletely thawed out. If your vehicle is
equipped with a wiper deicer, it is helpful
to thaw the windshield wiper blades. To
thaw out the rear wiper blade, use the rear
window defogger.
When driving in snow, if frozen snow starts
to stick on the surface of the windshield
despite wiper operation, use the defroster
with the airflow control dial in “
”and the
temperature control dial set for maximum
warmth. After the windshield gets warmed
enough to melt the frozen snow on it,
wash it away using the windshield washer. Snow stuck on the wiper arm prevents the
wiper from working effectively. If snow is
stuck on the wiper arm, pull off the road to
a safe place, then remove it. If you stop
the vehicle at road side, use the hazard
warning flasher to alert other drivers.
We recommend use of non-freezing type
wiper blades (winter blades) during the
seasons you could have snow and sub-
zero temperatures. Blades of this type
give superior wiping performance in
snowy conditions. Be sure to use blades
that are suitable for your vehicle.
CAUTION
During high-speed driving, non-
freezing type wiper blades may not
perform as well as standard wiper
blades. If this happens, reduce the
vehicle speed.
NOTE
When the season requiring non-freez-
ing type wiper blades is over, replace
them with standard wiper blades. & Corrosion protection
Refer to the “Corrosion protection ”section
(chapter 10). &
Snow tires
! All models except WRX-STI
WARNING
. When replacing original tires with
winter (snow) tires, make sure
you use only the same size,
construction and load range as
the original tires listed on the tire
placard. Using other sizes and
construction may affect speed-
ometer/odometer calibration and
clearance between the body and
tires. It also may be dangerous
and lead to loss of vehicle con-trol.
. You must install four winter tires
that are of the same size, con-
struction, brand, and load range.
Mixing other sizes or construc-
tions may result in severe me-
chanical damage to the drive
train of your vehicle and may
affect ride, handling, braking and
speedometer/odometer calibra-
tion. It also may be dangerous
and lead to loss of vehicle con-trol.
. Do not use a combination of
radial, belted bias or bias tires
Page 273 of 364
10-2Appearance care
Exterior care &Washing
CAUTION
. When washing the vehicle, the
brakes may get wet. As a result,
the brake stopping distance will
be longer. To dry the brakes,
drive the vehicle at a safe speed
while lightly pressing the brake
pedal to heat up the brakes.
. Do not wash the engine compart-
ment and area adjacent to it. If
water enters the engine air in-
take, electrical parts or the power
steering fluid reservoir, it will
cause engine trouble or faulty
power steering respectively.
. Since your vehicle is equipped
with a rear wiper, automatic car-
wash brushes could become
tangled around it, damaging the
wiper arm and other compo-
nents. Ask the automatic car-
wash operator not to let the
brushes touch the wiper arm or
to fix the wiper arm on the rear
window glass with adhesive tape
before operating the machine
(Wagon models only).
CAUTION
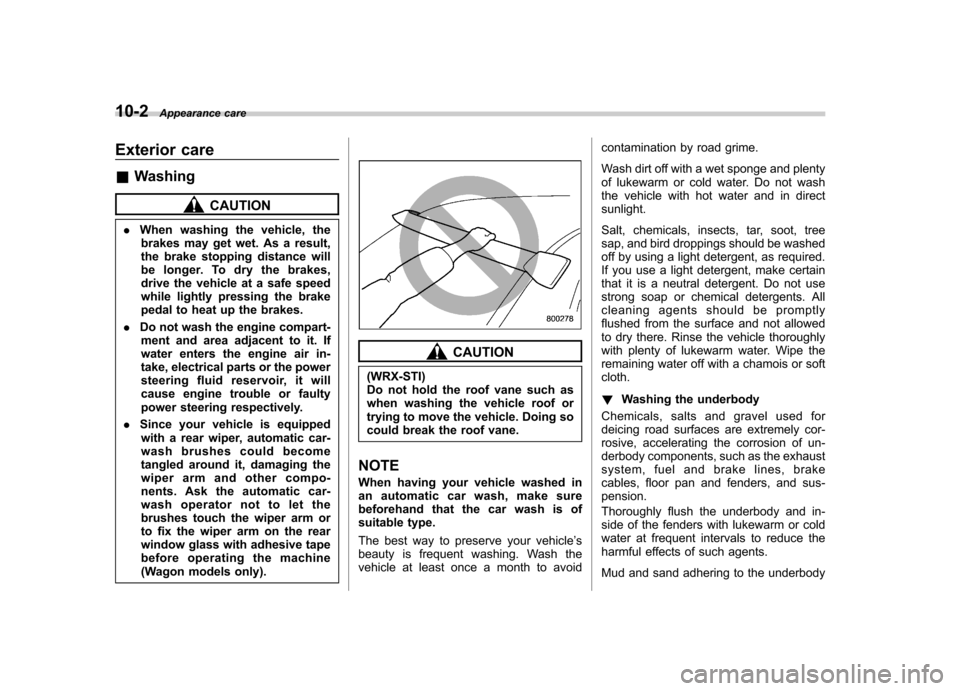
(WRX-STI)
Do not hold the roof vane such as
when washing the vehicle roof or
trying to move the vehicle. Doing so
could break the roof vane.
NOTE
When having your vehicle washed in
an automatic car wash, make sure
beforehand that the car wash is of
suitable type.
The best way to preserve your vehicle ’s
beauty is frequent washing. Wash the
vehicle at least once a month to avoid contamination by road grime.
Wash dirt off with a wet sponge and plenty
of lukewarm or cold water. Do not wash
the vehicle with hot water and in directsunlight.
Salt, chemicals, insects, tar, soot, tree
sap, and bird droppings should be washed
off by using a light detergent, as required.
If you use a light detergent, make certain
that it is a neutral detergent. Do not use
strong soap or chemical detergents. All
cleaning agents should be promptly
flushed from the surface and not allowed
to dry there. Rinse the vehicle thoroughly
with plenty of lukewarm water. Wipe the
remaining water off with a chamois or softcloth. !
Washing the underbody
Chemicals, salts and gravel used for
deicing road surfaces are extremely cor-
rosive, accelerating the corrosion of un-
derbody components, such as the exhaust
system, fuel and brake lines, brake
cables, floor pan and fenders, and sus-pension.
Thoroughly flush the underbody and in-
side of the fenders with lukewarm or cold
water at frequent intervals to reduce the
harmful effects of such agents.
Mud and sand adhering to the underbody
Page 277 of 364

Maintenance schedule....................................... 11-3
Maintenance precautions ................................... 11-3
Before checking or servicing in the engine compartment .................................................... 11-4
When you do checking or servicing in the engine compartment while the engine is running .......... 11-4
Engine hood ....................................................... 11-4
Engine compartment overview .......................... 11-6
Non-turbo models .............................................. 11-6
Turbo models ..................................................... 11-7
Engine oil ............................................................ 11-8
Checking the oil level ......................................... 11-8
Changing the oil and oil filter .............................. 11-9
Recommended grade and viscosity .................. 11-11
Recommended grade and viscosity under severe driving conditions .......................................... 11-12
Synthetic oil ..................................................... 11-12
Cooling system ................................................ 11-12
Cooling fan, hose and connections ................... 11-12
Engine coolant ................................................. 11-13
Air cleaner element .......................................... 11-15
Replacing the air cleaner element ..................... 11-15
Spark plugs ...................................................... 11-17
Recommended spark plugs .............................. 11-18
Drive belts ........................................................ 11-18
Manual transmission oil .................................. 11-19
Checking the oil level ....................................... 11-19
Recommended grade and viscosity .................. 11-20
Automatic transmission fluid .......................... 11-20
Checking the fluid level .................................... 11-20 Recommended fluid
......................................... 11-21
Front differential gear oil (AT vehicles) .......... 11-21
Checking the oil level ...................................... 11-21
Recommended grade and viscosity .................. 11-22
Rear differential gear oil .................................. 11-22
Checking the gear oil level ............................... 11-22
Recommended grade and viscosity .................. 11-23
Power steering fluid ........................................ 11-24
Checking the fluid level .................................... 11-24
Recommended fluid ......................................... 11-25
Brake fluid ........................................................ 11-25
Checking the fluid level .................................... 11-25
Recommended brake fluid ............................... 11-26
Clutch fluid (MT vehicles) ............................... 11-26
Checking the fluid level .................................... 11-26
Recommended clutch fluid ............................... 11-27
Brake booster .................................................. 11-27
Brake pedal ...................................................... 11-27
Checking the brake pedal free play .................. 11-27
Checking the brake pedal reserve distance....... 11-28
Clutch pedal (MT vehicles) .............................. 11-28
Checking the clutch function ............................ 11-28
Checking the clutch pedal free play .................. 11-28
Replacement of brake pad and lining ............ 11-29
Breaking-in of new brake pads and linings ....... 11-29
Parking brake stroke ....................................... 11-30
Tires and wheels .............................................. 11-30
Types of tires ................................................... 11-30
Tire inspection ................................................. 11-30
Tire pressures and wear .................................. 11-31
Maintenance and service
11
Page 294 of 364
11-18Maintenance and service
&Recommended spark plugs
Non-turbo models: FR5AP-11 (NGK)
Turbo models:
ILFR6B (NGK) Drive belts
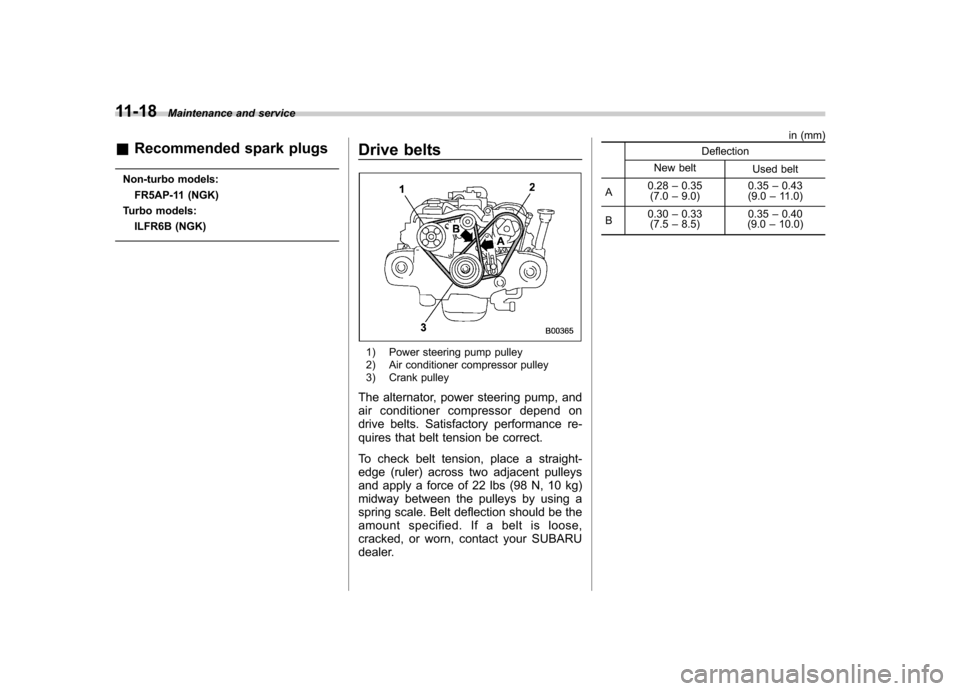
1) Power steering pump pulley
2) Air conditioner compressor pulley
3) Crank pulley
The alternator, power steering pump, and
air conditioner compressor depend on
drive belts. Satisfactory performance re-
quires that belt tension be correct.
To check belt tension, place a straight-
edge (ruler) across two adjacent pulleys
and apply a force of 22 lbs (98 N, 10 kg)
midway between the pulleys by using a
spring scale. Belt deflection should be the
amount specified. If a belt is loose,
cracked, or worn, contact your SUBARU
dealer. in (mm)
Deflection
New belt Used belt
A 0.28
–0.35
(7.0 –9.0) 0.35
–0.43
(9.0 –11.0)
B 0.30
–0.33
(7.5 –8.5) 0.35
–0.40
(9.0 –10.0)
Page 323 of 364
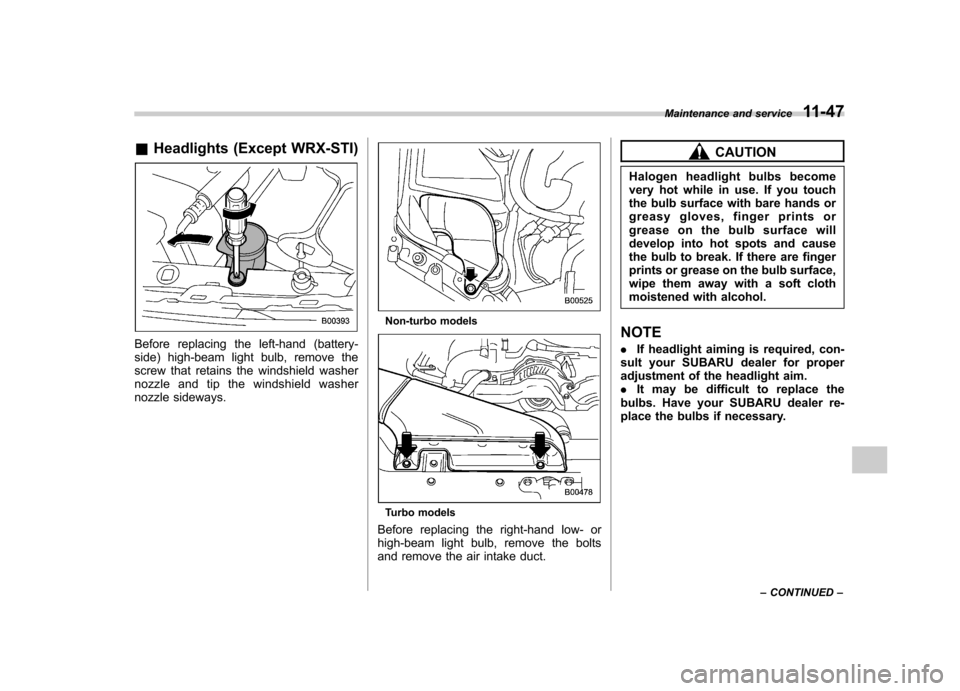
&Headlights (Except WRX-STI)
Before replacing the left-hand (battery-
side) high-beam light bulb, remove the
screw that retains the windshield washer
nozzle and tip the windshield washer
nozzle sideways.
Non-turbo models
Turbo models
Before replacing the right-hand low- or
high-beam light bulb, remove the bolts
and remove the air intake duct.
CAUTION
Halogen headlight bulbs become
very hot while in use. If you touch
the bulb surface with bare hands or
greasy gloves, finger prints or
grease on the bulb surface will
develop into hot spots and cause
the bulb to break. If there are finger
prints or grease on the bulb surface,
wipe them away with a soft cloth
moistened with alcohol.
NOTE . If headlight aiming is required, con-
sult your SUBARU dealer for proper
adjustment of the headlight aim.. It may be difficult to replace the
bulbs. Have your SUBARU dealer re-
place the bulbs if necessary. Maintenance and service
11-47
– CONTINUED –