2007 SUBARU IMPREZA lights
[x] Cancel search: lightsPage 139 of 364
3-30Instruments and controls
window defogger is operating. .Turn on the rear window defogger if
the wiper is frozen to the glass.
CAUTION
. Do not use sharp instruments or
window cleaner containing abra-
sives to clean the inner surface
of the rear window. They may
damage the conductors printed
on the window.
. To prevent the battery from being
discharged, do not operate the
defogger continuously for any
longer than necessary. Windshield wiper deicer (if equipped)
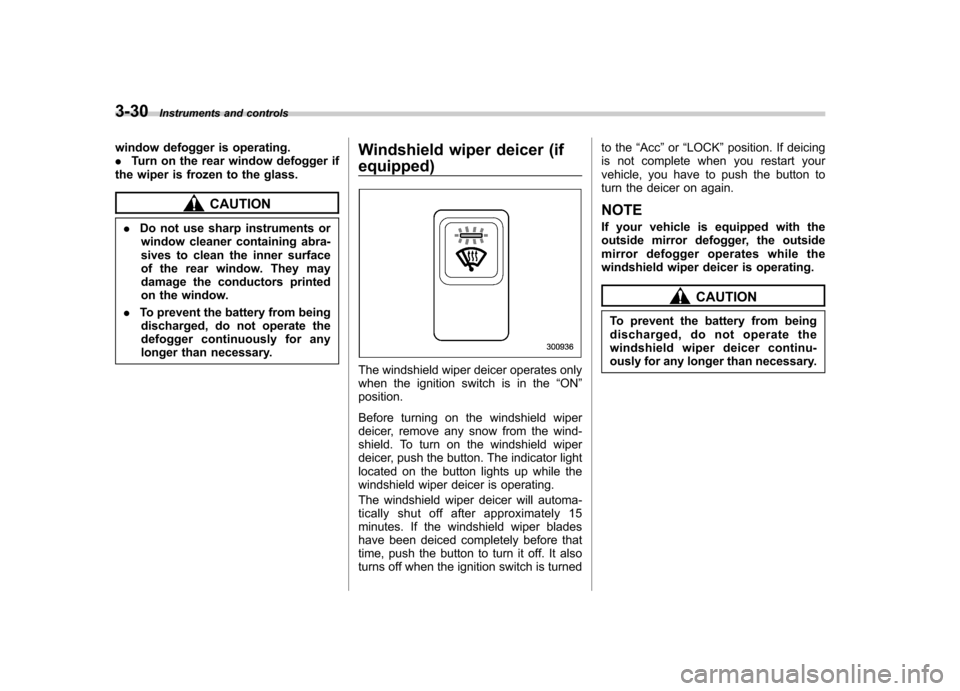
The windshield wiper deicer operates only
when the ignition switch is in the
“ON ”
position.
Before turning on the windshield wiper
deicer, remove any snow from the wind-
shield. To turn on the windshield wiper
deicer, push the button. The indicator light
located on the button lights up while the
windshield wiper deicer is operating.
The windshield wiper deicer will automa-
tically shut off after approximately 15
minutes. If the windshield wiper blades
have been deiced completely before that
time, push the button to turn it off. It also
turns off when the ignition switch is turned to the
“Acc ”or “LOCK ”position. If deicing
is not complete when you restart your
vehicle, you have to push the button to
turn the deicer on again.
NOTE
If your vehicle is equipped with the
outside mirror defogger, the outside
mirror defogger operates while the
windshield wiper deicer is operating.
CAUTION
To prevent the battery from being
discharged, do not operate the
windshield wiper deicer continu-
ously for any longer than necessary.
Page 141 of 364
3-32Instruments and controls
Mirrors
Always check that the inside and outside
mirrors are properly adjusted before you
start driving. &Inside mirror
The inside mirror has a day and night
position. Pull the tab at the bottom of the
mirror toward you for the night position.
Push it away for the day position. The
night position reduces glare from head-lights. !
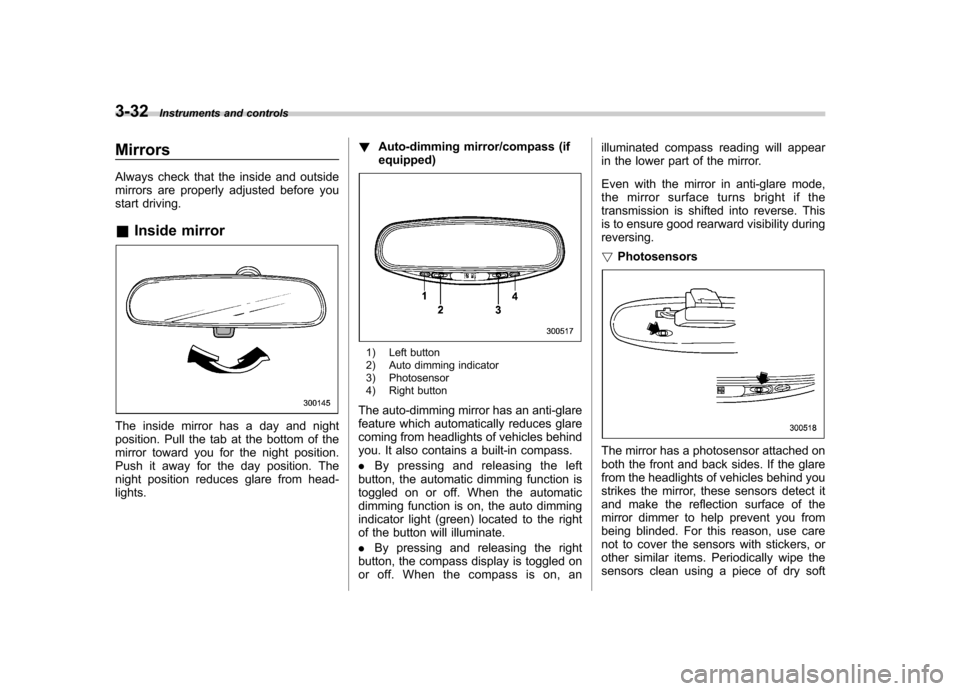
Auto-dimming mirror/compass (ifequipped)
1) Left button
2) Auto dimming indicator
3) Photosensor
4) Right button
The auto-dimming mirror has an anti-glare
feature which automatically reduces glare
coming from headlights of vehicles behind
you. It also contains a built-in compass. . By pressing and releasing the left
button, the automatic dimming function is
toggled on or off. When the automatic
dimming function is on, the auto dimming
indicator light (green) located to the right
of the button will illuminate. . By pressing and releasing the right
button, the compass display is toggled on
or off. When the compass is on, an illuminated compass reading will appear
in the lower part of the mirror.
Even with the mirror in anti-glare mode,
the mirror surface turns bright if the
transmission is shifted into reverse. This
is to ensure good rearward visibility duringreversing. !
Photosensors
The mirror has a photosensor attached on
both the front and back sides. If the glare
from the headlights of vehicles behind you
strikes the mirror, these sensors detect it
and make the reflection surface of the
mirror dimmer to help prevent you from
being blinded. For this reason, use care
not to cover the sensors with stickers, or
other similar items. Periodically wipe the
sensors clean using a piece of dry soft
Page 143 of 364
3-34Instruments and controls
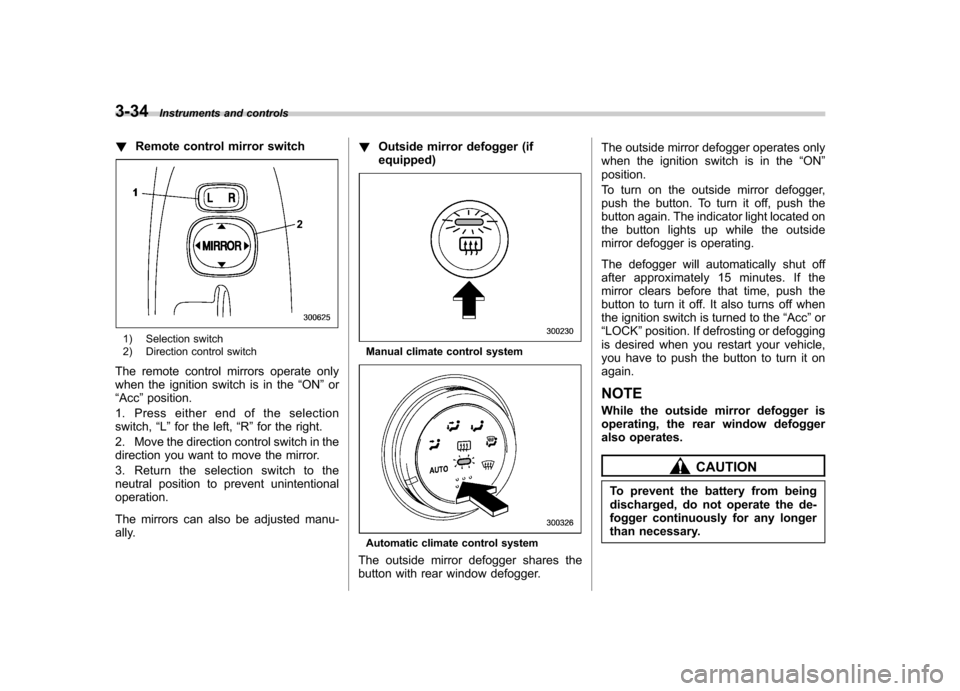
!Remote control mirror switch
1) Selection switch
2) Direction control switch
The remote control mirrors operate only
when the ignition switch is in the “ON ”or
“ Acc ”position.
1. Press either end of the selectionswitch, “L ” for the left, “R ”for the right.
2. Move the direction control switch in the
direction you want to move the mirror.
3. Return the selection switch to the
neutral position to prevent unintentionaloperation.
The mirrors can also be adjusted manu-
ally. !
Outside mirror defogger (ifequipped)Manual climate control system
Automatic climate control system
The outside mirror defogger shares the
button with rear window defogger. The outside mirror defogger operates only
when the ignition switch is in the
“ON ”
position.
To turn on the outside mirror defogger,
push the button. To turn it off, push the
button again. The indicator light located on
the button lights up while the outside
mirror defogger is operating.
The defogger will automatically shut off
after approximately 15 minutes. If the
mirror clears before that time, push the
button to turn it off. It also turns off when
the ignition switch is turned to the “Acc ”or
“ LOCK ”position. If defrosting or defogging
is desired when you restart your vehicle,
you have to push the button to turn it onagain. NOTE
While the outside mirror defogger is
operating, the rear window defogger
also operates.
CAUTION
To prevent the battery from being
discharged, do not operate the de-
fogger continuously for any longer
than necessary.
Page 182 of 364
5-24Audio
! To insert a disc
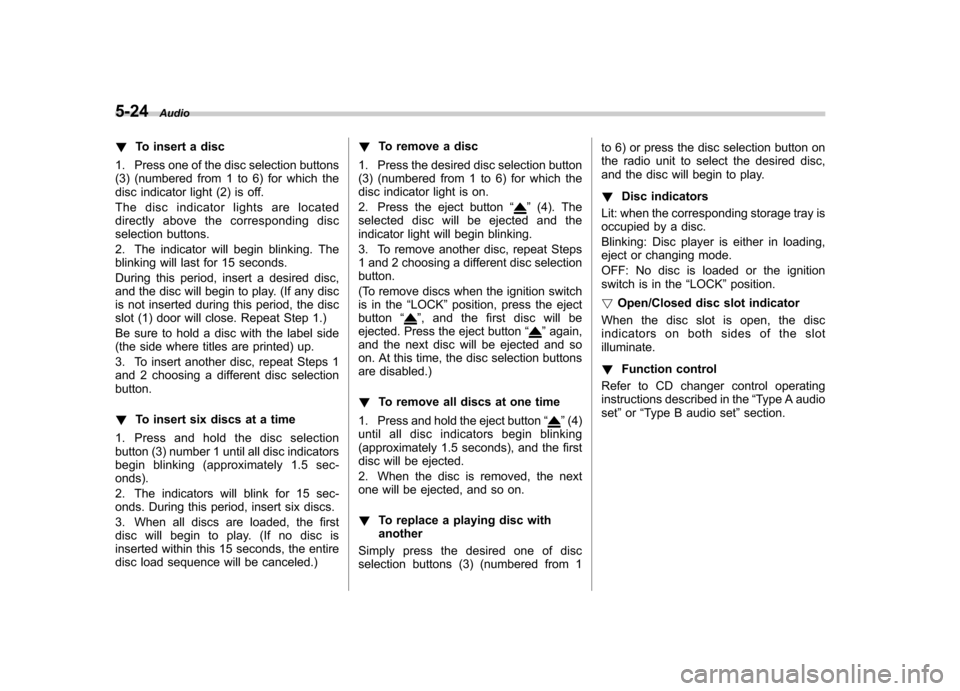
1. Press one of the disc selection buttons
(3) (numbered from 1 to 6) for which the
disc indicator light (2) is off.
The disc indicator lights are located
directly above the corresponding disc
selection buttons.
2. The indicator will begin blinking. The
blinking will last for 15 seconds.
During this period, insert a desired disc,
and the disc will begin to play. (If any disc
is not inserted during this period, the disc
slot (1) door will close. Repeat Step 1.)
Be sure to hold a disc with the label side
(the side where titles are printed) up.
3. To insert another disc, repeat Steps 1
and 2 choosing a different disc selectionbutton. ! To insert six discs at a time
1. Press and hold the disc selection
button (3) number 1 until all disc indicators
begin blinking (approximately 1.5 sec-onds).
2. The indicators will blink for 15 sec-
onds. During this period, insert six discs.
3. When all discs are loaded, the first
disc will begin to play. (If no disc is
inserted within this 15 seconds, the entire
disc load sequence will be canceled.) !
To remove a disc
1. Press the desired disc selection button
(3) (numbered from 1 to 6) for which the
disc indicator light is on.
2. Press the eject button “
”(4). The
selected disc will be ejected and the
indicator light will begin blinking.
3. To remove another disc, repeat Steps
1 and 2 choosing a different disc selectionbutton.
(To remove discs when the ignition switch
is in the “LOCK ”position, press the eject
button “
”, and the first disc will be
ejected. Press the eject button “”again,
and the next disc will be ejected and so
on. At this time, the disc selection buttons
are disabled.) ! To remove all discs at one time
1. Press and hold the eject button “
”(4)
until all disc indicators begin blinking
(approximately 1.5 seconds), and the first
disc will be ejected.
2. When the disc is removed, the next
one will be ejected, and so on. ! To replace a playing disc with another
Simply press the desired one of disc
selection buttons (3) (numbered from 1 to 6) or press the disc selection button on
the radio unit to select the desired disc,
and the disc will begin to play. !
Disc indicators
Lit: when the corresponding storage tray is
occupied by a disc.
Blinking: Disc player is either in loading,
eject or changing mode.
OFF: No disc is loaded or the ignition
switch is in the “LOCK ”position.
! Open/Closed disc slot indicator
When the disc slot is open, the disc
indicators on both sides of the slotilluminate. ! Function control
Refer to CD changer control operating
instructions described in the “Type A audio
set ”or “Type B audio set ”section.
Page 185 of 364
Interior lights....................................................... 6-2
Dome light .......................................................... 6-2
Cargo area light (if equipped) .............................. 6-2
Map light (if equipped) ........................................ 6-2
Sun visors ........................................................... 6-3
Vanity mirror (if equipped) ................................... 6-3
Storage compartment ......................................... 6-4
Glove box ........................................................... 6-4
Center console .................................................... 6-4
Coin tray ............................................................. 6-4
Pocket (if equipped) ............................................ 6-5
Cup holders ......................................................... 6-5
Front passenger ’s cup holder .............................. 6-5
Rear passenger ’s cup holder (if equipped) ........... 6-6Accessory power outlets
.................................... 6-6
Use with a cigarette lighter (Canada only, if equipped) .................................. 6-7
Ashtray (Canada only, if equipped) .................... 6-8
Floor mat (if equipped) ........................................ 6-9
Coat hooks ........................................................... 6-9
Cargo area cover (Wagon –if equipped) ......... 6-10
Using the cover ................................................. 6-10
To remove the cover .......................................... 6-10
Stowage of the cover ......................................... 6-11
To install the cover housing ............................... 6-11
Cargo tie-down hooks (Wagon –if equipped) .................................... 6-11
Cargo area bars (Wagon) .................................. 6-12
Under-floor storage compartment (Wagon –if equipped) .................................... 6-12
Interior equipment
6
Page 186 of 364
6-2Interior equipment
Interior lights
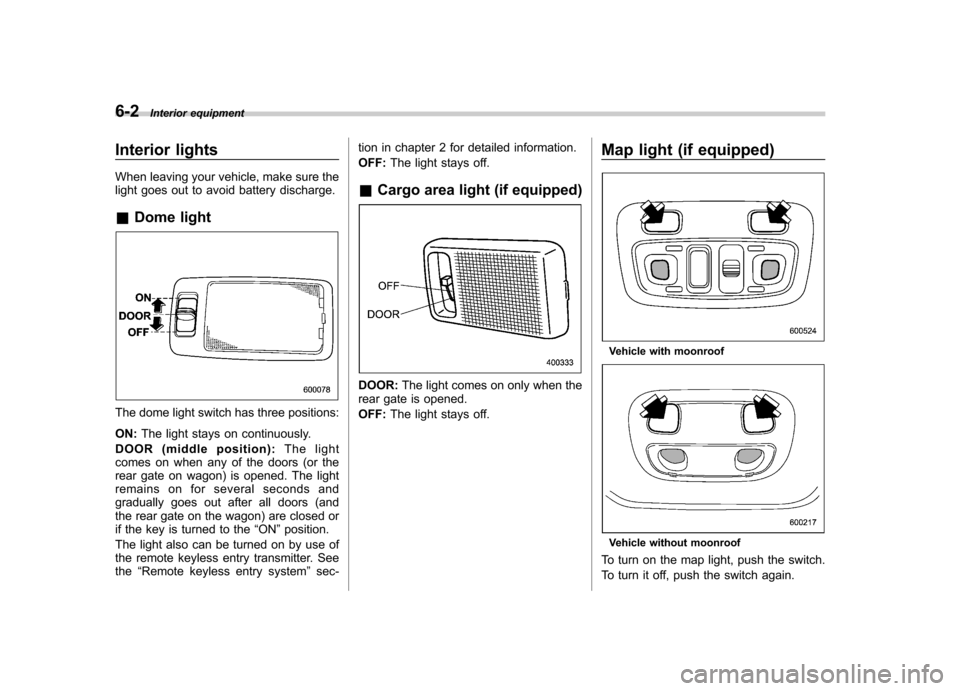
When leaving your vehicle, make sure the
light goes out to avoid battery discharge. &Dome light
The dome light switch has three positions: ON: The light stays on continuously.
DOOR (middle position): The light
comes on when any of the doors (or the
rear gate on wagon) is opened. The light
remains on for several seconds and
gradually goes out after all doors (and
the rear gate on the wagon) are closed or
if the key is turned to the “ON ”position.
The light also can be turned on by use of
the remote keyless entry transmitter. Seethe “Remote keyless entry system ”sec- tion in chapter 2 for detailed information. OFF:
The light stays off.
& Cargo area light (if equipped)
DOOR: The light comes on only when the
rear gate is opened. OFF: The light stays off. Map light (if equipped)
Vehicle with moonroof
Vehicle without moonroof
To turn on the map light, push the switch.
To turn it off, push the switch again.
Page 201 of 364
7-4Starting and operating
&Fuel filler lid and cap
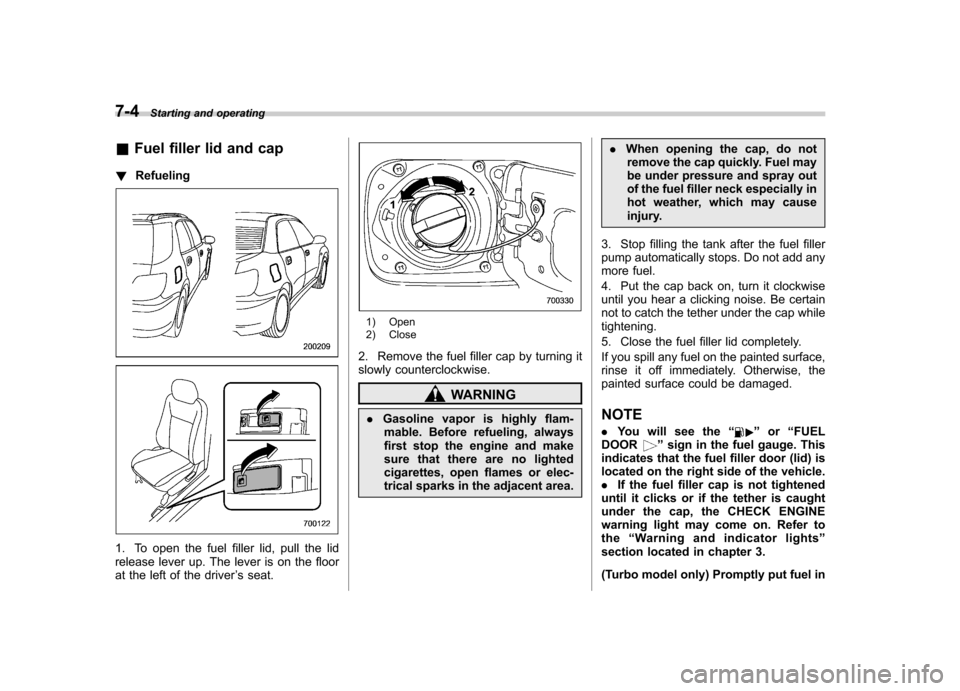
! Refueling
1. To open the fuel filler lid, pull the lid
release lever up. The lever is on the floor
at the left of the driver ’s seat.
1) Open
2) Close
2. Remove the fuel filler cap by turning it
slowly counterclockwise.
WARNING
. Gasoline vapor is highly flam-
mable. Before refueling, always
first stop the engine and make
sure that there are no lighted
cigarettes, open flames or elec-
trical sparks in the adjacent area. .
When opening the cap, do not
remove the cap quickly. Fuel may
be under pressure and spray out
of the fuel filler neck especially in
hot weather, which may cause
injury.
3. Stop filling the tank after the fuel filler
pump automatically stops. Do not add any
more fuel.
4. Put the cap back on, turn it clockwise
until you hear a clicking noise. Be certain
not to catch the tether under the cap whiletightening.
5. Close the fuel filler lid completely.
If you spill any fuel on the painted surface,
rinse it off immediately. Otherwise, the
painted surface could be damaged. NOTE . You will see the “
”or “FUEL
DOOR” sign in the fuel gauge. This
indicates that the fuel filler door (lid) is
located on the right side of the vehicle.. If the fuel filler cap is not tightened
until it clicks or if the tether is caught
under the cap, the CHECK ENGINE
warning light may come on. Refer tothe “Warning and indicator lights ”
section located in chapter 3.
(Turbo model only) Promptly put fuel in
Page 203 of 364
7-6Starting and operating
CAUTION
Resultant vehicle damage due to
improper testing is not covered
under the SUBARU Limited War-
ranty and is the responsibility of
the state inspection program or its
contractors or licensees.
The EPA has issued regulations for
inspecting the On-Board Diagnostic
(OBD) system as part of the state emis-
sions inspection. The OBD system is
designed to detect engine and transmis-
sion problems that might cause vehicle
emissions to exceed allowable limits.
These inspections apply to all 1996 model
year and newer passenger cars and light
trucks. Over 30 states plus the District of
Columbia have implemented the OBD
system inspection. . The inspection of the OBD system
consists of a visual operational check of the “CHECK ENGINE ”warning light/mal-
function indicator lamp (MIL) and an
examination of the OBD system with an
electronic scan tool while the engine isrunning. . Avehicle
passes the OBD system
inspection if proper the “CHECK ENGINE ”
warning light/MIL illumination is observed,
there is nostored diagnostic trouble codes, and the OBD system readiness
monitors are complete. .
A vehicle
fails the OBD inspection if the
“ CHECK ENGINE ”warning light/MIL is
not properly operating or there are one or
more diagnostic trouble codes stored in
the vehicle ’s computer with the “CHECK
ENGINE ”warning light/MIL illuminated.
. A state emission inspection may reject
(not pass or fail) a vehicle if the number of
OBD system readiness monitors “Not
Ready ”is greater than one. Under this
condition, the vehicle operator should be
instructed to drive his/her vehicle for a few
days to set the monitors and return for an
emission re-inspection. . Owners of rejected or failing vehicles
should contact their SUBARU Dealer for service. Preparing to drive
You should perform the following checks
and adjustments every day before you
start driving.
1. Check that all windows, mirrors, and
lights are clean and unobstructed.
2. Check the appearance and condition
of the tires. Also check tires for properinflation.
3. Look under the vehicle for any sign of leaks.
4. Check that the hood, trunk (Sedan)
and rear gate (Wagon) are fully closed.
5. Check the adjustment of the seat.
6. Check the adjustment of the inside
and outside mirrors.
7. Fasten your seatbelt. Check that your
passengers have fastened their seatbelts.
8. Check the operation of the warning
and indicator lights when the ignition
switch is turned to the
“ON ”position.
9. Check the gauges, indicator and warn-
ing lights after starting the engine.
NOTE
Engine oil, engine coolant, brake fluid,
washer fluid and other fluid levels
should be checked daily, weekly or at
fuel stops.