2007 SUBARU FORESTER tow
[x] Cancel search: towPage 181 of 356

6
Interior equipment
Interior lights ...................................................... 6-2Dome light ............................................................... 6-2
Cargo area light ..................................................... 6-2
Map lights ........................................................... 6-3
Sun visors ........................................................... 6-3 Vanity mirror ........................................................... 6-3
Storage compartments ...................................... 6-4 Glove box ................................................................ 6-4
Center console ........................................................ 6-4
Overhead console .................................................. 6-6
Dashboard storage compartment ......................... 6-6
Convenience net ..................................................... 6-6
Pocket (if equipped) ............................................... 6-7
Cup holders ........................................................ 6-7 Front passenger’s cup holder ............................... 6-8
Rear passenger’s cup holder ................................ 6-8
Accessory power outlets ................................... 6-8 Use with a cigarette lighter (Canada only, if equipped) .................................. 6-10
Ashtray (Canada only, if equipped) .................. 6-11
Floor mat ............................................................. 6-12
Coat hook ............................................................ 6-12
Cargo area cover (if equipped) ......................... 6-13 Using the cover ....................................................... 6-13
To remove the cover housing ................................ 6-13
Stowage of the cover ............................................. 6-13
To install the cover housing .................................. 6-13
Shopping bag hook ............................................ 6-14 Cargo tie-down hooks ........................................ 6-14
Cargo area bars .................................................. 6-14
Under-floor storage compartment .................... 6-15
Page 185 of 356

Interior equipment 6-5
– CONTINUED –
To use as rear passenger’s cup holder:
With the console top tipped toward the
rear seat, it can be used as a cup holder.
To use as storage space:
Raise the console top to the vertical posi-
tion or tip it toward the rear seat. Then, pull
up the lock button of the console box and
open the lid.
When closed, the lid can be used as a tray
for placing small items in it.
Do not step or sit on the armrest,
and do not place heavy objects on it.
The armrest could break, and you
could get hurt.
600520�y
To switch from using the console
top as an armrest to using it as a
rear passenger’s cup holder, raise
the console top to the vertical po-
sition before tipping it toward the
rear seat. Otherwise the console
top may break.
�y Do not place any object weighing
more than 4.4 lbs (2 kg) on the ta- ble.
�y Do not have hot drinks or other
objects on the table while driving.
During hard braking or negotia-
tion of a curve, they could fall
from the table and cause a burn or
other injury.
�yBefore opening the lid of the con-
sole box, raise the console top
completely to the vertical position
or tip it toward the rear seat. Oth-
erwise, the lid may be damaged
and an injury may occur.
600475
Page 193 of 356

Interior equipment 6-13
Cargo area cover (if
equipped)
The cargo area cover is provided for cov-
ering the cargo area and to protect its con-
tents from direct sunlight. This cover is de-
tachable to make room for additional car-
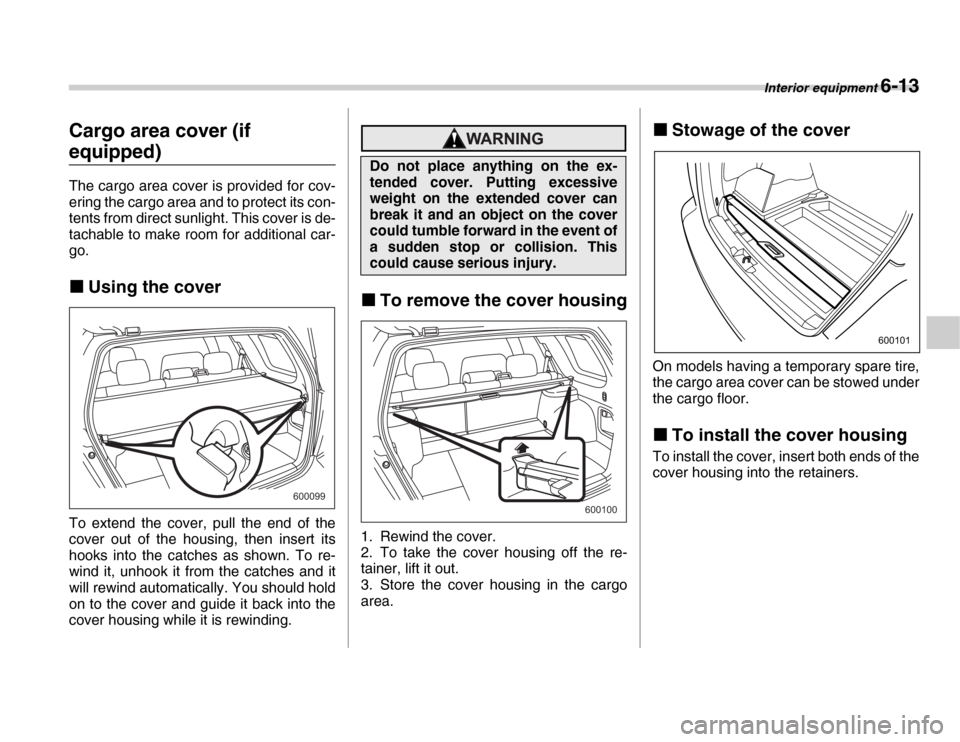
go. �„Using the cover
To extend the cover, pull the end of the
cover out of the housing, then insert its
hooks into the catches as shown. To re-
wind it, unhook it from the catches and it
will rewind automatically. You should hold
on to the cover and guide it back into the
cover housing while it is rewinding.
�„ To remove the cover housing
1. Rewind the cover.
2. To take the cover housing off the re-
tainer, lift it out.
3. Store the cover housing in the cargo
area. �„
Stowage of the cover
On models having a temporary spare tire,
the cargo area cover can be stowed under
the cargo floor. �„ To install the cover housing
To install the cover, insert both ends of the
cover housing into the retainers.
600099
Do not place anything on the ex-
tended cover. Putting excessive
weight on the extended cover can
break it and an object on the cover
could tumble forward in the event of
a sudden stop or collision. This
could cause serious injury.
600100
600101
Page 217 of 356

Starting and operating 7-19
– CONTINUED –
motion may therefore become somewhat
harder to control.
If the brake system warning light and ABS
warning light illuminate simultaneously,
take the following steps:
1. Stop the vehicle in the nearest safe, flat
place.
2. Shut down the engine, then restart it.
3. Release the parking brake. If both
warning lights go out, the EBD system
may be faulty.
Drive carefully to the nearest SUBARU
dealer and have the system inspected.
4. If both warning lights come on again
and stay illuminated after the engine has
been restarted, shut down the engine
again, apply the parking brake, and check
the brake fluid level.
5. If the brake fluid level is not below the
“MIN” mark, the EBD system may be
faulty. Drive carefully to the nearest
SUBARU dealer and have the system in-
spected.
6. If the brake fluid level is below the
“MIN” mark, DO NOT drive the vehicle. In-
stead, have the vehicle towed to the near-
est SUBARU dealer for repair.
Parking your vehicle
�y
Driving with the brake system
warning light on is dangerous.
This indicates your brake system
may not be working properly. If
the light remains on, have the
brakes inspected by a SUBARU
dealer immediately.
�yIf at all in doubt about whether the
brakes are operating properly, do
not drive the vehicle. Have your
vehicle towed to the nearest SUB-
ARU dealer for repair.
�yNever leave unattended children
or pets in the vehicle. They could
accidentally injure themselves or
others through inadvertent opera-
tion of the vehicle. Also, on hot or
sunny days, the temperature in a
closed vehicle could quickly be-
come high enough to cause se-
vere or possibly fatal injuries to
people.
�yDo not park the vehicle over flam-
mable materials such as dry
grass, waste paper or rags, as
they may burn easily if they come
near hot engine or exhaust sys-
tem parts.
�yBe sure to stop the engine if you
take a nap in the vehicle. If engine
exhaust gas enters the passenger
compartment, occupants in the
vehicle could die from carbon
monoxide (CO) contained in the
exhaust gas.
Page 225 of 356

8
Driving tips
New vehicle break-in driving – the first 1,000 miles (1,600 km) .................................... 8-2
Fuel economy hints ........................................... 8-2
Engine exhaust gas (Carbon monoxide) ........ 8-2
Catalytic converter ............................................. 8-3
Periodic inspections .......................................... 8-4
Driving in foreign countries .............................. 8-4
Driving tips for AWD vehicles ........................... 8-5
Off road driving .................................................. 8-6
Winter driving ..................................................... 8-7 Operation during cold weather .............................. 8-7
Driving on snowy and icy roads ............................ 8-9
Corrosion protection .............................................. 8-10
Snow tires ............................................................... 8-10
Tire chains ............................................................... 8-10
Rocking the vehicle ................................................ 8-11
Loading your vehicle ......................................... 8-11 Vehicle capacity weight ......................................... 8-12
GVWR and GAWR (Gross Vehicle Weight Rating and Gross Axle Weight Rating) ........................... 8-12
Roof rail and crossbar (if equipped) ..................... 8-13
Trailer hitch (if equipped) .................................. 8-16 Connecting a trailer ................................................ 8-16
When you do not tow a trailer ............................... 8-17
Trailer towing ...................................................... 8-18 Warranties and maintenance ................................. 8-18
Maximum load limits .............................................. 8-18 Trailer hitches ......................................................... 8-21
Connecting a trailer ................................................ 8-22
Trailer towing tips ................................................... 8-23
Page 229 of 356

Driving tips 8-5
Driving tips for AWD vehicles
All-Wheel Drive distributes the engine
power to all four wheels. AWD vehiclesprovide better traction when driving on
slippery, wet or snow-covered roads and
when moving out of mud, dirt and sand. By
shifting power between the front and rear
wheels, SUBARU AWD can also provide
added traction during acceleration and
added engine braking force during decel-
eration.
Therefore, your SUBARU AWD vehicle
may handle differently than an ordinary
two wheel drive vehicle and it contains
some features unique to AWD. For safety
purposes as well as to avoid damaging
the AWD system, you should keep the fol-
lowing tips in mind: �y
An AWD vehicle is better able to climb
steeper roads under snowy or slippery
conditions than a two wheel drive vehicle.
There is little difference in handling, how-
ever, during extremely sharp turns or sud-
den braking. Therefore, when driving
down a slope or turning corners, be sure
to reduce your speed and maintain an am-
ple distance from other vehicles. �y When replacing a tire, make sure you
use only the same size, construction,
brand, and load range as the original tires
listed on the tire placard. Using other sizes
or construction may result in severe me-
chanical damage to the drive train of your
vehicle and may affect ride, handling, braking, speedometer/odometer calibra-
tion, and clearance between the body and
tires. It also may be dangerous and lead to
loss of vehicle control. �y
Always check the cold tire pressure be-
fore starting to drive. The recommended
tire pressure is provided on the tire plac-
ard, which is located under the door latch
on the driver’s side. �y Tire chains should always be placed on
the front wheels only. �y There are some precautions that you
must observe when towing your vehicle.
For detail information, see the “Towing”
section in chapter 9.
�y Always maintain a safe driving
speed according to the road and
weather conditions in order to
avoid having an accident on a
sharp turn, during sudden braking
or under other similar conditions.
�yAlways use the utmost care in
driving – overconfidence because
you are driving an All-Wheel Drive
vehicle could easily lead to a seri-
ous accident.
800004
Page 230 of 356

8-6 Driving tips
Off road driving
Because of the AWD feature and higher
ground clearance, your SUBARU can be
driven on ordinary roads or off-road. But
please keep in mind that an AWD SUBA-
RU is a passenger car and is neither a
conventional off-road vehicle nor an all-
terrain vehicle. If you do take your SUBA-
RU off-road, certain common sense pre-
cautions such as the following should be
taken: �yMake certain that you and all of your
passengers are wearing seatbelts. �y Carry some emergency equipment,
such as a towing rope or chain, a shovel,
wheel blocks, first aid kit and cell phone or citizens band radio. �y
Drive carefully. Do not take unneces-
sary risks by driving in dangerous areas or
over rough terrain. �y Slow down and employ extra caution at
all times. When driving off-road, you will
not have the benefit of marked traffic
lanes, banked curves, traffic signs and the
like. �y Do not drive across steep slopes. In-
stead, drive either straight up or straight
down the slopes. A vehicle can much
more easily tip over sideways than it can
end over end. Avoid driving straight up or
down slopes that are too steep. �y Avoid sharp turning maneuvers, espe-
cially at higher speeds. �y Do not grip the inside or spokes of the
steering wheel. A bad bump could jerk the
wheel and injure your hands. Instead drive
with your fingers and thumbs on the out-
side of the rim. �y If driving through water, such as when
crossing shallow streams, first check the
depth of the water and the bottom of the
stream bed for firmness and ensure that
the bed of the stream is flat. Drive slowly
and completely through the stream. The
water should be shallow enough that it
does not reach the vehicle’s undercar-
riage. Water entering the engine air intake
or the exhaust pipe or water splashing onto electrical parts may damage your ve-
hicle and may cause it to stall. Never at-
tempt to drive through rushing water; re-
gardless of its depth, it can wash away the
ground from under your tires, resulting in
possible loss of traction and even vehicle
rollover. �y
Always check your brakes for effective-
ness immediately after driving in sand,
mud or water. Do this by driving slowly
and stepping on the brake pedal. Repeat
that process several times to dry out the
brake discs and brake pads. �y Do not drive or park over or near flam-
mable materials such as dry grass or fall-
en leaves, as they may burn easily. The
exhaust system is very hot while the en-
gine is running and right after the engine
stops. This could create a fire hazard. �y After driving through tall grass, mud,
rocks, sand, rivers, etc., check that there
is no grass, bush, paper, rags, stones,
sand, etc. adhering to or trapped on the
underbody. Clear off any such matter from
the underbody. If the vehicle is used with
these materials trapped or adhering to the
underbody, a mechanical breakdown or
fire could occur. �y Secure all cargo carried inside the vehi-
cle and make certain that it is not piled
higher than the seatbacks. During sudden
stops or jolts, unsecured cargo could be
�y Always maintain a safe driving
speed according to the road and
weather conditions in order to
avoid having an accident on a
sharp turn, during sudden braking
or under other similar conditions.
�yAlways use the utmost care in
driving – overconfidence because
you are driving an All-Wheel Drive
vehicle could easily lead to a seri-
ous accident.
Page 239 of 356

Driving tips 8-15
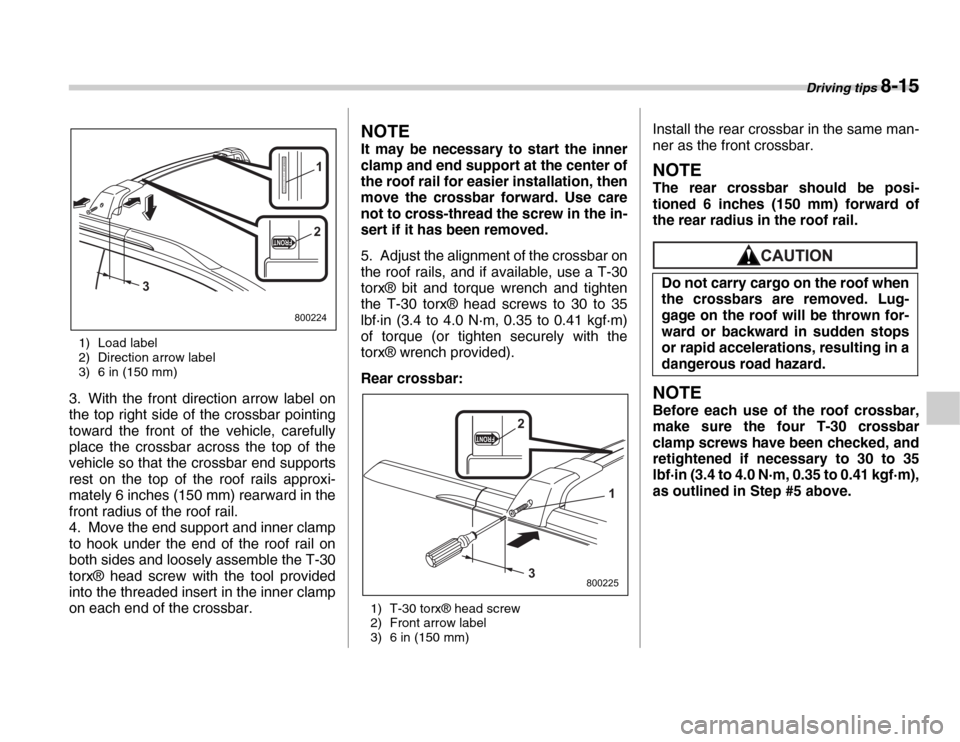
1) Load label
2) Direction arrow label
3) 6 in (150 mm)
3. With the front direction arrow label on
the top right side of the crossbar pointing
toward the front of the vehicle, carefully
place the crossbar across the top of the
vehicle so that the crossbar end supports
rest on the top of the roof rails approxi-
mately 6 inches (150 mm) rearward in the
front radius of the roof rail.
4. Move the end support and inner clamp
to hook under the end of the roof rail on
both sides and loosely assemble the T-30
torx® head screw with the tool provided
into the threaded insert in the inner clamp
on each end of the crossbar.
NOTE
It may be necessary to start the inner
clamp and end support at the center of
the roof rail for easier installation, then
move the crossbar forward. Use care
not to cross-thread the screw in the in-
sert if it has been removed.
5. Adjust the alignment of the crossbar on
the roof rails, and if available, use a T-30
torx® bit and torque wrench and tighten
the T-30 torx® head screws to 30 to 35
lbf·in (3.4 to 4.0 N·m, 0.35 to 0.41 kgf·m)
of torque (or tighten securely with the
torx® wrench provided).
Rear crossbar:
1) T-30 torx® head screw
2) Front arrow label
3) 6 in (150 mm) Install the rear crossbar in the same man-
ner as the front crossbar.
NOTE
The rear crossbar should be posi-
tioned 6 inches (150 mm) forward of
the rear radius in the roof rail.
NOTE
Before each use of the roof crossbar,
make sure the four T-30 crossbar
clamp screws have been checked, and
retightened if necessary to 30 to 35
lbf