2007 SUBARU FORESTER airbag
[x] Cancel search: airbagPage 39 of 356
Seat, seatbelt and SRS airbags 1-11
– CONTINUED –
Your vehicle is equipped with a crash
sensing and diagnostic module, which will
record the use of the seatbelt(s) by the
driver and/or front passenger when any of
the SRS frontal and side airbags deploys. �T
Infants or small children
Use a child restraint system that is suit-
able for your vehicle. See information on
“Child restraint systems” in this chapter. �T Children
If a child is too big for a child restraint sys-
tem, the child should sit in the rear seat
and be restrained using the seatbelts. Ac- cording to accident statistics, children are
safer when properly restrained in the rear
seating positions than in the front seating
positions. Never allow a child to stand up
or kneel on the seat.
If the shoulder portion of the belt crosses
the face or neck, adjust the shoulder belt
anchor height (window-side seating posi-
tions only) and then if necessary move the
child closer to the belt buckle to help pro-
vide a good shoulder belt fit. Care must be
taken to securely place the lap belt as low
as possible on the hips and not on the
child’s waist. If the shoulder portion of the
belt cannot be properly positioned, a child
restraint system should be used. Never
place the shoulder belt under the child’s
arm or behind the child’s back.
�T
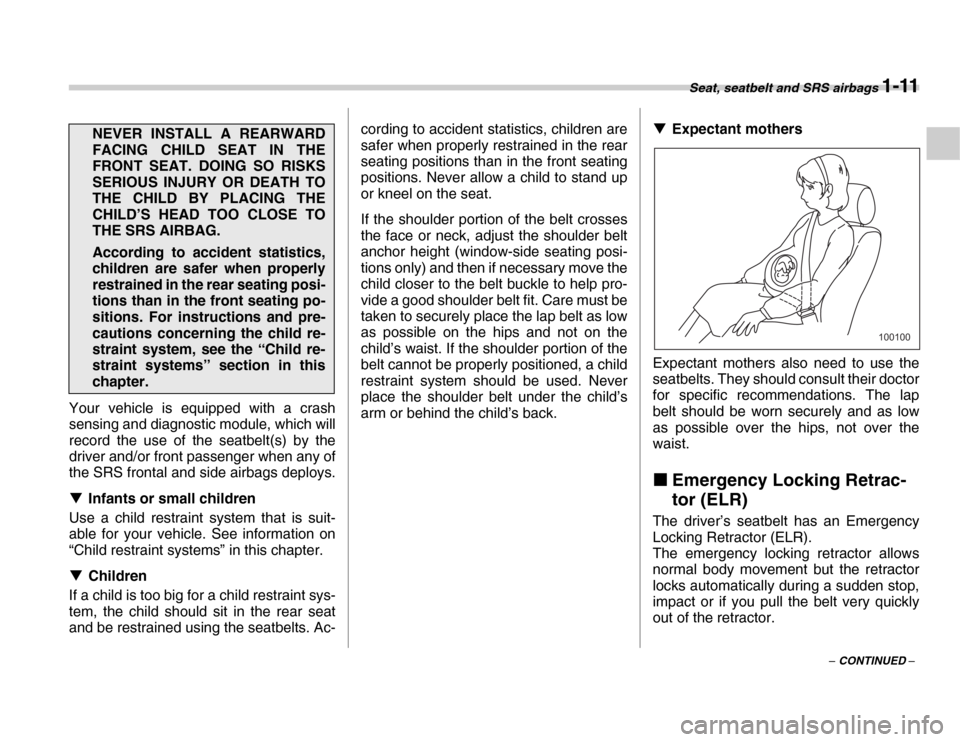
Expectant mothers
Expectant mothers also need to use the
seatbelts. They should consult their doctor
for specific recommendations. The lap
belt should be worn securely and as low
as possible over the hips, not over the
waist. �„ Emergency Locking Retrac-
tor (ELR)
The driver’s seatbelt has an Emergency
Locking Retractor (ELR).
The emergency locking retractor allows
normal body movement but the retractor
locks automatically during a sudden stop,
impact or if you pull the belt very quickly
out of the retractor.
NEVER INSTALL A REARWARD
FACING CHILD SEAT IN THE
FRONT SEAT. DOING SO RISKS
SERIOUS INJURY OR DEATH TO
THE CHILD BY PLACING THE
CHILD’S HEAD TOO CLOSE TOTHE SRS AIRBAG.
According to accident statistics,
children are safer when properly
restrained in the rear seating posi-
tions than in the front seating po-
sitions. For instructions and pre-
cautions concerning the child re-
straint system, see the “Child re-
straint systems” section in this
chapter.
100100
Page 40 of 356

1-12 Seat, seatbelt and SRS airbags
�„Automatic/Emergency Lock-
ing Retractor (A/ELR)
Each passenger’s seatbelt has an Auto-
matic/Emergency Locking Retractor (A/
ELR). The Automatic/Emergency Locking
Retractor normally functions as an Emer-
gency Locking Retractor (ELR). The A/
ELR has an additional locking mode “Au-
tomatic Locking Retractor (ALR) mode” in-
tended to secure a child restraint system.
When the seatbelt is once drawn out com-
pletely and is then retracted even slightly,
the retractor locks the seatbelt in that po-
sition and the seatbelt cannot be extend-
ed. As the belt is rewinding, clicks will be
heard which indicate the retractor func-
tions as an ALR. When the seatbelt is re-
tracted fully, the ALR mode is released.
When securing a child restraint system on
the rear seats by the use of the seatbelt,
the seatbelt must be changed over to the
Automatic Locking Retractor (ALR) mode.
When the child restraint system is re-
moved, make sure that the seatbelt re-
tracts fully and the retractor returned to
the Emergency Locking Retractor (ELR)
mode.
For instructions on how to convert the re-
tractor to the ALR mode and restore it to
the ELR mode, see the “Child restraint systems” section in this chapter.
�„ Seatbelt warning light
and chime
Your vehicle is equipped with a seatbelt
warning device at the driver’s seat, as re-
quired by current safety standards. There
is a seatbelt warning light in the combina-
tion meter.
If the driver has not yet fastened the seat-
belt when the ignition switch is turned to
the “ON” position, the seatbelt warning
light will flash for 6 seconds, to warn that
the seatbelt is unfastened. If the driver’s
seatbelt is not fastened, a chime will also
sound simultaneously.
If the driver’s seatbelt is still not fastened
6 seconds later, the warning light will re-
main lit for 15 seconds. If the driver’s seat-
belt is still not fastened even 15 seconds
later (21 seconds after turning ON the ig-
nition switch), the warning lights will alter-
nate between flashing and steady illumi-
nation at 15-second intervals, and the
chime will sound while the warning light is
flashing.
Alternate flashing and steady illumination
of the warning lights and sounding of the
chime will continue until the driver fastens
the seatbelt.NOTE �y If the driver unfastens the seatbelt af-
ter fastening, the seatbelt warning de-
vice operates as follows according to
the vehicle speed. �y At speeds lower than approximate-
ly 9 mph (15 km/h)
The warning light will alternate be-
tween flashing and steady illumina-
tion at 15-second intervals. The
chime will not sound. �y At speeds higher than approxi-
mately 9 mph (15 km/h)
The warning light will alternate be-
tween flashing and steady illumina-
tion at 15-second intervals and the
chime will sound while the warning
light is flashing.
�y It is possible to cancel the warning
operation that follows the 6-second
warning after turning ON the ignition
switch. When the ignition switch is
turned ON next time, however, the
complete sequence of warning opera-
tion resumes. For further details about
canceling the warning operation,
please contact your SUBARU dealer.
Page 41 of 356
Seat, seatbelt and SRS airbags 1-13
– CONTINUED –
�„
Fastening the seatbelt
�TFront seatbelts
1. Adjust the seat position:
Driver’s seat: Adjust the seatback to the
upright position. Move the seat as far from
the steering wheel as practical while still
maintaining full vehicle control.
Front passenger’s seat: Adjust the seat-
back to the upright position. Move the seat
as far back as possible.
2. Sit well back in the seat.
3. Pick up the tongue plate and pull the
belt out slowly. Do not let it get twisted. If
the belt stops before reaching the buckle,
return the belt slightly and pull it out more
slowly. If the belt still cannot be unlocked,
let the belt retract slightly after giving it a
strong pull, then pull it out slowly again.
�y Never use a belt that is twisted or
reversed. In an accident, this can
increase the risk or severity of in- jury.
�yKeep the lap belt as low as possi-
ble on your hips. In a collision,
this spreads the force of the lap
belt over stronger hip bones in-
stead of across the weaker abdo-
men.
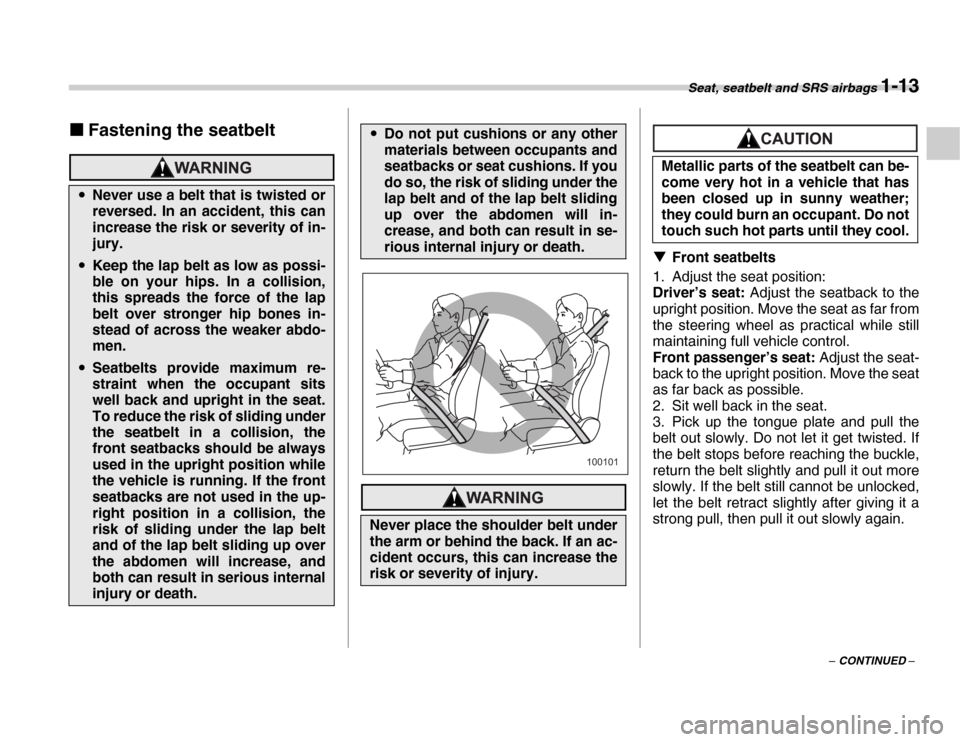
�ySeatbelts provide maximum re-
straint when the occupant sits
well back and upright in the seat.
To reduce the risk of sliding under
the seatbelt in a collision, the
front seatbacks should be always
used in the upright position while
the vehicle is running. If the front
seatbacks are not used in the up-
right position in a collision, the
risk of sliding under the lap belt
and of the lap belt sliding up over
the abdomen will increase, and
both can result in serious internal
injury or death.
�y Do not put cushions or any other
materials between occupants and
seatbacks or seat cushions. If you
do so, the risk of sliding under the
lap belt and of the lap belt sliding
up over the abdomen will in-
crease, and both can result in se-
rious internal injury or death.
Never place the shoulder belt under
the arm or behind the back. If an ac-
cident occurs, this can increase the
risk or severity of injury.
100101
Metallic parts of the seatbelt can be-
come very hot in a vehicle that has
been closed up in sunny weather;
they could burn an occupant. Do not
touch such hot parts until they cool.
Page 42 of 356
1-14 Seat, seatbelt and SRS airbags
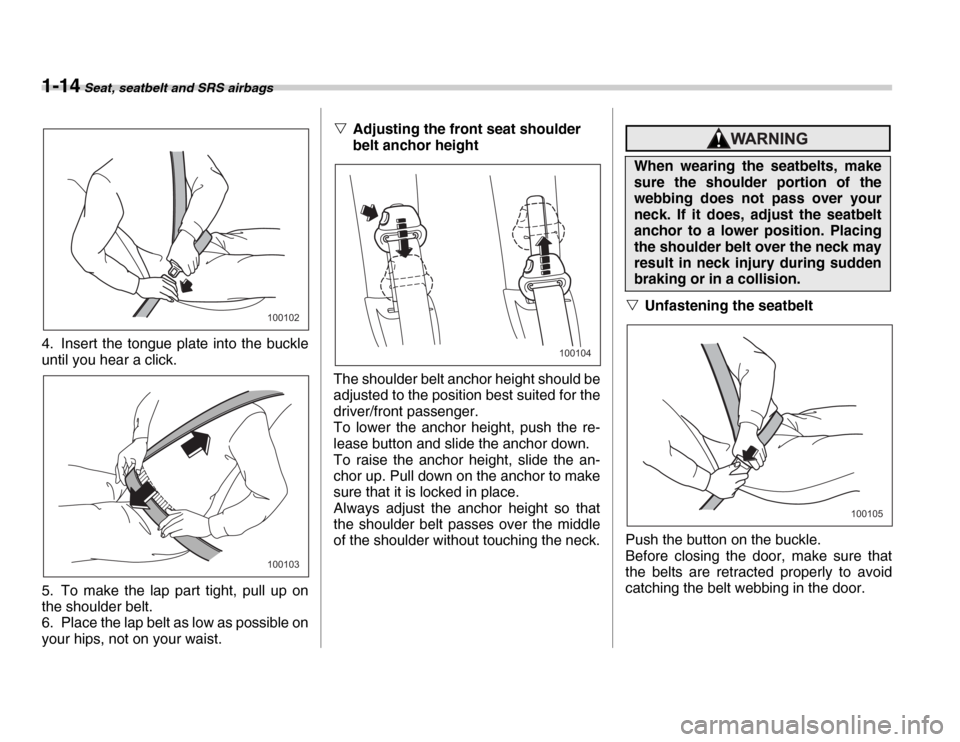
4. Insert the tongue plate into the buckle
until you hear a click.
5. To make the lap part tight, pull up on
the shoulder belt.
6. Place the lap belt as low as possible on
your hips, not on your waist.�V
Adjusting the front seat shoulder
belt anchor height
The shoulder belt anchor height should be
adjusted to the position best suited for the
driver/front passenger.
To lower the anchor height, push the re-
lease button and slide the anchor down.
To raise the anchor height, slide the an-
chor up. Pull down on the anchor to make
sure that it is locked in place.
Always adjust the anchor height so that
the shoulder belt passes over the middle
of the shoulder without touching the neck.
�V Unfastening the seatbelt
Push the button on the buckle.
Before closing the door, make sure that
the belts are retracted properly to avoid
catching the belt webbing in the door.100102
100103
100104
When wearing the seatbelts, make
sure the shoulder portion of the
webbing does not pass over your
neck. If it does, adjust the seatbelt
anchor to a lower position. Placing
the shoulder belt over the neck may
result in neck injury during sudden
braking or in a collision.
100105
Page 43 of 356
Seat, seatbelt and SRS airbags 1-15
– CONTINUED –
�T
Rear seatbelts (except rear center
seatbelt)
1. Sit well back in the seat.
2. Pick up the tongue plate and pull the
belt out slowly. Do not let it get twisted. If
the belt stops before reaching the buckle,
return the belt slightly and pull it out more
slowly. If the belt still cannot be unlocked,
let the belt retract slightly after giving a
strong pull on it, then pull it out slowly
again.
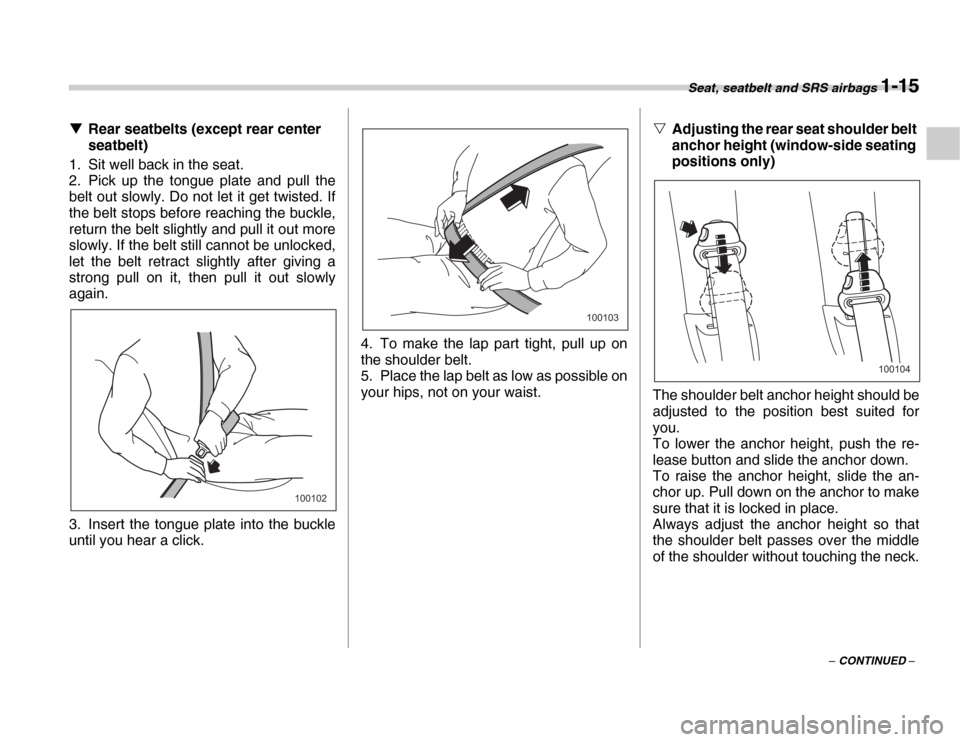
3. Insert the tongue plate into the buckle
until you hear a click. 4. To make the lap part tight, pull up on
the shoulder belt.
5. Place the lap belt as low as possible on
your hips, not on your waist. �V
Adjusting the rear seat shoulder belt
anchor height (window-side seating
positions only)
The shoulder belt anchor height should be
adjusted to the position best suited for
you.
To lower the anchor height, push the re-
lease button and slide the anchor down.
To raise the anchor height, slide the an-
chor up. Pull down on the anchor to make
sure that it is locked in place.
Always adjust the anchor height so that
the shoulder belt passes over the middle
of the shoulder without touching the neck.
100102
100103
100104
Page 44 of 356

1-16 Seat, seatbelt and SRS airbags
�VUnfastening the seatbelt
Push the button on the buckle.
Before closing the door, make sure that
the belts are retracted properly to avoid
catching the belt webbing in the door. �T
Rear center seatbelt
1) Center seatbelt tongue plate
2) Connector (tongue)
3) Connector (buckle)
4) Center seatbelt buckle
When wearing the seatbelts, make
sure the shoulder portion of the
webbing does not pass over your
neck. If it does, adjust the seatbelt
anchor to a lower position. Placing
the shoulder belt over the neck may
result in neck injury during sudden
braking or in a collision.
100105
1 2
3 4
100603
100108
Fastening the seatbelt with the web-
bing twisted can increase the risk or
severity of injury in an accident.
When fastening the belt after it is
pulled out from the retractor, espe-
cially when inserting the connec-
tor’s tongue plate into the mating
buckle (on right-hand side), always
check that the webbing is not twist-
ed.
100109
Page 45 of 356

Seat, seatbelt and SRS airbags 1-17
– CONTINUED –
0
Rear center seatbelt is stowed in the re-
cess of the ceiling.
1. Remove the connector (tongue) plate
from the slot located at the front of the re-
cess by pulling the connector (tongue)plate rearward.
2. Pull out the seatbelt slowly from the
overhead retractor.
1) Seatbelt comfort guide
3. Pass the seatbelt through the seatbelt comfort guide located beside the head re-
straint.
4. After confirming that the webbing is not
twisted, insert the connector (tongue) at-
tached at the webbing end into the buckle
on the right-hand side until a click is heard.
If the belt stops before reaching the buck-
le, return the belt slightly and pull it out
more slowly. If the belt still cannot be un-
locked, let the belt retract slightly after giv-
ing it a strong pull, then pull it out slowly
again.
Be sure to fasten both tongue plates
to the respective buckles. If the
seatbelt is used only as a shoulder
belt (with the connector’s tongue
plate not fastened to the connec-
tor’s buckle on the right-hand side),
it cannot properly restrain the wear-
er in position in an accident, possi-
bly resulting in serious injury or
death.
100110
100111
1
100604
100113
Page 46 of 356
1-18 Seat, seatbelt and SRS airbags
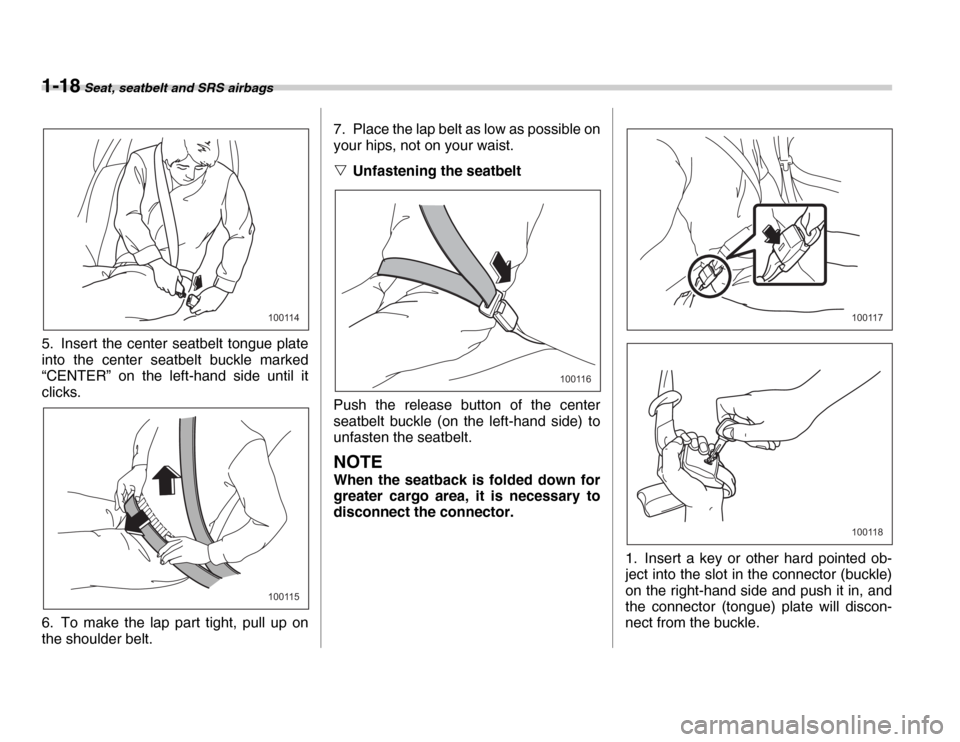
5. Insert the center seatbelt tongue plate
into the center seatbelt buckle marked
“CENTER” on the left-hand side until it
clicks.
6. To make the lap part tight, pull up on
the shoulder belt.7. Place the lap belt as low as possible on
your hips, not on your waist. �V
Unfastening the seatbelt
Push the release button of the center
seatbelt buckle (on the left-hand side) to
unfasten the seatbelt.
NOTE
When the seatback is folded down for
greater cargo area, it is necessary to
disconnect the connector.
0
1. Insert a key or other hard pointed ob-
ject into the slot in the connector (buckle)
on the right-hand side and push it in, and
the connector (tongue) plate will discon-
nect from the buckle.
100114
100115
100116
100117
100118