Page 311 of 356
Maintenance and service 11 - 39
– CONTINUED –
1) Plastic support
4. Pull out the end of the blade rubber as-
sembly to unlock it from the plastic sup-
port.
5. Pull the blade rubber assembly out of the plastic support.
1) Metal spines
6. If the new blade rubber is not provided
with two metal spines, remove the metal
spines from the old blade rubber and in-
stall them in the new blade rubber. 7. Align the claws of the plastic support
with the grooves in the blade rubber as-
sembly, then slide the blade rubber as-
sembly into place.
Securely lock the end of the plastic sup-
port as shown in the illustration. If the rub-
1
B00381
B00064
1
B00333
B00066
B00067
Page 312 of 356

11 - 4 0 Maintenance and service
ber is not retained properly, the wiper may
scratch the rear window glass.
8. Install the wiper blade assembly to the
wiper arm. Make sure that it locks in place.
9. Lower the wiper arm.Battery
�yBefore beginning work on or near
any battery, be sure to extinguish
all cigarettes, matches, and light-
ers. Never expose a battery to an
open flame or electric sparks. Bat-
teries give off a gas which is high-
ly flammable and explosive.
�yFor safety, in case an explosion
does occur, wear eye protection
or shield your eyes when working
near any battery. Never lean over
a battery.
�yDo not let battery fluid contact
eyes, skin, fabrics, or paint be-
cause battery fluid is a corrosive
acid. If battery fluid gets on your
skin or in your eyes, immediately
flush the area with water thor-
oughly. Seek medical help imme-
diately if acid has entered the
eyes.
If battery fluid is accidentally
swallowed, immediately drink a
large amount of milk or water, and
seek medical attention immediate-
ly.
�yTo lessen the risk of sparks, re-
move rings, metal watchbands,
and other metal jewelry. Never al-
low metal tools to contact the pos-
itive battery terminal and anything
connected to it WHILE you are at
the same time in contact with any
other metallic portion of the vehi-
cle because a short circuit will re-
sult.
�yKeep everyone including children
away from the battery.
�yCharge the battery in a well-venti-
lated area.
�yBattery posts, terminals and relat-
ed accessories contain lead and
lead compounds, chemicals
known to the State of California to
cause cancer and reproductive
harm. Batteries also contain other
chemicals known to the State of
California to cause cancer. Wash
hands after handling.
Never use more than 10 amperes
when charging the battery because
it will shorten battery life.
Page 314 of 356

11 - 4 2 Maintenance and service
in the main fuse box cover in the engine
compartment.1) Good
2) Blown
If any lights, accessories or other electri-
cal controls do not operate, inspect the
corresponding fuse. If a fuse has blown,
replace it.
1. Turn the ignition switch to the “LOCK”
position and turn off all electrical accesso-
ries.
2. Remove the cover.
3. Determine which fuse may be blown.
The back side of each fuse box cover and
the “Fuses and circuits” section in chapter
12 in this manual show the circuit for each
fuse. 4. Pull out the fuse with the fuse puller.
5. Inspect the fuse. If it has blown, re-
place it with a spare fuse of the same rat-
ing.
6. If the same fuse blows again, this indi-
cates that its system has a problem. Con-
tact your SUBARU dealer for repairs.Main fuse
Main fuse box
The main fuses are designed to melt dur-
ing an overload to prevent damage to the
wiring harness and electrical equipment.
Check the main fuses if any electrical
component fails to operate (except the
starter motor) and other fuses are good. A
melted main fuse must be replaced. Use
only replacements with the same speci-
fied rating as the melted main fuse. If a
main fuse blows after it is replaced, have
the electrical system checked by your
nearest SUBARU dealer.
12
B00338
600160
600444
Page 318 of 356

11 - 4 6 Maintenance and service
�„Headlights (Except Canada-
spec. 2.5XT)
NOTE
�y If headlight aiming is required, con-
sult your SUBARU dealer for proper
adjustment of the headlight aim. �y It may be difficult to replace the
bulbs. Have your SUBARU dealer re-
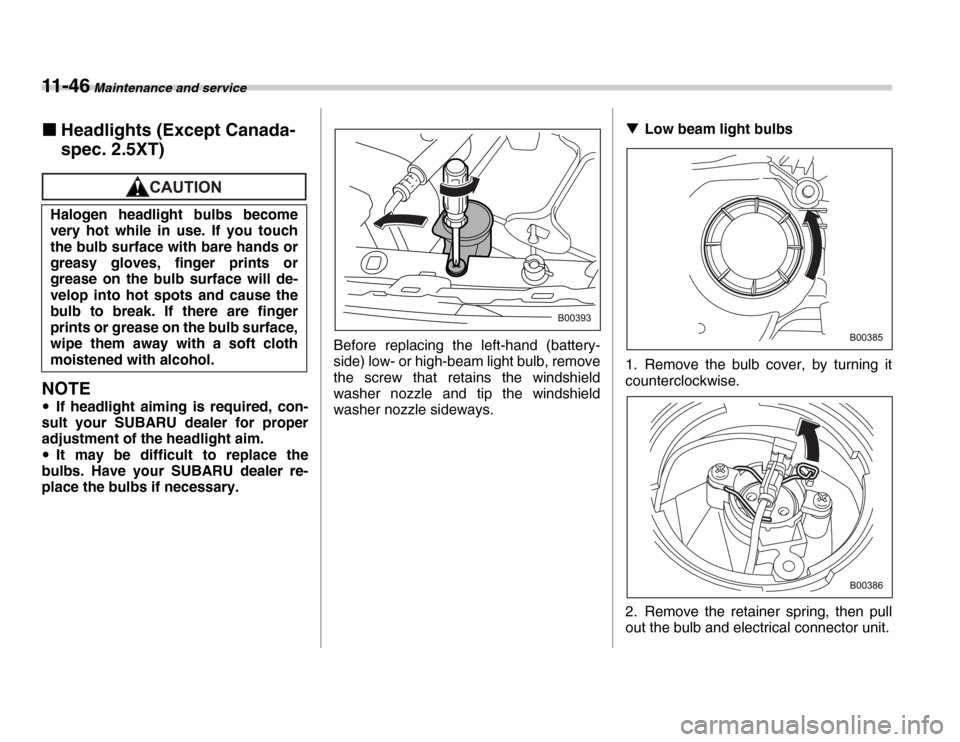
place the bulbs if necessary. Before replacing the left-hand (battery-
side) low- or high-beam light bulb, remove
the screw that retains the windshield
washer nozzle and tip the windshield
washer nozzle sideways. �T
Low beam light bulbs
1. Remove the bulb cover, by turning it
counterclockwise.
2. Remove the retainer spring, then pull
out the bulb and electrical connector unit.
Halogen headlight bulbs become
very hot while in use. If you touch
the bulb surface with bare hands or
greasy gloves, finger prints or
grease on the bulb surface will de-
velop into hot spots and cause the
bulb to break. If there are finger
prints or grease on the bulb surface,
wipe them away with a soft cloth
moistened with alcohol.
B00393
B00385
B00386
Page 319 of 356
Maintenance and service 11 - 47
– CONTINUED –
3. Disconnect the electrical connector
from the bulb.
4. Install a new bulb into the electrical
connector, then set the retainer spring se-
curely.
5. Install the bulb cover.
�T
High beam light bulbs
1. Disconnect the electrical connector
from the bulb.
2. Remove the bulb from the headlight
assembly by turning it counterclockwise. 3. Replace the bulb with new one.
4. Reconnect the electrical connector. At
this time, use care not to touch the bulb
surface.
5. To install the bulb to the headlight as-
sembly, turn it clockwise until it clicks. �„
Rear combination lights
1. Remove the upper and lower screws.
Then, slide the rear combination lamp as-
sembly to the rear and remove it from the
vehicle.
B00387
700093
B00388
B00389
Page 320 of 356
11 - 4 8 Maintenance and service
1) Tail/stop light
2) Backup light
3) Rear turn signal light
4) Tail/stop light
2. Remove the bulb holder from the rear
combination light assembly by turning it
counterclockwise.
3. Pull the bulb from the holder. Install a
new bulb.
4. Set the bulb holder into the rear combi-
nation light assembly and turn it clockwise
until it locks.
5. Reinstall the rear combination light as-
sembly. �„
License plate light
0
1. Remove the mounting screws using a
Phillips screwdriver.
2. Remove the cover and lens.
3. Pull the bulb out of the socket. Install a
new bulb.
4. Reinstall the lens and cover.
5. Tighten the mounting screws. �„
Dome light and map light
Dome light
Map light
1. Remove the lens by prying the edge of
1
2
3
4B00390
B00391B00090
B00091
Page 328 of 356
12-6 Specifications
Fuses and circuits �„Fuse panel located behind the instrument pan- el
1 234 56
7891 01112
14
13 15 16 17 18 19
20 21 22 23
C00000
Fuse panelFuse ratingCircuit
115A�yHeater fan
215A�yHeater fan
315A�yPower door lock
�y Remote keyless entry
415A�yPower outlet (front)
�y Remote controlled rear view mirrors
510A�yTail light
�y Parking light
615A�ySRS airbag
715A�yFog light
830A�yABS
915A�yRadio
1010A
Page 330 of 356
12-8 Specifications
�„Fuse panel located in the engine compartment
A) FWD socket
B) Main fuse
A 12 4
3 B
5
6 789
10 11 12 13
C00105
14
Fuse panelFuse ratingCircuit
130A�y
Radiator cooling fan (Main)
230A�yRadiator cooling fan (Sub)
330A�yABS motor
430A�yEngine sensor (Non-turbo models only)
520A�yRear window defogger
615A�yHazard warning flasher
�y Horn
715A�yTurn signal lights
810A�yAutomatic transmission control unit
910A�yAlternator
1015A�yHeadlight (right side)
1115A�yHeadlight (left side)
1220A�yLighting switch
1315A�yClock
�y Interior light
1410A�ySecondary air combination valve
(Turbo models only)