Page 9 of 64

Quick Reference Guide
6After turning the equipment on, the sound source previously active is
selected. The equipment will be switched off if the ignition is turned off. It is
possible to turn the equipment on when the ignition is off. It will be switched
off automatically after an hour to stop the vehicle battery from running down.
If no CD is inserted in the reader, the message Insert the navigation CD will
be displayed after the pin has been entered pressing .
If you do not wish to use the navigation system immediately, you can still
select a different audio source by pressing the appropriate button. Unit card
The code number is printed on a unit card together with the serial number.
This card can be found at the front of the vehicle wallet.
The unit card must be kept in a safe
place - under no circumstances in the
vehicle! Without the code, the unit be useless to unauthorized persons.
Note
If the code is introduced incorrectly twice, the equipment will remain locked
for one hour ( System locked on the screen). After, the correct code may be
entered. The equipment must re main on during this time.
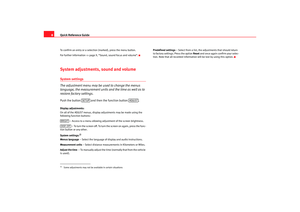
Handling the menusThe menu button may be used to access nearly all of the functions and to adjust them.
OK
Fig. 3 Example
RNS MP3_ingles Seite 6 Mittwoch, 10. Mai 2006 7:52 19
Page 10 of 64

Quick Reference Guide7
Press the button ⇒ page 3, fig. 1 to access the sound adjust-
ment menu, for example.
Select an option from the menu
– Rotate the menus button until the option desired is marked by both an upper and lower bar ⇒page 6, fig. 3 .
To select an option from the menu
– Mark the option desired and then press the menus button.
To activate or deactivate a menu option
– If an option from the menu has been selected then after the symbol
appears, a box appears when the menu button is
pressed allowing activation or deactivation of the option by
rotating and pushing the menu button. Adjusting a value
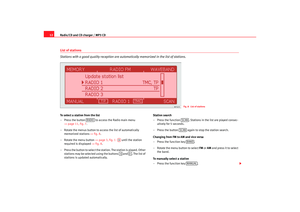
– Rotate the menu button until the desired value is reached
⇒fig. 4.
– Press the menu button to activate the chosen value.
The vertical bar (“Selection bar”) ⇒page 6, fig. 3 indicates that more
options may be displayed when the bar is moved downwards.
The menu options between brackets are not available (for example [Fader]
⇒ page 6, fig. 3 in vehicle not equipped with rear loudspeakers).
The option with the symbol
has a submenu ⇒ page 9, fig. 6.
The symbol
with the option indicates the current selection (for example, the
radio station selected) ⇒page 12, fig. 8.
Some functions can only be activated or deactivated. A filled box behind the
entry indicates that the function is activated, an “empty” box indicates that
the function is deactivated. To activate or deactivate functions, press on the
menu button.
Fig. 4 Adjust values
A6
AA
AB
RNS MP3_ingles Seite 7 Mittwoch, 10. Mai 2006 7:52 19
Page 11 of 64
, press the menu button.
For further information ⇒page 9, “Sound, sound focus and volume”.System adjustments, sound and volume")
Quick Reference Guide
8To confirm an entry or a selection (marked), press the menu button.
For further information ⇒page 9, “Sound, sound focus and volume”.System adjustments, sound and volumeSystem settings
The adjustment menu may be used to change the menus
language, the measurement units and the time as well as to
restore factory settings.Push the button and then the function button .Display adjustments:
On all of the ADJUST menus, display adjustments may be made using the
following function buttons:
– Access to a menu allowing adjustment of the screen brightness. – To turn the screen off. To turn the screen on again, press the func-
tion button or any other.
System settings:
1)
Menus language – Select the language of display and audio instructions.
Measurement units – Select distance measuremen ts in Kilometers or Miles.
Adjust the time – To manually adjust the time ( normall y that fro m the vehicle
is used). Predefined settings
– Select from a list, the adjustments that should return
to factory settings. Press the option Reset and once again confirm your selec-
tion. Note that all recorded informat ion will be lost by using this option.1)Some adjustments may not be available in certain situations
SETUP
ADJUST
BRIGHTDISP. OFF
RNS MP3_ingles Seite 8 Mittwoch, 10. Mai 2006 7:52 19
Page 12 of 64
Quick Reference Guide9
Sound, sound focus and volume
The sound and volume properties of individual sound sources may be adjusted.– Press button ⇒page 3, fig. 1 .
Fig. 5 Main Sound menuFig. 6 Volume settings
A7
RNS MP3_ingles Seite 9 Mittwoch, 10. Mai 2006 7:52 19
Page 13 of 64
 – Sound focus setting front / rear.
High , medium
3) and base – To adjust the so")
Quick Reference Guide
10Adjustments of the main Sound menu:
Balance – Sound focus setting left / right.
Fader
2) – Sound focus setting front / rear.
High , medium
3) and base – To adjust the sound properties.
Volume adjustments – This option is used to adjust the volume independ-
ently for each one of the sound sources.
Volume settings
Traffic information – Minimum volume for traffic reports
Navigation volume – This may be used to adjust the volume of the audio navi-
gation instructions. It is also possible to set the level at which the volume of
other sound sources should attenuate (for example, the radio): bass, medium
and high frequencies.
Telephone volume – Minimum volume for telephone conversations. During a
telephone conversation, the volume may be adjusted using the corre-
sponding control.
Initial volume – This setting is used to define the initial volume when the
equipment is turned on.
GALA – The setting for the sensitivity of the speed-dependent volume adjust-
ment (GALA). The greater the vehicle speed, the more noise there is in the
interior. This system increases the v olume of the equipment as a result. The
volume will be increased more the furthe r the control is set towards the right.
2)only if rear loudspeakers are fitted3)depending on option
RNS MP3_ingles Seite 10 Mittwoch, 10. Mai 2006 7:52 19
Page 14 of 64

Radio/CD and CD charger / MP3 CD11
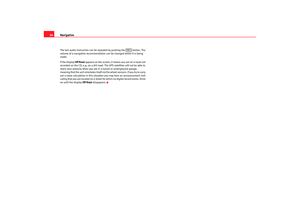
Radio/CD and CD charger / MP3 CDRadio Indications of the main Radio menu
Options of the four function keys ⇒page 3, fig. 1 :
− – Goes from the list of stations ⇒page 12 to the memory
list ⇒page 14 and vice versa. If MEMORY appears without a black
background, the memories list is active.
− – Change from AM to FM and vice versa ⇒page 12.
− – Manual selection of the station ⇒page 12.
− – Begin / cancel the station search.
Radio mode and band indicator
Current station ⇒page 13, “To change the name of the station” TP
(TP=Traffic Program) indicates the station currently giving out traffic
information. Otherwise, hyphens appear. The box marking TP indicates
that the TP function is active, otherwise, the box is dotted. Turning the TP
function on/off ⇒page 15, “Radio adjustments (SETUP)”.
Actual station tuned
TMC indicates that the selected station offers the TMC ( Traffic- Message-
C hannels) service. Otherwise, hyphens appear. The equipment receives
TMC messages on another level. These may be consulted pressing the button and are defined by the dynamic destination guide
⇒ page 51.
Fig. 7 Main Radio menu
AA
A5
MEMORYBANDMANUALSCAN
ABAC
ADAEAF
TRAFFIC
RNS MP3_ingles Seite 11 Mittwoch, 10. Mai 2006 7:52 19
Page 15 of 64

Radio/CD and CD charger / MP3 CD
12List of stations
Stations with a good quality reception are automatically memorized in the list of stations.To select a station from the list
– Press the button to access the Radio main menu
⇒page 11, fig. 7 .
– Rotate the menus button to access the list of automatically memorized stations ⇒fig. 8.
– Rotate the menu button ⇒page 3, fig. 1 until the station
required is displayed ⇒fig. 8.
– Press the button to select the stat ion. The station is played. Other
stations may be selected using the buttons and . The list of
stations is updated automatically. Station search
– Press the function . Stations in the list are played consec-
utively for 5 seconds.
– Press the button again to stop the station search.
Changing from FM to AM and vice versa
– Press the function key .
– Rotate the menu button to select FM or AM and press it to select
the band.
To manually select a station
– Press the function key .
Fig. 8 List of stations
RADIO
A3
SCANSCAN
BANDMANUAL
RNS MP3_ingles Seite 12 Mittwoch, 10. Mai 2006 7:52 19
Page 16 of 64

Radio/CD and CD charger / MP3 CD13
– Rotate the menu button to search the station frequency required.
To update the list of stations
– T h e l i s t o f s ta t i o n s is u p d a t e d a u t o m a t i ca ll y w h e n t h e e q u i p m e n t is turned off. It is also possible to update the list while the equip-
ment is turned on.
– For this, rotate the menu button on the station list to select the upper option Update the station list .
– Press the menu button. The message Updating station list...
appears.
– To interrupt the update, press the menu button.
The actual station is accompanied by the symbol
on the station list.
The stations regularly emitting traf fic reports are accompanied by the TP
symbol (T raffic Program) ⇒page 15, “Traffic report function TP (Traffic
Program)”. The stations offering TMC messages ( Traffic- Message- Channel)
are accompanied by a TMC symbol. If the actual station offers the TMC
service, the equipment receives TMC messages. These TMC messages may
be consulted pressing the button and are defined by the dynamic
destination guide ⇒page 51.
To change the name of the station
The station name is shown instead of the frequency if the RDS function is
switched on . If the station transmits additional information using the RDS
function when the station list is being updated, for example, it is possible
that the station name is not correctly displayed. If this is the case, the station
name may be changed. For this, select the corresponding station, wait until
the name appears correctly on the screen then press the menu button. The
station is memorized with this name.
Note
•
If the button appears highlighted on a black background, then
it is memorized in the list ⇒page 14, fig. 9. Only stations from the list can
be selected. Press the button to leave the “station list” function.
•
If no control is touched for 5 seconds, the equipment changes automati-
cally from the station list to the ma in Radio menu. Rotate the menus button
to visualise the station list once more.
TRAFFIC
MEMORY
MEMORY
RNS MP3_ingles Seite 13 Mittwoch, 10. Mai 2006 7:52 19