2007 Seat Ibiza 5D towing
[x] Cancel search: towingPage 204 of 272

If and when
202If and whenVehicle tools, spare wheelVehicle To ols
The vehicle onboard tools are located under the floor panel in
the luggage compartment.– Lift floor panel
– Take the onboard tools out of the vehicle.The tool kit includes:•
Jack*
•
Hook for removing wheel covers* or hub caps*
•
Box spanner for wheel bolts*
•
Reversible screwdriver with handle (including hexagonal interior) for the
wheel bolts. The screwdriver is a combination tool.
•
Towing ring*
•
Adapter for the anti-theft wheel bolts*
Some of the items listed are only prov ided in certain models / model years,
or are optional extras.
WARNING
•
Do not use the hexagonal socket in the screwdriver handle to tighten
the wheel bolts as with this it is not possible to tighten the bolts to the
required torque, risk of accident.
•
The jack supplied by the factory is only designed for changing wheels
on this model. On no account attempt to use it for lifting heavier vehicles
or other loads, risk of injury.
•
Use the jack only on firm, level ground.
•
Never start the engine when the vehicle is on the jack, risk of accident.
•
I f wo r k is t o b e ca r r i e d o u t un d e r n ea th the vehicle, this must be secured
by suitable stands. Otherwise, there is a risk of injury.WARNING (continued)
IBI_ANG_0707 Seite 202 Montag, 6. August 2007 3:59 15
Page 205 of 272

If and when203
Safety First
Operating instructions
Tips and Maintenance
Te c h n i c a l D a t a
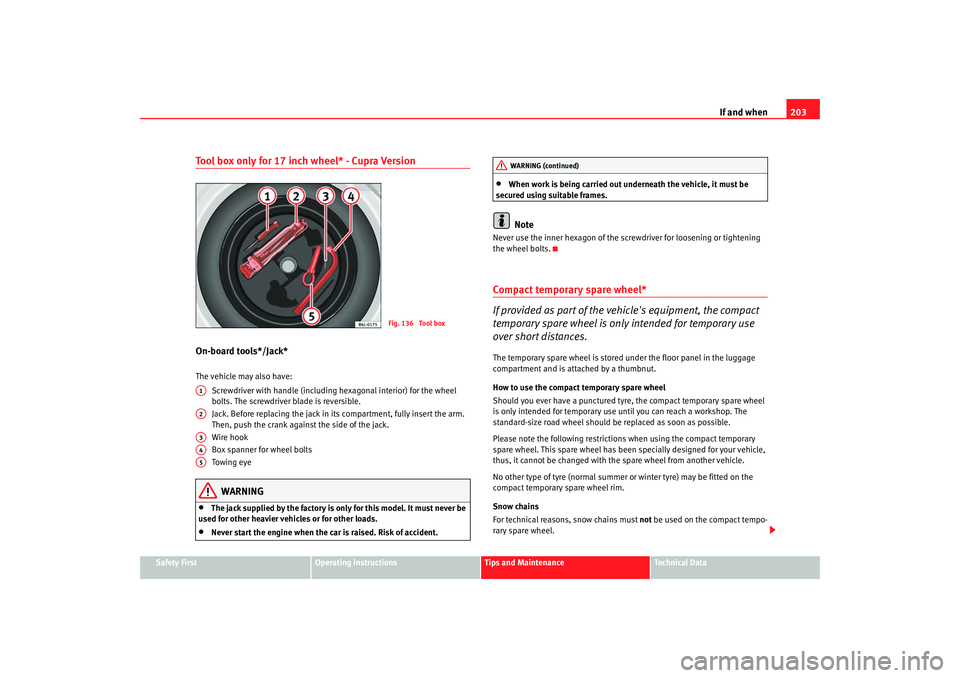
Tool box only for 17 inch wheel* - Cupra VersionOn-board tools*/Jack*The vehicle may also have:
Screwdriver with handle (including hexagonal interior) for the wheel
bolts. The screwdriver blade is reversible.
Jack. Before replacing the jack in it s compartment, fully insert the arm.
Then, push the crank against the side of the jack.
Wire hook
Box spanner for wheel bolts
Towing eye
WARNING
•
The jack supplied by the factory is only for this model. It must never be
used for other heavier vehicles or for other loads.
•
Never start the engine when the car is raised. Risk of accident.
•
When work is being carried out underneath the vehicle, it must be
secured using suitable frames.Note
Never use the inner hexagon of the sc rewdriver for loosening or tightening
the wheel bolts.Compact temporary spare wheel*
If provided as part of the vehicle's equipment, the compact
temporary spare wheel is only intended for temporary use
over short distances.The temporary spare wheel is stored under the floor panel in the luggage
compartment and is attached by a thumbnut.
How to use the compact temporary spare wheel
Should you ever have a punctured tyre, the compact temporary spare wheel
is only intended for temporary use until you can reach a workshop. The
standard-size road wheel should be replaced as soon as possible.
Please note the following restrictions when using the compact temporary
spare wheel. This spare wheel has been specially designed for your vehicle,
thus, it cannot be changed with the spare wheel from another vehicle.
No other type of tyre (normal summer or winter tyre) may be fitted on the
compact temporary spare wheel rim.
Snow chains
For technical reasons, snow chains must not be used on the compact tempo-
rary spare wheel.
Fig. 136 Tool box
A1A2A3A4A5
WARNING (continued)
IBI_ANG_0707 Seite 203 Montag, 6. August 2007 3:59 15
Page 207 of 272

If and when205
Safety First
Operating instructions
Tips and Maintenance
Te c h n i c a l D a t a
Taking out the spare wheel
7)
– Lift the carpet, then remove the plastic nut anticlockwise.
– Take out the tool box* and remove the spare wheel*.
Securing the defective wheel in the spare wheel well
– Put the defective wheel into its housing, and then put the tool
box* into the hollow in the wheel.
– Turn the plastic nut clockwise until the defective wheel is well secured.
– Unhook the carpet and place it on the floor.
WARNING
Check the spare wheel and the tools ar e firmly held to avoid injury to
passengers in the event of sudden braking or collision.Tyre repair kit*
The tyre repair kit (for vehicles not including a spare wheel) is
stored under the floor panel in the luggage compartment.Your vehicle is equipped with the Tyre Mobility System “Tyre repair kit”.
The tyre repair kit consists of a contai ner with sealing compound to repair the
puncture and a compressor to generate the required tyre pressure. The kit will
reliably seal punctures up to a size of about 4 mm caused by the penetration
of a foreign body into the tyre.
Note
•
Seek professional assistance if the repair of a tyre puncture is not
possible with the sealing compound.
Wheel changePreparation work
What you must do before changing a wheel.– If you have a flat tyre or puncture, park the vehicle as far away from the flow of traffic as possible. Choose a location that is as
level as possible.
– All passengers should leave the vehicle. They should wait in a
safe area (for instance behind the roadside crash barrier).
– Switch off the engine. Switch on the hazard warning lights.
–Apply the handbrake firmly.
– Engage the first gear , or put the selector lever to position P for
those vehicles with an automatic gearbox.
– If you are towing a trailer, unhitch it from your vehicle.
– Take the vehicle tools and the spare wheel out of the luggage
compartment.
7)The 17 inch spare wheel is only carried if the "SEAT racing brakes" option is chosen.
IBI_ANG_0707 Seite 205 Montag, 6. August 2007 3:59 15
Page 235 of 272

If and when233
Safety First
Operating instructions
Tips and Maintenance
Te c h n i c a l D a t a
Towing and tow-startingTo w - s t a r t i n g *
The use of jump leads is preferable to tow-starting.We recommend that you do not tow-start your vehicle. Jump-starting
is preferable ⇒page 230.
However, if your vehicle has to be tow-started:
–Engage the 2
nd or the 3
rd gear.
– Keep the clutch pressed down.
– Switch on the ignition.
– Once both vehicles are mo ving, release the clutch.
– As soon as the engine starts, press the clutch and move the gear lever into neutral. This helps to prevent driving into the towing
vehicle.
WARNING
The risk of accidents is high when tow-starting. The vehicle being towed
can easily collide with the towing vehicle.
Caution
When tow-starting, fuel could enter the catalytic converter and damage it.
Towing eyesPlease observe the following points if you use a tow-rope:
Notes for the driver of the towing vehicle
– Drive slowly at first until the tow-rope is taut. Then accelerate gradually.
– Begin and change gears cautiously. If you are driving an auto- matic vehicle, accelerate gently.
– Remember that the brake servo and power steering are not working in the vehicle you are towing. Brake earlier than you
would normally, but with a more gentle pressure on the brake.
Notes for the driver of the towed vehicle
– Ensure that the tow-rope remains taut at all times when towing.
Fig. 171 Towing eye at
the front of the vehicle
IBI_ANG_0707 Seite 233 Montag, 6. August 2007 3:59 15
Page 236 of 272

If and when
234
Fitting the front towing eye
– First remove the right hand cover from the lower part of the bumper.
– Remove the bolt ⇒page 233, fig. 171 .
– Take the towing ring from the onboard tools.
– Rotate the towing ring to the left until it is completely tightened into position.
– To remove the ring, rotate it to the right.Tow-rope or tow-bar
It is easier and safer to tow a vehicle with a tow-bar. You should only use a
tow-rope if you do not have a tow-bar.
A tow-rope should be slightly elastic to reduce the loading on both vehicles.
It is advisable to use a tow-rope made of synthetic fibre or similarly elastic
material.
Attach the tow-rope or the tow-bar only to the towing eyes provided or a
towing bracket.
Driving style
Towing requires some experience, especially when using a tow-rope. Both
drivers should be familiar with the te chnique required for towing. Inexperi-
enced drivers should not attempt to tow-start or tow away another vehicle.
Do not pull too hard with the towing vehicle and take care to avoid jerking the
tow-rope. When towing on an unpaved ro ad, there is always a risk of over-
loading and damaging the anchorage points.
The ignition of the vehicle being towed must be switched on to prevent the
steering wheel from locking and also to allow the use of the turn signals,
horn, windscreen wipers and washers. As the brake servo does not work if the
engine is not running, you must apply
considerably more pressure to the brake pedal than you normally would.
As the power assisted steering does not work if the engine is not running, you
will need more strength to steer than you normally would.
Towing vehicles with an automatic gearbox
•
Put the selector lever into position “N”.
•
Do not drive faster than 50 km/h when towing a vehicle.
•
Do not tow further than 50 km.
•
If a breakdown vehicle is used, the vehicle must be towed with the front
wheels raised.Note
•
Observe legal requirements when towing or tow-starting.
•
Switch on the hazard warning lights of both vehicles. However, observe
any regulations to the contrary.
•
For technical reasons, vehicles with an automatic gearbox must not be
tow-started.
•
If damage to your vehicle means that there is no lubricant in the gearbox,
you must raise the drive wheels while the vehicle is being towed.
•
If the vehicle has to be towed more than 50 km, the front wheels must be
raised during towing, and towing should be carried out by a qualified person.
•
The steering wheel is locked when the vehicle has no electrical power. The
vehicle must then be towed with the front wheels raised. Towing should be
carried out by a qualified person.
•
The towing eye should always be kept in the vehicle. Please refer to the
notes on ⇒page 233.
AA
IBI_ANG_0707 Seite 234 Montag, 6. August 2007 3:59 15
Page 237 of 272

If and when235
Safety First
Operating instructions
Tips and Maintenance
Te c h n i c a l D a t a
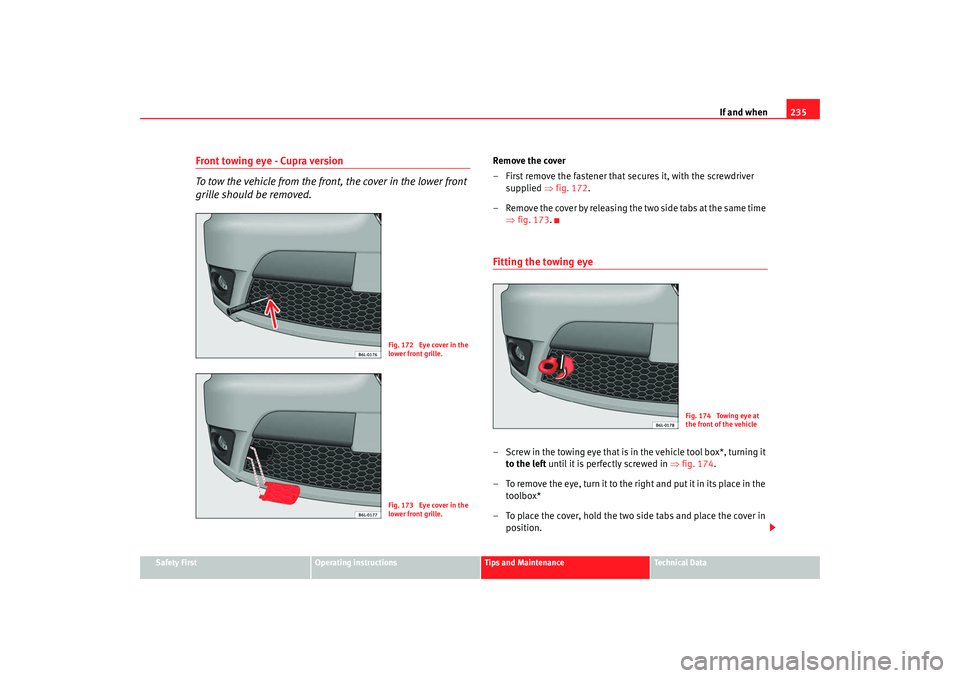
Front towing eye - Cupra version
To tow the vehicle from the front, the cover in the lower front
grille should be removed.
Remove the cover
– First remove the fastener that secures it, with the screwdriver
supplied ⇒fig. 172 .
– Remove the cover by releasing the two side tabs at the same time ⇒fig. 173.Fitting the towing eye– Screw in the towing eye that is in the vehicle tool box*, turning it
to the left until it is perfectly screwed in ⇒fig. 174.
– To remove the eye, turn it to the right and put it in its place in the toolbox*
– To place the cover, hold the two side tabs and place the cover in position.
Fig. 172 Eye cover in the
lower front grille.Fig. 173 Eye cover in the
lower front grille.
Fig. 174 Towing eye at
the front of the vehicle
IBI_ANG_0707 Seite 235 Montag, 6. August 2007 3:59 15
Page 238 of 272

If and when
236
NoteThe eye should always be carried in the vehicle, as it is specifically for this
model.Rear towline anchorageAt the rear, on the right below the rear bumper is a towline point.
Fig. 175 Rear towing ring
IBI_ANG_0707 Seite 236 Montag, 6. August 2007 3:59 15
Page 242 of 272

General notes on the technical data
240WeightsKerb weight refers to the basic model with a fuel tank filled to 90% capacity
and without optional extras. The figure quoted includes 75 kg to allow for the
weight of the driver.
For special versions and optional equipment fittings or for the addition of
accessories, the weight of the vehicle will increase ⇒.
WARNING
•
Please note that the centre of gravity may shift when transporting
heavy objects; this may affect the vehi cle's handling and lead to an acci-
dent. Always adjust your speed and dr iving style to suit road conditions
and requirements.
•
Never exceed the gross axle weight rating or the gross vehicle weight
rating. If the allowed axle load or the allowed total weight is exceeded, the
driving characteristics of the vehicle may change, leading to accidents,
injuries and damage to the vehicle.
To w i n g a t r a i l e rTrailer weightsTrailer weights
The trailer weights and drawbar loads approved are selected in intensive
trials according to precisely defined criteria. The approved trailer weights are
valid for vehicles in the EU for maximum speeds of 80 km/h (in certain
circumstances up to 100 km/h). The figu res may be different in other coun-
tries. All data in the official vehicl e documents take precedence over these
data ⇒ . Drawbar load
The
maximum permitted weight exerted by the trailer drawbar on the ball joint
of the towing bracket must not exceed 75 kg.
In the interest of road safety, we recommend that you always tow
approaching the maximum drawbar load. The response of the trailer on the
road will be poor if th e drawbar load is too small.
If the maximum permissible drawbar load cannot be met (e.g. with small,
empty and light-weight single axle trailers or tandem axle trailers with an axle
base of less than 1 metre), at least 4% of the actual trailer weight is a legal
stipulation for a drawbar load.
WARNING
•
For safety reasons, you should not drive at speeds above 80 km/h when
towing a trailer. This also applies to countries where higher speeds are
permitted.
•
Never exceed the maximum trailer weights or the draw bar loading. If
the permissible axle load or the perm issible total weight is exceeded, the
driving characteristics of the vehicle may change, leading to accidents,
injuries and damage to the vehicle.
WheelsTyre pressure, snow chains, wheel boltsTyre pressures
The sticker with the tyre pressure values can be found on the inside of the
tank flap. The tyre pressure values given there are for cold tyres. The slightly
raised pressures of warm tyres must not be reduced ⇒.
IBI_ANG_0707 Seite 240 Montag, 6. August 2007 3:59 15