Page 219 of 470

Ejecting a Disc
Press the eject button on the radio to eject the disc.
If a disc is ejected from the radio, but not removed,
the radio reloads the disc after a short period of
time. The disc is stored in the radio. The radio does
not resume play of the disc automatically.
Remote Control
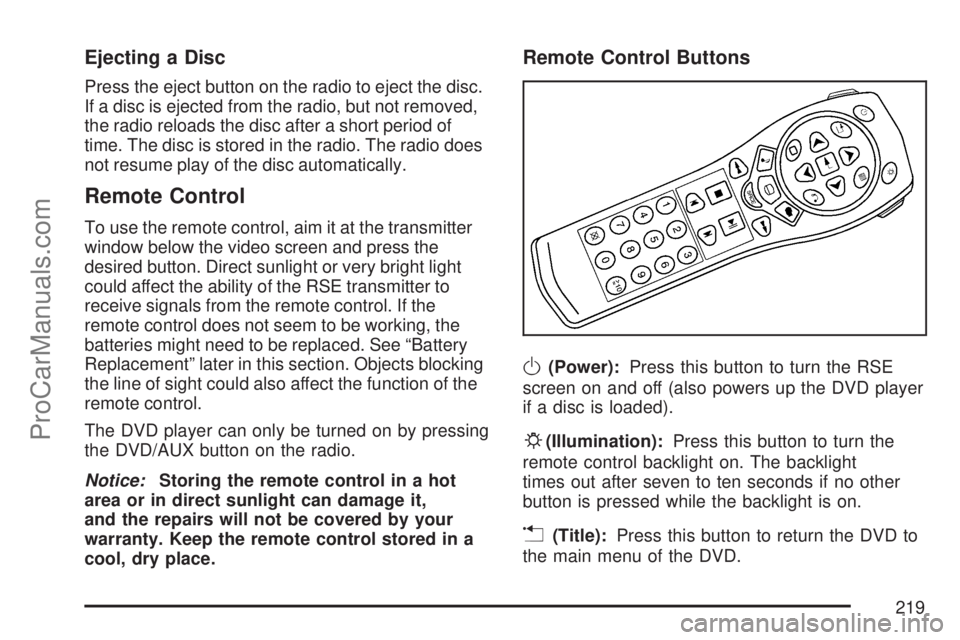
To use the remote control, aim it at the transmitter
window below the video screen and press the
desired button. Direct sunlight or very bright light
could affect the ability of the RSE transmitter to
receive signals from the remote control. If the
remote control does not seem to be working, the
batteries might need to be replaced. See “Battery
Replacement” later in this section. Objects blocking
the line of sight could also affect the function of the
remote control.
The DVD player can only be turned on by pressing
the DVD/AUX button on the radio.
Notice:Storing the remote control in a hot
area or in direct sunlight can damage it,
and the repairs will not be covered by your
warranty. Keep the remote control stored in a
cool, dry place.
Remote Control Buttons
O(Power):Press this button to turn the RSE
screen on and off (also powers up the DVD player
if a disc is loaded).
P(Illumination):Press this button to turn the
remote control backlight on. The backlight
times out after seven to ten seconds if no other
button is pressed while the backlight is on.
v(Title):Press this button to return the DVD to
the main menu of the DVD.
219
ProCarManuals.com
Page 220 of 470

y(Main DVD Menu):Press this button to access
the DVD menu. The DVD menu is different on every
DVD. Use the up, down, left, and right arrow
buttons to move the cursor around the DVD menu.
After making a selection press the enter button.
This button only operates when using a DVD.
n,q,p,o(Menu Navigation Arrows):Use
the arrow buttons to navigate through a menu.
r(Enter):Press this button to select the
choices that are highlighted in any menu.
z(Display Menu):Press this button to adjust
the color, tint, brightness, contrast, and display
mode (normal, full, or zoom). The dynamic range
compression feature can be used to reduce
loud audio and increase low audio produced by
some DVDs.
q(Return):Press this button to exit the current
active menu and return to the previous menu.
This button operates only when a DVD is playing
and a menu is active.
e(Audio):Press this button to display a menu
that only appears when a DVD is playing. The
format and content of this function varies for
each disc.
{(Subtitle):Press this button to turn on
subtitles and to move through subtitle options
when a DVD is playing. The format and content of
this function varies for each disc.
|(Camera Angle):Press this button to
change camera angles on DVDs that have this
feature when a DVD is playing. The format
and content of this function varies for each disc.
r(Fast Reverse):Press this button to fast
reverse the DVD or CD. To stop fast reversing,
press this button again. This button might not work
when the DVD is playing the copyright information
or the previews.
SRCE (Source):Press this button to switch
between the DVD player and an auxiliary source.
[(Fast Forward):Press this button to fast
forward the DVD or CD. To stop fast forwarding,
press this button again. This button might not work
when the DVD is playing the copyright information
or the previews.
c(Stop):Press this button to stop playing,
rewinding, or fast forwarding a DVD. Press this
button twice to return to the beginning of the DVD.
220
ProCarManuals.com
Page 222 of 470

DVD Player Error Messages
The video screen could display one of
the following:
Disc Load/Eject Error:This message displays
when there are disc load or eject problems.
Disc Format Error:This message displays, if the
disc is inserted with the disc label wrong side
up, or if the disc is damaged.
Disc Region Error:This message displays, if the
disc is not from a correct region.
No Disc Inserted:This message displays, if no
disc is present when the EJECT or DVD/AUX
button is pressed on the radio.
DVD Distortion
Video distortion could occur when operating
cellular phones, scanners, CB radios, Global
Position Systems (GPS)*, two-way radios, mobile
fax, or walkie talkies.
It might be necessary to turn off the DVD player
when operating one of these devices in or near
the vehicle.
*Excludes the OnStar
®System.
Cleaning the DVD Player
When cleaning the outside DVD faceplate and
buttons, use only a clean cloth dampened
with clean water.
Cleaning the Video Screen
When cleaning the video screen, use only a
clean cloth dampened with clean water. Use care
when directly touching or cleaning the screen,
as damage could result.
222
ProCarManuals.com
Page 400 of 470

Dust may be removed from small buttons and
knobs using a small brush with soft bristles.
Your retailer has a product for cleaning your
vehicle’s glass. Should it become necessary, you
can also obtain a product from your retailer to
remove odors from your vehicle’s upholstery.
Do not clean your vehicle using the following
cleaners or techniques:
Never use a knife or any other sharp object to
remove a soil from any interior surface.
Never use a stiff brush. It can cause damage
to your vehicle’s interior surfaces.
Never apply heavy pressure or rub
aggressively with a cleaning cloth. Use of
heavy pressure can damage your interior and
does not improve the effectiveness of soil
removal.
Use only mild, neutral-pH soaps. Avoid
laundry detergents or dishwashing soaps with
degreasers. Using too much soap will leave a
residue that leaves streaks and attracts dirt.
For liquid cleaners, about 20 drops per gallon
(3.78 L) of water is a good guide.
Do not heavily saturate your upholstery while
cleaning.
Damage to your vehicle’s interior may result
from the use of many organic solvents such as
naptha, alcohol, etc.
Fabric/Carpet
Use a vacuum cleaner with a soft brush
attachment frequently to remove dust and loose
dirt. A canister vacuum with a beater bar in
the nozzle may only be used on �oor carpet and
carpeted �oor mats. For soils, always try to remove
them �rst with plain water or club soda. Before
cleaning, gently remove as much of the soil
as possible using one of the following techniques:
For liquids: gently blot the remaining soil with a
paper towel. Allow the soil to absorb into the
paper towel until no more can be removed.
For solid dry soils: remove as much as possible
and then vacuum.
400
ProCarManuals.com
Page:
< prev 1-8 9-16 17-24