2007 NISSAN VERSA malfunction indicator light
[x] Cancel search: malfunction indicator lightPage 138 of 304

4. Push thebutton. The indicator light
comes on.
5. Turn the temperature control dial to the de-
sired position.
Dehumidified defogging
This mode is used to defog the windows and
dehumidify the air.
1. Move the air intake lever to the
posi-
tion.
2. Turn the air flow control dial to the
position.
3. Turn the fan control dial to the desired posi-
tion.
4. Push on the
button. The indicator
light comes on.
5. Turn the temperature control dial to the de-
sired position.
Operating tips
cKeep the windows and sunroof closed while
the air conditioner is in operation.
cAfter parking in the sun, drive for 2 or 3
minutes with the windows open to vent hot
air from the passenger compartment. Then,
close the windows. This allows the air con-
ditioner to cool the interior more quickly.cThe air conditioning system should be
operated for approximately 10 minutes
at least once a month. This helps pre-
vent damage to the system due to lack
of lubrication.
cA visible mist may be seen coming from the
ventilators in hot, humid conditions as the air
is cooled rapidly. This does not indicate a
malfunction.
cIf the high temperature warning
light
illuminates in red indicating
engine coolant temperature is over the
normal range, turn the air conditioner
off. See “If your vehicle overheats” in
the “In case of emergency” section of
this manual.
AIR FLOW CHARTS
The following charts show the button and dial
positions forMAXIMUM AND QUICKheating,
cooling or defrosting.The air recirculation le-
ver should always be in the OFF position
for heating and defrosting.
4-6Heater, air conditioner, audio and phone systems
ZREVIEW COPYÐ2007 Versa(vrs)
Owners ManualÐUSA_English(nna)
10/05/06Ðdebbie
X
Page 193 of 304

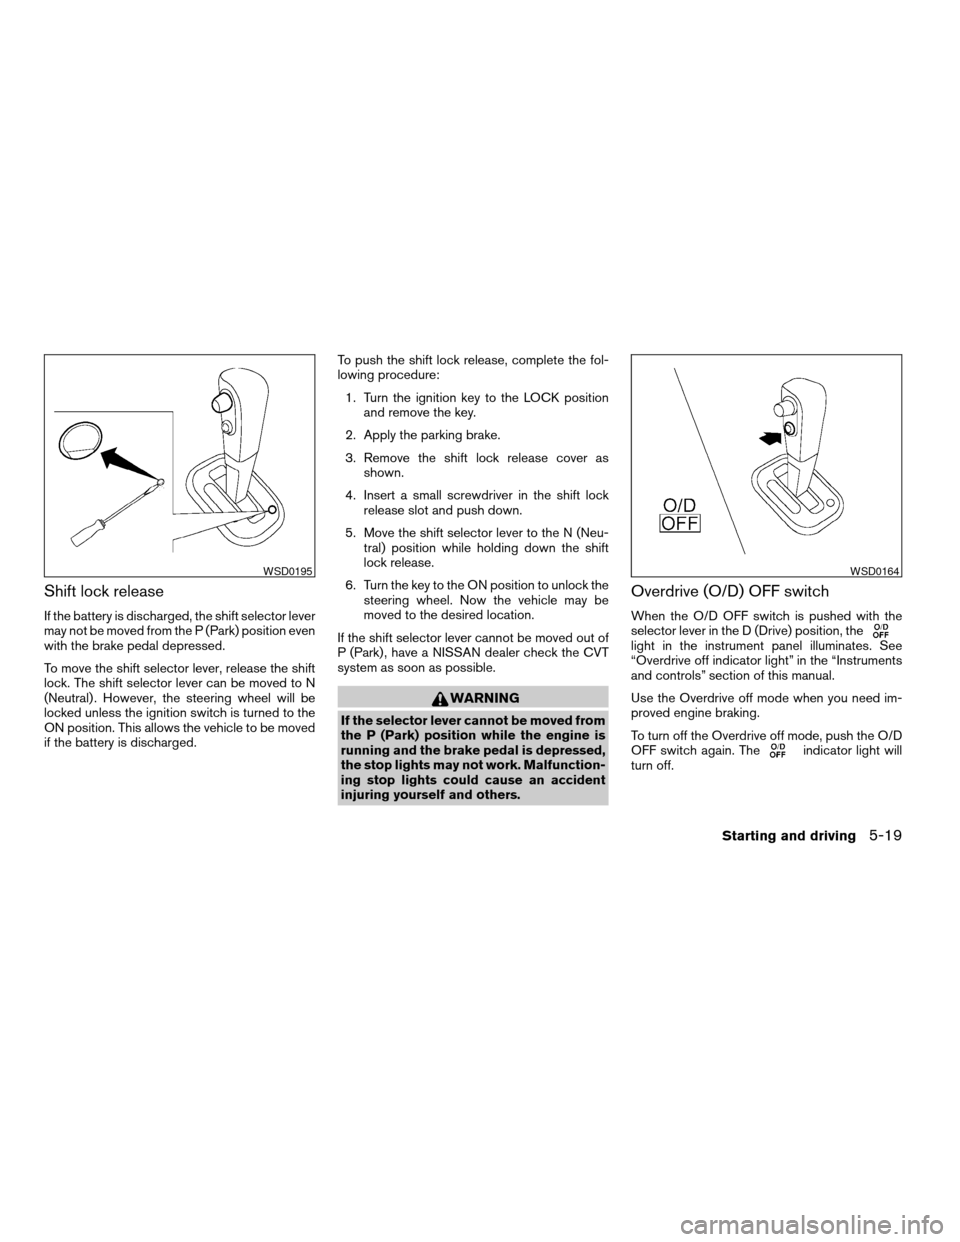
Shift lock release
If the battery is discharged, the shift selector lever
may not be moved from the P (Park) position even
with the brake pedal depressed.
To move the shift selector lever, release the shift
lock. The shift selector lever can be moved to N
(Neutral) . However, the steering wheel will be
locked unless the ignition switch is turned to the
ON position. This allows the vehicle to be moved
if the battery is discharged.To push the shift lock release, complete the fol-
lowing procedure:
1. Turn the ignition key to the LOCK position
and remove the key.
2. Apply the parking brake.
3. Remove the shift lock release cover as
shown.
4. Insert a small screwdriver in the shift lock
release slot and push down.
5. Move the shift selector lever to the N (Neu-
tral) position while holding down the shift
lock release.
6. Turn the key to the ON position to unlock the
steering wheel. Now the vehicle may be
moved to the desired location.
If the shift selector lever cannot be moved out of
P (Park) , have a NISSAN dealer check the CVT
system as soon as possible.
WARNING
If the selector lever cannot be moved from
the P (Park) position while the engine is
running and the brake pedal is depressed,
the stop lights may not work. Malfunction-
ing stop lights could cause an accident
injuring yourself and others.
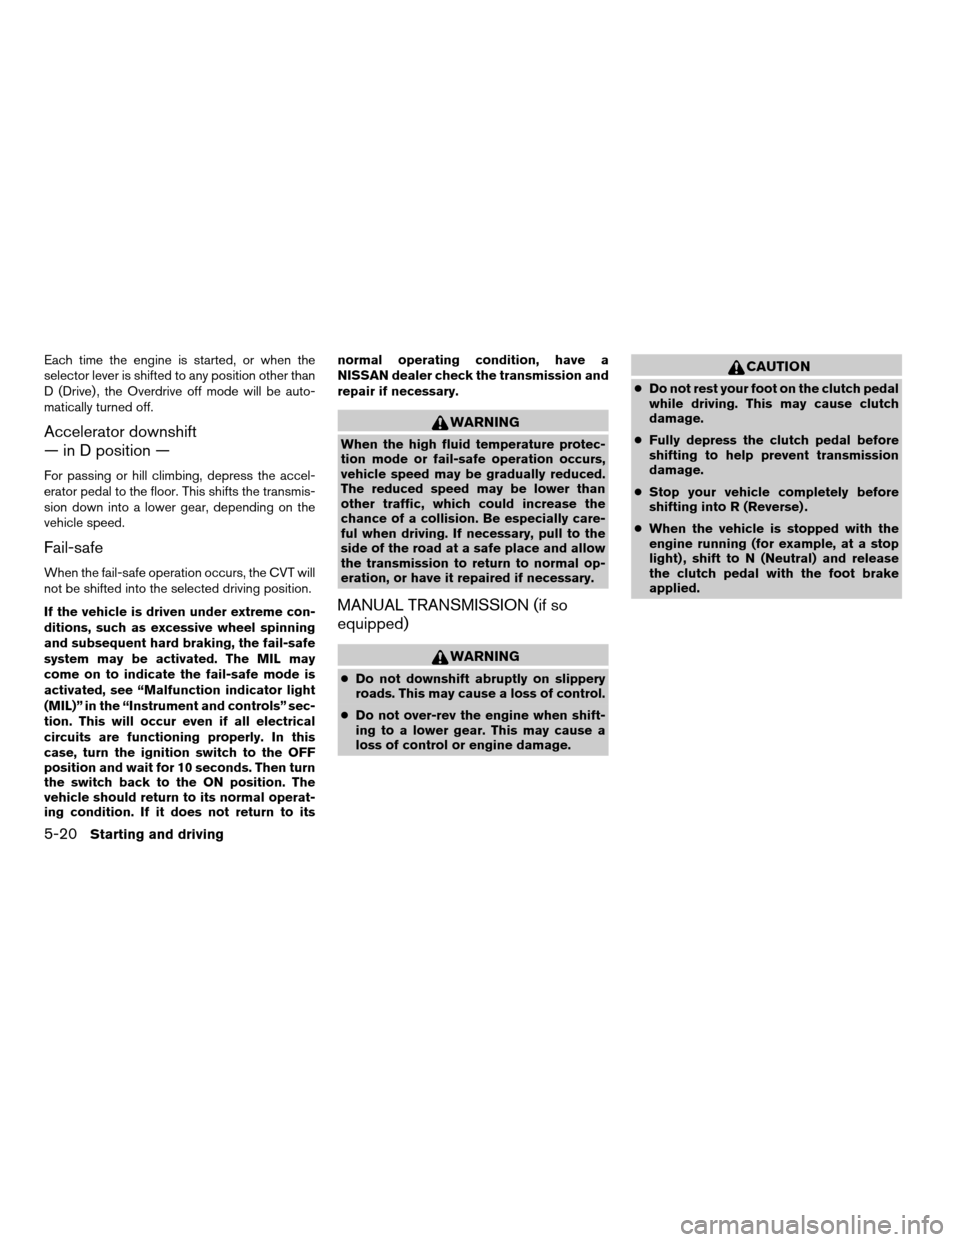
Overdrive (O/D) OFF switch
When the O/D OFF switch is pushed with the
selector lever in the D (Drive) position, the
light in the instrument panel illuminates. See
“Overdrive off indicator light” in the “Instruments
and controls” section of this manual.
Use the Overdrive off mode when you need im-
proved engine braking.
To turn off the Overdrive off mode, push the O/D
OFF switch again. The
indicator light will
turn off.
WSD0195WSD0164
Starting and driving5-19
ZREVIEW COPYÐ2007 Versa(vrs)
Owners ManualÐUSA_English(nna)
10/05/06Ðdebbie
X
Page 194 of 304

Each time the engine is started, or when the
selector lever is shifted to any position other than
D (Drive) , the Overdrive off mode will be auto-
matically turned off.
Accelerator downshift
— in D position —
For passing or hill climbing, depress the accel-
erator pedal to the floor. This shifts the transmis-
sion down into a lower gear, depending on the
vehicle speed.
Fail-safe
When the fail-safe operation occurs, the CVT will
not be shifted into the selected driving position.
If the vehicle is driven under extreme con-
ditions, such as excessive wheel spinning
and subsequent hard braking, the fail-safe
system may be activated. The MIL may
come on to indicate the fail-safe mode is
activated, see “Malfunction indicator light
(MIL)” in the “Instrument and controls” sec-
tion. This will occur even if all electrical
circuits are functioning properly. In this
case, turn the ignition switch to the OFF
position and wait for 10 seconds. Then turn
the switch back to the ON position. The
vehicle should return to its normal operat-
ing condition. If it does not return to itsnormal operating condition, have a
NISSAN dealer check the transmission and
repair if necessary.
WARNING
When the high fluid temperature protec-
tion mode or fail-safe operation occurs,
vehicle speed may be gradually reduced.
The reduced speed may be lower than
other traffic, which could increase the
chance of a collision. Be especially care-
ful when driving. If necessary, pull to the
side of the road at a safe place and allow
the transmission to return to normal op-
eration, or have it repaired if necessary.
MANUAL TRANSMISSION (if so
equipped)
WARNING
cDo not downshift abruptly on slippery
roads. This may cause a loss of control.
cDo not over-rev the engine when shift-
ing to a lower gear. This may cause a
loss of control or engine damage.
CAUTION
cDo not rest your foot on the clutch pedal
while driving. This may cause clutch
damage.
cFully depress the clutch pedal before
shifting to help prevent transmission
damage.
cStop your vehicle completely before
shifting into R (Reverse) .
cWhen the vehicle is stopped with the
engine running (for example, at a stop
light) , shift to N (Neutral) and release
the clutch pedal with the foot brake
applied.
5-20Starting and driving
ZREVIEW COPYÐ2007 Versa(vrs)
Owners ManualÐUSA_English(nna)
10/05/06Ðdebbie
X
Page 197 of 304

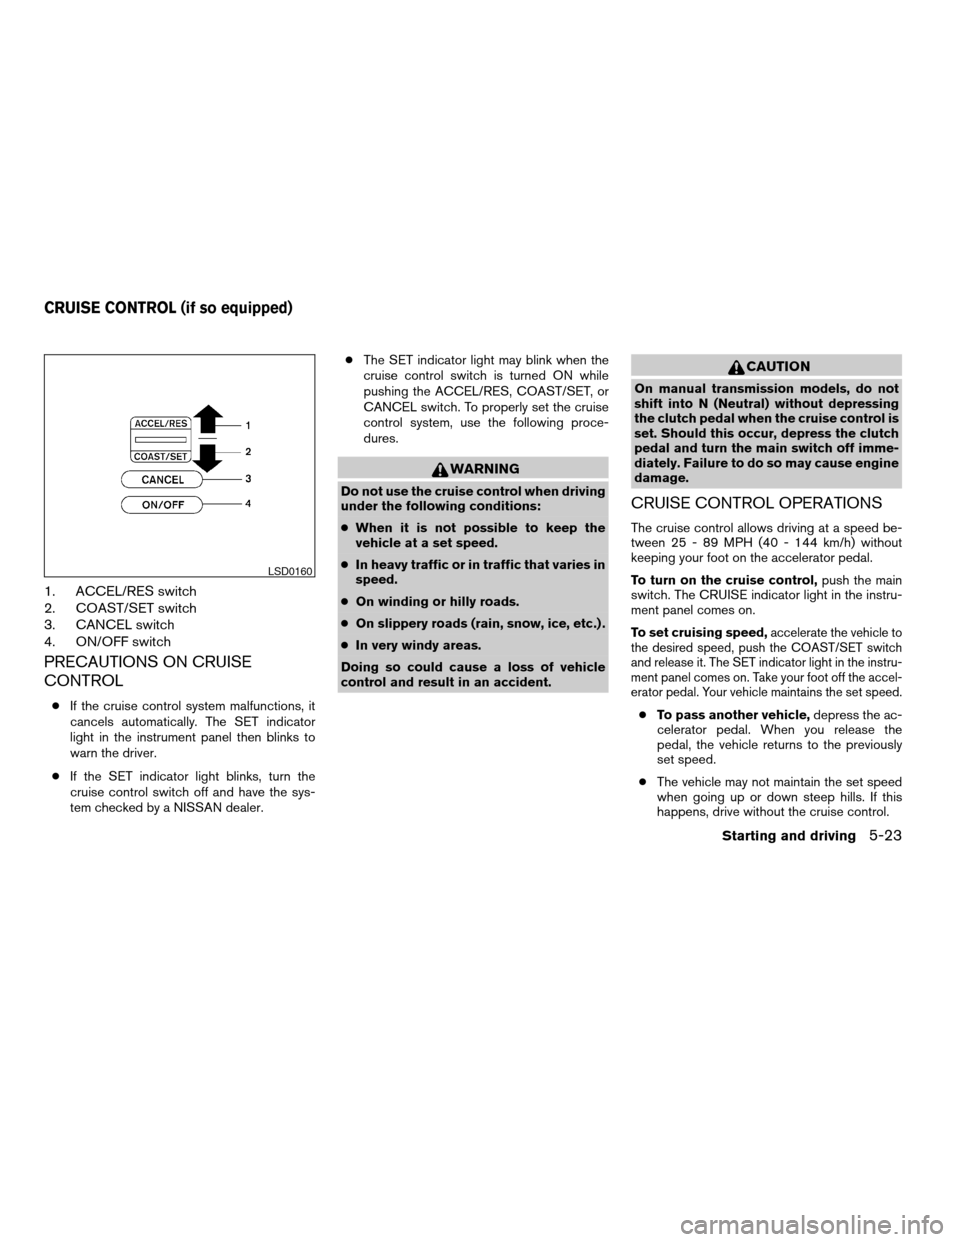
1. ACCEL/RES switch
2. COAST/SET switch
3. CANCEL switch
4. ON/OFF switch
PRECAUTIONS ON CRUISE
CONTROL
cIf the cruise control system malfunctions, it
cancels automatically. The SET indicator
light in the instrument panel then blinks to
warn the driver.
cIf the SET indicator light blinks, turn the
cruise control switch off and have the sys-
tem checked by a NISSAN dealer.cThe SET indicator light may blink when the
cruise control switch is turned ON while
pushing the ACCEL/RES, COAST/SET, or
CANCEL switch. To properly set the cruise
control system, use the following proce-
dures.
WARNING
Do not use the cruise control when driving
under the following conditions:
cWhen it is not possible to keep the
vehicle at a set speed.
cIn heavy traffic or in traffic that varies in
speed.
cOn winding or hilly roads.
cOn slippery roads (rain, snow, ice, etc.) .
cIn very windy areas.
Doing so could cause a loss of vehicle
control and result in an accident.
CAUTION
On manual transmission models, do not
shift into N (Neutral) without depressing
the clutch pedal when the cruise control is
set. Should this occur, depress the clutch
pedal and turn the main switch off imme-
diately. Failure to do so may cause engine
damage.
CRUISE CONTROL OPERATIONS
The cruise control allows driving at a speed be-
tween 25 - 89 MPH (40 - 144 km/h) without
keeping your foot on the accelerator pedal.
To turn on the cruise control,push the main
switch. The CRUISE indicator light in the instru-
ment panel comes on.
To set cruising speed,
accelerate the vehicle to
the desired speed, push the COAST/SET switch
and release it. The SET indicator light in the instru-
ment panel comes on. Take your foot off the accel-
erator pedal. Your vehicle maintains the set speed.
cTo pass another vehicle,depress the ac-
celerator pedal. When you release the
pedal, the vehicle returns to the previously
set speed.
cThe vehicle may not maintain the set speed
when going up or down steep hills. If this
happens, drive without the cruise control.
LSD0160
CRUISE CONTROL (if so equipped)
Starting and driving5-23
ZREVIEW COPYÐ2007 Versa(vrs)
Owners ManualÐUSA_English(nna)
10/05/06Ðdebbie
X
Page 208 of 304

TIRE PRESSURE MONITORING
SYSTEM (TPMS) (if so equipped)
This vehicle is equipped with the tire pressure
monitoring system (TPMS) . It monitors tire pres-
sure of all tires except the spare. When the low
tire pressure warning light is lit, one or more of
your tires is significantly under-inflated. If the
vehicle is being driven with low tire pressure, the
TPMS will activate and warn you of it by the low
tire pressure warning light. This system will acti-
vate only when the vehicle is driven at speeds
above 16 MPH (25 km/h) . For more details, refer
to “Warning/indicator lights and audible remind-
ers” in the “Instruments and controls” section,
and “Tire pressure monitoring system (TPMS)” in
the “Starting and driving” section.
WARNING
cIf the low tire pressure warning light
illuminates while driving, avoid sudden
steering maneuvers or abrupt braking,
reduce vehicle speed, pull off the road
to a safe location and stop the vehicle
as soon as possible. Serious vehicle
damage could occur and may lead to an
accident and could result in serious
personal injury. Check the tire pressure
for all four tires. Adjust the tire pressure
to the recommended COLD tire pres-
sure shown on the Tire and Loading
Information label to turn the low tire
pressure warning light OFF. If you have
a flat tire, replace it with a spare tire as
soon as possible.
cWhen a spare tire is mounted or a wheel
is replaced, the TPMS will not function
and the low tire pressure warning light
will flash for approximately 1 minute.
The light will remain on after 1 minute.
Contact your NISSAN dealer as soon as
possible for tire replacement and/or
system resetting.
cReplacing tires with those not originally
specified by NISSAN could affect the
proper operation of the TPMS.cDo not inject any tire liquid or aerosol
tire sealant into the tires, as this may
cause a malfunction of the tire pressure
sensors.
CHANGING A FLAT TIRE
If you have a flat tire, follow the instructions be-
low.
Stopping the vehicle
1. Safely move the vehicle off the road and
away from traffic.
2. Turn on the hazard warning flashers.
3. Park on a level surface and apply the parking
brake. Shift the transmission into P (Park) or
the manual transmission into R (Reverse) .
4. Turn off the engine.
5. Raise the hood to warn other traffic and to
signal professional road assistance person-
nel that you need assistance.
6. Have all passengers get out of the vehicle
and stand in a safe place, away from traffic
and clear of the vehicle.
FLAT TIRE
6-2In case of emergency
ZREVIEW COPYÐ2007 Versa(vrs)
Owners ManualÐUSA_English(nna)
10/05/06Ðdebbie
X
Page 287 of 304

If you believe that your vehicle has a de-
fect which could cause a crash or could
cause injury or death, you should immedi-
ately inform the National Highway Traffic
Safety Administration (NHTSA) in addi-
tion to notifying NISSAN.
If NHTSA receives similar complaints, it
may open an investigation, and if it finds
that a safety defect exists in a group of
vehicles, it may order a recall and remedy
campaign. However, NHTSA cannot be-
come involved in individual problems be-
tween you, your dealer, or NISSAN.
To contact NHTSA, you may call the Ve-
hicle Safety Hotline toll-free at 1-888-
327-4236 (TTY: 1-800-424-9153); go
to http://www.safercar.gov; or write to:
Administrator, NHTSA, 400 Seventh
Street, SW., Washington, D.C. 20590.
You can also obtain other information
about motor vehicle safety from
http://www.safercar.gov.
You may notify NISSAN by contacting our
Consumer Affairs Department, toll-free, at
1-800-NISSAN-1.Due to legal requirements in some states and
Canadian Provinces, your vehicle may be re-
quired to be in what is called the “ready condi-
tion” for an Inspection/Maintenance (I/M) test of
the emission control system.
The vehicle is set to the “ready condition” when it
is driven through certain driving patterns. Usually,
the ready condition can be obtained by ordinary
usage of the vehicle.
If a powertrain system component is repaired or
the battery is disconnected, the vehicle may be
reset to a “not ready” condition. Before taking the
I/M test, check the vehicle’s
inspection/maintenance test readiness condi-
tion. Turn the ignition switch ON without starting
the engine. If the Malfunction Indicator Light
(MIL) comes on steady for 20 seconds and then
blinks for 10 seconds , the I/M test condition is
9not ready9. If the MIL does not blink after 20
seconds, the I/M test condition is9ready.9If the
MIL indicates the vehicle is in a9not ready9con-
dition, drive the vehicle through the following
pattern to set the vehicle to the ready condition. If
you cannot or do not want to perform the driving
pattern, a NISSAN dealer can conduct it for you.WARNING
Always drive the vehicle in a safe and
prudent manner according to traffic con-
ditions and obey all traffic laws.
1. Start the engine, the low temperature indi-
cator light
illuminates in blue. Allow
the engine to idle until the low temperature
indicator light
goes out, indicating
normal operating temperature.
2. Accelerate the vehicle to 55 MPH (88
km/h) , then quickly release the accelerator
pedal completely and keep it released for at
least 10 seconds.
3. Quickly depress the accelerator pedal for a
moment, then drive the vehicle at a speed of
53 - 60 MPH (86 - 96 km/h) for at least 9
minutes.
4. Stop the vehicle.
5. Accelerate the vehicle to 35 MPH (55 km/h)
and maintain the speed for 20 seconds.
6. Repeat steps 4 through 5 at least 10 times.
7. Accelerate the vehicle to 55 MPH (88 km/h)
and maintain the speed for at least 3 min-
utes.
REPORTING SAFETY DEFECTS (US
only)READINESS FOR INSPECTION/
MAINTENANCE (I/M) TEST
Technical and consumer information9-19
ZREVIEW COPYÐ2007 Versa(vrs)
Owners ManualÐUSA_English(nna)
10/05/06Ðdebbie
X
Page 294 of 304

Lock
Child safety rear door lock..........3-6
Door locks..................3-4
Fuel-filler door lock opener lever......3-28
Power door locks...............3-5
Low fuel warning light..............2-9
Low tire pressure warning light.........2-9
Low washer fluid warning light.........2-10
Luggage (See vehicle loading information) . .9-13
M
Maintenance
General maintenance............8-2
Inside the vehicle...............8-3
Maintenance precautions..........8-5
Outside the vehicle..............8-2
Seat belt maintenance...........1-14
Under the hood and vehicle.........8-4
Malfunction indicator light...........2-12
Manual front seat adjustment..........1-2
Manual windows................2-30
Map lights....................2-33
Map pocket...................2-23
Meters and gauges................2-3
Instrument brightness control.......2-20
Mirror
Inside mirror.................3-30
Outside mirror control...........3-31
Outside mirrors...............3-31
Vanity mirror.................3-30N
NISSAN vehicle immobilizer
system................2-15, 3-2, 5-10
O
Octane rating (See fuel octane rating).....9-4
Odometer.....................2-4
Oil
Capacities and recommended
fuel/lubricants.................9-2
Changing engine oil.............8-9
Changing engine oil filter..........8-10
Checking engine oil level..........8-8
Engine oil...................8-8
Engine oil and oil filter recommendation . .9-5
Engine oil viscosity..............9-5
Outside mirror control.............3-31
Outside mirrors.................3-31
Overdrive switch................5-16
Overheat
If your vehicle overheats..........6-10
Owner’s manual order form..........9-20
Owner’s manual/service manual order
information....................9-20
P
Parking
Parking brake operation..........5-22
Parking/parking on hills...........5-26
Phone, BluetoothThands-free system. . . .4-28Power
Power door locks...............3-5
Power outlet.................2-22
Power rear windows............2-29
Power steering system...........5-27
Power windows...............2-28
Rear power windows............2-29
Precautions
Maintenance precautions..........8-5
Precautions on child
restraints............1-14, 1-23, 1-29
Precautions on seat belt usage.......1-7
Precautions on supplemental restraint
system....................1-34
Precautions when starting and driving . . .5-2
Push starting...................6-9
R
Radio
Car phone or CB radio...........4-27
Compact Disc (CD) changer.......4-23
FM-AM radio with compact disc (CD)
player....................4-16
FM/AM/SAT radio with compact disc (CD)
changer...................4-20
Steering wheel audio control switch. . . .4-26
Readiness for inspection maintenance (I/M)
test........................9-19
Rear power windows..............2-29
Rear seat.....................1-4
Rear window and outside mirror defroster
switch......................2-18
Rear window wiper and washer switches . . .2-18
10-4
ZREVIEW COPYÐ2007 Versa(vrs)
Owners ManualÐUSA_English(nna)
10/05/06Ðdebbie
X