STARTER MOTOR
STR-35
< ON-VEHICLE REPAIR >[K9K]
C
D
E
F
G
H
I
J
K
L
MA
STR
N
P O
ON-VEHICLE REPAIR
STARTER MOTOR
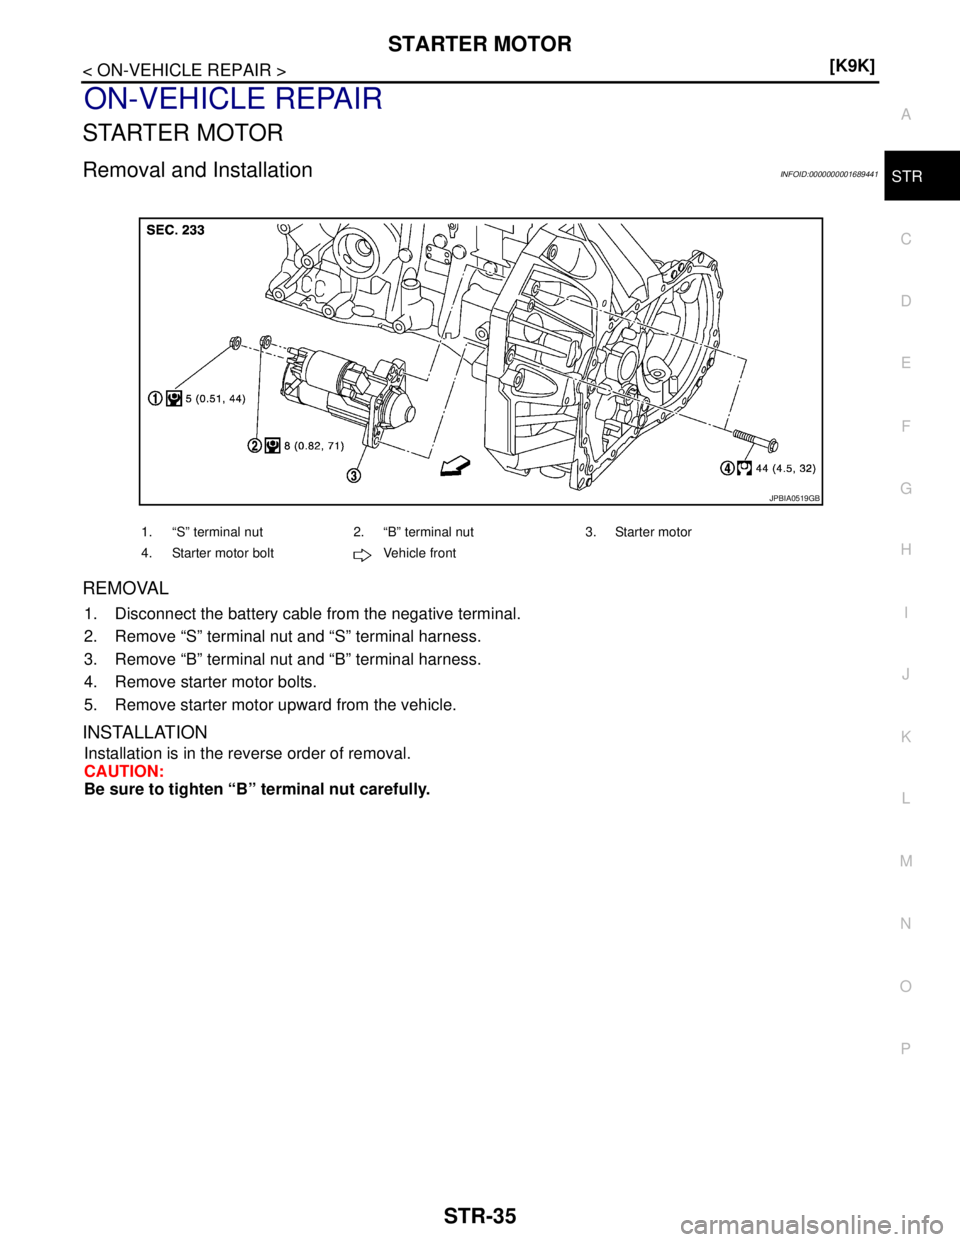
Removal and InstallationINFOID:0000000001689441
REMOVAL
1. Disconnect the battery cable from the negative terminal.
2. Remove “S” terminal nut and “S” terminal harness.
3. Remove “B” terminal nut and “B” terminal harness.
4. Remove starter motor bolts.
5. Remove starter motor upward from the vehicle.
INSTALLATION
Installation is in the reverse order of removal.
CAUTION:
Be sure to tighten “B” terminal nut carefully.
1. “S” terminal nut 2. “B” terminal nut 3. Starter motor
4. Starter motor bolt Vehicle front
JPBIA0519GB
SYSTEM SYMPTOM
TM-135
< SYMPTOM DIAGNOSIS >[TYPE 1 (4AT: RE4F03B)]
C
E
F
G
H
I
J
K
L
MA
B
TM
N
O
P
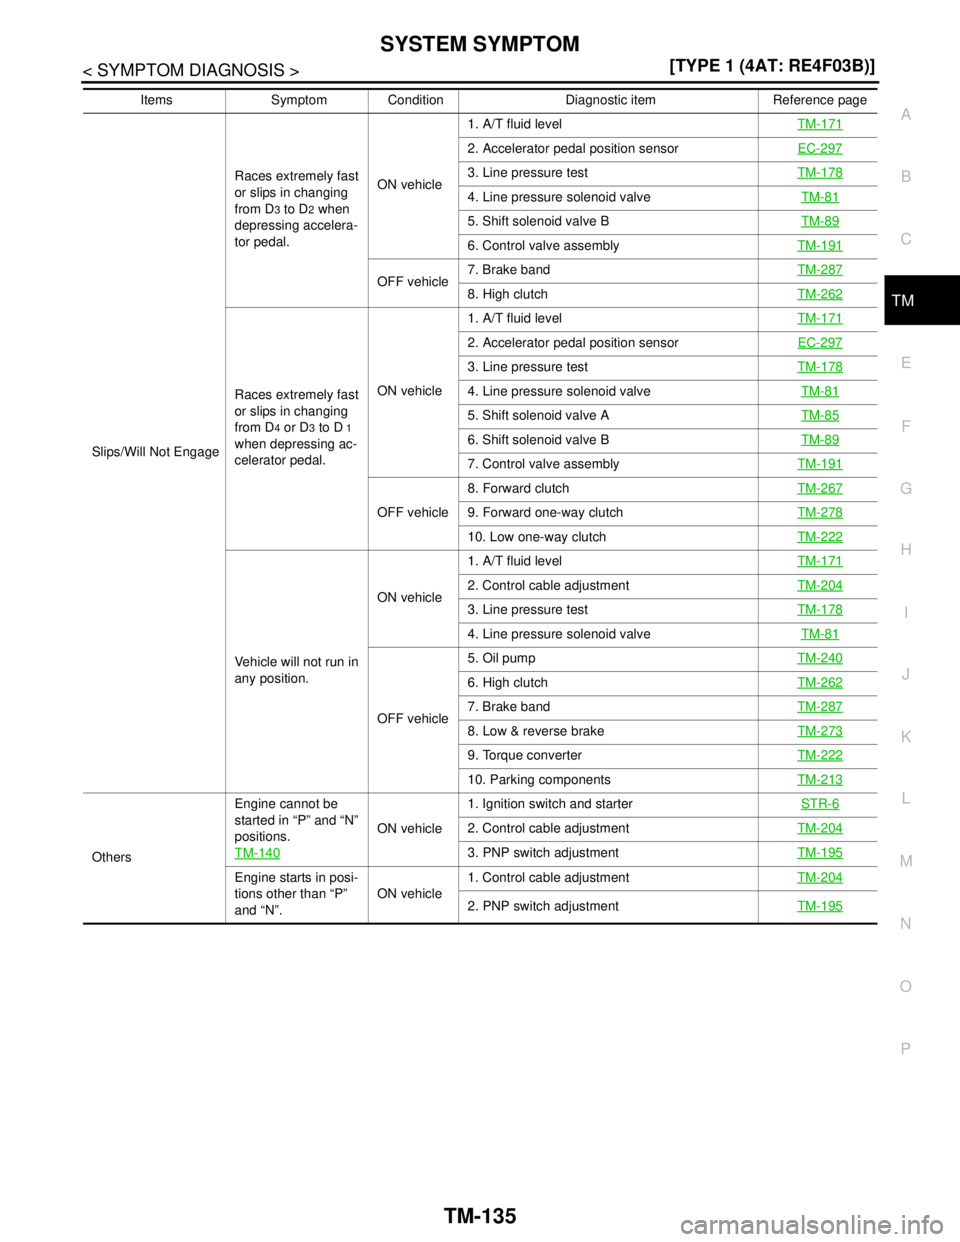
Slips/Will Not EngageRaces extremely fast
or slips in changing
from D
3 to D2 when
depressing accelera-
tor pedal. ON vehicle1. A/T fluid levelTM-171
2. Accelerator pedal position sensor EC-297
3. Line pressure testTM-178
4. Line pressure solenoid valveTM-81
5. Shift solenoid valve BTM-89
6. Control valve assemblyTM-191
OFF vehicle7. Brake bandTM-2878. High clutchTM-262
Races extremely fast
or slips in changing
from D
4 or D3 to D 1
when depressing ac-
celerator pedal.ON vehicle1. A/T fluid levelTM-171
2. Accelerator pedal position sensorEC-297
3. Line pressure testTM-178
4. Line pressure solenoid valveTM-81
5. Shift solenoid valve ATM-85
6. Shift solenoid valve BTM-89
7. Control valve assemblyTM-191
OFF vehicle8. Forward clutchTM-2679. Forward one-way clutchTM-278
10. Low one-way clutchTM-222
Vehicle will not run in
any position.ON vehicle1. A/T fluid levelTM-171
2. Control cable adjustmentTM-204
3. Line pressure testTM-178
4. Line pressure solenoid valveTM-81
OFF vehicle5. Oil pumpTM-240
6. High clutchTM-262
7. Brake bandTM-287
8. Low & reverse brakeTM-273
9. Torque converterTM-222
10. Parking componentsTM-213
OthersEngine cannot be
started in “P” and “N”
positions.
TM-140
ON vehicle1. Ignition switch and starterSTR-62. Control cable adjustmentTM-204
3. PNP switch adjustmentTM-195
Engine starts in posi-
tions other than “P”
and “N”.ON vehicle1. Control cable adjustmentTM-204
2. PNP switch adjustmentTM-195
Items Symptom Condition Diagnostic item Reference page
SYSTEM SYMPTOM
TM-437
< SYMPTOM DIAGNOSIS >[TYPE 2 (4AT: RE4F03B)]
C
E
F
G
H
I
J
K
L
MA
B
TM
N
O
P
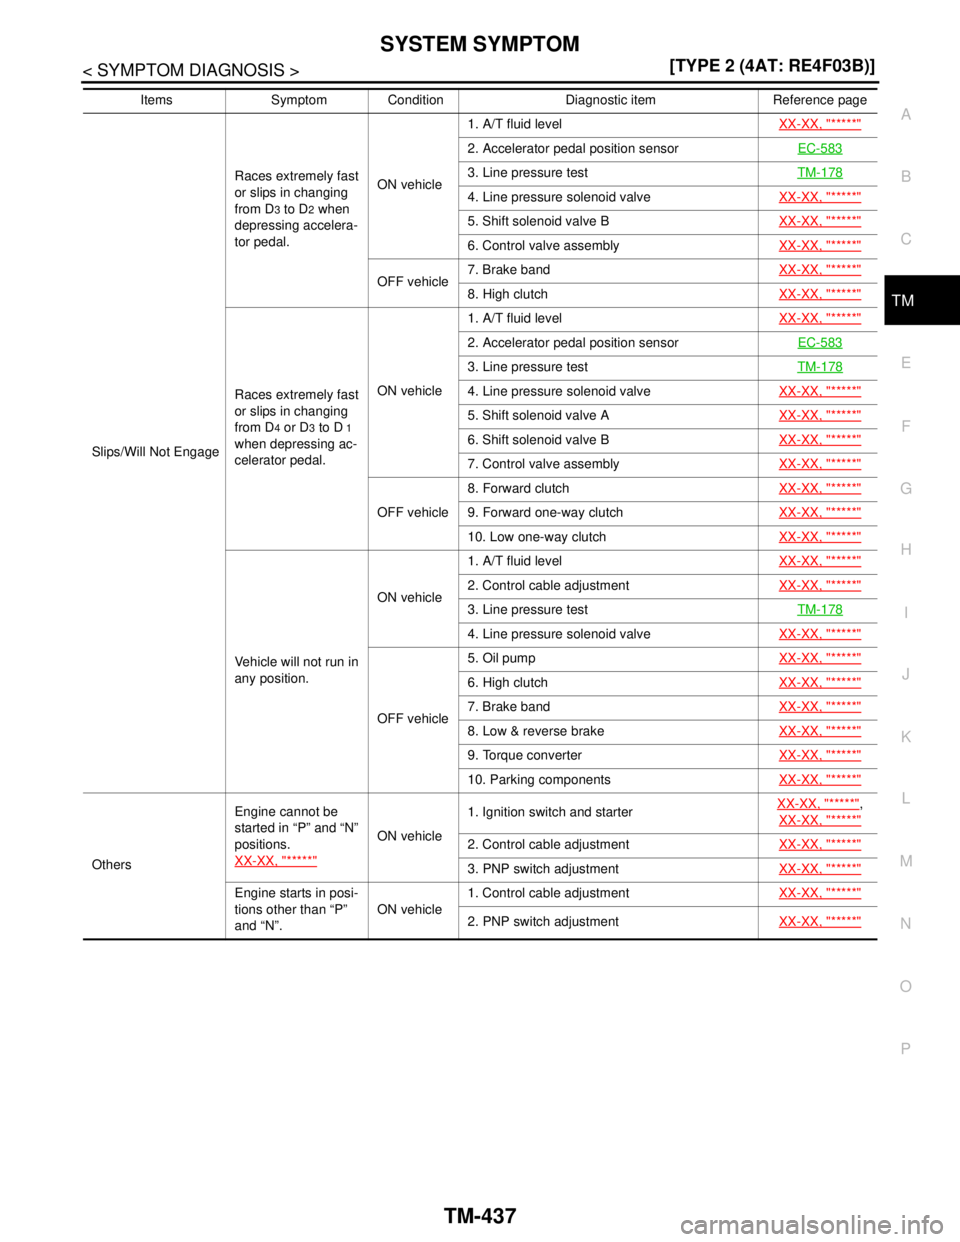
Slips/Will Not EngageRaces extremely fast
or slips in changing
from D
3 to D2 when
depressing accelera-
tor pedal. ON vehicle1. A/T fluid levelXX-XX, "*****"
2. Accelerator pedal position sensor EC-583
3. Line pressure testTM-178
4. Line pressure solenoid valveXX-XX, "*****"
5. Shift solenoid valve BXX-XX, "*****"
6. Control valve assemblyXX-XX, "*****"
OFF vehicle7. Brake bandXX-XX, "*****"8. High clutchXX-XX, "*****"
Races extremely fast
or slips in changing
from D
4 or D3 to D 1
when depressing ac-
celerator pedal.ON vehicle1. A/T fluid levelXX-XX, "*****"
2. Accelerator pedal position sensorEC-583
3. Line pressure testTM-178
4. Line pressure solenoid valveXX-XX, "*****"
5. Shift solenoid valve AXX-XX, "*****"
6. Shift solenoid valve BXX-XX, "*****"
7. Control valve assemblyXX-XX, "*****"
OFF vehicle8. Forward clutchXX-XX, "*****"9. Forward one-way clutchXX-XX, "*****"
10. Low one-way clutchXX-XX, "*****"
Vehicle will not run in
any position.ON vehicle1. A/T fluid levelXX-XX, "*****"
2. Control cable adjustmentXX-XX, "*****"
3. Line pressure testTM-178
4. Line pressure solenoid valveXX-XX, "*****"
OFF vehicle5. Oil pumpXX-XX, "*****"
6. High clutchXX-XX, "*****"
7. Brake bandXX-XX, "*****"
8. Low & reverse brakeXX-XX, "*****"
9. Torque converterXX-XX, "*****"
10. Parking componentsXX-XX, "*****"
OthersEngine cannot be
started in “P” and “N”
positions.
XX-XX, "*****"
ON vehicle1. Ignition switch and starterXX-XX, "*****"
,
XX-XX, "*****"
2. Control cable adjustmentXX-XX, "*****"
3. PNP switch adjustmentXX-XX, "*****"
Engine starts in posi-
tions other than “P”
and “N”.ON vehicle1. Control cable adjustmentXX-XX, "*****"
2. PNP switch adjustmentXX-XX, "*****"
Items Symptom Condition Diagnostic item Reference page
TRANSAXLE ASSEMBLY
TM-633
< REMOVAL AND INSTALLATION >[5MT: RS5F91R]
C
E
F
G
H
I
J
K
L
MA
B
TM
N
O
P
REMOVAL AND INSTALLATION
TRANSAXLE ASSEMBLY
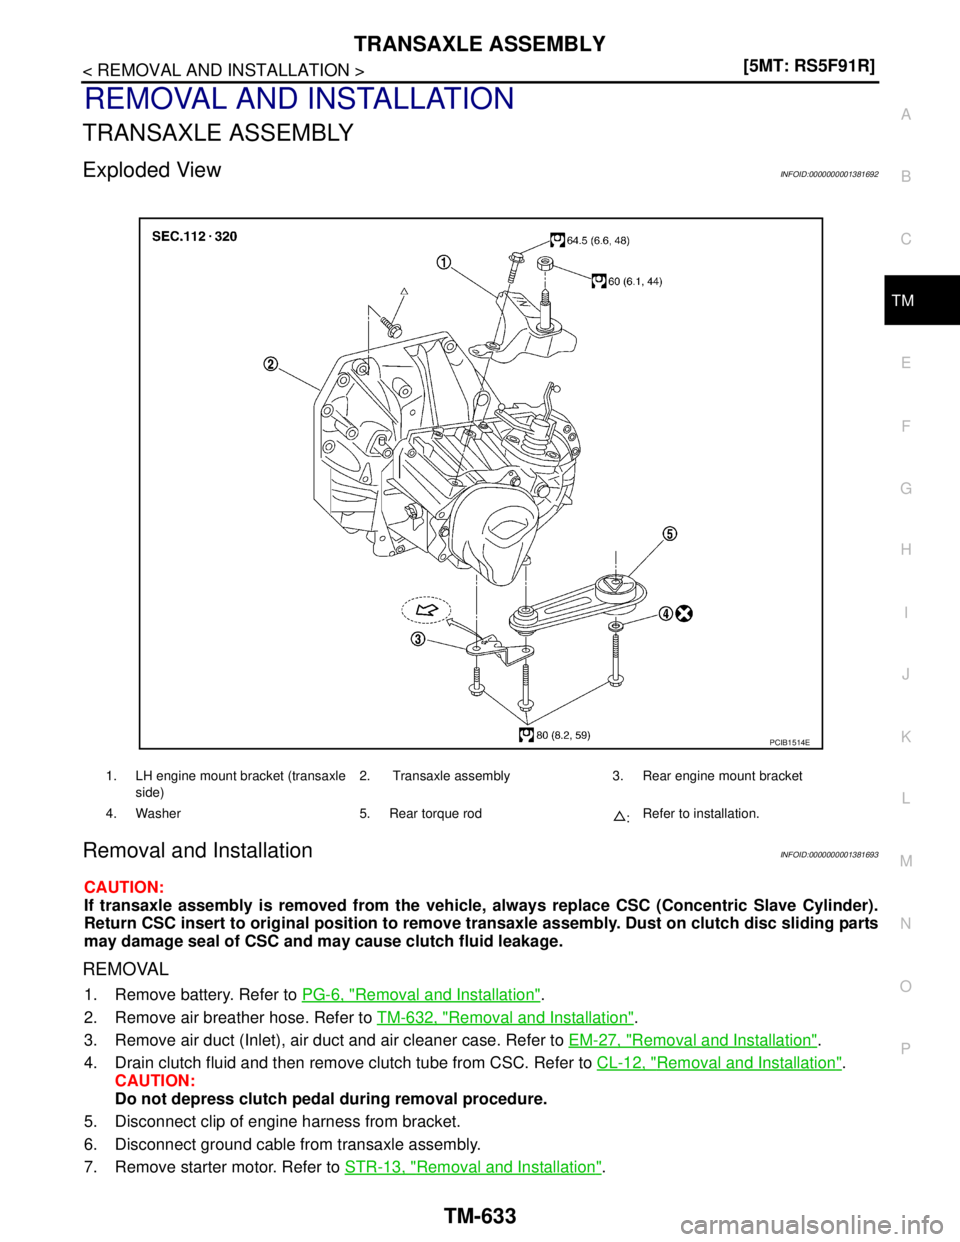
Exploded ViewINFOID:0000000001381692
Removal and InstallationINFOID:0000000001381693
CAUTION:
If transaxle assembly is removed from the vehicle, always replace CSC (Concentric Slave Cylinder).
Return CSC insert to original position to remove transaxle assembly. Dust on clutch disc sliding parts
may damage seal of CSC and may cause clutch fluid leakage.
REMOVAL
1. Remove battery. Refer to PG-6, "Removal and Installation".
2. Remove air breather hose. Refer to TM-632, "
Removal and Installation".
3. Remove air duct (Inlet), air duct and air cleaner case. Refer to EM-27, "
Removal and Installation".
4. Drain clutch fluid and then remove clutch tube from CSC. Refer to CL-12, "
Removal and Installation".
CAUTION:
Do not depress clutch pedal during removal procedure.
5. Disconnect clip of engine harness from bracket.
6. Disconnect ground cable from transaxle assembly.
7. Remove starter motor. Refer to STR-13, "
Removal and Installation".
1. LH engine mount bracket (transaxle
side)2. Transaxle assembly 3. Rear engine mount bracket
4. Washer 5. Rear torque rod
:Refer to installation.
PCIB1514E