2007 NISSAN QUEST brake
[x] Cancel search: brakePage 306 of 384
7. Refill engine with recommended oil through
the oil filler opening, then install the oil filler
cap securely.
See “Capacities and recommended
fuel/lubricants” in the “Technical and con-
sumer information” section of this manual for
drain and refill capacity.
The drain and refill capacity depends on the
oil temperature and drain time. Use these
specifications for reference only. Always use
the dipstick to determine when the proper
amount of oil is in the engine.
8. Start the engine. Check for leakage around
the drain plug and oil filter. Correct as re-
quired.
9. Turn the engine off and wait more than 10
minutes. Check the oil level with the dipstick.
Add engine oil if necessary.
CHANGING ENGINE OIL FILTER
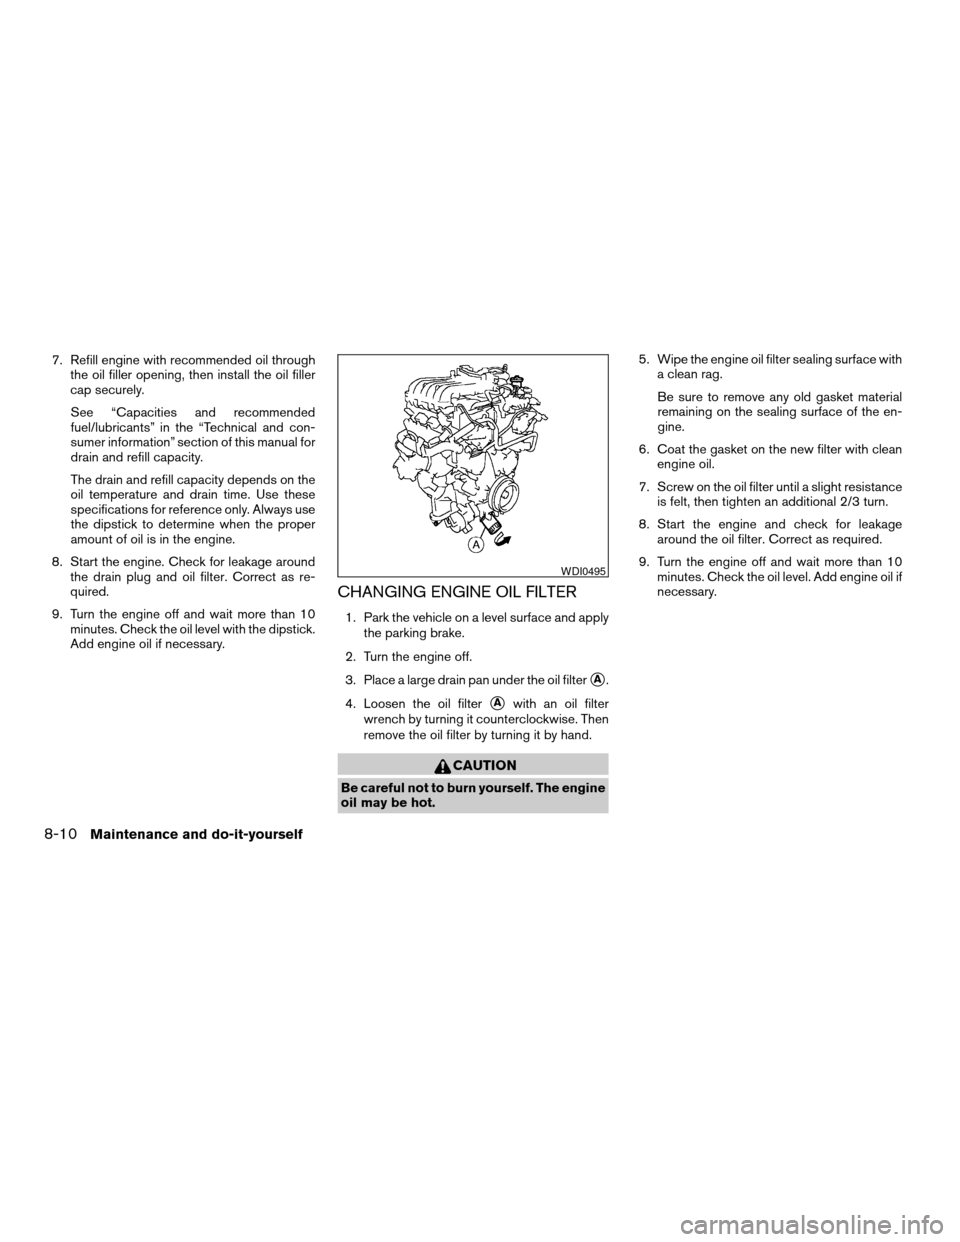
1. Park the vehicle on a level surface and apply
the parking brake.
2. Turn the engine off.
3. Place a large drain pan under the oil filter
sA.
4. Loosen the oil filter
sAwith an oil filter
wrench by turning it counterclockwise. Then
remove the oil filter by turning it by hand.
CAUTION
Be careful not to burn yourself. The engine
oil may be hot.5. Wipe the engine oil filter sealing surface with
a clean rag.
Be sure to remove any old gasket material
remaining on the sealing surface of the en-
gine.
6. Coat the gasket on the new filter with clean
engine oil.
7. Screw on the oil filter until a slight resistance
is felt, then tighten an additional 2/3 turn.
8. Start the engine and check for leakage
around the oil filter. Correct as required.
9. Turn the engine off and wait more than 10
minutes. Check the oil level. Add engine oil if
necessary.
WDI0495
8-10Maintenance and do-it-yourself
ZREVIEW COPYÐ2007 Quest(van)
Owners ManualÐUSA_English(nna)
02/27/06Ðdebbie
X
Page 308 of 384
For further brake fluid specification information,
refer to “Capacities and recommended
fuel/lubricants” in the “Technical and consumer
information” section of this manual.
WARNING
Use only new fluid from a sealed con-
tainer. Old, inferior or contaminated fluid
may damage the brake system. The use of
improper fluids can damage the brake
system and affect the vehicle’s stopping
ability.
CAUTION
Do not spill the fluid on any painted sur-
faces. This will damage the paint. If fluid is
spilled, immediately wash the surface
with water.BRAKE FLUID
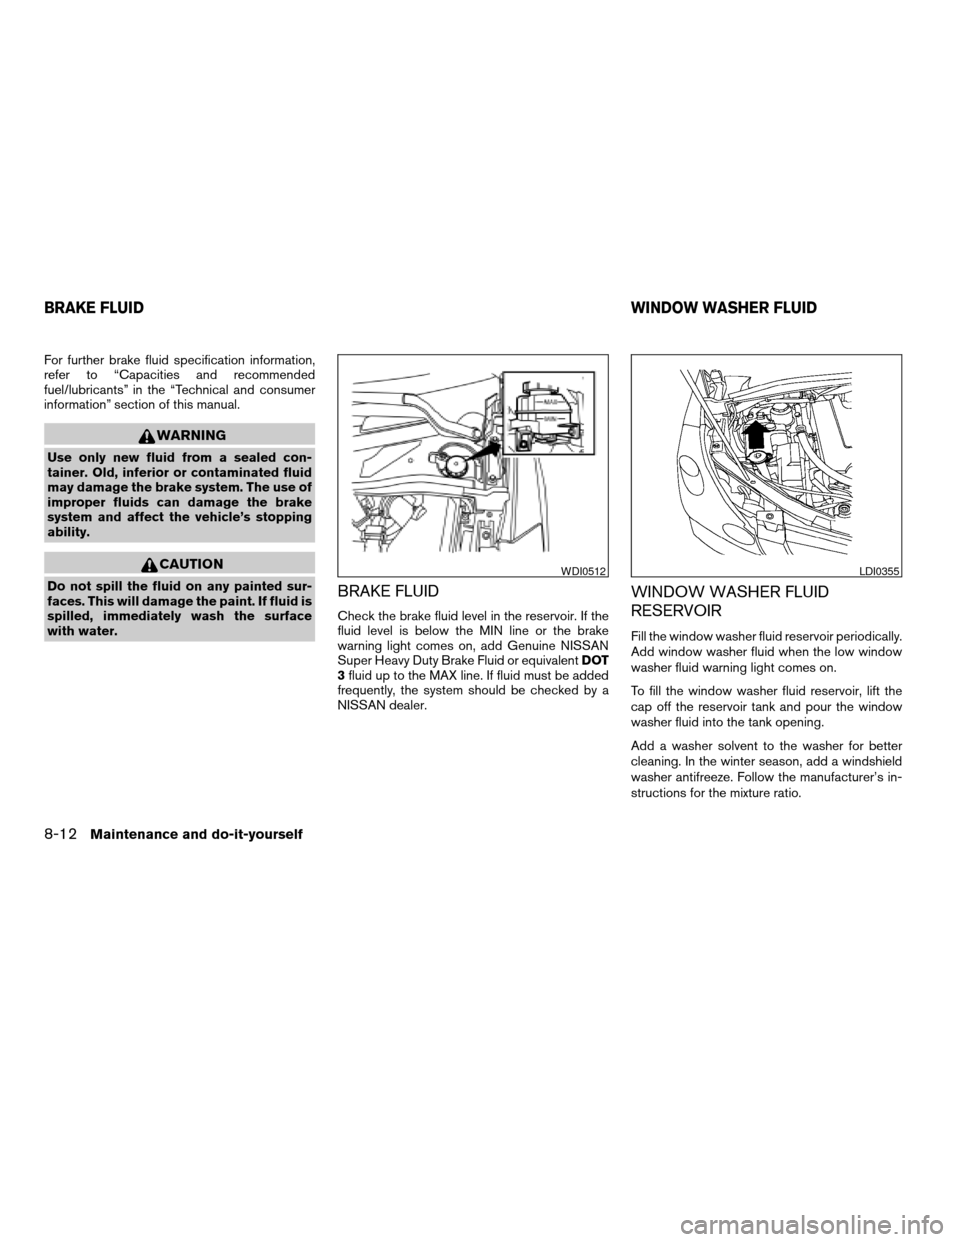
Check the brake fluid level in the reservoir. If the
fluid level is below the MIN line or the brake
warning light comes on, add Genuine NISSAN
Super Heavy Duty Brake Fluid or equivalentDOT
3fluid up to the MAX line. If fluid must be added
frequently, the system should be checked by a
NISSAN dealer.
WINDOW WASHER FLUID
RESERVOIR
Fill the window washer fluid reservoir periodically.
Add window washer fluid when the low window
washer fluid warning light comes on.
To fill the window washer fluid reservoir, lift the
cap off the reservoir tank and pour the window
washer fluid into the tank opening.
Add a washer solvent to the washer for better
cleaning. In the winter season, add a windshield
washer antifreeze. Follow the manufacturer’s in-
structions for the mixture ratio.
WDI0512LDI0355
BRAKE FLUIDWINDOW WASHER FLUID
8-12Maintenance and do-it-yourself
ZREVIEW COPYÐ2007 Quest(van)
Owners ManualÐUSA_English(nna)
02/27/06Ðdebbie
X
Page 312 of 384
WARNING
Be sure the engine and ignition switch are
off and that the parking brake is engaged
securely.
CAUTION
Be sure to use the correct socket to re-
move the spark plugs. An incorrect socket
can damage the spark plugs.
If replacement is required, see your NISSAN
dealer for assistance.
The air cleaner filter should not be cleaned and
reused. Replace it according to the maintenance
log shown in the “NISSAN Service and Mainte-
nance Guide.” When replacing the filter, wipe the
inside of the air cleaner filter housing and the
cover with a damp cloth.
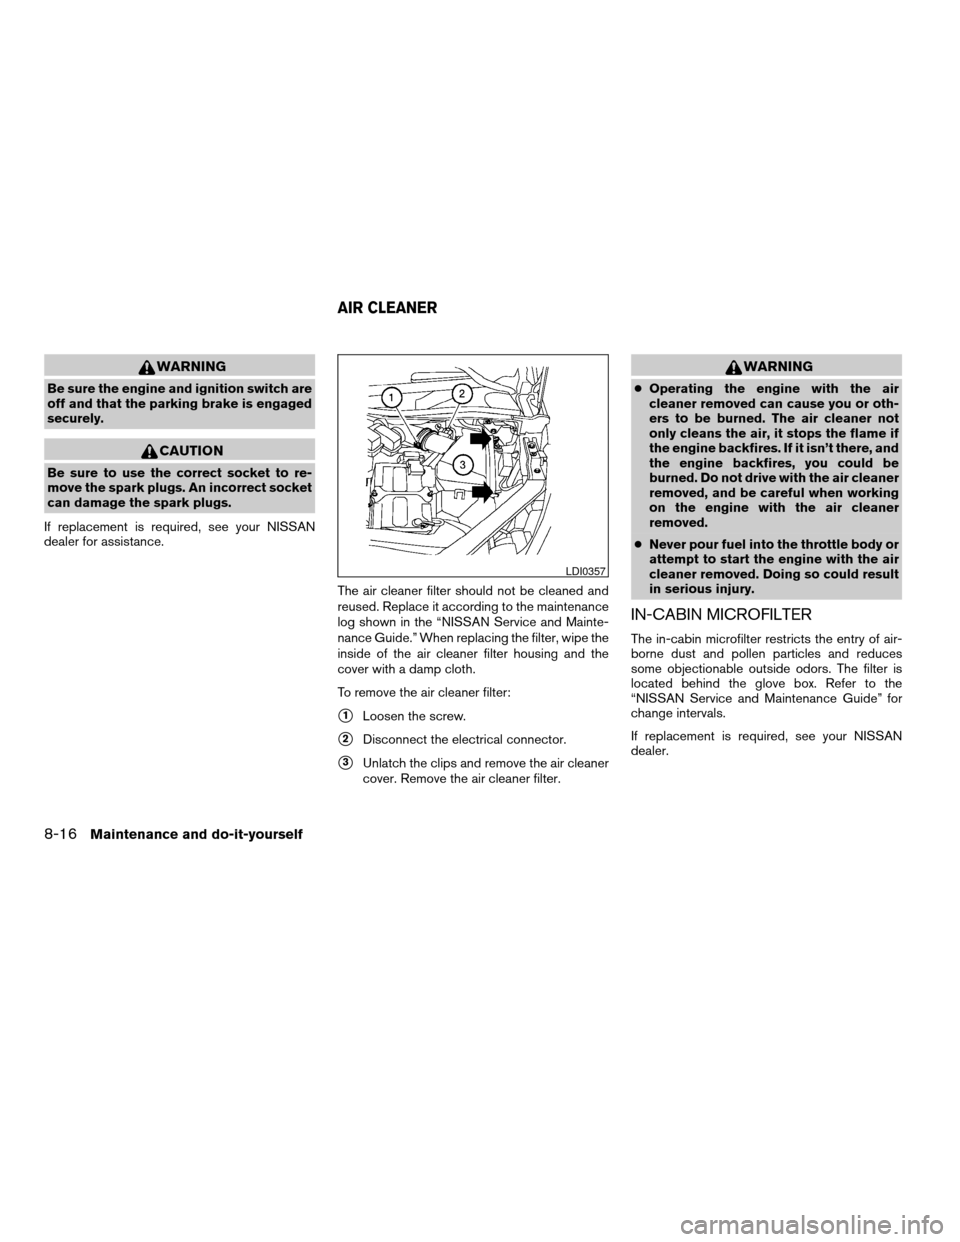
To remove the air cleaner filter:
s1Loosen the screw.
s2Disconnect the electrical connector.
s3Unlatch the clips and remove the air cleaner
cover. Remove the air cleaner filter.
WARNING
cOperating the engine with the air
cleaner removed can cause you or oth-
ers to be burned. The air cleaner not
only cleans the air, it stops the flame if
the engine backfires. If it isn’t there, and
the engine backfires, you could be
burned. Do not drive with the air cleaner
removed, and be careful when working
on the engine with the air cleaner
removed.
cNever pour fuel into the throttle body or
attempt to start the engine with the air
cleaner removed. Doing so could result
in serious injury.
IN-CABIN MICROFILTER
The in-cabin microfilter restricts the entry of air-
borne dust and pollen particles and reduces
some objectionable outside odors. The filter is
located behind the glove box. Refer to the
“NISSAN Service and Maintenance Guide” for
change intervals.
If replacement is required, see your NISSAN
dealer.
LDI0357
AIR CLEANER
8-16Maintenance and do-it-yourself
ZREVIEW COPYÐ2007 Quest(van)
Owners ManualÐUSA_English(nna)
02/27/06Ðdebbie
X
Page 316 of 384
Self-adjusting brakes
Your vehicle is equipped with self-adjusting
brakes.
The front and rear disc-type brakes self-adjust
every time the brake pedal is applied.
WARNING
See a NISSAN dealer for a brake system
check if the brake pedal height does not
return to normal.
Brake pad wear indicators
The disc brake pads on your vehicle have audible
wear indicators. When a brake pad requires re-
placement, a high pitched scraping or screech-
ing sound will be heard when the vehicle is in
motion. The noise will be heard whether or not the
brake pedal is depressed. Have the brakes
checked as soon as possible if the wear indicator
sound is heard.
Under some driving or climate conditions, occa-
sional brake squeak, squeal or other noise may
be heard. Occasional brake noise during light to
moderate stops is normal and does not affect the
function or performance of the brake system.Proper brake inspection intervals should
be followed.For more information regarding
brake inspections, see the appropriate mainte-
nance schedule information in the “NISSAN Ser-
vice and Maintenance Guide”.
ENGINE COMPARTMENT
CAUTION
Never use a fuse of a higher or lower
amperage rating than specified on the
fuse box cover. This could damage the
electrical system or cause a fire.
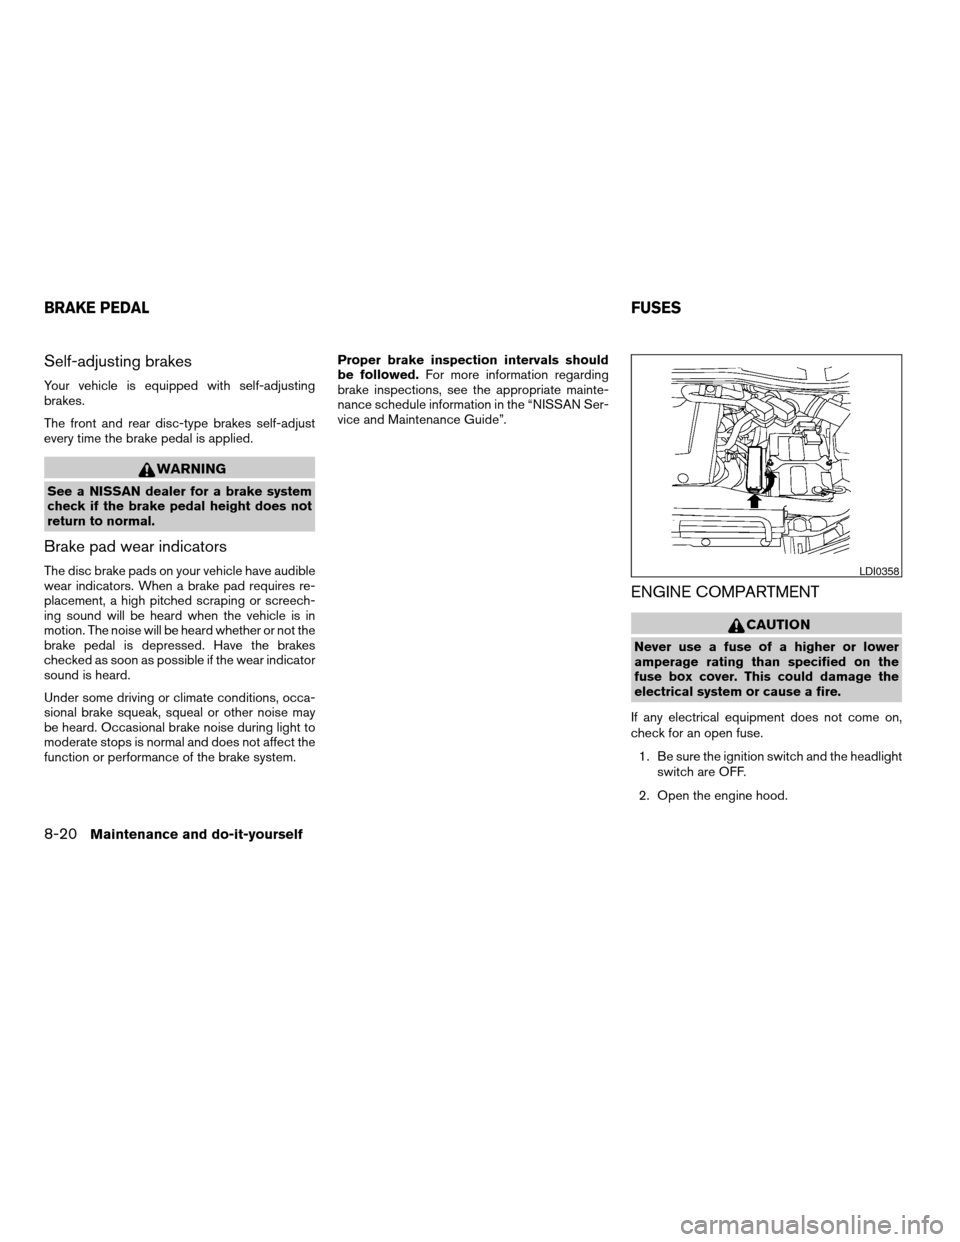
If any electrical equipment does not come on,
check for an open fuse.
1. Be sure the ignition switch and the headlight
switch are OFF.
2. Open the engine hood.
LDI0358
BRAKE PEDALFUSES
8-20Maintenance and do-it-yourself
ZREVIEW COPYÐ2007 Quest(van)
Owners ManualÐUSA_English(nna)
02/27/06Ðdebbie
X
Page 337 of 384
cThe original tires have built-in
tread wear indicators. When the
wear indicators are visible, the
tire(s) should be replaced.
cTires degrade with age and use.
Have tires, including the spare,
over 6 years old checked by a
qualified technician because
some tire damage may not be ob-
vious. Replace the tires as neces-
sary to prevent tire failure and
possible personal injury.
cImproper service of the spare tire
may result in serious personal in-
jury. If it is necessary to repair the
spare tire, contact a NISSAN
dealer.
cFor additional information re-
garding tires, refer to “Important
Tire Safety Information” (US) or
“Tire Safety Information”
(Canada) in the Warranty Infor-
mation Booklet.Replacing wheels and tires
When replacing a tire, use the same size, tread
design, speed rating and load carrying capacity
as originally equipped. Recommended types and
sizes are shown in “Wheels and tires” in the
“Technical and consumer information” section of
this manual.
WARNING
cThe use of tires other than those recom-
mended or the mixed use of tires of
different brands, construction (bias,
bias-belted or radial) , or tread patterns
can adversely affect the ride, braking,
handling, ground clearance, body-to-
tire clearance, tire chain clearance,
speedometer calibration, headlight aim
and bumper height. Some of these ef-
fects may lead to accidents and could
result in serious personal injury.
cIf the wheels are changed for any rea-
son, always replace with wheels which
have the same off-set dimension.
Wheels of a different off-set could
cause premature tire wear, degrade ve-
hicle handling characteristics and/or
interference with the brake
discs/drums. Such interference can
lead to decreased braking efficiencyand/or early brake pad/shoe wear. Re-
fer to “Wheels and tires” in the “Techni-
cal and consumer information” section
of this manual for wheel off-set
dimensions.
cWhen a spare tire is mounted or a wheel
is replaced, tire pressure will not be
indicated, the TPMS will not function
and the low tire pressure warning light
will flash. Contact your NISSAN dealer
as soon as possible for tire replacement
and/or system resetting.
cReplacing tires with those not originally
specified by NISSAN could affect the
proper operation of the TPMS.
cDo not install a deformed wheel or tire
even if it has been repaired. Such
wheels or tires could have structural
damage and could fail without warning.
cThe use of retread tires is not
recommended.
cFor additional information regarding
tires, refer to “Important Tire Safety In-
formation” (US) or “Tire Safety Informa-
tion” (Canada) in the Warranty Informa-
tion Booklet.
Maintenance and do-it-yourself8-41
ZREVIEW COPYÐ2007 Quest(van)
Owners ManualÐUSA_English(nna)
02/27/06Ðdebbie
X
Page 342 of 384
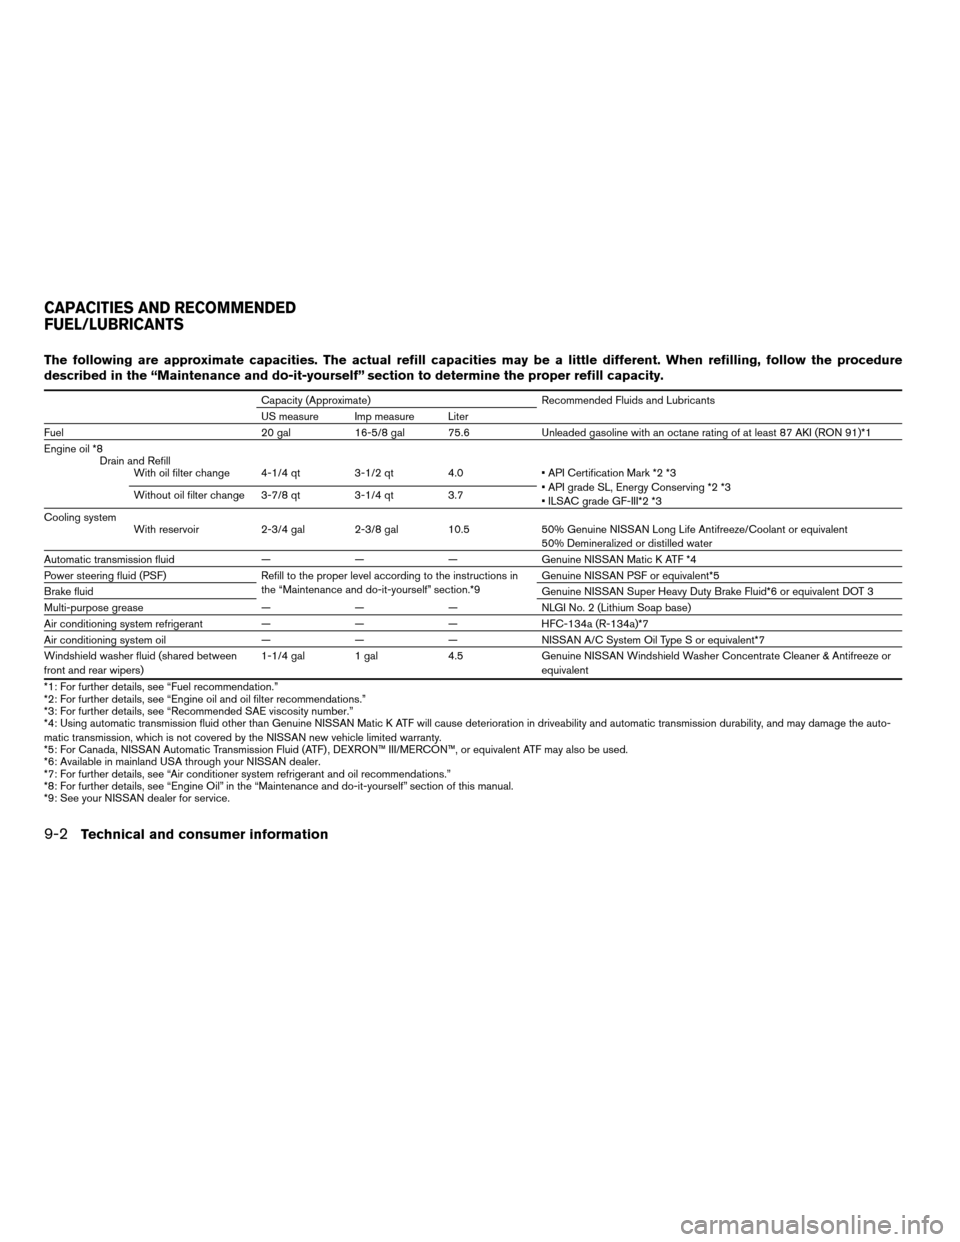
The following are approximate capacities. The actual refill capacities may be a little different. When refilling, follow the procedure
described in the “Maintenance and do-it-yourself” section to determine the proper refill capacity.
Capacity (Approximate) Recommended Fluids and Lubricants
US measure Imp measure Liter
Fuel 20 gal 16-5/8 gal 75.6 Unleaded gasoline with an octane rating of at least 87 AKI (RON 91)*1
Engine oil *8
Drain and Refill
With oil filter change 4-1/4 qt 3-1/2 qt 4.0 • API Certification Mark *2 *3
• API grade SL, Energy Conserving *2 *3
• ILSAC grade GF-III*2 *3 Without oil filter change 3-7/8 qt 3-1/4 qt 3.7
Cooling system
With reservoir 2-3/4 gal 2-3/8 gal 10.5 50% Genuine NISSAN Long Life Antifreeze/Coolant or equivalent
50% Demineralized or distilled water
Automatic transmission fluid — — — Genuine NISSAN Matic K ATF *4
Power steering fluid (PSF) Refill to the proper level according to the instructions in
the “Maintenance and do-it-yourself” section.*9Genuine NISSAN PSF or equivalent*5
Brake fluidGenuine NISSAN Super Heavy Duty Brake Fluid*6 or equivalent DOT 3
Multi-purpose grease — — — NLGI No. 2 (Lithium Soap base)
Air conditioning system refrigerant — — — HFC-134a (R-134a)*7
Air conditioning system oil — — — NISSAN A/C System Oil Type S or equivalent*7
Windshield washer fluid (shared between
front and rear wipers)1-1/4 gal 1 gal 4.5 Genuine NISSAN Windshield Washer Concentrate Cleaner & Antifreeze or
equivalent
*1: For further details, see “Fuel recommendation.”
*2: For further details, see “Engine oil and oil filter recommendations.”
*3: For further details, see “Recommended SAE viscosity number.”
*4: Using automatic transmission fluid other than Genuine NISSAN Matic K ATF will cause deterioration in driveability and automatic transmission durability, and may damage the auto-
matic transmission, which is not covered by the NISSAN new vehicle limited warranty.
*5: For Canada, NISSAN Automatic Transmission Fluid (ATF) , DEXRON™ III/MERCON™, or equivalent ATF may also be used.
*6: Available in mainland USA through your NISSAN dealer.
*7: For further details, see “Air conditioner system refrigerant and oil recommendations.”
*8: For further details, see “Engine Oil” in the “Maintenance and do-it-yourself” section of this manual.
*9: See your NISSAN dealer for service.
CAPACITIES AND RECOMMENDED
FUEL/LUBRICANTS
9-2Technical and consumer information
ZREVIEW COPYÐ2007 Quest(van)
Owners ManualÐUSA_English(nna)
02/27/06Ðdebbie
X
Page 356 of 384
WARNING
Overloading or improper loading of a
trailer and its cargo can adversely affect
vehicle handling, braking and perfor-
mance and may lead to accidents.
CAUTION
cDo not tow a trailer or haul a heavy load
for the first 500 miles (800 km) . Your
engine, axle or other parts could be
damaged.
cFor the first 500 miles (800 km) that you
tow a trailer, do not drive over 50 mph
(80 km/h) and do not make starts at full
throttle. This helps the engine and other
parts of your vehicle wear in at the
heavier loads.
Your new vehicle was designed to be used pri-
marily to carry passengers and cargo. Remember
that towing a trailer places additional loads on
your vehicle’s engine, drive train, steering, brak-
ing and other systems.
A NISSAN Towing Guide (U.S. only) is available
on the website at www.nissanusa.com. This
guide includes information on trailer towing ca-
pability and the special equipment required for
proper towing.
MAXIMUM LOAD LIMITS
Maximum trailer loads
Never allow the total trailer load to exceed the
value specified in the “Towing
Load/Specification” chart found later in this sec-
tion. The total trailer load equals trailer weight
plus its cargo weight.
cWhen towing a trailer load of 1,000 lbs.
(454 kg) or more, trailers with a brake
system must be used.
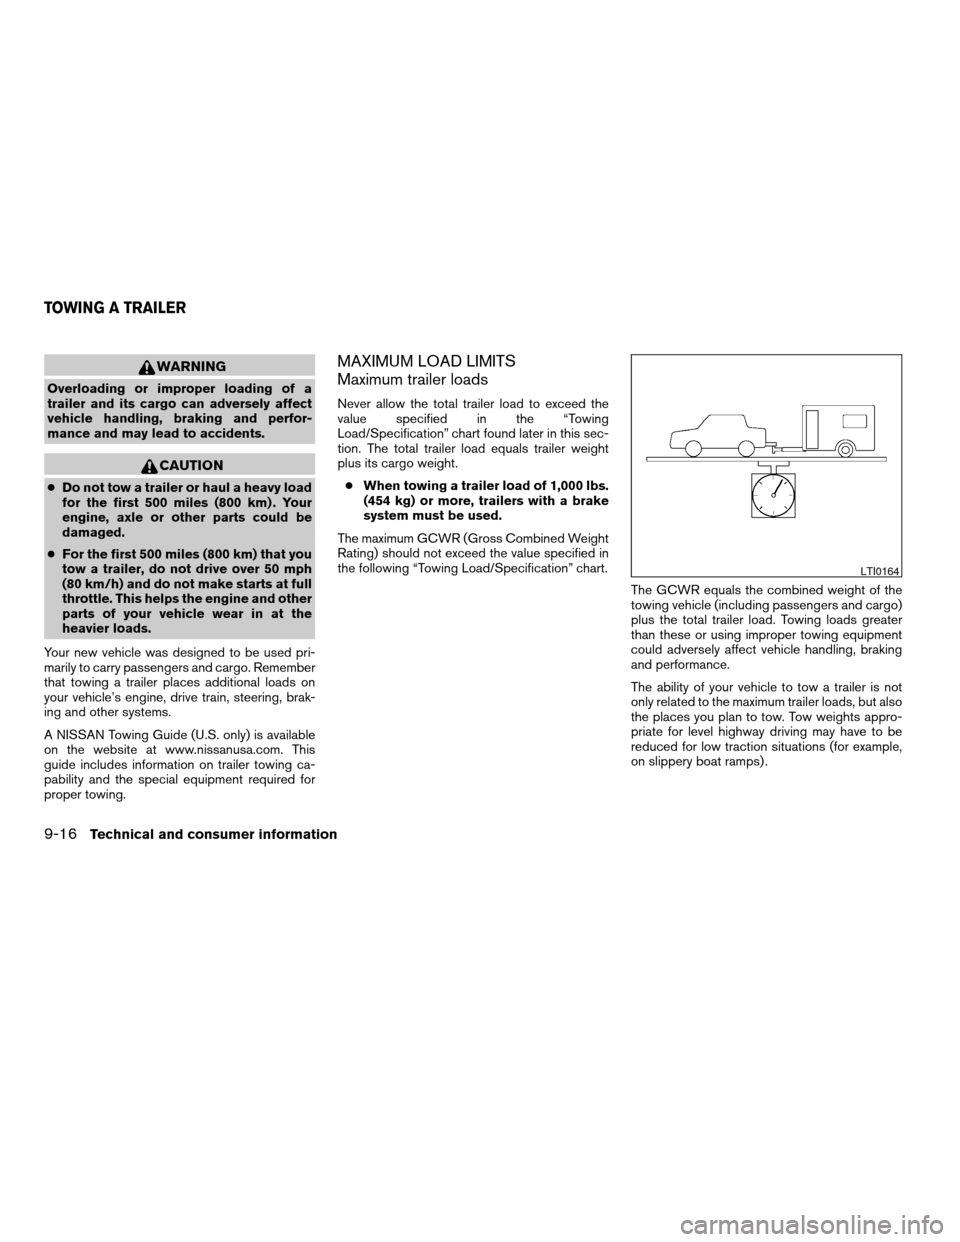
The maximum GCWR (Gross Combined Weight
Rating) should not exceed the value specified in
the following “Towing Load/Specification” chart.
The GCWR equals the combined weight of the
towing vehicle (including passengers and cargo)
plus the total trailer load. Towing loads greater
than these or using improper towing equipment
could adversely affect vehicle handling, braking
and performance.
The ability of your vehicle to tow a trailer is not
only related to the maximum trailer loads, but also
the places you plan to tow. Tow weights appro-
priate for level highway driving may have to be
reduced for low traction situations (for example,
on slippery boat ramps) .
LTI0164
TOWING A TRAILER
9-16Technical and consumer information
ZREVIEW COPYÐ2007 Quest(van)
Owners ManualÐUSA_English(nna)
02/27/06Ðdebbie
X
Page 359 of 384
to allow for proper tongue load. Always verify that
available capacities are under the required rat-
ings.
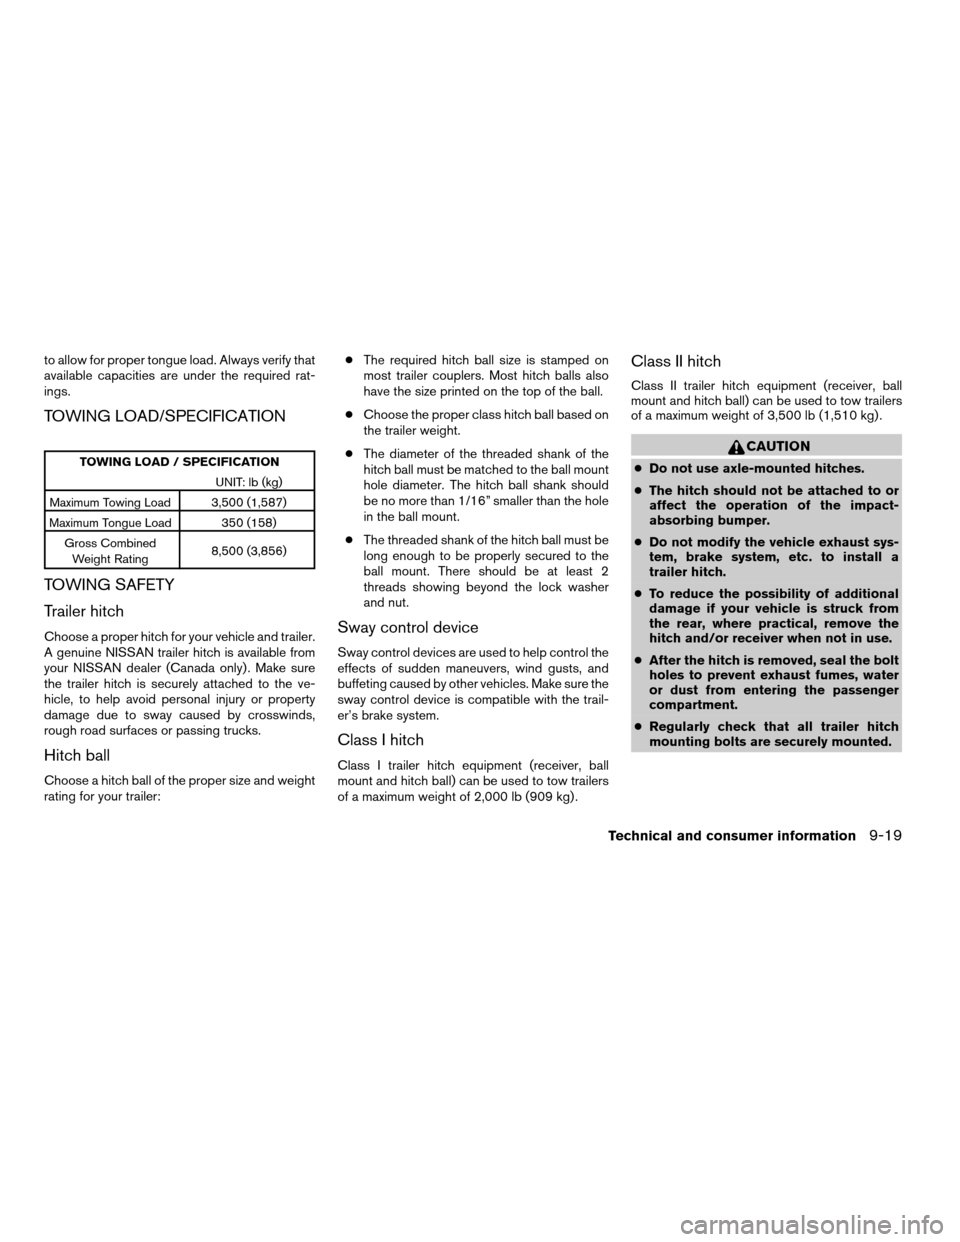
TOWING LOAD/SPECIFICATION
TOWING LOAD / SPECIFICATION
UNIT: lb (kg)
Maximum Towing Load 3,500 (1,587)
Maximum Tongue Load 350 (158)
Gross Combined
Weight Rating8,500 (3,856)
TOWING SAFETY
Trailer hitch
Choose a proper hitch for your vehicle and trailer.
A genuine NISSAN trailer hitch is available from
your NISSAN dealer (Canada only) . Make sure
the trailer hitch is securely attached to the ve-
hicle, to help avoid personal injury or property
damage due to sway caused by crosswinds,
rough road surfaces or passing trucks.
Hitch ball
Choose a hitch ball of the proper size and weight
rating for your trailer:cThe required hitch ball size is stamped on
most trailer couplers. Most hitch balls also
have the size printed on the top of the ball.
cChoose the proper class hitch ball based on
the trailer weight.
cThe diameter of the threaded shank of the
hitch ball must be matched to the ball mount
hole diameter. The hitch ball shank should
be no more than 1/16” smaller than the hole
in the ball mount.
cThe threaded shank of the hitch ball must be
long enough to be properly secured to the
ball mount. There should be at least 2
threads showing beyond the lock washer
and nut.
Sway control device
Sway control devices are used to help control the
effects of sudden maneuvers, wind gusts, and
buffeting caused by other vehicles. Make sure the
sway control device is compatible with the trail-
er’s brake system.
Class I hitch
Class I trailer hitch equipment (receiver, ball
mount and hitch ball) can be used to tow trailers
of a maximum weight of 2,000 lb (909 kg) .
Class II hitch
Class II trailer hitch equipment (receiver, ball
mount and hitch ball) can be used to tow trailers
of a maximum weight of 3,500 lb (1,510 kg) .
CAUTION
cDo not use axle-mounted hitches.
cThe hitch should not be attached to or
affect the operation of the impact-
absorbing bumper.
cDo not modify the vehicle exhaust sys-
tem, brake system, etc. to install a
trailer hitch.
cTo reduce the possibility of additional
damage if your vehicle is struck from
the rear, where practical, remove the
hitch and/or receiver when not in use.
cAfter the hitch is removed, seal the bolt
holes to prevent exhaust fumes, water
or dust from entering the passenger
compartment.
cRegularly check that all trailer hitch
mounting bolts are securely mounted.
Technical and consumer information9-19
ZREVIEW COPYÐ2007 Quest(van)
Owners ManualÐUSA_English(nna)
02/27/06Ðdebbie
X