2007 NISSAN NOTE towing
[x] Cancel search: towingPage 9 of 235

FRONT
1.Bonnet (P. 3-10)
2.Windscreen (Wiper and washer switch
P. 2-13, Wiper replacement P. 8-19, Washer
fluid P. 8-14)
3.Power windows (P. 2-25)
4.Headlights, front side lights, turn signal lights
(Switch P. 2-16, Location and bulb replace-
ment P. 8-23)
5.Towing eye (P. 6-13)
6.Tyres (Tyres and wheels P. 8-29, 9-5, Flat tyre
P. 6-3)
7.Side turn signal light (P. 2-17, Location and
bulb replacement P. 8-23)
8.Outside rear view mirrors (P. 3-12)
9.Doors (Keys P. 3-2, Door locks P. 3-6,
Remote keyless entry system P. 3-3)
REAR
1.Rear window (Defogger switch P. 2-15)
2.High mounted stop light (P. 8-23)
3.Antenna (P. 4-16)
4.Rear combination light (Switch P. 2-16, Loca-
tion and bulb replacement P. 8-23)
5.Back door handle (Door locks P. 3-8, Remote
keyless entry system P. 3-3)
6.Rear wiper (Wiper and washer switch P. 2-13,
Wiper replacement P. 8-19)
7.Ultrasonic parking sensors (P. 3-22)
8.Fuel filler lid (P. 3-11)
NIC1104ZNIC1475
EXTERIOR FRONT AND REAR
Illustrated table of contents0-3
Page 50 of 235

“Supplemental Restraint System (air bag system)”
in the “1. Safety — seats, seat belts and supple-
mental restraint system” section.
Brake warning light
This light functions for both the handbrake and the
footbrake systems.
Handbrake indicator:
The light comes on when the handbrake is applied.
Low brake fluid warning:
The light warns of a low brake fluid level in the brake
power assist unit. If the light comes on while the
engine is running and the handbrake is not applied,
stop the vehicle and perform the following:
1. Check the brake fluid level. Add brake fluid as
much as necessary. See “Brake and clutch fluid”
in the “8. Maintenance and do-it-yourself” sec-
tion.
WARNING
If the level is below the MIN mark on the brake
fluid reservoir, do not drive until the brake sys-
tem has been checked at a NISSAN dealer or
qualified workshop.
2. If the brake fluid level is correct:
Have the warning system checked by a NISSAN
dealer or qualified workshop.
WARNING
•Driving your vehicle could be dangerous.
Therefore have it towed to the nearest
NISSAN dealer or qualified workshop.
•Pressing the brake pedal with the engine
stopped and/or low brake fluid level could in-
crease your stopping distance and require
greater pedal effort as well as pedal travel.
Charge warning light
If the light comes on while the engine is running, it
may indicate that the charging system is malfunc-
tioning. Turn the engine off and check the alternator
belt. If the belt is loose, broken, missing or if the light
remains on, see a NISSAN dealer or qualified work-
shop immediately.
CAUTION
Do not continue driving if the belt is loose, bro-
ken or missing.
Door open warning light
This light comes on when any of the doors are not
closed securely while the ignition switch is in the
ON position.
Engine coolant temperature
warning light
The engine coolant temperature varies with the out-
side air temperature and driving condition.
When the ignition switch is turned to the ON posi-tion, the engine coolant temperature warning light
illuminates for a few seconds and then goes off.
This means the system is operational.
The engine coolant temperature warning light illumi-
nates when the engine coolant temperature reaches
an excessively high temperature of approximately
105 °C (221 °F).
CAUTION
•If the engine coolant temperature warning
light comes on, stop the vehicle as soon as
safely possible and contact a NISSAN dealer
or qualified workshop.
•When towing a trailer or driving uphill, reduce
the vehicle speed as soon as safely possible
to decrease the engine coolant temperature.
•If the engine overheats, continued operation
of the vehicle may seriously damage the en-
gine. See “Engine overheat” in the “6. In case
of emergency” section for immediate action
required.
WARNING
Do not remove the radiator cap while the engine
is hot. Otherwise, there is a danger of being
scalded by the coolant that is likely to erupt from
the filler.
Engine oil pressure warning light
This light warns of low engine oil pressure. If the
light flickers, comes on during normal driving, or
stays on once the engine is started, pull off the road
2-8Instruments and controls
Page 55 of 235
when you leave the vehicle. See “Headlight and turn
signal switch” later in this section for further details
on the lighting operation.
Key reminder chime
The chime will sound if the driver’s side door is
opened while the key is left in the ignition switch and
an attempt is made to set the power door lock switch
to the LOCK position.
The chime will sound if the driver’s door is opened
while the Intelligent Key (where fitted) is left inside
the vehicle and the ignition knob is not in the LOCK
position.
Remove the key or Intelligent Key and take it with
you when leaving the vehicle.
Handbrake reminder buzzer
(where fitted)
The buzzer will sound if the vehicle is driven and the
handbrake has not previously been released.
First release the handbrake, then start driving.
See “Handbrake lever” in the “3. Pre-driving checks
and adjustments” section for further operating infor-
mation.
Trailer direction indicator buzzer
The electrical system of the vehicle will detect an
additional electrical load of the trailer lighting when
towing a trailer and the turn signal switch is used.
As a result, the direction indicator tone will be differ-
entFor additional information, see “Trailer towing” in
the “5. Starting and driving” section.
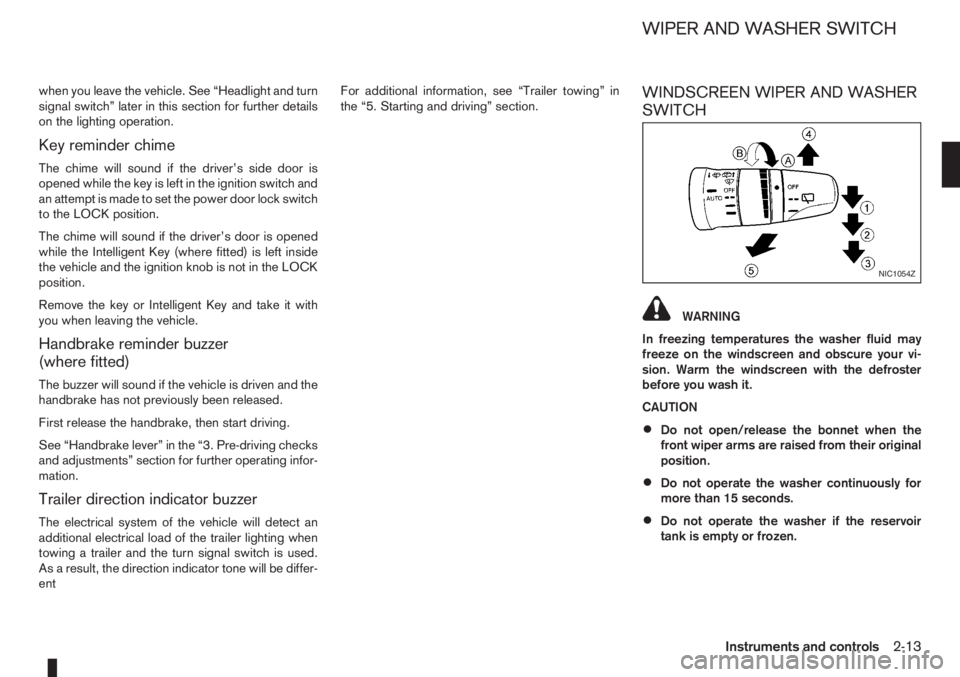
WINDSCREEN WIPER AND WASHER
SWITCH
WARNING
In freezing temperatures the washer fluid may
freeze on the windscreen and obscure your vi-
sion. Warm the windscreen with the defroster
before you wash it.
CAUTION
•Do not open/release the bonnet when the
front wiper arms are raised from their original
position.
•Do not operate the washer continuously for
more than 15 seconds.
•Do not operate the washer if the reservoir
tank is empty or frozen.
NIC1054Z
WIPER AND WASHER SWITCH
Instruments and controls2-13
Page 125 of 235

5Starting and drivingStarting and driving
Running-in schedule ................................................ 5-2
Before starting the engine ........................................ 5-2
Precautions when starting and driving ...................... 5-3
Exhaust gas (Carbon Monoxide) ......................... 5-3
Three-way catalyst (Petrol engine models)................ 5-4
To help prevent damage ..................................... 5-4
Turbocharger system (Diesel engine models) ........... 5-4
Diesel particulate filter (where fitted) ........................ 5-5
Care when driving ................................................... 5-5
Engine cold start period ...................................... 5-5
Loading luggage ................................................. 5-5
Driving on wet roads ........................................... 5-5
Driving under winter conditions ........................... 5-5
Ignition switch.......................................................... 5-6
Manual transmission ........................................... 5-6
Automatic transmission ....................................... 5-6
Steering lock ...................................................... 5-7
Key positions ...................................................... 5-7
NISSAN Anti-Theft System (NATS)..................... 5-7
Ignition knob (where fitted)....................................... 5-7
Manual transmission ........................................... 5-8
Automatic transmission ....................................... 5-8
Steering lock ...................................................... 5-8
Ignition knob position .......................................... 5-8
Emergency key – Intelligent Key dead battery
situation .............................................................. 5-9
NISSAN Anti-Theft System (NATS)..................... 5-9
Starting the engine................................................... 5-10
Driving ..................................................................... 5-11
Driving with manual transmission......................... 5-11Driving with automatic transmission..................... 5-12
Speed limiter ........................................................... 5-15
Speed limiter operations ..................................... 5-16
Cruise control system .............................................. 5-18
Precautions on cruise control system .................. 5-19
Cruise control system operations ........................ 5-19
Ultrasonic Parking Sensor (where fitted) .................. 5-22
Parking .................................................................... 5-22
Trailer towing ........................................................... 5-24
Operating precautions ........................................ 5-24
Tyre pressure ..................................................... 5-25
Safety chains ...................................................... 5-25
Trailer brakes...................................................... 5-25
Trailer detection (where fitted) ............................ 5-25
Installation of coupling device ............................. 5-25
Vehicle security........................................................ 5-26
Power steering system............................................. 5-27
Brake system ........................................................... 5-27
Brake precautions .............................................. 5-27
Anti-lock Braking System (ABS).......................... 5-28
Electronic Stability Programme (ESP) system
(where fitted) ........................................................... 5-29
Electronic Stability Programme (ESP) OFF
switch................................................................. 5-30
Cold weather driving................................................ 5-31
Battery ............................................................... 5-31
Engine coolant .................................................... 5-31
Tyre equipment ................................................... 5-31
Special winter equipment.................................... 5-32
Corrosion protection ........................................... 5-32
Page 148 of 235
•Turn the ignition switch to the LOCK position
and remove the key/Intelligent Key (where fit-
ted).Your new vehicle was designed to be used primarily
to carry passengers and luggage.
Remember that towing a trailer will place additional
loads on your vehicle’s engine, drive-train, steering,
braking and other systems. Towing a trailer will also
exaggerate other conditions, such as sway caused
by crosswinds, rough road surfaces or passing
trucks. Driving style and speed must be adjusted
according to the circumstances. Before towing a
trailer, see a NISSAN dealer or qualified workshop
for an explanation of towing equipment and its
proper use.
OPERATING PRECAUTIONS
•Avoid towing a trailer during the running-in
schedule.
•Choose proper coupling devices (trailer hitch,
safety chain, roof carrier, etc.) for your vehicle
and trailer. These devices are available from a
NISSAN dealer or qualified workshop where you
can also obtain more detailed information about
trailer towing.
Heavy-duty kits are available at a NISSAN dealer
or qualified workshop.
•It is advisable to contact a NISSAN dealer or
qualified workshop for towing details, before
towing a trailer up steep slopes for long dis-
tances.
•Never allow the total trailer load (trailer weight
plus its cargo weight) to exceed the maximum
set for the coupling device.Contact a NISSAN dealer or qualified workshop
for more information on this matter.
•The trailer must be loaded so that heavy goods
are distributed over the axle and as low in the
trailer as possible. Poor load distribution can se-
riously affect the stability of the trailer and tow
vehicle.
•Do not exceed the maximum permitted vertical
load on the trailer hitch.
•Before driving, make sure that the lighting sys-
tem of the trailer works properly.
•Avoid abrupt starts, accelerations and stops.
•Avoid sharp turns and lane changes.
•Always drive your vehicle at a moderate speed.
•Always block the wheels on both vehicle and
trailer when parking. Apply the handbrake (where
fitted) on the trailer. Parking on a steep slope is
not recommended.
If parking on a steep slope is unavoidable it is
also advisable to put the vehicle into gear, or
select P (Park, AT models), and turn the front
wheels into the kerb (in addition to the other pre-
cautions described). Before parking on a steep
slope consider the incline (the towing weights
quoted are for a 12% slope).
•Follow the trailer manufacturer’s instructions.
TRAILER TOWING
5-24Starting and driving
Page 149 of 235
•Trailer towing requires more fuel than under nor-
mal circumstances because of a considerable
increase in traction power required and resis-
tance.
•When towing a trailer, observe the following re-
stricted towing speeds:
Speed: below 100 km/h (62 MPH)
CAUTION
While towing a trailer, make sure the engine cool-
ant temperature warning light does not come on,
in order to prevent engine overheating.
TYRE PRESSURE
When towing a trailer, inflate the vehicle tyres to the
maximum recommended COLD tyre pressure, as
indicated on the tyre placard (for full loading). Make
sure the trailer tyre pressures are correct.
CAUTION
Do not tow a trailer when the vehicle is installed
with a temporary-use spare tyre.
SAFETY CHAINS
Always use a suitable chain between the vehicle
and trailer. The chain should be attached to the hitch
and not to the vehicle bumper or axle. Be sure to
leave enough slack in the chain to permit turning
corners. The chain should not drag on the ground:
passing the chain across the trailer hitch may be the
best practice depending on your trailer.
TRAILER BRAKES
Ensure that trailer brakes are installed as required
by local regulations. Also check that all other trailer
equipment conforms to local regulations.
TRAILER DETECTION (where fitted)
When towing a trailer and the turn signal switch is
used, the electrical system of the vehicle will detect
an additional electrical load of the trailer lighting. As
a result, the direction indicator tone will sound dif-
ferently.
INSTALLATION OF COUPLING
DEVICE
NISSAN recommends that the coupling device for
trailer towing be installed under the following condi-
tions:
•Maximum permissible vertical load on the cou-
pling device: 490N (50 kg, 110 lb)
•The coupling device, mounting points and instal-
lation parts on your vehicle: as shown as an ex-
ample in the illustration.
Follow all of the coupling device manufacturer’s in-
structions for installation and use.
Starting and driving5-25
Page 157 of 235
6In case of emergencyIn case of emergency
Spare tyre................................................................ 6-2
Temporary-use spare tyre ................................... 6-2
Flat tyre ................................................................... 6-3
Stopping the vehicle ........................................... 6-3
Changing flat tyre (Models with spare wheel,
where fitted) ....................................................... 6-3
Repairing flat tyre (Models with emergency
tyre puncture repair kit, where fitted) ................... 6-7Jump-starting ........................................................... 6-9
Push-starting ........................................................... 6-11
Engine overheat ....................................................... 6-11
Tow truck towing ..................................................... 6-12
Towing precautions ............................................ 6-12
Recommended towing ........................................ 6-13
Towing eye ......................................................... 6-13
Freeing the vehicle from sand, snow or mud ....... 6-14
Page 162 of 235
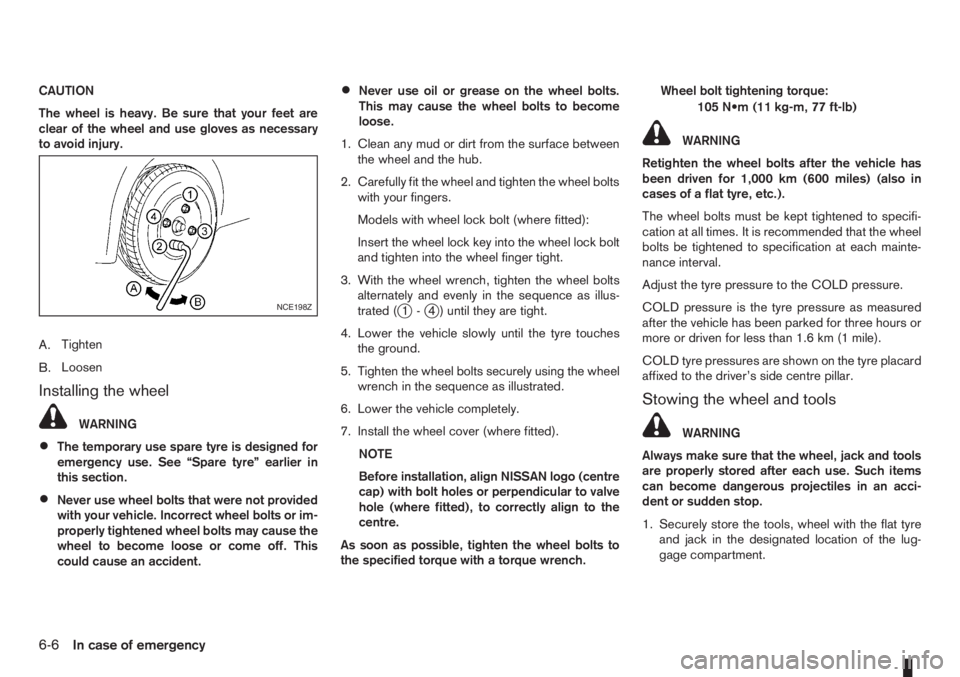
CAUTION
The wheel is heavy. Be sure that your feet are
clear of the wheel and use gloves as necessary
to avoid injury.
A.Tighten
B.Loosen
Installing the wheel
WARNING
•The temporary use spare tyre is designed for
emergency use. See “Spare tyre” earlier in
this section.
•Never use wheel bolts that were not provided
with your vehicle. Incorrect wheel bolts or im-
properly tightened wheel bolts may cause the
wheel to become loose or come off. This
could cause an accident.
•Never use oil or grease on the wheel bolts.
This may cause the wheel bolts to become
loose.
1. Clean any mud or dirt from the surface between
the wheel and the hub.
2. Carefully fit the wheel and tighten the wheel bolts
with your fingers.
Models with wheel lock bolt (where fitted):
Insert the wheel lock key into the wheel lock bolt
and tighten into the wheel finger tight.
3. With the wheel wrench, tighten the wheel bolts
alternately and evenly in the sequence as illus-
trated (
j1-j4 ) until they are tight.
4. Lower the vehicle slowly until the tyre touches
the ground.
5. Tighten the wheel bolts securely using the wheel
wrench in the sequence as illustrated.
6. Lower the vehicle completely.
7. Install the wheel cover (where fitted).
NOTE
Before installation, align NISSAN logo (centre
cap) with bolt holes or perpendicular to valve
hole (where fitted), to correctly align to the
centre.
As soon as possible, tighten the wheel bolts to
the specified torque with a torque wrench.Wheel bolt tightening torque:
105 N•m (11 kg-m, 77 ft-lb)
WARNING
Retighten the wheel bolts after the vehicle has
been driven for 1,000 km (600 miles) (also in
cases of a flat tyre, etc.).
The wheel bolts must be kept tightened to specifi-
cation at all times. It is recommended that the wheel
bolts be tightened to specification at each mainte-
nance interval.
Adjust the tyre pressure to the COLD pressure.
COLD pressure is the tyre pressure as measured
after the vehicle has been parked for three hours or
more or driven for less than 1.6 km (1 mile).
COLD tyre pressures are shown on the tyre placard
affixed to the driver’s side centre pillar.
Stowing the wheel and tools
WARNING
Always make sure that the wheel, jack and tools
are properly stored after each use. Such items
can become dangerous projectiles in an acci-
dent or sudden stop.
1. Securely store the tools, wheel with the flat tyre
and jack in the designated location of the lug-
gage compartment.
NCE198Z
6-6In case of emergency