2007 NISSAN NOTE automatic transmission
[x] Cancel search: automatic transmissionPage 138 of 235

Accelerator downshift – In the D (Drive)
position
For rapid passing or driving uphill, fully depress the
accelerator pedal to the floor. This shifts the trans-
mission down into a lower gear, depending on the
vehicle speed.
A.RHD models
B.LHD models
Overdrive switch
ON: For normal driving, push the overdrive
switchto“ON
” with the selector lever in
the D (Drive) position. The transmission is
shifted up into OVERDRIVE as the vehicle
speed increases.
The overdrive will not engage until the engine
has warmed up.
OFF: For driving up and down long slopes where
engine braking is necessary, push the over-
drive switch “OFF
”. The overdrive off in-dicator light
in the instrument panel
illuminates.
When cruising at low speeds or climbing a
gentle slope, you may feel an uncomfortable
shift shock as the transmission shifts in and
out of the overdrive position repeatedly. In
this case, push the overdrive switch to turn
the Overdrive “OFF”.
When driving conditions change, push the overdrive
switch to turn the overdrive “ON”. The overdrive off
indicator light
in the instrument panel will turn
off.
Remember not to drive at high speeds for extended
periods of time with the overdrive “OFF”. This re-
duces fuel economy.
A.RHD models
B.LHD models
Shift lock release
If the battery is discharged, the selector lever can-
not be moved from the P (Park) position even with
the brake pedal depressed and the ignition switch in
the ON position.
To move the selector lever, push the shift lock re-
lease button
j1 (as illustrated) and press the selec-
tor lever buttonj2 . It is now possible to move the
selector lever to the N (Neutral) position.
For your safety, make sure the handbrake is applied
and the brake pedal is depressed during the opera-
tion.
If there is any problem moving the lever out of the P
(Park) position, have a NISSAN dealer or qualified
workshop to check the automatic transmission sys-
tem as soon as possible.
Fail-safe
When the Fail-safe operation occurs, the automatic
transmission will be locked in the third gear.
If the vehicle is driven under extreme conditions,
such as excessive wheel spinning and subse-
quent hard braking, the Fail-safe system may be
activated. This will occur even if all electrical cir-
cuits are functioning properly. In this case, turn
the ignition switch “OFF” and wait for 3 seconds.
Then turn the key back to the ON position. The
vehicle should return to its normal operating con-
dition. If it does not return to its normal operating
condition have your NISSAN dealer or qualified
NSD309Z
NSD310Z
5-14Starting and driving
Page 139 of 235
workshop check the transmission and have the
transmission repaired by a NISSAN dealer or
qualified workshop, if necessary.The speed limiter allows you to set the desired ve-
hicle speed limit. While the speed limiter is acti-
vated, you can perform normal braking and accel-
eration, but the vehicle will not exceed the set speed.
When the vehicle reaches the set speed limit or if
the set speed limit is lower than the actual vehicle
speed, the accelerator pedal will not work until the
vehicle speed drops below the set speed limit.
WARNING
•The speed limiter will not automatically brake
the vehicle to the set speed limit.
•Always observe posted speed limits. Do not
set the speed above them.
•Always confirm the setting status of the speed
limiter in the combination meter display.
•When the speed limiter is set, avoid hard ac-
celeration to reach the set limit to ensure that
the system can limit the speed of the vehicle
correctly.
•When additional floor mats are used, be sure
that they are correctly secured and that they
cannot interfere with the accelerator pedal.
Mats not adapted to the vehicle may prevent
proper operation of the speed limiter.
When the speed limiter is on the cruise control sys-
tem cannot be operated.The speed limiter operation switches are located on
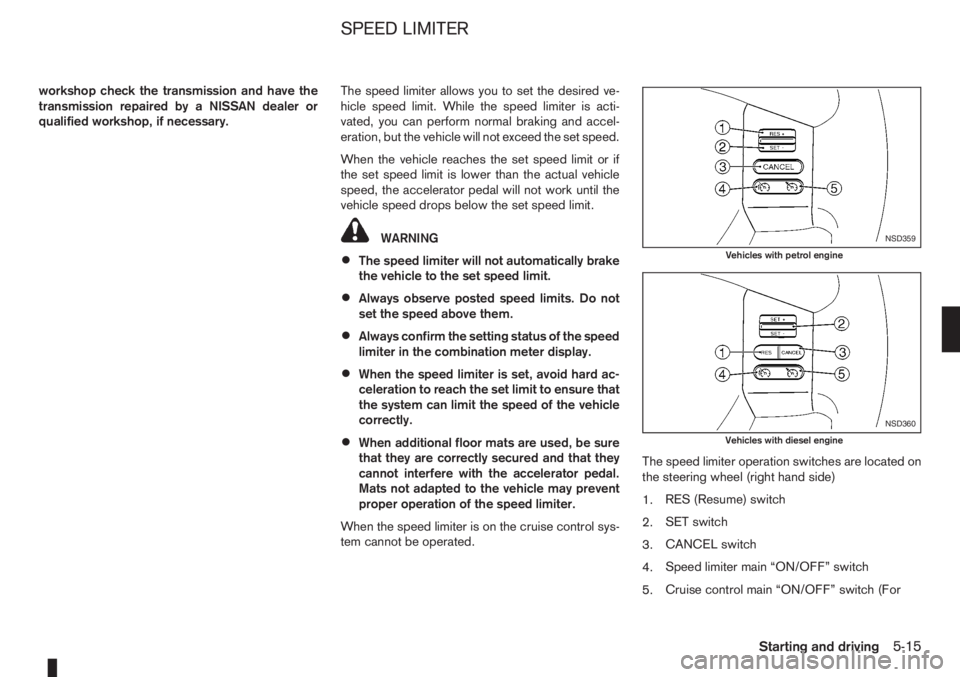
the steering wheel (right hand side)
1.RES (Resume) switch
2.SET switch
3.CANCEL switch
4.Speed limiter main “ON/OFF” switch
5.Cruise control main “ON/OFF” switch (For
NSD359
Vehicles with petrol engine
NSD360
Vehicles with diesel engine
SPEED LIMITER
Starting and driving5-15
Page 146 of 235

•Push the cruise control main “ON/OFF” switchj5 . The cruise control symbolj7 , the CRUISE
indicatorj6 , the SET indicatorj8 , and the set
speed valuej9 will turn off in the combination
meter display.
•Push the speed limiter main “ON/OFF” switchj5 . The cruise control system information in the
combination meter will be replaced with the
speed limiter information. For details see “Speed
limiter” earlier in this section.
•When the vehicle is stopped and the ignition is
turned to the off position.
Turning off the cruise control system will erase
the cruise control system memory.Ultrasonic sensors
jA , fitted in the vehicle’s rear
bumper, measure the distance between the vehicle
and an obstacle when reversing. When reverse gear
is engaged a beeping sound is heard. The frequency
of the beeps will increase the closer the vehicle
comes to an obstacle until, the sound becomes a
constant beep when, the vehicle is approximately
35 cm (14 in) from the obstacle.
NOTE
•This system is intended as an aid to reversing,
to be used in conjunction with your rear view
mirror.
•Make sure that the ultrasonic sensors are not
obscured (by dirt, mud, snow, etc.).
WARNING
•Do not park the vehicle over flammable mate-
rials, such as dry grass, waste paper, or rags.
They may ignite and cause a fire.
•Safe parking procedures require that:
– The handbrake is applied.
– The gear lever is placed in an appropriate
gear for manual transmission models.
– The selector lever is placed in the P (Park)
position for automatic transmission mod-
els.
Failure to follow the above recommenda-
tions could cause the vehicle to move un-
expectedly or roll away and result in an
accident.
•Never leave the engine running while the ve-
hicle is unattended.
•Do not leave children or adults who would
normally require the support of others alone
in your vehicle. Pets should also not be left
alone either. On hot, sunny days, tempera-
tures in a closed vehicle could quickly be-
come high enough to cause severe or possi-
bly fatal injuries to people or animals.
•Manual transmission models:
Depress the clutch pedal and place the gear
lever in the R (Reverse) position. When parking
on an uphill gradient, place the gear lever in the
1st (Low gear) position.
NSD358
ULTRASONIC PARKING SENSOR
(where fitted)PARKING
5-22Starting and driving
Page 147 of 235

•Automatic transmission models:
Fully depress the brake pedal and move the se-
lector lever to the P (Park) position.
WARNING
Make sure that the selector lever has been
pushed as far forward as it can go and cannot be
moved without depressing the button on the se-
lector lever handle.
•When parked on a sloping driveway, turn the
wheels so the vehicle will not roll into the street
in case it moves.
•FACING DOWNHILL:j1
Turn the wheels into the kerb, allow the vehicle
to move forward until the kerb side wheel gently
touches the kerb. Then set the handbrake.
•FACING UPHILL:j2
Turn the wheels away from the kerb and allow
the vehicle to move back until the kerb side wheel
gently touches the kerb. Then set the handbrake.
•NO KERB — FACING DOWNHILL OR UPHILL:j3
Turn the wheels toward the side of the road so
the vehicle will move away from the centre of the
road if it moves. Then set the handbrake.
NSD324Z
LHD models
NSD325Z
RHD models
Starting and driving5-23
Page 159 of 235
In case of a flat tyre, follow the instructions as de-
scribed below:
STOPPING THE VEHICLE
WARNING
•Make sure that the handbrake is securely ap-
plied.
•For Manual Transmission (MT) models: Make
sure the gear lever is in the R (Reverse) posi-
tion.
For Automatic Transmission (AT) models:
Make sure that the selector lever is in the P
(Park) position.
•Never change tyres when the vehicle is on a
slope, ice or a slippery area. This is hazard-
ous.
•Never change tyres if oncoming traffic is close
to your vehicle. Wait for professional road as-
sistance.
1. Safely move the vehicle off the road, away from
traffic.
2. Switch on the hazard warning flashers.
3. Park on a level surface.
4. Apply the handbrake.
5. Shift the gear lever (MT models) into the R (Re-
verse) position [AT models, move the selector
lever to the P (Park) position].
6. Turn off the engine.7. Open the bonnet (for details, see “Bonnet
release” in the “3. Pre-driving checks and
adjustments” section) in order to:
•Warn other traffic.
•Signal to professional road assistance that
you require assistance.
8. Have all passengers exit the vehicle and stand in
a safe place, away from traffic and clear of the
vehicle.
CHANGING FLAT TYRE (Models with
spare wheel, where fitted)
Blocking the wheels
WARNING
Make sure to block the appropriate wheel to pre-
vent the vehicle from moving, which may cause
personal injury.
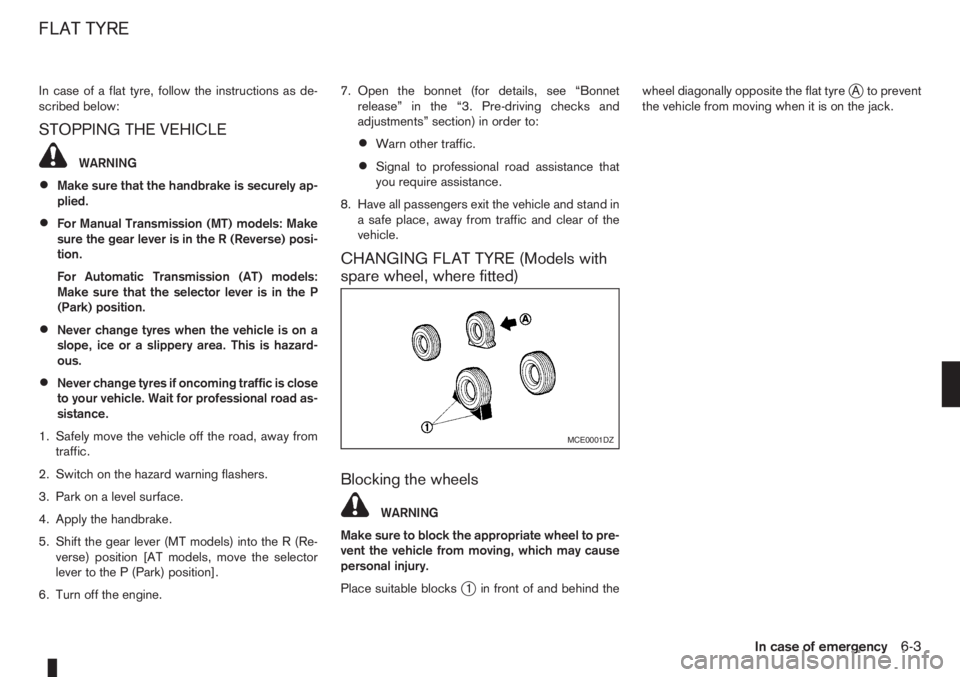
Place suitable blocks
j1 in front of and behind thewheel diagonally opposite the flat tyre
jA to prevent
the vehicle from moving when it is on the jack.
MCE0001DZ
FLAT TYRE
In case of emergency6-3
Page 167 of 235
CAUTION
•Three-way catalyst equipped models should
not be started by pushing the vehicle as the
three-way catalyst may be damaged.
•Automatic transmission (AT) models cannot
be started by pushing the vehicle. This may
cause transmission damage.
•Never try to start the vehicle by towing it; when
the engine starts, the forward surge could
cause the vehicle to collide with the tow ve-
hicle.
WARNING
•Never continue driving if the engine of your
vehicle overheats. Doing so could cause a ve-
hicle fire.
•Never open the bonnet if steam is coming
out.
•Never remove the radiator cap (where fitted)
or engine coolant reservoir cap when the en-
gine is hot. If the radiator cap (where fitted) or
engine coolant reservoir cap is removed while
the engine is hot, pressurised hot water will
spurt out and possibly cause burning, scald-
ing or serious injury.
•If steam or coolant is coming out of the en-
gine, stand clear of the vehicle to prevent get-
ting injured.
•The engine cooling fan will start whenever the
coolant temperature exceeds preset degrees.
•Be careful not to allow your hands, hair, jewel-
lery or clothing to come into contact with, or
get caught in, the cooling fan or drive belts.
If the engine of your vehicle is overheating (indi-
cated by the engine coolant temperature warning
light (red)) or if you feel a lack of engine power,
detect an unusual noise, etc., proceed as follows:
1. Move and park the vehicle safely off the road and
away from traffic.
2. Turn on the hazard warning flasher lights.
3. Apply the handbrake.4. Shift the gear lever (M/T models) into the N (Neu-
tral) position [AT models, move the selector lever
to the P (Park) position].
DO NOT STOP THE ENGINE.
5. Open all windows.
6. Switch off the air conditioner system (where fit-
ted).
7. Set the heater or air conditioner temperature
control to maximum “HOT” and fan speed con-
trol to maximum speed.
8. Exit the vehicle.
9. Visually inspect and listen for steam or coolant
escaping from the radiator before opening the
bonnet. Wait until no steam or coolant can be
seen before proceeding.
10. Open the bonnet. For details, see “Bonnet
release” in the “3. Pre-driving checks and
adjustments” section.
11. Visually check if the cooling fan is running.
12. Visually check the radiator and radiator hoses
for leakage.
WARNING
If coolant is leaking, the cooling fan belt is
missing or loose or the cooling fan is not run-
ning, stop the engine.
PUSH-STARTING ENGINE OVERHEAT
In case of emergency6-11
Page 168 of 235
13. After the engine cools down, check the coolant
level in the engine coolant reservoir with the
engine running.Do not open the radiator cap
(where fitted).
14. If the level is low, remove the engine coolant
reservoir cap and add coolant slowly into the
reservoir. After refilling the reservoir to the MAX
level, install the reservoir cap.
WARNING
Before removing the engine coolant reservoir
cap and to avoid the danger of being scalded,
cover the reservoir cap with a rag and loosen
the reservoir cap to the first notch to allow the
steam to escape.
15. Close the bonnet.
Have your vehicle inspected or repaired by a
NISSAN dealer or qualified workshop.When towing your vehicle, local regulations for tow-
ing must be followed. Incorrect towing equipment
could damage your vehicle. To assure proper tow-
ing and to prevent accidental damage to your ve-
hicle, NISSAN recommends that you have a service
operator tow your vehicle. It is advisable to have the
service operator carefully read the following precau-
tions.WARNING
•Do not allow any occupants in the vehicle that
is being towed.
•Never get under your vehicle after it has been
lifted by a tow truck.
TOWING PRECAUTIONS
•When towing:Make sure that the transmission,
axles, steering system and power train are in
working condition. If any unit is damaged, the
vehicle must be towed using a dolly or be placed
on a flat bed lorry.
•Release the handbrake and shift the manual
transmission (MT), or automatic transmission
(AT) into the N (Neutral) position before starting
to tow the vehicle.
•When towing manual transmission models
with the front wheels on the ground:Move the
gear lever to the N (Neutral) position and turn the
ignition switch to the “OFF” position then secure
the steering wheel in a straight ahead position
using a rope or similar device.Never place theignition switch in the LOCK position.This will
result in damage to the steering lock mecha-
nism.
•When towing with the rear wheels on the
ground, release the handbrake.
•Always attach safety chains before towing.
TOW TRUCK TOWING
6-12In case of emergency
Page 169 of 235
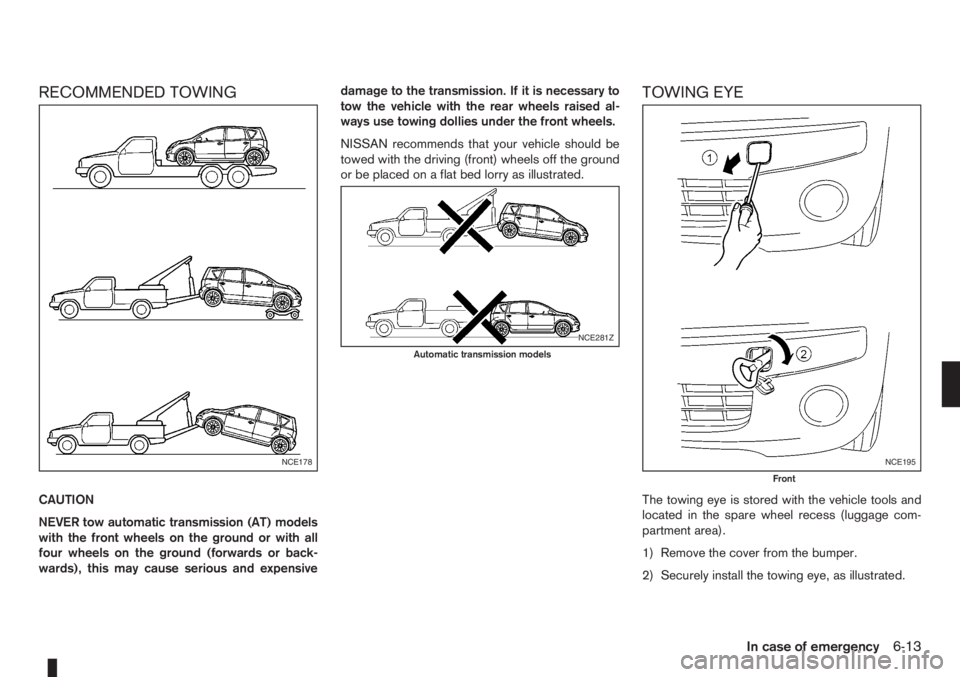
RECOMMENDED TOWING
CAUTION
NEVER tow automatic transmission (AT) models
with the front wheels on the ground or with all
four wheels on the ground (forwards or back-
wards), this may cause serious and expensivedamage to the transmission. If it is necessary to
tow the vehicle with the rear wheels raised al-
ways use towing dollies under the front wheels.
NISSAN recommends that your vehicle should be
towed with the driving (front) wheels off the ground
or be placed on a flat bed lorry as illustrated.
TOWING EYE
The towing eye is stored with the vehicle tools and
located in the spare wheel recess (luggage com-
partment area).
1) Remove the cover from the bumper.
2) Securely install the towing eye, as illustrated.
NCE178
NCE281Z
Automatic transmission models
NCE195
Front
In case of emergency6-13