2007 NISSAN MAXIMA buttons
[x] Cancel search: buttonsPage 189 of 336

SCAN/RPT tuning button:
Press the SCAN/RPT button for more than 1.5
seconds to stop at each broadcasting station
(AM, FM or SAT, if so equipped) for 5 seconds.
Pressing the button again during this 5 second
period will stop scan tuning and the radio will
remain tuned to that station. If the SCAN/RPT
button is not pressed within 5 seconds, scan
tuning moves to the next station.
PRESET A·B·C (Station memory opera-
tions):
18 stations can be set for the FM, AM and SAT
(satellite, if so equipped) radio to the A, B and C
preset button in any combination of FM, AM or
SAT stations.
1. Choose preset bank A, B or C using the
PRESET A·B·C select button.
2. Select the desired FM, AM or SAT station
band.
3. Tune to the desired station using manual,
SEEK or SCAN tuning. Press and hold any
of the desired station memory buttons (1 –
6) until a beep sound is heard.
4. The channel indicator will then come on and
the sound will resume. Programming is now
complete.5. Other buttons can be set in the same man-
ner.
If the battery cable is disconnected, or if the fuse
opens, the radio memory will be canceled. In that
case, reset the desired stations.
Radio data system (RDS):
RDS stands for Radio Data System, and is a data
information service transmitted by some radio
stations on the FM band (not AM band) . Cur-
rently, most RDS stations are in large cities, but
many stations are now considering broadcasting
RDS data.
RDS can display:
cStation call sign, such as “WHFR 98.3”.
cStation name, such as “The Groove”.
cMusic or programming type such as “Clas-
sical”, “Country”, or “Rock”.
cArtist and song information.
If the station broadcasts RDS information, the
RDS icon is displayed.
Compact disc (CD) changer operation
Turn the ignition key to the ACC or ON position
and insert the compact disc into the slot with the
label side facing up. The compact disc will beguided automatically into the slot and start play-
ing. To insert the disc, first press the LOAD
button.
If the radio is already operating, it will automati-
cally turn off and the compact disc will play.
If the system has been turned off while the com-
pact disc was playing, pressing the
POWER/VOLUME control knob will start the
compact disc.
LOAD button:
To insert a CD in the CD changer, press the
LOAD button for less than 1.5 seconds. Select
the loading slot by pressing the CD insert select
button (1 – 6) , then insert the CD.
To insert 6 CDs to the CD changer, press the
LOAD button for more than 1.5 seconds.
The slot numbers (1 – 6) will illuminate on the
display when CDs are loaded into the changer.
CD button:
When the CD button is pressed with the system
off and the compact disc loaded, the system will
turn on and the compact disc will start to play.
When the CD button is pressed with the com-
pact disc loaded with the radio playing, the radio
will automatically be turned off and the compact
disc will start to play.
Display screen, heater, air conditioner, audio and phone systems4-39
ZREVIEW COPYÐ2007 Maxima(max)
Owners ManualÐUSA_English(nna)
01/26/07Ðarosenma
X
Page 190 of 336

TUNE/FOLDER·CAT
button:
CD:
cWhile playing a CD press the
orbutton, the CD plays at an in-
creased speed while rewinding or fast for-
warding through the current track being
played. When the button is released the CD
returns to normal play speed.
MP3 CD:
cWhile playing an MP3, press the
TUNE/FOLDER·CAT button
orto scan backward or forward through avail-
able folders.
cPress and hold the
orbutton
for more than 1.5 seconds while an MP3 CD
is playing, the MP3 CD plays at an increased
speed while rewinding or fast forwarding
through the current track being played.
When the button is released the MP3 CD
returns to normal play speed.
SEEK/TRACK button:
When the
button is pressed for less than
1.5 seconds while a compact disc is playing, the
track being played returns to its beginning. Pressseveral times to skip back through tracks. The
compact disc will go back the number of times
the button is pressed.
When the
button is pressed for less than
1.5 seconds while the compact disc is playing,
the next track will start to play from its beginning.
Press several times to skip through tracks. The
compact disc will advance the number of times
the button is pressed. (When the last track on the
compact disc is skipped through, the first track
will be played.)
CD select buttons:
To play another CD that has been loaded, press a
CD select button (1 – 6) .
SCAN/RPT:
When the SCAN/RPT play button is pushed
while the compact disc is played, the play pattern
can be changed as follows:
ALL DISC RPT!1 DISC RPT!1 TRACK RPT
!ALL DISC RDM!1 DISC RDM!ALL DISC
RPT
ALL DISC RPT: All discs loaded will be repeated.
1 DISC RPT: The disc that is currently playing will
be repeated.
1 TRACK RPT: The track that is currently playing
will be repeated
ALL DISC RDM: Tracks from all discs will be
played randomly1 DISC RDM: Tracks from the disc that is cur-
rently playing will be played randomlyCD EJECT:
Current disc:
cPress the
button for less than 1.5
seconds. Then press one of the CD select (1
– 6) buttons for the selected CD to be
ejected. If one of the CD select (1 – 6)
buttons are not pressed within 1.5 seconds
the current loaded CD will be ejected. If the
disc is not removed within 15 seconds, the
disc will reload.
All discs:
cPress and hold the
button for more
than 1.5 seconds. The compact discs will be
ejected one by one. If a disc is not removed
within 15 seconds, or the
button is
pressed again during the eject sequence,
the entire disc eject sequence will be can-
celed.
When this button is pressed while the compact
disc is being played, the compact disc will eject
and the last source will be played.
CD IN indicator:
The slot numbers (1 – 6) will illuminate if CDs
have been loaded into the changer in CD mode
only.
4-40Display screen, heater, air conditioner, audio and phone systems
ZREVIEW COPYÐ2007 Maxima(max)
Owners ManualÐUSA_English(nna)
01/26/07Ðarosenma
X
Page 197 of 336

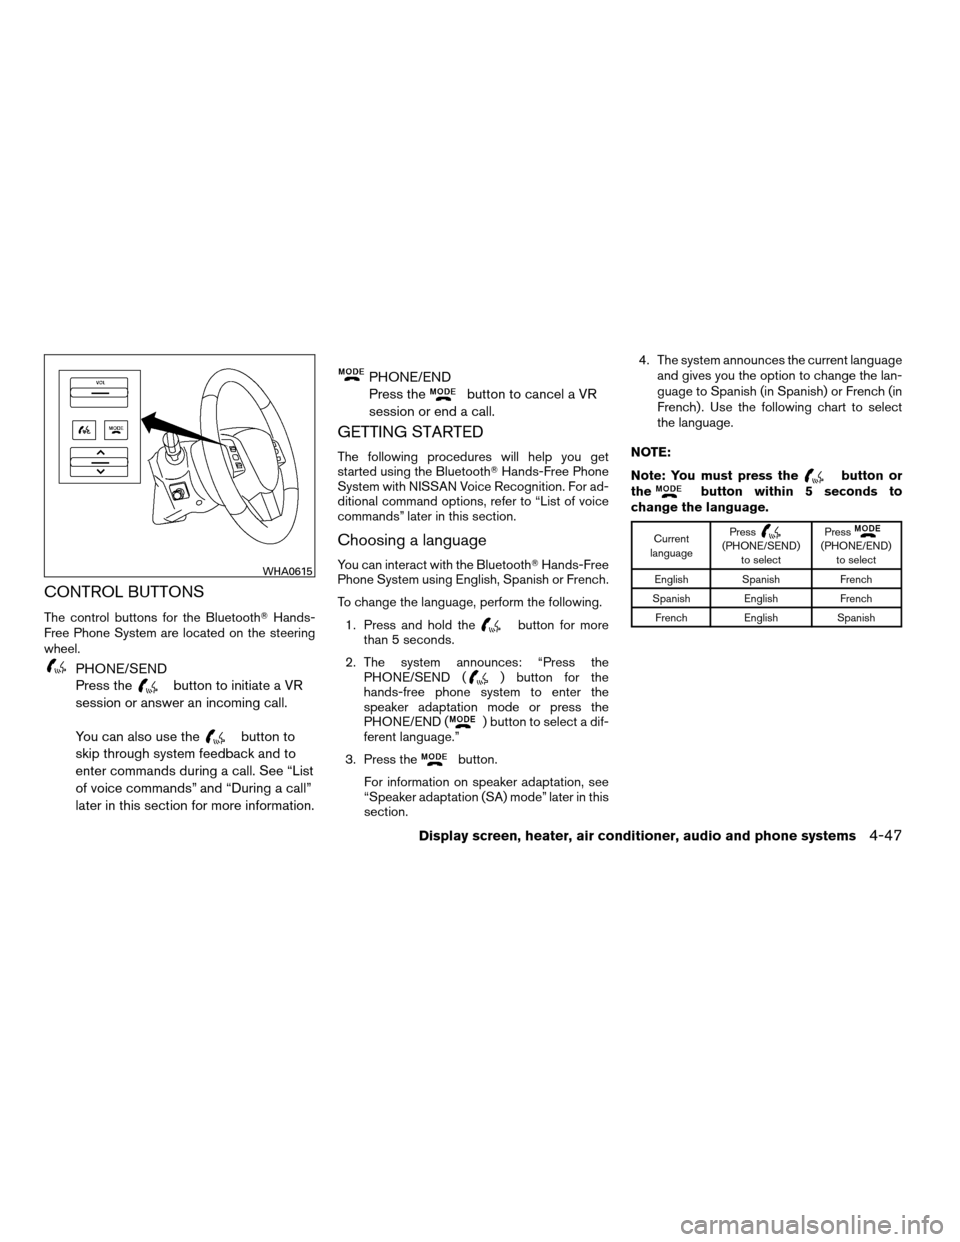
CONTROL BUTTONS
The control buttons for the BluetoothTHands-
Free Phone System are located on the steering
wheel.
PHONE/SEND
Press the
button to initiate a VR
session or answer an incoming call.
You can also use the
button to
skip through system feedback and to
enter commands during a call. See “List
of voice commands” and “During a call”
later in this section for more information.
PHONE/END
Press the
button to cancel a VR
session or end a call.
GETTING STARTED
The following procedures will help you get
started using the BluetoothTHands-Free Phone
System with NISSAN Voice Recognition. For ad-
ditional command options, refer to “List of voice
commands” later in this section.
Choosing a language
You can interact with the BluetoothTHands-Free
Phone System using English, Spanish or French.
To change the language, perform the following.
1. Press and hold the
button for more
than 5 seconds.
2. The system announces: “Press the
PHONE/SEND (
) button for the
hands-free phone system to enter the
speaker adaptation mode or press the
PHONE/END (
) button to select a dif-
ferent language.”
3. Press the
button.
For information on speaker adaptation, see
“Speaker adaptation (SA) mode” later in this
section.4. The system announces the current language
and gives you the option to change the lan-
guage to Spanish (in Spanish) or French (in
French) . Use the following chart to select
the language.
NOTE:
Note: You must press the
button or
thebutton within 5 seconds to
change the language.
Current
languagePress(PHONE/SEND)
to selectPress(PHONE/END)
to select
English Spanish French
Spanish English French
French English Spanish
WHA0615
Display screen, heater, air conditioner, audio and phone systems4-47
ZREVIEW COPYÐ2007 Maxima(max)
Owners ManualÐUSA_English(nna)
01/26/07Ðarosenma
X
Page 275 of 336

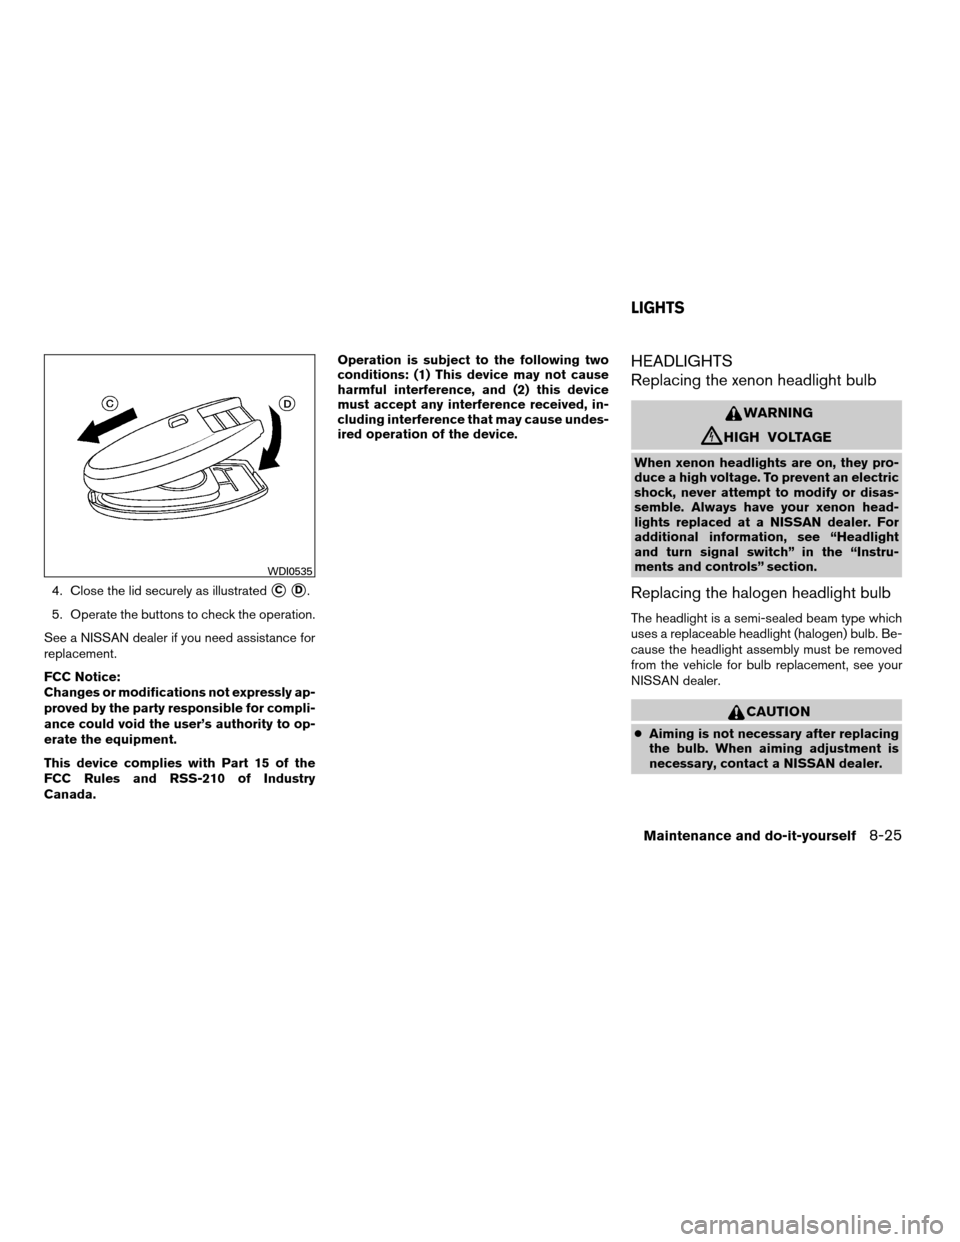
4. Close the lid securely as illustratedsCsD.
5. Operate the buttons to check the operation.
See a NISSAN dealer if you need assistance for
replacement.
FCC Notice:
Changes or modifications not expressly ap-
proved by the party responsible for compli-
ance could void the user’s authority to op-
erate the equipment.
This device complies with Part 15 of the
FCC Rules and RSS-210 of Industry
Canada.Operation is subject to the following two
conditions: (1) This device may not cause
harmful interference, and (2) this device
must accept any interference received, in-
cluding interference that may cause undes-
ired operation of the device.
HEADLIGHTS
Replacing the xenon headlight bulb
WARNING
cHIGH VOLTAGE
When xenon headlights are on, they pro-
duce a high voltage. To prevent an electric
shock, never attempt to modify or disas-
semble. Always have your xenon head-
lights replaced at a NISSAN dealer. For
additional information, see “Headlight
and turn signal switch” in the “Instru-
ments and controls” section.
Replacing the halogen headlight bulb
The headlight is a semi-sealed beam type which
uses a replaceable headlight (halogen) bulb. Be-
cause the headlight assembly must be removed
from the vehicle for bulb replacement, see your
NISSAN dealer.
CAUTION
cAiming is not necessary after replacing
the bulb. When aiming adjustment is
necessary, contact a NISSAN dealer.
WDI0535
LIGHTS
Maintenance and do-it-yourself8-25
ZREVIEW COPYÐ2007 Maxima(max)
Owners ManualÐUSA_English(nna)
01/26/07Ðarosenma
X
Page 324 of 336

Compact disc (CD) player...........4-32
Compass display.................2-6
Console box...................2-34
Continuously Variable Transmission (CVT) . . .5-9
Continuously Variable Transmission (CVT)
fluid.....................8-11
Driving with Continuously Variable
Transmission (CVT).............5-9
Control panel buttons
Brightness/contrast button.........4-18
Back button..................4-7
Clock set...................4-5
Enter button..................4-6
Setting button.............4-5, 4-11
Startup screen................4-7
Trip button................4-3, 4-7
With navigation system...........4-6
Without navigation system..........4-2
Controls
Audio controls (steering wheel)......4-42
Coolant
Capacities and recommended
fuel/lubricants.................9-2
Changing engine coolant..........8-8
Checking engine coolant level........8-7
Engine coolant temperature gauge.....2-5
Cornering light.................2-26
Corrosion protection...............7-6
Cruise control..................5-14
Cup holders...................2-32
D
Daytime running light system
(Canada only)..................2-24Defroster switch
Rear window and outside mirror defroster
switch....................2-20
Dimensions and weights.............9-8
Dimmer switch for instrument panel......2-25
Display controls
(see control panel buttons).........4-2, 4-6
Distance to empty..............4-3, 4-8
Door locks....................3-4
Door open warning................4-6
Door open warning light............2-10
Drive belt....................8-14
Drive positioner, Automatic...........3-28
Driving
Cold weather driving............5-23
Driving with Continuously Variable
Transmission (CVT).............5-9
Precautions when starting and driving . . .5-2
E
Economy - fuel.................5-16
Emission control information label.......9-10
Emission control system warranty.......9-25
Engine
Before starting the engine..........5-8
Block heater.................5-25
Capacities and recommended
fuel/lubricants.................9-2
Changing engine coolant..........8-8
Changing engine oil.............8-9
Changing engine oil filter..........8-10
Checking engine coolant level........8-7
Checking engine oil level..........8-8
Engine compartment check locations. . . .8-6Engine coolant temperature gauge.....2-5
Engine cooling system............8-7
Engine oil...................8-8
Engine oil and oil filter
recommendation...............9-5
Engine oil pressure warning light.....2-11
Engine oil viscosity..............9-5
Engine serial number............9-10
Engine specifications.............9-7
Starting the engine..............5-8
English/metric setting..............4-15
Enter button....................4-6
Event data recorders..............9-26
Exhaust gas (Carbon monoxide)........5-2
Eyeglass case..................2-32
F
Flashers
(See hazard warning flasher switch)......2-26
Flat tire......................6-2
Floor mat positioning aid.............7-5
Fluid
Brake fluid..................8-11
Capacities and recommended
fuel/lubricants.................9-2
Continuously Variable Transmission (CVT)
fluid.....................8-11
Engine coolant................8-7
Engine oil...................8-8
Power steering fluid.............8-11
Window washer fluid............8-12
F.M.V.S.S. certification label..........9-10
Fog light switch.................2-25
Folding rear seat.................1-6
10-2
ZREVIEW COPYÐ2007 Maxima(max)
Owners ManualÐUSA_English(nna)
01/26/07Ðarosenma
X