Page 2647 of 2896
 moves freely within the sunroof unit
assembly while manually p")
SUNROOF
RF-29
C
D
E
F
G
H
J
K
L
MA
B
RF
Revision: June 20062007 Versa
InspectionEIS0096B
WIND DEFLECTOR
Check that the wind deflector (1) moves freely within the sunroof unit
assembly while manually pressing down and releasing. If a malfunc-
tion is detected, remove and visually check the deflector for damage,
deteriorated components, or foreign objects within mechanism.
Check to determine if a sufficient amount of grease has been applied
to the pivot areas for non-binding operation, if not add grease as
required. If it is damaged, replace it with a new one. If no damage is
found, reinstall it properly.
⇐: Vehicle front
LINK ASSEMBLY AND WIRE
NOTE:
Before replacing a suspect part, make sure it is the source of noise being experienced.
1. Check link to determine if coated film has peeled off to such an extent that substrate is visible. Check also
to determine if link is the source of noise. If it is, replace it.
2. Visually check to determine if a sufficient amount of grease has been applied to wire or rail groove of the
sunroof unit assembly. If not, add grease as required.
3. Check wire for any damage or deterioration. If any damage is found, replace sunroof unit assembly.
WEATHERSTRIP
1. Visually check weatherstrip for damage, deterioration, or deformation.
�Open glass lid assembly enough to inspect front edge of weatherstrip.
�Tilt up glass lid assembly fully to inspect sides and rear edge of weatherstrip.
If any area of the weatherstrip is found to be damaged, replace the glass lid assembly. Refer to RF-25,
"GLASS LID" .
2. Check for leakage around glass lid.
�Close glass lid fully.
�Pour water around surface to determine area of concern.
–For gaps or misalignment, adjust glass lid to specifications. Refer to RF-28, "Fitting Adjustment" .
–For damaged sealing surfaces, either replace glass lid RF-25, "GLASS LID" , or repair the panel BL-
258, "Precautions in Repairing High Strength Steel" .
WIIA0849E
Page 2648 of 2896
RF-30
SUNROOF
Revision: June 20062007 Versa
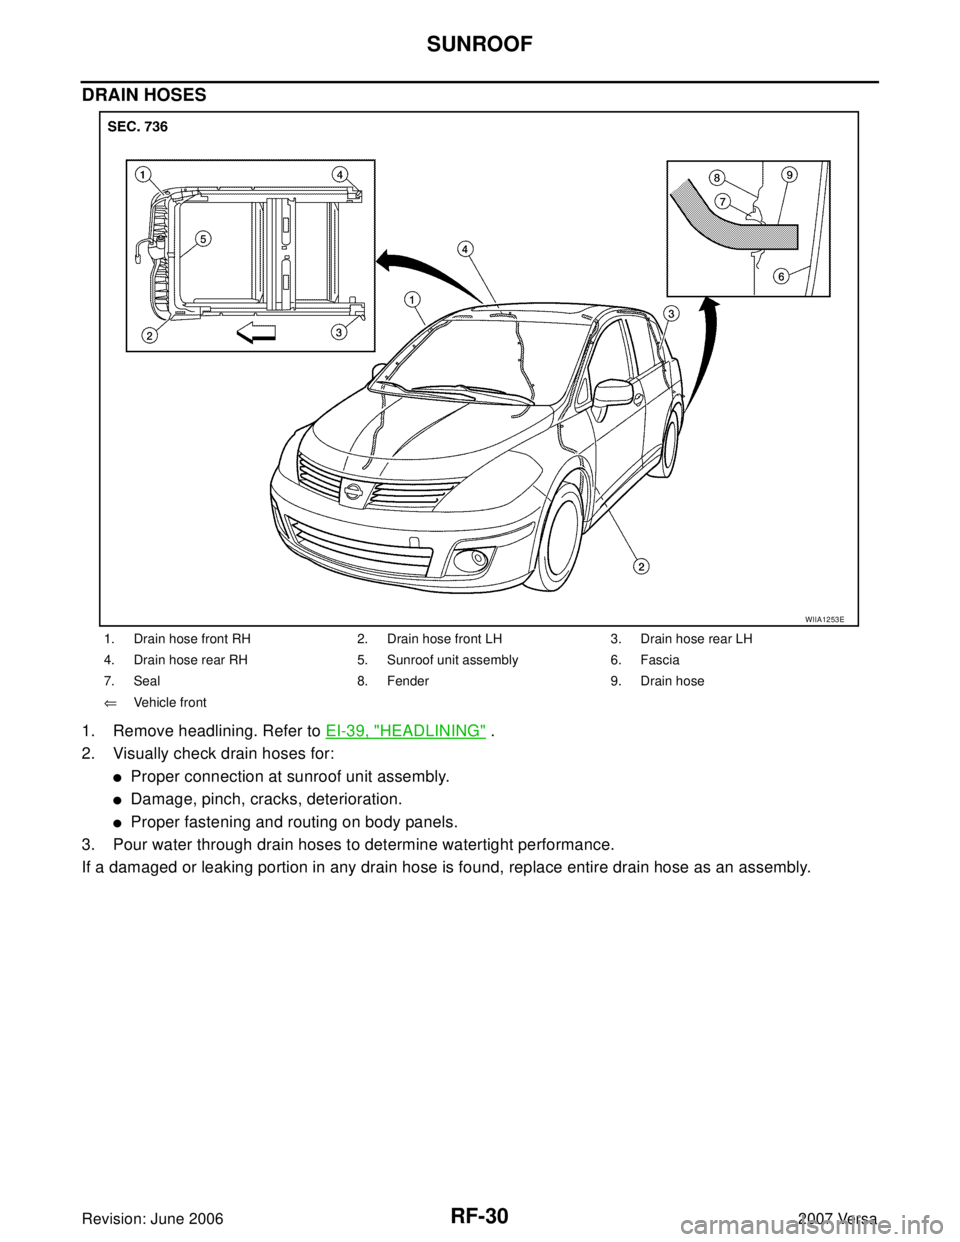
DRAIN HOSES
1. Remove headlining. Refer to EI-39, "HEADLINING" .
2. Visually check drain hoses for:
�Proper connection at sunroof unit assembly.
�Damage, pinch, cracks, deterioration.
�Proper fastening and routing on body panels.
3. Pour water through drain hoses to determine watertight performance.
If a damaged or leaking portion in any drain hose is found, replace entire drain hose as an assembly.
1. Drain hose front RH 2. Drain hose front LH 3. Drain hose rear LH
4. Drain hose rear RH 5. Sunroof unit assembly 6. Fascia
7. Seal 8. Fender 9. Drain hose
⇐Vehicle front
WIIA1253E
Page 2709 of 2896

SE-1
SEAT
I BODY
CONTENTS
C
D
E
F
G
H
J
K
L
M
SECTION SE
A
B
SE
Revision: June 20062007 Versa PRECAUTIONS .......................................................... 2
Precautions for Supplemental Restraint System
(SRS) “AIR BAG” and “SEAT BELT PRE-TEN-
SIONER” .................................................................. 2
Service Notice .......................................................... 2
Precautions .............................................................. 2
PREPARATION ........................................................... 3
Special Service Tool ................................................. 3
Commercial Service Tool ......................................... 3
SQUEAK AND RATTLE TROUBLE DIAGNOSES ..... 4
Work Flow ................................................................ 4
CUSTOMER INTERVIEW ..................................... 4
DUPLICATE THE NOISE AND TEST DRIVE ....... 5
CHECK RELATED SERVICE BULLETINS ........... 5
LOCATE THE NOISE AND IDENTIFY THE
ROOT CAUSE ...................................................... 5
REPAIR THE CAUSE ........................................... 5
CONFIRM THE REPAIR ....................................... 6
Generic Squeak and Rattle Troubleshooting ........... 6
INSTRUMENT PANEL .......................................... 6
CENTER CONSOLE ............................................. 6
DOORS ................................................................. 6TRUNK .................................................................. 7
SUNROOF/HEADLINING ..................................... 7
OVERHEAD CONSOLE (FRONT AND REAR) ..... 7
SEATS ................................................................... 7
UNDERHOOD ....................................................... 7
Diagnostic Worksheet ............................................... 8
FRONT SEAT ............................................................ 10
Driver Seat .............................................................. 10
............................................................................ 10
Passenger Seat ...................................................... 11
Removal and Installation ........................................ 12
MANUAL SEAT ................................................... 12
Disassembly and Assembly .................................... 12
SEAT CUSHION TRIM AND PAD ....................... 12
SEAT CUSHION FRAME .................................... 13
REAR SEAT .............................................................. 14
Component Parts Drawing ..................................... 14
60:40 SPLIT FOLD DOWN SEAT ....................... 14
Removal and Installation ........................................ 15
60:40 SPLIT FOLD DOWN SEAT ....................... 15
Disassembly and Assembly .................................... 17
60:40 SPLIT FOLD DOWN SEAT ....................... 17
Page 2715 of 2896

SQUEAK AND RATTLE TROUBLE DIAGNOSES
SE-7
C
D
E
F
G
H
J
K
L
MA
B
SE
Revision: June 20062007 Versa
TRUNK
Trunk noises are often caused by a loose jack or loose items put into the trunk by the owner.
In addition look for:
1. Trunk lid bumpers out of adjustment
2. Trunk lid striker out of adjustment
3. The trunk lid torsion bars knocking together
4. A loose license plate or bracket
Most of these incidents can be repaired by adjusting, securing or insulating the item(s) or component(s) caus-
ing the noise.
SUNROOF/HEADLINING
Noises in the sunroof/headlining area can often be traced to one of the following:
1. Sunroof lid, rail, linkage or seals making a rattle or light knocking noise
2. Sun visor shaft shaking in the holder
3. Front or rear windshield touching headliner and squeaking
Again, pressing on the components to stop the noise while duplicating the conditions can isolate most of these
incidents. Repairs usually consist of insulating with felt cloth tape.
OVERHEAD CONSOLE (FRONT AND REAR)
Overhead console noises are often caused by the console panel clips not being engaged correctly. Most of
these incidents are repaired by pushing up on the console at the clip locations until the clips engage.
In addition look for:
1. Loose harness or harness connectors.
2. Front console map/reading lamp lense loose.
3. Loose screws at console attachment points.
SEATS
When isolating seat noise it's important to note the position the seat is in and the load placed on the seat when
the noise is present. These conditions should be duplicated when verifying and isolating the cause of the
noise.
Cause of seat noise include:
1. Headrest rods and holder
2. A squeak between the seat pad cushion and frame
3. The rear seatback lock and bracket
These noises can be isolated by moving or pressing on the suspected components while duplicating the con-
ditions under which the noise occurs. Most of these incidents can be repaired by repositioning the component
or applying urethane tape to the contact area.
UNDERHOOD
Some interior noise may be caused by components under the hood or on the engine wall. The noise is then
transmitted into the passenger compartment.
Causes of transmitted underhood noise include:
1. Any component mounted to the engine wall
2. Components that pass through the engine wall
3. Engine wall mounts and connectors
4. Loose radiator mounting pins
5. Hood bumpers out of adjustment
6. Hood striker out of adjustment
These noises can be difficult to isolate since they cannot be reached from the interior of the vehicle. The best
method is to secure, move or insulate one component at a time and test drive the vehicle. Also, engine RPM
or load can be changed to isolate the noise. Repairs can usually be made by moving, adjusting, securing, or
insulating the component causing the noise.